Create successful ePaper yourself
Turn your PDF publications into a flip-book with our unique Google optimized e-Paper software.
EN 10<br />
4.<br />
<strong>LC7.1E</strong> PA<br />
Mechanical Instructions<br />
4.3.7 Power Supply Board<br />
The PSU belongs to the PDP panel. Please refer to the PDP<br />
repair manual for more info (info on front page).<br />
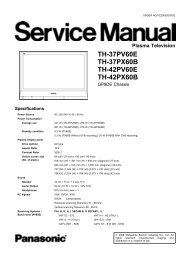
4.3.8 Small Signal Board [B]<br />
1<br />
1. Unplug all connectors. Carefully unplug the LVDS<br />
connector as it is very fragile.<br />
2. Remove the T10 tapping screws [1].<br />
3. Remove the T10 parker screws [2].<br />
4. Take out the panel.<br />
2<br />
H_16960_012.eps<br />
060407<br />
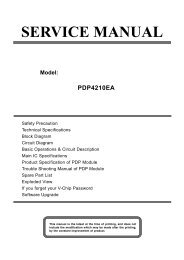
Figure 4-12 PDP panel [1/3]<br />
1<br />
H_16960_010.eps<br />
030407<br />
Figure 4-10 Small Signal Board -1-<br />
1<br />
1<br />
2<br />
2<br />
H_17000_009.eps<br />
260207<br />
Figure 4-13 PDP panel [2/3]<br />
H_16960_011.eps<br />
030407<br />
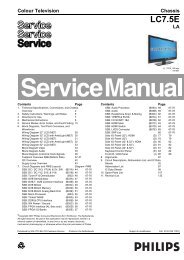
Figure 4-11 Small Signal Board -2-<br />
4.3.9 PDP Panel<br />
1. Refer to next figures.<br />
2. Remove the bottom “speaker cover”, as earlier described.<br />
3. Unplug mains cable from PDP Power Supply Unit [1].<br />
4. Unplug all connectors to/from the panels inside the “SSB<br />
tray”. Pay attention to the LVDS connector.<br />
5. Remove screws [2], and remove the metal “SSB tray” (incl.<br />
panels) from the set.<br />
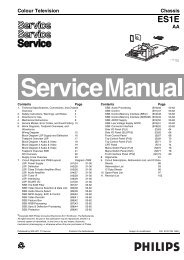
6. You now view the PDP boards, as shown in fig. “PDP panel<br />
[2/3]“.<br />
7. Remove fixation screws [3] and lift the complete PDP (incl.<br />
the boards and wiring) by means of the mounting brackets<br />
[4] from the set. Note: Remove these brackets [4] before<br />
returning the defective PDP.<br />
4<br />
Figure 4-14 PDP panel [3/3]<br />
3<br />
4<br />
H_17000_015.eps<br />
280207