Installation, Operation and Maintenance Manual - Data Aire
Installation, Operation and Maintenance Manual - Data Aire
Installation, Operation and Maintenance Manual - Data Aire

You also want an ePaper? Increase the reach of your titles
YUMPU automatically turns print PDFs into web optimized ePapers that Google loves.
Although this value represents the original factory charge, it is still necessary to measure <strong>and</strong> note<br />
proper unit operation including superheat, sub-cooling, head <strong>and</strong> suction pressure. Some adjustment<br />
to charge may be required.<br />
WARNING: Before starting a compressor, the crankcase heater should be energized<br />
for a minimum of 12 hours to reduce the possibility of liquid slugging on start-up. Failure<br />
to energize the crankcase heater could result in compressor damage.<br />
5.2.2 Split Indoor Air Cooled Systems Charging (Units with Indoor Condenser)<br />
After refrigerant piping is properly completed, connect the refrigerant drum to the low side <strong>and</strong><br />
charge with vapor. For systems with R-407C, charge with approximately 2.55 lbs. per nominal<br />
ton. Systems with R-410A require 3 lbs. per nominal ton.<br />
For example, a model DAPA-0312 is a nominal 3 ton unit. Charge with about 7.65 lbs. of refrigerant<br />
if R-407C. 9 lbs. if R-410A. It is likely that more refrigerant will be required to complete the<br />
charging procedure for additional piping between the evaporator <strong>and</strong> the condenser. Make sure<br />
all hoses are properly purged. From a vacuum, feed liquid refrigerant into the high side of the<br />
system until the pressures equalizes. At this point there will be about 70-80% of the total charge<br />
in the system.<br />
For units with either the Mini DAP-III or DAP-III, a quick <strong>and</strong> easy way to run the blower <strong>and</strong> compressor<br />
is by using the manual switches provided with the microprocessor (located in the control<br />
module). Switch the blower <strong>and</strong> compressor manual switches to the ON position. All automatic<br />
control is disabled but safety switches will remain functional.<br />
WARNING: Before starting a compressor, the crankcase heater should be energized<br />
for a minimum of 12 hours to reduce the possibility of liquid slugging on start-up. Failure<br />
to energize the crankcase heater could result in compressor damage. If the system<br />
is charged from a vacuum, the pre-heating of the compressor is not necessary.<br />
Start the evaporator fan <strong>and</strong> compressor. Check the liquid line sight-glass to get a feel for the approximate<br />
charge. Bubbles in the sight-glass are not unusual at this point <strong>and</strong> can be caused by<br />
fl ashing from liquid line pressure drop, low sub-cooling or low charge. It is likely more refrigerant<br />
will be required to complete the charging procedure.<br />
Adjust the refrigerant charge until the sub-cooling is 8 to 10° <strong>and</strong> has sparse bubbles. The unit<br />
should be allowed to stabilize for several minutes before meaningful measurements can be taken.<br />
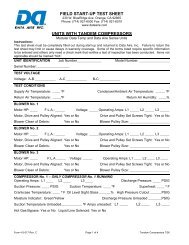
A properly charged system operating at typical parameters will have the following pressures:<br />
Units with R-407C Head pressure<br />
Suction Pressure<br />
240 – 295 PSIG<br />
58 PSIG or greater<br />
Units with R-410A Head pressure 340 – 415 PSIG<br />
Suction pressure 104 – 121 PSIG<br />
The superheat at the compressor suction line should be 8 – 15 degrees. Sub-cooling should be<br />
8 – 10 degrees.<br />
23