MACH M2 - Dr. Mach
MACH M2 - Dr. Mach
MACH M2 - Dr. Mach

Create successful ePaper yourself
Turn your PDF publications into a flip-book with our unique Google optimized e-Paper software.
<strong>Mach</strong> <strong>M2</strong><br />
Directions for use<br />
<strong>MACH</strong> <strong>M2</strong><br />
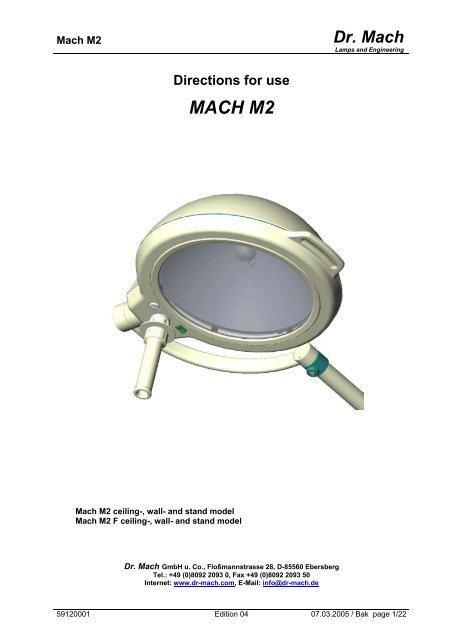
<strong>Mach</strong> <strong>M2</strong> ceiling-, wall- and stand model<br />
<strong>Mach</strong> <strong>M2</strong> F ceiling-, wall- and stand model<br />
<strong>Dr</strong>. <strong>Mach</strong> GmbH u. Co., Floßmannstrasse 28, D-85560 Ebersberg<br />
Tel.: +49 (0)8092 2093 0, Fax +49 (0)8092 2093 50<br />
Internet: www.dr-mach.com, E-Mail: info@dr-mach.de<br />
<strong>Dr</strong>. <strong>Mach</strong><br />
Lamps and Engineering<br />
59120001 Edition 04 07.03.2005 / Bak page 1/22
<strong>Mach</strong> <strong>M2</strong><br />
List of contents<br />
<strong>Dr</strong>. <strong>Mach</strong><br />
Lamps and Engineering<br />
1. Safety instructions ....................................................................................page 4<br />
2. Operating the lamp <strong>MACH</strong> <strong>M2</strong>..................................................................page 5<br />
2.1 Brief description of the lamp...............................................................page 5<br />
2.2 Turning the lamp ON/OFF..................................................................page 5<br />
2.3 Positioning..........................................................................................page 5<br />
2.4 Adjusting the light field .......................................................................page 6<br />
3. Cleaning ...................................................................................................page 6<br />
3.1 Sterilisable handle ..............................................................................page 6<br />
3.2 Lamp housing and splinter protection disk .........................................page 8<br />
4. Maintenance .............................................................................................page 9<br />
4.1 Adjusting the mobility .........................................................................page 9<br />
4.1.1 Settings at the lamp head............................................................page 9<br />
4.2 Changing of spare parts .....................................................................page 9<br />
4.2.1 Changing the halogen bulbs........................................................page 9<br />
4.2.2 Changing the filter disk................................................................page 12<br />
4.2.3 Changing the splinter protection disk ..........................................page 14<br />
5. Data..........................................................................................................page 17<br />
5.1 Technical data ....................................................................................page 17<br />
5.2 Electrical data.....................................................................................page 18<br />
5.3 Environmental conditions ...................................................................page 18<br />
5.4 General remarks.................................................................................page 18<br />
6. CE-mark ...................................................................................................page 18<br />
7. Disposal....................................................................................................page 19<br />
8. Spare parts...............................................................................................page 20<br />
8.1 <strong>Mach</strong> <strong>M2</strong> F .........................................................................................page 20<br />
8.2 <strong>Mach</strong> <strong>M2</strong>.............................................................................................page 21<br />
9. Spare parts list..........................................................................................page 22<br />
59120001 Edition 04 07.03.2005 / Bak page 2/22
<strong>Mach</strong> <strong>M2</strong><br />
Dear customer!<br />
Congratulations for acquiring our new lamp <strong>MACH</strong> <strong>M2</strong>.<br />
<strong>Dr</strong>. <strong>Mach</strong><br />
Lamps and Engineering<br />
With this lighting system you profit from a whole range of new developments, based on 50<br />
years of experience in the production of operating and doctor lights.<br />
The lighting system is characterised by a previously unreceivable general colour rendition<br />
value of Ra=96. In other words, the colours are reproduced naturally and in high contrast.<br />
The wound area is shown in a comfortable light.<br />
The different reds of a wound area can now be recognised very precisely. For the doctor or<br />
surgeon this means a considerable improvement in the recognition of details in the<br />
wound area.<br />
The R96 lighting system uses computer-optimised cold-light filters that reduce both the unwanted<br />
build-up of heat in the head area and the heat radiated on the illuminated<br />
wound area to a minimum.<br />
All information quoted here relates only to the illuminants. Details of ceiling, wall and stand installation<br />
can be found in the mounting instructions.<br />
59120001 Edition 04 07.03.2005 / Bak page 3/22
<strong>Mach</strong> <strong>M2</strong><br />
1. Safety instructions<br />
Pay attention to the directions for use when handling the lamp.<br />
WARNING:<br />
<strong>Dr</strong>. <strong>Mach</strong><br />
Lamps and Engineering<br />
This device has not been designed for use in potentially explosive areas.<br />
According to the Medical Device Regulation the lamp is classified under class I.<br />
Store the OT-lamp in its package for at least 24 hours in the respective roombefore<br />
mounting, in order to eqal temperature differences.<br />
Please read the instructions for use carefully to make the most of your lighting system<br />
and to avoid any damages to the device.<br />
The lamps may only be repaired and special assembly work may only be carried out<br />
on the reflector or sockets by ourselves or a company that has been expressly<br />
authorised by us.<br />
The manufacturer can only be made responsible for the safety of the lamp if repairs<br />
and alterations are carried out by the manufacturer himself or a company that guaranteed<br />
to observe the safety regulations.<br />
The manufacturer cannot be made liable for personal or material damages if the<br />
lamp is operated inexpediently or incorrectly or used for purposes other than those<br />
for which it is intended.<br />
All lamps are equipped with heat protection filter.<br />
It is not allowed to use the lamps without this filter! Do not remove the heat protection<br />
filter, otherwise risk of burn!<br />
The lamp is to be dismatled from the spring arm in reverse order to its assembly<br />
and is to be done only after securing the spring arm by a second person.<br />
Make sure that the lamp is in perfect working order before every use.<br />
Attention, external transformer!<br />
The lamp works only with an external transformer.<br />
The external transformer must be tested and validated according to IEC 60601-1,<br />
otherwise it is not allowed to use it with <strong>Dr</strong>. <strong>Mach</strong> lamps.<br />
59120001 Edition 04 07.03.2005 / Bak page 4/22
<strong>Mach</strong> <strong>M2</strong><br />
2.1 Brief description of the lamp<br />
2. Operating the lamp <strong>MACH</strong> <strong>M2</strong><br />
The lamp <strong>MACH</strong> <strong>M2</strong> is available in following versions:<br />
- <strong>Mach</strong> <strong>M2</strong>, examination and small surgery lamp with fix-focus;<br />
- <strong>Mach</strong> <strong>M2</strong> F, examination and small surgery lamp with focusable light field.<br />
2<br />
1<br />
3<br />
2.2 Turning the lamp ON/OFF<br />
<strong>Dr</strong>. <strong>Mach</strong><br />
Lamps and Engineering<br />
The lamp is turned ON and OFF by the rocker<br />
switch 1.<br />
2.3 Positioning<br />
Use the sterilisable handle 2 or the handle 3 at the<br />
lamp housing the position the lamp.<br />
Use the sterilisable handle 2 for positioning during<br />
treatment. This handle can be removed for sterilisation.<br />
59120001 Edition 04 07.03.2005 / Bak page 5/22
<strong>Mach</strong> <strong>M2</strong><br />
2<br />
4<br />
2<br />
3. Cleaning<br />
2.4 Adjusting the light field<br />
(only <strong>Mach</strong> <strong>M2</strong> F)<br />
<strong>Dr</strong>. <strong>Mach</strong><br />
Lamps and Engineering<br />
The lamps <strong>Mach</strong> <strong>M2</strong> F have a focusing function.<br />
That means, the diameter of the light field can either<br />
be enlarged or bundled to a smaller area, depending<br />
on the circumstances.<br />
For adjusting the light field size turn the handle<br />
2 at the lamp (see figure).<br />
3.1 Sterilisable handle<br />
At delivery the lamp is equipped with the handle 2.<br />
The handle is removable and sterilisable. Before using<br />
the first time and before every use the handle sleeve<br />
must be cleaned, disinfected and sterilised.<br />
The handle must be removed for sterilisation:<br />
• To remove press the lock 4 and pull off the sterilisable<br />
handle 2 while keeping the lock pressed.<br />
• To attach, push on and slightly twist the handle<br />
until the lock 4 engages securely.<br />
Handles often become unsterile during an operation.<br />
Therefore always keep aditional handles available for<br />
exchange.<br />
59120001 Edition 04 07.03.2005 / Bak page 6/22
<strong>Mach</strong> <strong>M2</strong><br />
Cleaning / disinfection and sterilisation<br />
<strong>Dr</strong>. <strong>Mach</strong><br />
Lamps and Engineering<br />
Basics<br />
Efficient cleaning / disinfection is an essential requirement for effective sterilisation of the handle.<br />
Within the scope of responsibility for the sterility of the products it should be noted that only sufficiently<br />
validated equipment and product specific processes are used for cleaning / disinfection and that the validated<br />
parameters are complied with in every cycle.<br />
In addition, the hospital / clinic hygiene regulations must be observed.<br />
Cleaning / disinfection<br />
Cleaning and disinfection must be carried out immediately after use.<br />
A mechanised process (disinfector) should be used for cleaning / disinfection. The efficiency of the process<br />
used must be recognised and validated in principle (e.g. listed under disinfectants and disinfection<br />
procedures tested and recognised by Robert-Koch-Institute / DGHM).<br />
When using other procedures (e.g. a manual procedure), proof and process efficiency in principle must<br />
be provided within the scope of validation.<br />
Proof in principle of the suitability of the handles for efficient cleaning / disinfection was provided using a<br />
cyclic cleaning system (Netsch-Bellmed T-600-IUDT/AN, programme 2 for small parts; code B).<br />
It is not allowed to use agents / disinfectants, which contain the following substances, as these may<br />
cause changes in the material:<br />
- High-concentration organic and inorganic acids<br />
- Chlorinated hydrocarbons<br />
- 2-ethoxyethanol<br />
When cleaning / disinfecting, the following procedures must be followed:<br />
Process Time (sec.)<br />
Zone 1 Pre-rinse, external, cold, 10 – 15°C 45<br />
Washing, acidic, external 35°C 120<br />
<strong>Dr</strong>aining time 10<br />
Re-rinse, external approx. 80°C *10<br />
<strong>Dr</strong>aining time *15<br />
Re-rinse, external approx. 80°C *15<br />
<strong>Dr</strong>aining time 15<br />
Zone 2 Washing, alkaline, external, 93°C 135<br />
<strong>Dr</strong>aining time 10<br />
Re-rinse, external, acidic, 90°C 10<br />
<strong>Dr</strong>aining time 15<br />
Re-rinse, external 90°C 15<br />
<strong>Dr</strong>aining time 15<br />
Zone 3 <strong>Dr</strong>ying, external 100 – 120°C 200<br />
Zone 4 <strong>Dr</strong>ying, external 100 – 120°C 200<br />
Door open / close & transport 60<br />
(sluice discharge)<br />
Cycle time overall ca. 290<br />
≈ 5 minutes<br />
* When occupying the disinfection zone (washing zone 2), the re-rinse and draining times will depend on<br />
the respective objects being washed therein!<br />
59120001 Edition 04 07.03.2005 / Bak page 7/22
<strong>Mach</strong> <strong>M2</strong><br />
<strong>Dr</strong>. <strong>Mach</strong><br />
Lamps and Engineering<br />
Sterilisation<br />
Only previously cleaned and disinfected handles may be sterilised.<br />
The handles are placed in a suitable sterilisation pack (one-way sterilisation pack, e.g. foil / paper sterilisation<br />
bags, single or double pack) in accordance with DIN EN 868 / ISO 11607 for steam sterilisation<br />
and then sterilised.<br />
Use only the sterilisation procedure listed below for sterilisation. Other sterilisation procedures (e.g. ethylene<br />
oxide, formaldehyde and low-temperature plasma sterilisation) are not permissible.<br />
Steam sterilisation procedure<br />
Validated in accordance with DIN EN 554/ISO 11134<br />
Maximum sterilisation temperature 134°C<br />
Proof in principle of the handles’ suitability for effective sterilisation was provided using a fractional vacuum<br />
process (Euroselectomat 666 by MMM Münchner Medizin Mechanik GmbH, sterilising temperature<br />
134°C, holding time 7 min.)<br />
Inspection / durability<br />
The handles should be inspected for damage and changed before re-use, if required.<br />
The handles may be cleaned / disinfected, sterilised and re-used for a maximum of 1000 times. If the<br />
handles are re-used more than 1000 times, then this will be the responsibility of the hospital / clinic.<br />
5<br />
Alc. ≤ 20 %<br />
3.2 Lamp head, splinter protection disk<br />
The lamp has a high-quality surface. The surface<br />
can be cleaned with conventional cleaning agents.<br />
The splinter protection disk 5 is made of a highquality<br />
plastic. Pay attention to the following during<br />
cleaning:<br />
• Always clean the splinter protection disk 5<br />
with a wet cloth (never clean with a dry cloth!).<br />
• Only use disinfectants with less than 20% alcohol.<br />
Wipe the splinter protection disk 5 after cleaning<br />
with an antistatic, non-fluffy cloth.<br />
59120001 Edition 04 07.03.2005 / Bak page 8/22
<strong>Mach</strong> <strong>M2</strong><br />
4.1 Adjusting the mobility<br />
6<br />
4.2 Changing of spare parts<br />
4.2.1 Changing the halogen bulbs<br />
4. Maintenance<br />
8<br />
7<br />
<strong>Dr</strong>. <strong>Mach</strong><br />
Lamps and Engineering<br />
The lamp <strong>MACH</strong> <strong>M2</strong> is supplied with brakes on the<br />
suspension fixture and on the lamp housing. Adjust<br />
these brakes, if necessary, after installation.<br />
If it is difficult to move the lamp, or if it does not<br />
keep its set position, the brake forces should be<br />
adjusted.<br />
Service and a check of the lamp should be made<br />
every two years.<br />
In order to keep the system easy-running throughout<br />
its life span, we recommend that the hinges<br />
should be greased avery two years with acid-free<br />
grease.<br />
Attention: Before dismounting the lamp, set the<br />
height adjustment of the spring arm to horizontal<br />
position (see mounting instructions “Ceiling<br />
attachment – wall attchment”).<br />
4.1.1 Adjustments at the lamp head<br />
Adjusting the mobility in the lamp joint 6 is not<br />
necessary.<br />
In case the mobility in the lamp joint 7 is too easygoing<br />
or too heavy-going, the brake screw 8 must<br />
be adjusted with an appropriate screw driver.<br />
<strong>Dr</strong>. <strong>Mach</strong> uses special halogen bulbs as illuminants.<br />
Only original <strong>Dr</strong>. <strong>Mach</strong> replacement bulbs may be used.<br />
The use of other bulbs can lead to a considerable reduction of the light power and increase in the thermal<br />
load. The halogen bulbs have a service life of approx. 1200 hours.<br />
9<br />
• Turn off the lamp.<br />
ATTENTION: Parts of the housing and the halogen<br />
bulb may be very hot immediately after<br />
use.<br />
• Turn the lamp, so the light outlet points to the<br />
ceiling.<br />
• Turn the screw 9 anticlockwise with an appropriate<br />
screw driver.<br />
Remark:<br />
In case there is no screw driver available, you<br />
can use a coin.<br />
59120001 Edition 04 07.03.2005 / Bak page 9/22
<strong>Mach</strong> <strong>M2</strong><br />
11<br />
10<br />
9<br />
<strong>Dr</strong>. <strong>Mach</strong><br />
Lamps and Engineering<br />
• By turning the screw 9 anticlockwise, the retaining<br />
ring 10 turns clockwise off the lower<br />
housing part.<br />
• Turn the screw 9 until the two marking arrows<br />
on the ring of the light and the lower housing<br />
part of the lamp match as shown in the figure.<br />
• Then remove the retaining ring 10 by pulling it<br />
upwards.<br />
• Now you can see the open reflector 11 in front<br />
of you.<br />
ATTENTION: Do not touch the inner surface<br />
of the reflector, otherwise this surface can<br />
be damaged.<br />
59120001 Edition 04 07.03.2005 / Bak page 10/22
<strong>Mach</strong> <strong>M2</strong><br />
13<br />
9<br />
12<br />
14 10<br />
15<br />
<strong>Dr</strong>. <strong>Mach</strong><br />
Lamps and Engineering<br />
• Tilt the shadower 12 off-center as shown in the<br />
figure on the left, until it snaps in in the provided<br />
groove.<br />
• Pull the halogen bulb 13 carefully off its<br />
socket.<br />
ATTENTION: Never touch new halogen bulbs<br />
with your fingers. Always use the original packaging<br />
or a clean cloth.<br />
• Carefully insert the halogen bulb (22,8V, 77W)<br />
in the socket.<br />
• Tilt the shadower 12 in its original position.<br />
• Mount the retaining ring 10 in reverse order<br />
(anticlockwise rotation).<br />
For mounting position the retaining ring 10 so<br />
that the toothed wheel segment 14 of the ring<br />
and the toothed wheel 7 in the lower housing<br />
part work into each other.<br />
• Fix the retaining ring by turning the screw 9<br />
clockwise.<br />
• Check the function of the new halogen bulb.<br />
59120001 Edition 04 07.03.2005 / Bak page 11/22
<strong>Mach</strong> <strong>M2</strong><br />
9<br />
4.2.2 Changing the filter disk<br />
<strong>Dr</strong>. <strong>Mach</strong><br />
Lamps and Engineering<br />
The filter disk mounted between reflector and splinter<br />
protection disk prevents a damaging heating of<br />
the illuminated area.<br />
ATTENTION!<br />
It is not allowed to use the lamp without this<br />
filter.<br />
Always place the filter disk on a soft, nonscratching<br />
base to preserve its surface.<br />
• Turn off the lamp.<br />
ATTENTION: Parts of the housing and the halogen<br />
bulb may be very hot immediately after<br />
use.<br />
• Turn the lamp, so the light outlet points to the<br />
ceiling.<br />
• Turn the screw 9 anticlockwise with an appropriate<br />
screw driver.<br />
Remark:<br />
In case there is no screw driver available, you<br />
can use a coin.<br />
• By turning the screw 9 anticlockwise, the retaining<br />
ring 10 turns clockwise off the lower<br />
housing part.<br />
• Turn the screw 9 until the two marking arrows<br />
on the ring of the light and the lower housing<br />
part of the lamp match as shown in the figure.<br />
59120001 Edition 04 07.03.2005 / Bak page 12/22
<strong>Mach</strong> <strong>M2</strong><br />
10<br />
9<br />
17<br />
16<br />
16<br />
<strong>Dr</strong>. <strong>Mach</strong><br />
Lamps and Engineering<br />
• Then remove the retaining ring 10 by pulling it<br />
upwards.<br />
• The filter disk 16 is held by six retainers 17,<br />
which are fixed with six recessed head screws.<br />
• Loosen the screws at three adjacent retainers<br />
17.<br />
• Lift the filter disk 16 carefully and pull it off the<br />
other three retainers.<br />
• Mount the new filter disk in reverse order.<br />
ATTENTION: Only use filter disks, that have<br />
been cleaned properly (see chapter 3.2).<br />
59120001 Edition 04 07.03.2005 / Bak page 13/22
<strong>Mach</strong> <strong>M2</strong><br />
9<br />
14 10<br />
15<br />
9<br />
<strong>Dr</strong>. <strong>Mach</strong><br />
Lamps and Engineering<br />
• Mount the retaining ring 10 in reverse order<br />
(anticlockwise rotation).<br />
For mounting position the retaining ring 10 so<br />
that the toothed wheel segment 14 of the ring<br />
and the toothed wheel 7 in the lower housing<br />
part work into each other.<br />
• Fix the retaining ring by turning the screw 9<br />
clockwise.<br />
4.2.3 Changing the dispersing lens<br />
The dispersing lens is made of a high-quality plastic.<br />
In case the dispersing lens looses its optical characteristics,<br />
this can reduce the luminous intensity and<br />
the light quality provided.<br />
It may be necessary to exchange the dispersing<br />
lens.<br />
Always place the dispersing lens on a soft, nonscratching<br />
base to preserve its surface.<br />
• Turn off the lamp.<br />
ATTENTION: Parts of the housing and the halogen<br />
bulb may be very hot immediately after<br />
use.<br />
• Turn the lamp, so the light outlet points to the<br />
ceiling.<br />
• Turn the screw 9 anticlockwise with an appropriate<br />
screw driver.<br />
Remark:<br />
In case there is no screw driver available, you<br />
can use a coin.<br />
59120001 Edition 04 07.03.2005 / Bak page 14/22
<strong>Mach</strong> <strong>M2</strong><br />
10<br />
9<br />
<strong>Dr</strong>. <strong>Mach</strong><br />
Lamps and Engineering<br />
• By turning the screw 9 anticlockwise, the retaining<br />
ring 10 turns clockwise off the lower<br />
housing part.<br />
• Turn the screw 9 until the two marking arrows<br />
on the ring of the light and the lower housing<br />
part of the lamp match as shown in the figure.<br />
• By turning the screw 9 anticlockwise, the retaining<br />
ring 10 turns clockwise off the lower<br />
housing part.<br />
• Remove the retaining ring 10 by pulling it upwards.<br />
59120001 Edition 04 07.03.2005 / Bak page 15/22
<strong>Mach</strong> <strong>M2</strong><br />
9<br />
14 10<br />
15<br />
18<br />
17<br />
16<br />
20<br />
19<br />
<strong>Dr</strong>. <strong>Mach</strong><br />
Lamps and Engineering<br />
• Loosen the six screws 18 and remove them.<br />
• Lift the filter disk 17 off the six retainers 16.<br />
Always place the filter disk on a soft, nonscratching<br />
base to preserve its surface.<br />
• Remove the six retainers 16.<br />
• Remove the ring 20.<br />
• Remove the splinter protection disk 19.<br />
Always place the splinter protection disk on<br />
a soft, non-scratching base to preserve its<br />
surface.<br />
• Mount the new splinter protection disk 19.<br />
ATTENTION: Only use splinter protection<br />
disks, that have been cleaned properly (see<br />
chapter 3.2).<br />
• Mount the ring 20, the retainers 16 and the<br />
filter disk 17 in reverse order and fix the six retainers<br />
with the screws 18.<br />
• Mount the retaining ring 10 in reverse order<br />
(anticlockwise rotation).<br />
For mounting position the retaining ring 10 so<br />
that the toothed wheel segment 14 of the ring<br />
and the toothed wheel 7 in the lower housing<br />
part work into each other.<br />
• Fix the retaining ring by turning the screw 9<br />
clockwise.<br />
59120001 Edition 04 07.03.2005 / Bak page 16/22
<strong>Mach</strong> <strong>M2</strong><br />
5.1 Technical data<br />
Central light intensity<br />
at a distance of 1 meter<br />
5. Data<br />
<strong>Mach</strong> <strong>M2</strong> F <strong>Mach</strong> <strong>M2</strong><br />
40.000 – 80.000 Lux 60.000 Lux<br />
Light field diameter d10 160 mm 170 mm<br />
Light field diameter d50 90 mm 110 mm<br />
Light intensity with one shadower 125 Lux 45 Lux<br />
Light intensity with two shadowers 47.000 Lux 35.000 Lux<br />
Light intensity on the ground of a<br />
normed tube<br />
Light intensity on the ground of a<br />
normed tube with one shadower<br />
Light intensity on the ground of a<br />
normed tube with two shadowers<br />
79.200 Lux 59.600 Lux<br />
85 Lux 30 Lux<br />
46.000 Lux 34.500 Lux<br />
Illumination depth 1600 mm 1600 mm<br />
Colour rendering index Ra<br />
at 4300 Kelvin<br />
Colour rendering index R9<br />
at 4300 Kelvin<br />
96 96<br />
> 90 > 90<br />
Focusable light field size 140 – 240 mm 180 mm Fixfocus<br />
Colour temperature (Kelvin) 4300 4300<br />
Radiation intensity in field 130 W/m 2 130 W/m 2<br />
Temperature increase in head area 2 °C 2 °C<br />
Total power consumption 80 VA 80 VA<br />
Number of bulbs:<br />
Halogen 22,8/24V 80W<br />
1 1<br />
Working distance 700 – 1400 mm 700 – 1400 mm<br />
Height adjustment 1300 mm 1300 mm<br />
<strong>Dr</strong>. <strong>Mach</strong><br />
Lamps and Engineering<br />
59120001 Edition 04 07.03.2005 / Bak page 17/22
<strong>Mach</strong> <strong>M2</strong><br />
5.2 Electrical data<br />
<strong>Mach</strong> <strong>M2</strong> F / <strong>Mach</strong> <strong>M2</strong><br />
Power consumption 80 W<br />
Voltage AC/DC 22,8 V<br />
Current 3,5 A<br />
Halogen bulb 22,8 V / 80 W IRC<br />
Frequency 50/60 Hz<br />
Degree of protection Type B<br />
Class of protection I.<br />
5.3 Environmental conditions<br />
Operation<br />
Min. Max.<br />
<strong>Dr</strong>. <strong>Mach</strong><br />
Lamps and Engineering<br />
Temperature +10°C +40°C<br />
Relative athmospheric humidity 30 % 75 %<br />
Air pressure 700 hPa 1060 hPa<br />
Transport / storage<br />
Min. Max.<br />
Temperature -10°C +50°C<br />
Relative athmospheric humidity 20 % 90 %<br />
Air pressure 700 hPa 1060 hPa<br />
5.4 General remarks<br />
When installing a lamp, its fail-safety must be guaranteed according to DIN VDE 0100-710 (former DIN<br />
VDE 0107).<br />
Protective conductor<br />
6. CE-mark<br />
The products <strong>Mach</strong> <strong>M2</strong> comply with the standards 93/42/EEC for medical products of the<br />
European Community’s Council. <strong>Dr</strong>. <strong>Mach</strong> applies the standard EN 60601-2-41.<br />
<strong>Dr</strong>. <strong>Mach</strong> GmbH is certified according to DIN EN 46001:1996 and DIN EN ISO<br />
13485:2001.<br />
59120001 Edition 04 07.03.2005 / Bak page 18/22
<strong>Mach</strong> <strong>M2</strong><br />
7. Disposal<br />
The lamp doesn’t contain any dangerous goods.<br />
The components of the OT-lamp should be properly disposed at the end of its shelf-life.<br />
Make sure, that the materials are carefully separated.<br />
The components should be disposed according to the contained materials.<br />
<strong>Dr</strong>. <strong>Mach</strong><br />
Lamps and Engineering<br />
59120001 Edition 04 07.03.2005 / Bak page 19/22
<strong>Mach</strong> <strong>M2</strong><br />
8.1 <strong>Mach</strong> <strong>M2</strong> F<br />
11<br />
13<br />
10<br />
12<br />
9<br />
8. Spare parts<br />
3<br />
4<br />
5<br />
<strong>Dr</strong>. <strong>Mach</strong><br />
Lamps and Engineering<br />
59120001 Edition 04 07.03.2005 / Bak page 20/22<br />
1<br />
2<br />
6<br />
7<br />
8
<strong>Mach</strong> <strong>M2</strong><br />
8.2 <strong>Mach</strong> <strong>M2</strong><br />
11<br />
13<br />
10<br />
12<br />
9<br />
3<br />
4<br />
5<br />
<strong>Dr</strong>. <strong>Mach</strong><br />
Lamps and Engineering<br />
59120001 Edition 04 07.03.2005 / Bak page 21/22<br />
1<br />
2<br />
6<br />
7<br />
8
<strong>Mach</strong> <strong>M2</strong><br />
9. Spare parts list<br />
<strong>Dr</strong>. <strong>Mach</strong><br />
Lamps and Engineering<br />
Item Qty. Name EDVNO Remark<br />
1 1 Upper housing part 12011001 with sealing cord<br />
2 1 Sterilisable handle 21150002<br />
3 6 Screw DIN7985-HM3x12-Ni 65152037<br />
4 1 Conversion filter D284 Califlex Eco 67390204<br />
5 6 Retainer 27021206<br />
6 1 Ring 27021205<br />
7 1 Splinter protection disk 27021201<br />
8 1 Retaining ring 27021203<br />
9 1 Socket GY 6.35 67320007<br />
10 1 Halogen bulb 22,8V 80W IRC 67100105<br />
11 1 Shadower 27061001<br />
12 1 ON/OFF switch 67340004<br />
13 1 Sliding contact with cable<br />
Remark:<br />
The parts 3,4,5,6,7 and 8 can also be ordered as a premounted complete unit (No. 27021001, retainig<br />
ring).<br />
59120001 Edition 04 07.03.2005 / Bak page 22/22