Basic information on the surgical procedures - Straumann
Basic information on the surgical procedures - Straumann
Basic information on the surgical procedures - Straumann

You also want an ePaper? Increase the reach of your titles
YUMPU automatically turns print PDFs into web optimized ePapers that Google loves.
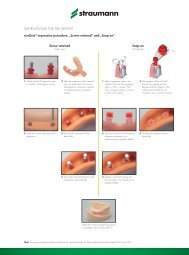
4.3 Placing <strong>the</strong> implant<br />
A <strong>Straumann</strong> ® implant can be placed ei<strong>the</strong>r manually with <strong>the</strong> ratchet or with <strong>the</strong> aid of <strong>the</strong> handpiece. A maximum<br />
speed of 15 rpm is recommended. The following step-by-step shows how a <strong>Straumann</strong> ® Standard Plus Implant is<br />
placed with <strong>the</strong> handpiece (left column <strong>on</strong> <strong>the</strong> following pages) and how a <strong>Straumann</strong> ® B<strong>on</strong>e Level Implant is placed<br />
with <strong>the</strong> ratchet (right column).<br />
Note<br />
<strong>Straumann</strong> ® B<strong>on</strong>e Level implants must be rotati<strong>on</strong>ally oriented for both, handpiece and ratchet inserti<strong>on</strong> (see Step 5 <strong>on</strong><br />
page 49). Apart from this excepti<strong>on</strong>, all <strong>Straumann</strong> ® implants are placed in <strong>the</strong> same way.<br />
Placement with <strong>the</strong> handpiece<br />
Example: <strong>Straumann</strong> ® Standard Plus Implant<br />
1 1<br />
Placement with <strong>the</strong> ratchet<br />
Example: <strong>Straumann</strong> ® B<strong>on</strong>e Level Implant<br />
“click”<br />
Step 1 – Attach <strong>the</strong> handpiece adapter<br />
Grasp <strong>the</strong> closed part of <strong>the</strong> implant carrier. Attach <strong>the</strong><br />
handpiece adapter to <strong>the</strong> implant. A click is heard when<br />
<strong>the</strong> handpiece adapter is attached correctly.<br />
Step 1 – Attach <strong>the</strong> ratchet adapter<br />
Hold <strong>the</strong> implant carrier at <strong>the</strong> closed end and push <strong>the</strong><br />
ratchet adapter <strong>on</strong>to <strong>the</strong> transfer part until you hear a<br />
click.<br />
46<br />
4. Surgical <strong>procedures</strong> 4.3 Placing <strong>the</strong> implant