All markets - Selecon
All markets - Selecon
All markets - Selecon

You also want an ePaper? Increase the reach of your titles
YUMPU automatically turns print PDFs into web optimized ePapers that Google loves.
PL1 LED Luminaires<br />
Installation & User’s Manual<br />
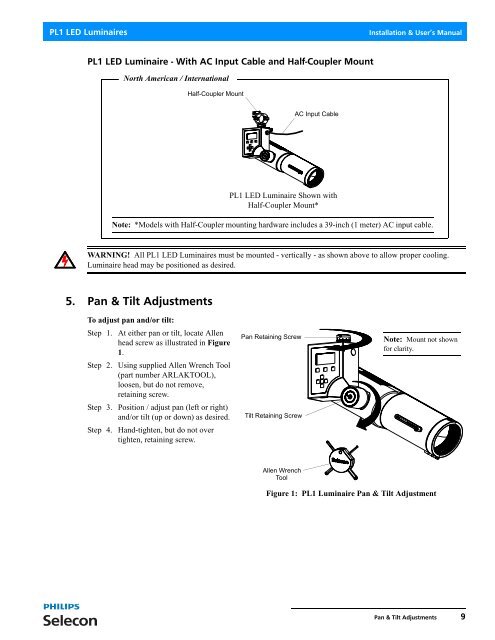
PL1 LED Luminaire - With AC Input Cable and Half-Coupler Mount<br />
North American / International<br />
Half-Coupler Mount<br />
AC Input Cable<br />
PL1 LED Luminaire Shown with<br />
Half-Coupler Mount*<br />
Note: *Models with Half-Coupler mounting hardware includes a 39-inch (1 meter) AC input cable.<br />
WARNING! <strong>All</strong> PL1 LED Luminaires must be mounted - vertically - as shown above to allow proper cooling.<br />
Luminaire head may be positioned as desired.<br />
5. Pan & Tilt Adjustments<br />
To adjust pan and/or tilt:<br />
Step 1. At either pan or tilt, locate <strong>All</strong>en<br />
head screw as illustrated in Figure<br />
1.<br />
Step 2. Using supplied <strong>All</strong>en Wrench Tool<br />
(part number ARLAKTOOL),<br />
loosen, but do not remove,<br />
retaining screw.<br />
Step 3. Position / adjust pan (left or right)<br />
and/or tilt (up or down) as desired.<br />
Step 4. Hand-tighten, but do not over<br />
tighten, retaining screw.<br />
Pan Retaining Screw<br />
Tilt Retaining Screw<br />
Note: Mount not shown<br />
for clarity.<br />
<strong>All</strong>en Wrench<br />
Tool<br />
Figure 1: PL1 Luminaire Pan & Tilt Adjustment<br />
Pan & Tilt Adjustments 9