Palette OS Manual - Strand Lighting
Palette OS Manual - Strand Lighting
Palette OS Manual - Strand Lighting

You also want an ePaper? Increase the reach of your titles
YUMPU automatically turns print PDFs into web optimized ePapers that Google loves.
<strong>Palette</strong> <strong>OS</strong> v10<br />
Table of Contents<br />
Concepts and Overview 6<br />
Feature Overview 6<br />
About <strong>Palette</strong> 10<br />
System Capacities 12<br />
Universal Attribute Control Model 14<br />
Definition 15<br />
Conclusion 38<br />
Tracking 39<br />
A Note on Redundant Data 41<br />
Timing 43<br />
Multiple Cue List Concept 48<br />
Fade Resolution 50<br />
HTP vs LTP 51<br />
Priorities 53<br />
Tips and Tricks 54<br />
Screen Layout 60<br />
Toolbars 60<br />
Channel Grid 63<br />
Channel's different states 65<br />
Attribute Grid 68<br />
File Menu 70<br />
Display Menu 72<br />
Help Menu 74<br />
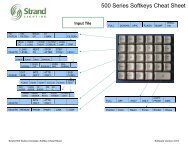
Softkeys 77<br />
Status Window 80<br />
Look Pages 83<br />
Macro Buttons 86<br />
View Properties 88<br />
Remote Video 89<br />
Screen Layout 91<br />
Console Buttons 93<br />
Display Keys 94<br />
Live Button 94<br />
Blind Button 95<br />
Patch Button 96<br />
Playback Keys 97<br />
DBO Button 97<br />
Go Button 98<br />
Goto Cue Button 99<br />
Select Button 100<br />
Halt Back Button 101<br />
Step Cue Buttons 102<br />
Release Playback Button 103<br />
Recording Keys 104<br />
Record Button 104<br />
Update Button 105<br />
Cue Button 106<br />
<strong>Strand</strong> <strong>Lighting</strong><br />
p1
<strong>Palette</strong> <strong>OS</strong> v10<br />
Group Button 107<br />
Look Button 108<br />
Action Keys 109<br />
Arrow Buttons 109<br />
Delete Button 110<br />
Edit Button 111<br />
Load Button 112<br />
Move / Copy Button 113<br />
Tools Button 114<br />
View Button 115<br />
Main Keys 116<br />
Additional 10-Key buttons 116<br />
Next Button 117<br />
Number Buttons 118<br />
Release Button 119<br />
Rem-Dim Button 120<br />
Shift Button 121<br />
Soft Keys 122<br />
Up Button 123<br />
Programming and Viewing Fixtures 124<br />
Fixture Colors and Symbols 124<br />
Command Line Syntax 128<br />
Fixture Title 135<br />
Captured Attributes 136<br />
Selecting and Setting Channels 137<br />
Using the Mouse to Select Channels and Set Levels 140<br />
Controlling Moving Lights 142<br />
Controlling Colour 149<br />
Independent Timing 151<br />
Effects 157<br />
Release 164<br />
Select Softkeys 166<br />
Recording and Editing Cues 169<br />
Recording Cues 169<br />
Record Options 174<br />
Updating Cues 179<br />
Load 183<br />
Blind 187<br />
Edits Track Forward 190<br />
Track Sheets 191<br />
Move In Black 193<br />
Cue Lists 196<br />
Cue List Directory 196<br />
Cue List 198<br />
Cue List Properties 201<br />
Cue List Pointer 204<br />
Autoscroll Cue List 205<br />
Blue Box 206<br />
Profiles 212<br />
Releasing & Asserting Cue Lists 218<br />
<strong>Strand</strong> <strong>Lighting</strong><br />
p2
<strong>Palette</strong> <strong>OS</strong> v10<br />
Step Forward and Back 219<br />
Cue Numbering Scheme 220<br />
Renumber Cues 221<br />
Blocking and Unblocking of cues 223<br />
Cue Properties 226<br />
Deleting Cues 229<br />
Goto Cue 231<br />
Follow Cues 233<br />
Linking Cues 235<br />
Playback Loops 237<br />
Action on GO within Cue Loop 239<br />
Part Cues 241<br />
SMPTE Timecode on Cue Lists 244<br />
Recording and Using Looks and Groups 248<br />
Looks 248<br />
Sub Master Types 251<br />
Recording Looks 253<br />
Busking 257<br />
Recording and Using Groups 259<br />
Apply Levels/<strong>Palette</strong>s 260<br />
Patching 262<br />
Patch 262<br />
Scrollers 267<br />
Individual Attributes 269<br />
Tools 271<br />
Tools 271<br />
SMPTE Learn Mode 273<br />
Flip 274<br />
Fanning 275<br />
Highlight/Lowlight 278<br />
Rem Dim 279<br />
Colour Picker 280<br />
Channel Check 282<br />
Flash Fixture or Output 284<br />
General Information 285<br />
General Show Options 285<br />
Default Cue List Options 287<br />
Venue Setup/Location 290<br />
Show Save Options 292<br />
Move/Copy 295<br />
ShowNet 301<br />
Pathport 304<br />
One to One Patch 306<br />
Power Patch 307<br />
Printing 309<br />
Hardware Setup 311<br />
Hardware Setup Dialog Box 311<br />
Priorities 312<br />
A/B C/D 313<br />
Grand Master and Black Out Button 317<br />
<strong>Strand</strong> <strong>Lighting</strong><br />
p3
<strong>Palette</strong> <strong>OS</strong> v10<br />
Button Array 320<br />
Button Array Described 322<br />
Triggers 326<br />
Trigger Wiring 327<br />
Console 328<br />
MIDI / SMPTE Interface 331<br />
Remote Focus Unit 332<br />
Macros & Show Control 334<br />
Macro Editor & Commands 334<br />
Macro Editor & Scripts 337<br />
User Interface Macros 343<br />
Variables, Button Stations & MIDI Notes 345<br />
Vision Net 348<br />
Time Events 352<br />
Browser Control 357<br />
Media Player Control 361<br />
PowerPoint Automation 362<br />
Serial Out Macros 365<br />
Telnet and Serial Communications 367<br />
MIDI Show Control 368<br />
<strong>Palette</strong> Control Panel 370<br />
<strong>Palette</strong> Control Panel 370<br />
Upgrading <strong>Palette</strong> Software 372<br />
Console Group 373<br />
Launch <strong>Palette</strong> Button 373<br />
Hardware Test 374<br />
Release Notes 376<br />
System Group 378<br />
Date Time & Input Language 378<br />
Screen Resolution 383<br />
ELO Touch Screens 391<br />
On-Screen Keyboard 393<br />
Mouse 394<br />
Keyboard 397<br />
Accessibility 398<br />
Network 399<br />
MonitorPower 404<br />
Network Printers 406<br />
Shutdown 408<br />
Applications Group 409<br />
Explorer 409<br />
MediaPlayer 411<br />
Internet Explorer 414<br />
Outlook Express 415<br />
Notepad 416<br />
Paint 417<br />
Additional Applications 418<br />
System Up Time 419<br />
Backup, Support and Contact Information 420<br />
Tracking Backup 420<br />
<strong>Strand</strong> <strong>Lighting</strong><br />
p4
<strong>Palette</strong> <strong>OS</strong> v10<br />
Recovery & Enable Outputs 422<br />
Recalibrating, Striking and Dousing Fixtures 424<br />
Software Revision History 425<br />
Console Connections 426<br />
<strong>Palette</strong> 426<br />
Light <strong>Palette</strong> 429<br />
Rack <strong>Palette</strong> 432<br />
Appendix 435<br />
License 435<br />
Offices and Service Centres 437<br />
Keyboard Shortcuts 438<br />
<strong>Strand</strong> <strong>Lighting</strong><br />
p5
<strong>Palette</strong> <strong>OS</strong> v10<br />
Concepts and Overview<br />
Welcome Page<br />
Date: Februray 2008<br />
Engine<br />
Version:<br />
User Interface<br />
Version:<br />
v10.0.0<br />
v10.0.0<br />
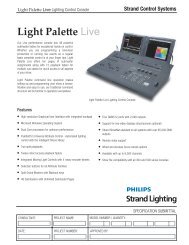
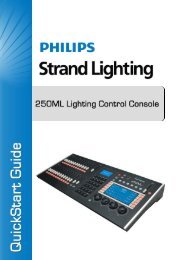
Congratulations on the purchase of your <strong>Strand</strong> <strong>Lighting</strong> <strong>Palette</strong> <strong>Lighting</strong> Control Console.<br />
For general help, use the Contents, Index or Search tab on the left.<br />
Check out the Software Revision History.<br />
<strong>Palette</strong> is a powerful, yet easy to program and operate theatrical control system that truly does<br />
marry dimming and automated control like no other desk. The key is in the software design,<br />
using a Graphical User Interface, together with a control surface that gives you all the direct<br />
access that you have come to expect from a professional lighting console. The core fade engine<br />
works on the Last-Action philosophy, meaning levels and attributes stay put until another control<br />
moves them, freeing you from recording all channels in all cues. This lends itself nicely to the<br />
multiple cue list environment that <strong>Palette</strong> also boasts. Below are links to full-fledged help topics<br />
that describe some of the keys features that make <strong>Palette</strong> a very powerful desk:<br />
o<br />
o<br />
o<br />
o<br />
o<br />
Universal Attribute Control Model - Horizon Control's UAC is a whole new way of<br />
thinking about controlling moving lights. It frees the designer from the crazy world of<br />
DMX charts and lets you think of the lights in your rig as tools to aid you in your<br />
design.<br />
Adding Effects with <strong>Palette</strong> is as easy and convenient as making a gobo rotate<br />
clockwise. Effects can be added to any attribute or attribute family and from that point<br />
onward in the show, the parameters of the effect track, just like any other attribute<br />
value.<br />
Busking - With <strong>Palette</strong>'s unique approach to storing entire looks, rather than just<br />
levels, the slider panels become incredibly flexible tools to busk shows live. The setup<br />
and operation is far faster than other desks and core fade engine allows you to build<br />
up extremely complex looks and then tear them back down to their primitives in any<br />
order.<br />
Move In Black - Never again worry about manually marking your moving lights so you<br />
don't see unwanted live moves on stage as cues come up without being limited to<br />
global parameter timing. Each cue possess its own MIB timing as well as MIB<br />
Suppression.<br />
Timing parameters are extremely flexible, from individual attribute family's wait, fade<br />
<strong>Strand</strong> <strong>Lighting</strong><br />
p6
<strong>Palette</strong> <strong>OS</strong> v10<br />
o<br />
o<br />
o<br />
Tip of the Day<br />
and profile settings for every cue, to traditional cue part architecture and extending<br />
into the very powerful Independent Timing of every attribute in every cue.<br />
Updating Cues - It couldn't be made easier: Just press [UPDT] and <strong>Palette</strong> presents<br />
you with a list of possible items to update given your most recent changes, including<br />
the current cue, palettes used in the current cue, track-back cues or Looks that are<br />
being controlled by slider panels.<br />
Track Sheets - Examining what is going on in your show during editing sessions can<br />
sometimes be very tedious. <strong>Palette</strong>'s Track Sheets give you a clear idea of what is<br />
moving when (intensities or attributes) and even tells you when it moved last.<br />
Safety Net Features - Tracking Backup, Mirrored Saves, Checkpoint Files and Recovery<br />
allow you to program and operate your show in a worry free environment.<br />
By default, the Tip Of The Day is turned on when you start up <strong>Palette</strong>. You can scroll through tips<br />
by pressing the [S2] key on the desk and close the tip by either pressing [ENTER] or [UNDO]. It<br />
is tempting to turn it off, but keep in mind that these brief tips were written to point out some of<br />
the more subtle features <strong>Palette</strong> has to offer. You would have to do a lot of reading of the on-line<br />
help or printed manual to get these hints.<br />
You can read tips anytime by selecting Tip of the Day from the main Help menu.<br />
On-Line Help<br />
Why read the manual when it is all on-line. Every dialog box has context sensitive help by just<br />
pressing the [HELP] button. Press [HELP] then any other button to get a description of its uses.<br />
Press [HELP] twice to get the full help contents. The on-line help has advantage over the printed<br />
manual as the hyperlinks allow you to jump around very quickly from topic to topic.<br />
<strong>Strand</strong> <strong>Lighting</strong><br />
p7
<strong>Palette</strong> <strong>OS</strong> v10<br />
The full and up-to-date manual is also available on-line at www.strandlighting.com<br />
<strong>Palette</strong> Control Panel<br />
When you are running the main software and no moving lights are selected, you can press [S4]<br />
to reach the processor’s Control Panel. The Control Panel gives you access to general functions<br />
like changing the date and time, adjusting how the trackpad works and setting up your network<br />
connections. <strong>Palette</strong> comes loaded with useful software like Notepad, Internet Explorer and MS<br />
Media Player. Listen to MP3s or CD while you work. You can also launch a hardware test to make<br />
sure all your buttons, LEDs and sliders are working properly from the Control Panel.<br />
Getting Technical Support<br />
<strong>Strand</strong> <strong>Lighting</strong><br />
p8
<strong>Palette</strong> <strong>OS</strong> v10<br />
For technical support, please refer to the <strong>Strand</strong> <strong>Lighting</strong> Offices and Service Centres<br />
-o-<br />
<strong>Strand</strong> <strong>Lighting</strong><br />
p9
<strong>Palette</strong> <strong>OS</strong> v10<br />
About <strong>Palette</strong><br />
Two basic styles of lighting consoles have evolved since computerized consoles were<br />
introduced in the early 1970s. These two styles can best be described as “tracking” and<br />
“preset”.<br />
Preset consoles record cues the way manual preset consoles do. On a manual preset console,<br />
the user sets up a look on an active set of faders, then sets up the next look on an inactive<br />
set of faders, and then uses cross-faders to fade from one look to the next. In a computerized<br />
preset console, these looks are saved as cues, but each channel needs to be told what to do<br />
in each cue, and cue execution can only crossfade from one cue to another.<br />
With a tracking console, when a cue brings a channel to a level, that channel stays at that<br />
level until it receives a specific instruction to change levels. This level then tracks through all<br />
subsequent cues until the level is increased or decreased by another cue. Tracking consoles<br />
are capable of much more sophisticated and complicated effects than Preset consoles because<br />
of their ability to have more than one fade executing at the same time.<br />
Where does <strong>Palette</strong> fit in?<br />
o <strong>Palette</strong> is a tracking console.<br />
o<br />
o<br />
o<br />
o<br />
o<br />
<strong>Palette</strong> offers the techniques of tracking consoles in an easy-to-learn environment.<br />
The Timing options in <strong>Palette</strong> are extremely flexible and easy to use. The interface for<br />
changing simple times is as easy to use as a spreadsheet and allows adjustment on<br />
individual attribute family's wait, fade and profile settings for every cue. <strong>Palette</strong> also<br />
has a traditional cue part implementation that greatly reduces the number of<br />
keystrokes necessary to maintain these typically complex cues. In very demanding<br />
programming environments, <strong>Palette</strong> extends timing options with the very powerful<br />
Independent Timing of every attribute in every cue.<br />
<strong>Palette</strong> deals with moving lights using Horizon Control's Universal Attribute Control<br />
Model. This means that regardless of who manufactured the moving light and what<br />
protocol it is using, it is presented to the user the same way. Cues are stored using<br />
descriptions like "Blue", "3 RPM" and "11 Hz". This means that not only can you c opy<br />
attributes from one type of fixture in your rig to another with predictable results, you<br />
can also swap your entire rig out for another and not have to re-program your cues.<br />
<strong>Palette</strong> uses a “Graphical User Interface” and replaces the hidden command structure<br />
of the D<strong>OS</strong>-based tracking consoles with modern computer interfaces like menus and<br />
dialog boxes. It can easily be understood and programmed by any computer-literate<br />
operator. Since each dialog box control has a softkey accelerator, your hands are not<br />
tied to the mouse. Pure keystroke syntax is not only possible, but quite often quicker<br />
than competing consoles. On the flip side, there is no need to memorize a strict syntax<br />
as the softkeys are always narrowing your choices to less than a dozen option. You can<br />
read the dialog box from top to bottom like a book and quickly find the options you are<br />
looking for, even resorting to the mouse if that suites you. <strong>Palette</strong> will never beep at<br />
you and expect you to fix the command line.<br />
Because <strong>Palette</strong>'s design leverages on consumer based technology (such as readily<br />
available operating systems, USB interfaces and Pentium® Processors) it allows lower<br />
budget theatres with operators who are not full time employees to have the<br />
<strong>Strand</strong> <strong>Lighting</strong><br />
p10
<strong>Palette</strong> <strong>OS</strong> v10<br />
o<br />
sophistication that has previously been reserved for only the biggest of professional<br />
theatres using specialized and dedicated equipment.<br />
Since a standard operating system is used and the hardware interfaces with USB, you<br />
already have your backup desk. In fact, you probably have over a dozen of them in<br />
your facility.<br />
The software is designed, written and owned by Horizon Control Inc.<br />
See Also:<br />
Universal Attribute Control<br />
Tracking<br />
Edits Track Forward<br />
Blocking and Unblocking of cues<br />
License<br />
<strong>Strand</strong> <strong>Lighting</strong><br />
p11
<strong>Palette</strong> <strong>OS</strong> v10<br />
System Capacities<br />
The <strong>Palette</strong> system capacities outlined below represent the upper range of capacities the<br />
program can support.<br />
Output Devices<br />
Control Channels<br />
Cues<br />
Cue Lists<br />
Looks<br />
Looks per page<br />
Look Pages<br />
Simultaneous Fades<br />
Priorities<br />
Macro Buttons<br />
Remote Video<br />
Portable Remote Focus Unit<br />
Tracking Backup<br />
Crash Recovery<br />
ILS Architectural Button Stations<br />
Browser Control<br />
Show Control Programming<br />
SMPTE/MIDI Interface<br />
Serial Out<br />
External Trigger Events<br />
Telnet and Serial session<br />
32,768 (1024 on physical console without<br />
external output devices)<br />
No reasonable limit - determined by<br />
amount purchased<br />
Unlimited<br />
Unlimited<br />
Unlimited<br />
Unlimited<br />
Unlimited<br />
Unlimited<br />
100 different priorities available for every<br />
Cue List and Sub Master<br />
12 pageable virtual<br />
Five connections via XP machine on LAN<br />
running <strong>Palette</strong>PC software<br />
Optional<br />
Yes<br />
Yes<br />
Optional with ILS Interface card<br />
On local or networked Internet browsers<br />
Full programming language using Macro<br />
Scripts and the Lua language<br />
Optional<br />
Macros available to output RS232<br />
commands<br />
2 triggers on <strong>Palette</strong> hardware or ILS<br />
buttons stations or contact closures<br />
16 Com ports and multiple telnet session<br />
available<br />
<strong>Strand</strong> <strong>Lighting</strong><br />
p12
<strong>Palette</strong> <strong>OS</strong> v10<br />
Astronomical & Time Event Clock<br />
Yes<br />
"No reasonable limit" means that the limit is determined the processor and RAM on the<br />
system.<br />
See Also:<br />
About <strong>Palette</strong><br />
-o-<br />
<strong>Strand</strong> <strong>Lighting</strong><br />
p13
<strong>Palette</strong> <strong>OS</strong> v10<br />
The Universal Attribute<br />
Control Model by<br />
Horizon Control Inc.<br />
"Simplicity, clarity, singleness: These are the attributes that give our lives power and<br />
vividness and joy as they are also the marks of great art." - Richard Holloway<br />
Communication and the expression of ideas is central to the art of lighting. Creating great<br />
lighting is a team effort lead by the designer. The language a designer uses to communicate<br />
with the team, and specifically the console programmer, is crucial to the process of creating<br />
the art. The programmer, in turn, must then train the console in order to orchestrate the<br />
lights to ultimately relay the intent of the designer to the audience. There is ample<br />
opportunity in this process for misinterpretations to muddy the waters of communication.<br />
More recently, and at a furious pace, moving lights have entered the theatre and the<br />
multitude of options they provide has only complicated this process amplifying the<br />
opportunity for 'miscue' of intent.<br />
Not surprisingly, there has been an increasing necessity to simplify the process of moving<br />
light control. Unlike the hard and fast rules that have existed for decades, a uniform language<br />
for designers and programmers to use for describing moving light behaviors has been<br />
non-existent. Moreover, the method used to communicate to lights has never been<br />
standardized. The pioneering manufacturers of automated lighting equipment each<br />
implemented different philosophies of control. More recently, generic moving light console<br />
manufacturers have had issues with just covering the bases. It has been a challenge for some<br />
to turn the lights on and make them move about. In all respects, these consoles were merely<br />
outputting numbers, sometimes masqueraded by words to get the job done. Now that<br />
automated lighting is no longer in its infancy, it is time for a fresh new approach on intelligent<br />
lighting control. Horizon Control has risen to that challenge and this document will explain<br />
how we have achieved that goal with our Universal Attribute Control Model.<br />
See Also:<br />
Controlling Moving Lights<br />
<strong>Strand</strong> <strong>Lighting</strong><br />
p14
<strong>Palette</strong> <strong>OS</strong> v10<br />
Definition<br />
The heart of this technology is our Universal Attribute Control Model or UAC for short. It is our<br />
method of standardizing the language of communication with respect to intelligent lighting<br />
control.<br />
Elevating the means of control to an higher layer allows designers to once again think of their<br />
lighting fixtures as merely tools available to get the job done. As the theatre embraced<br />
moving light fixtures, it reluctantly accepted all of the idiosyncratic methods needed to control<br />
them. The designers found themselves constantly adapting to the language imposed on them<br />
by the manufacturer. Gone were the days of simply asking for lights and photons would land<br />
on the stage.<br />
Lets go back to the advent of com puter controlled lighting to examine the issues that plagued<br />
communication in the theatre. Before computers entered the theatre, the most popular<br />
dimmer controllers were known as road-boards. These large devices had individual handles<br />
for each dimmer and designers would ask operators to move a handle to a position to set the<br />
light level. These 'move' instructions were written down as cues and with each one executed<br />
in succession you had a show. The advantage of this system (which was only realized fully<br />
after the obsolescence of road-boards) was that each move could be controlled at different<br />
rates and multiple moves could be executed simultaneously by different operators.<br />
Computer control first appeared on Broadway in 1975 when Tharon Musser used the<br />
Electronics Diversified LS-8 console on A Chorus Line. This new technology allowed for<br />
unprecedented repeatability and a huge number of cues executed in record time. As<br />
processing power was very limited, decisions had to be made on how to execute these fades.<br />
The technology and code development tools of the day dictated that each channel would be<br />
recorded in each cue. This greatly simplified the process of playing back a show, or more<br />
specifically, jumping from scene to scene during rehearsals. Remember, in the old days of<br />
road-boards, getting to any place at random in the show almost always meant starting from<br />
the beginning and executing each cue to ensure accuracy. LS-8 and others could do this with<br />
ease. Kliegl quickly followed with the Performance and <strong>Strand</strong> with Multi-Q and Broadway<br />
converted to computer control seemingly overnight. People were blown away with the<br />
apparent new flexibility that these computers offered.<br />
These early computer control systems did not emulate road-boards, but rather manual preset<br />
boards. What designers eventually figured out, given a bit of experience on these consoles,<br />
was that they could not achieve the complex cue timing that two or three road-board<br />
operators did in the past. As these preset consoles recorded every channel in every cue, they<br />
only moved from state to state. This resulted in robotic or non-organic fades. It was only<br />
when <strong>Strand</strong> introduced the Light <strong>Palette</strong> that the technological problem that plagued these<br />
fundamental concepts was realized on a computer (in North America at least).<br />
People everywhere (and since) have praised Light <strong>Palette</strong> for marrying designer's desires and<br />
computer control by using a common language. Almost every controller that has been<br />
accepted on Broadway since has used core concepts introduced by Light <strong>Palette</strong>. With the<br />
advent of intelligent lighting, so many more parameters have entered the equation that the<br />
language conventions that have evolved are discordant and technologically inadequate. The<br />
language must be overhauled. Conventional lighting control just worked in 2-space; Intensity<br />
and Time. That is not so with moving light control. There are many many more parameters.<br />
Moving light control has long suffered from the lack of this common language that designers<br />
and programmers and manufacturers could use. To date, intelligent lighting control has only<br />
stumbled along, managing to keep up with an evolving technology and never experienced the<br />
<strong>Strand</strong> <strong>Lighting</strong><br />
p15
<strong>Palette</strong> <strong>OS</strong> v10<br />
sort of watershed event that occurred in the industry with the introduction of Light <strong>Palette</strong>.<br />
The problem was compounded by that fact that industry leaders were extremely protective of<br />
their intellectual property. There was no sharing of control protocols between lights and<br />
controllers. Each manufacturer vigorously protected the methods they used to control their<br />
fixtures and automated systems were sole-source. Only recently has the industry evolved to<br />
the point where most believe that inter-operability is a good thing.<br />
Horizon Control Inc. (HCI) is at the very leading edge of this new paradigm of lighting control.<br />
For years now HCI has had members sitting on ESTA's Control Protocols Working Group and<br />
we are actively involved in the development of new protocols such as ACN (ANSI E1.17).<br />
Horizon Control pulls from over a decade of experience writing lighting control software and<br />
members of the development team were pivotal in the evolution of computer visualization<br />
software. People on our staff have worked on some of the largest shows ever mounted with<br />
virtually every make and model of popular lighting control systems. Our desire to simplify and<br />
revolutionize the fundamental methods that are used to control lighting is deep rooted in our<br />
collective years of experience.<br />
The result is one of the most highly effective developments of a technology that we call<br />
'Universal Attribute Control'. The descriptions and examples in this document are taken from<br />
the implementation of our ' Universal Attribute Control' as used by the <strong>Palette</strong> <strong>Lighting</strong><br />
Console.<br />
Background<br />
The earliest forms of computer control, though digital at their core, output an analog signal<br />
between 0 and 10v. This in turn controlled the lights from no output to full intensity. Inside<br />
the console, these numbers were generally stored using 8-bit bytes, giving 256 steps of<br />
resolution. With the advent of moving light systems, the resolution was doubled to 16-bit,<br />
providing 65536 steps of resolution. Computers then calculated fades that produced a<br />
one-to-one relationship between the 65,000 steps directly to motors that moved the light<br />
from, say, pan-stop to pan-stop. This concept persisted for years and, given a specific<br />
controller tied to a specific lighting system, pre-programmed shows were reproduced faithfully<br />
night after night.<br />
The downfall of this method of control is that these numbers ([0-10], [0-255] or [0-65535])<br />
mean very little in the real world. They are actually only significant when used with very<br />
specific equipment. When applied to other equipment, these numbers mean very little at all,<br />
and in fact are often meaningless. UAC's objective is to provide an intuitive programming<br />
experience and a versatile control system that when played back can actually provide the<br />
operator information about the system it is controlling.<br />
UAC does this by porting the control to an 'abstract' layer. This has a number of benefits:<br />
1. The 'handles' you use to control moving lights are more inline with what you would do<br />
to manipulate conventional lighting.<br />
2. The numbers and 'words' you use to build cues will actually mean something. You will<br />
have an idea of what you can do with the lights and what is on stage by reading the<br />
screen.<br />
3. If you have mixed equipment, the methodology you use to communicate with your<br />
entire rig is identical, regardless of the protocols defined by the equipment<br />
manufacturers.<br />
4. Building a set of looks with one group of lights in your rig can be copied to another<br />
group, regardless of what type of lights they are.<br />
The cues you have in your show file can be played back with any equipment.<br />
One of the key things in Point #2 above that bears repeating is that UAC uses numbers and<br />
<strong>Strand</strong> <strong>Lighting</strong><br />
p16
<strong>Palette</strong> <strong>OS</strong> v10<br />
'words' to control lighting. You may claim that has been done for years with the use of<br />
'named' palettes. For example, moving lights desks can use labelled position palettes to build<br />
cues and the cue displays use these 'words' to make it easier to read. Don't lose sight of the<br />
fact that palettes, like "Down Stage Center", are just place holders for a combination of<br />
values between 0 and 65535. The words themselves do not mean anything to the desk (nor<br />
do the numbers). They are just displayed on the screen for convenience. In contrast, with<br />
UAC, the words do mean very specific things within the cue structure.<br />
Some of the words used include:<br />
o<br />
o<br />
o<br />
o<br />
o<br />
15 degrees of pan<br />
rotate counter clockwise at 6 RPM<br />
strobe at 9 hertz<br />
thrust the shutter into the aperture of the fixture half way<br />
reset the fixture's motor control system<br />
At show-time, these 'words' need to be converted into 'values' that the specified lighting<br />
fixtures can use. The trick with UAC is that this conversion is figured out each and every time<br />
GO is pressed (and not before). That means that the protocol, the mode, the model or the<br />
manufacturer can be changed at any time. Moreover, each and every light, regardless of who<br />
makes it, appears similar to the user, giving a more consistent experience when programming<br />
a show.<br />
Apart from the benefits described above, this method of controlling lights is not restricted to<br />
traditional linear channels mapped to attributes on the fixture. Looking at a few examples in<br />
<strong>Palette</strong>'s implementation of this model will demonstrate the intuitive nature of describing<br />
fixtures' attributes as opposed to traditional convoluted methods that sometimes group<br />
completely unrelated behaviours on the same channel.<br />
Pan and Tilt Example<br />
The Home position for pan and tilt on most DMX Moving Lights is 50:50 (or 32767:32767).<br />
This positions the light such that you will have maximum movement in each direction before<br />
encountering a stop (pan-stop or tilt-stop). For a light that has a total pan range of 360<br />
degrees, with the control channel set to half, you are sitting at 180 degrees. Taking the<br />
control channel to full will move the light 180 off axis towards a stop. So, to summarize, a<br />
value of 50% means Home, and a value of 100% means go to the pan-stop 180 degrees from<br />
Home. Figuring out that 90 degrees is half way in between those two values is easy. That<br />
would be 75%. And a 45 degree pan from Home is, again, half way between those two values<br />
or 62.5%. That gets a little too complex for the programmer to calculate quickly.<br />
To add to the complication, imagine you have another light in the rig that has a total pan<br />
range of 540 degrees. Now the numbers you just figured out for the first fixture mean nothing<br />
to this one. Worse yet, if you grab both of the fixtures and pan them in tandem, you would<br />
get completely differing results:<br />
<strong>Strand</strong> <strong>Lighting</strong><br />
p17
<strong>Palette</strong> <strong>OS</strong> v10<br />
Using the same values (62.5%), the angles of pan are completely different. The beams of<br />
light are not even close to parallel. You can see how this can be very frustrating if you have a<br />
mixed rig. With UAC, the Pan attribute is represented in real-world units of degrees.<br />
Therefore, when you talk to the light, you tell it to pan so many degrees:<br />
Apart from having parallel beams of light from multiple fixtures, notice that there is no need<br />
for the "=" sign. Forty-five degrees is forty-five degrees. This makes controlling a rig that is<br />
made up of different types of fixtures easy to communicate with and easy to understand.<br />
If you program the show using one type of fixture, then swap it for another, it is important to<br />
remember that it is these real-world values (in this case, degrees) that are used when fading<br />
cues, not the DMX values. The example below will demonstrate this with two cues. Cue 1 and<br />
Cue 2 are programmed with a fixture that is capable of panning 540 degrees (-270 to +270).<br />
Cue 1 takes the fixture to its pan-stop at +270 degrees. Cue 2 has it move (in 10 seconds) to<br />
a position of pan +90 degrees.<br />
<strong>Strand</strong> <strong>Lighting</strong><br />
p18
<strong>Palette</strong> <strong>OS</strong> v10<br />
If we were to substitute this fixture out for a fixture that only has a total pan capability of 360<br />
degrees and run the cue, a surprising, but predictable thing happens. When Cue 1 is active,<br />
the fixture can't reach +270 degrees, so it stops at its pan-stop (+180 degrees). Then Cue 2<br />
is executed, which is a 10 second fade to +90 degrees. For the first 5 seconds of Cue 2, the<br />
fixture doesn't move. But, when the Live display on the screen reads +180 degrees, which is<br />
half way through the cue, the fixture will start to move. When Cue 2 is complete, the fixture<br />
will be resting at +90 degrees:<br />
Since the Universal Attribute Control Model doesn't figure out DMX values until the very last<br />
second, it can also alter the way in which the conversion is done at run-time, producing new<br />
and exciting methods of transition during the fade from cue to cue. Various attributes, such<br />
as position and color lend themselves very nicely to working in different ways. Color Space is<br />
described in detail below, but let's examine how we can move from one place to another on<br />
stage given two stored end places.<br />
In this example, we are going to once again consider a moving head fixture as opposed to a<br />
moving mirror. Moving head lamps achieve movement by physically moving the source and<br />
lens train with two motors within a yoke. This Pan/Tilt relationship equates to a polar<br />
coordinate system using azimuth and elevation. When you move in this coordinate system, if<br />
<strong>Strand</strong> <strong>Lighting</strong><br />
p19
<strong>Palette</strong> <strong>OS</strong> v10<br />
you pan more than you tilt, as the beam of light intersects the plane of your stage, it will<br />
move in an arc:<br />
We have become used to this characteristic movement of moving heads. Very good moving<br />
lights that move extremely smoothly are sometimes described as moving in an organic<br />
manner or looking like they are operated by a follow-spot operator. People are quick to<br />
forgive the fact that they are always moving in this arc pattern. UAC gives you the option of<br />
how the light will move. It doesn't have to move in an arc. When a follow-spot operator<br />
moves a light from point A to point B, the light normally travels in a straight line.<br />
There is a Movement attribute that alters the way fades are calculated when you press GO. If<br />
you record a cue using specific Pan and Tilt values and specify the Movement to be Linear, the<br />
end points of the cue do not change, but the method the intervening Pan and Tilt values get<br />
from Cue 1 to Cue 2 does. It is not a linear crossfade mapped to a polar system, but rather a<br />
transition that forces the Pan/Tilt mechanism to travel the beam of light in a straight line. Not<br />
only in a straight line, but also at a constant velocity on the stage deck, regardless of how far<br />
Cue 2's end point is in relation to the hanging position of the fixture. The result is that moving<br />
light cues will look even more organic when programmed this way.<br />
<strong>Strand</strong> <strong>Lighting</strong><br />
p20
<strong>Palette</strong> <strong>OS</strong> v10<br />
Zoom Example<br />
The 540 versus 360 degree examples above demonstrated that you can swap one fixture for<br />
another and get predictable results. Far more useful is the fact that the same values are used<br />
to control different types of lights in a similar fashion. Looking at the zoom attribute<br />
demonstrates this again.<br />
It is quite common to have two or more different types of lights in today's lighting rigs.<br />
Matching beam sizes is a process of grabbing one type of light, setting its zoom, then<br />
selecting the other and tweaking it to match. You cannot grab both and crank the wheel and<br />
hope to get matching results. UAC eliminates the need to remember who made what light<br />
when you're programming. Everything in the air is considered a tool to get the job done; why<br />
should you be expected to address each light in a different language?<br />
Here are two lights; one that has a zoom range of 19° to 70°, the other from 10° to 50°. Cue<br />
1 is written to put both at 30°:<br />
It is just that simple! Cue 1 stores a value of 30° and both lights achieve it. You rig looks<br />
consistent and symmetrical with no undesirable surprises and no need for manual<br />
re-translation.<br />
If Cue 2 was written such that both lights go to 70°, as you ran it, the fixture on the right<br />
would have to give up mid-way:<br />
<strong>Strand</strong> <strong>Lighting</strong><br />
p21
<strong>Palette</strong> <strong>OS</strong> v10<br />
It wouldn't stop the cue from running though. The fixture on the left would go all the way to<br />
70°:<br />
To be fair, Cue 2 could not have been written using the fixture on the right. This cue must<br />
have been recorded using a fixture that can achieve 70°. Even though in this example it was<br />
played back using a 50° fixture, it does not change the cue. If you later swapped it back to a<br />
70° fixture, it would go to 70°. It is only when writing cues that you are limited to the<br />
physical constraints of the light currently patched.<br />
Shutter Control Example<br />
One the most time consuming endeavours when programming moving lights is shutter<br />
control. To achieve desirable effects, the shutter mechanisms need a lot of motors, and<br />
hence, a lot of control channels. Typically, most shutter assemblies have nine motors. There<br />
are four shutters, each using two motors to control its position within the aperture of the<br />
fixture and a ninth to rotate the entire assembly clockwise or counterclockwise. Many times<br />
these channels are labelled like this:<br />
<strong>Strand</strong> <strong>Lighting</strong><br />
p22
<strong>Palette</strong> <strong>OS</strong> v10<br />
You can imagine that trying to make some light cuts can be a time consuming effort of<br />
hunting and pecking for the right channel or more likely, pair of channels. That is why UAC<br />
groups related pairs together onto encoders to reduce the search process by half. UAC labels<br />
the shutters like this.<br />
To get to the shutter control, the encoder banks group opposite shutters together. So the first<br />
encoder bank deals with the Top and Bottom Shutters. Moreover, motors 1a and 1b are<br />
grouped together on the first encoder to thrust the encoder into the aperture of the fixture.<br />
The next encoder controls the relationship between those two motors, giving you one handle<br />
for controlling the angle of that shutter:<br />
<strong>Strand</strong> <strong>Lighting</strong><br />
p23
<strong>Palette</strong> <strong>OS</strong> v10<br />
The following examples show how UAC greatly simplifies the process of getting ideal shutter<br />
cuts.<br />
In this example, note the value of Top Thrust. It is set to 50% and the top shutter is cutting the<br />
beam in half. If you cranked the first encoder all the way to the right, it is unlikely that it will reach<br />
100%. Most moving lights only allow you to put the shutter in part way into the field of light. That<br />
exact amount is represented here in percent.<br />
If you adjusted the second encoder to adjust the angle of the Top Shutter, note how it affects the<br />
beam of light. In this example, the shutter is about a quarter the way across the beam and cut to a<br />
15 degree angle.<br />
<strong>Strand</strong> <strong>Lighting</strong><br />
p24
<strong>Palette</strong> <strong>OS</strong> v10<br />
Banking the Lens family one past the group that controls Left and Right Shutters exposes a group of<br />
four encoders that groups Top and Bottom on one wheel and Left and Right on another. That way<br />
you can adjust two opposite groups of motors with one encoder. Here the Thrust of the Top and<br />
Bottom are grouped together and set to a level of 48% resulting in a thin bar of light passing<br />
through the center of the beam. If both attributes were put to 50%, the fixture would not output<br />
any light whatsoever as the two shutters would be either touching or just overlapping.<br />
Using this third bank of shutter controls you could create a box of light by just adjusting one<br />
encoder. Do this by using your left hand to press and hold both the T/B Thrust and L/R Thrust<br />
softkeys and your right hand to roll the black wheel. Then grouping encoder 2 and 4, you could<br />
<strong>Strand</strong> <strong>Lighting</strong><br />
p25
<strong>Palette</strong> <strong>OS</strong> v10<br />
adjust the angle of that box in space. In all of these examples, we never used the ninth motor<br />
labeled 'Rot'. That attribute is generally available on a fourth Lens bank and is marked Shutter <br />
and also uses the units degrees. Also check out direct Command Line entry of values rather than<br />
having to roll the encoders.<br />
Gobo Control<br />
Individual moving light manufacturers' implementation of gobo control has notoriously been<br />
annoyingly inconsistent. There are so many things these modern machines allow us to do<br />
with imagining, but there has never been a consistent method of describing what they do.<br />
UAC attempts to pull in the reins and consolidate on a common language of control.<br />
The assembly that holds the entire gobo selection is called the Wheel. Wheels can Spin<br />
Forward or Reverse and can Select gobos. The individual choices are called Gobos. Gobos can<br />
be Indexed in Degrees like hands on a compass or Rotated continuously Clockwise or<br />
Counterclockwise.<br />
<strong>Strand</strong> <strong>Lighting</strong><br />
p26
<strong>Palette</strong> <strong>OS</strong> v10<br />
Different manufacturers use a variety of control handles to achieve all of these possible<br />
behaviors. Some use lots of handles which surprisingly makes the control of the gobo wheel<br />
easier, and other insist on bunching up behaviours on only a couple of channels. The<br />
examples below are generic and are only used to show how it could be done using linear DMX<br />
channels and how it is handled using UAC.<br />
The first of the pair of these two linear channels is used to position the wheel and select a specific<br />
gobo and do one of two things with it; either Index it or Rotate it. The second channel changes<br />
modes based on the position of the first. Here the first channel is set to about 10% and Selects the<br />
Glacier gobo for Indexing. The second channel is set to about 10% which indexes the gobo 15<br />
degrees. <strong>Palette</strong>'s blue attribute bubbles show how this would be achieved using UAC.<br />
<strong>Strand</strong> <strong>Lighting</strong><br />
p27
<strong>Palette</strong> <strong>OS</strong> v10<br />
To rotate the glacier gobo continuously in the clockwise direction, the first handle must be placed at<br />
60%. That changes the mode of the second handle and the 10% position is now meaningless. To<br />
see a rotation of 4 RPM clockwise, the channel must be set to 42%. (Where that value comes from is<br />
undetermined. Truthfully, you would never get a concise answer even if you to visit the factory that<br />
built the fixture and asked the firmware engineers!) To achieve the same results in <strong>Palette</strong>, see the<br />
blue bubbles below.<br />
Changing the direction of the rotation on a DMX based system means you must travel the second<br />
handle through a bunch of values that are not of interest to you. The gobo would slow down, then<br />
stop, then change direction and speed up again as you adjust the control channel. This can be very<br />
<strong>Strand</strong> <strong>Lighting</strong><br />
p28
<strong>Palette</strong> <strong>OS</strong> v10<br />
disconcerting for a designer who is watching the stage. None of those behaviours were asked for,<br />
but were necessary to achieve the desired effect. With UAC, you just nudge the second encoder one<br />
tick to change the value from CW to CCW. The fourth encoder, which controls the speed, is not<br />
changed. The DMX values would jump from the value needed for clockwise rotation at 4 RPM directly<br />
to the counterclockwise 4 RPM value (whatever that is).<br />
Attribute Substitutions<br />
Copying and swapping attributes among fixtures that share scalar properties like Position<br />
and Zoom is only the tip of the iceberg when using UAC. The real power of UAC can be seen<br />
when you start using similar, but not identical attributes and how UAC can work with them.<br />
Color is a great example. There are three primary automated color systems in use today;<br />
<strong>Strand</strong> <strong>Lighting</strong><br />
p29
<strong>Palette</strong> <strong>OS</strong> v10<br />
Subtractive Color Systems like CMY, Additive Color Systems like RGB and Fixed Color<br />
Systems that use gel (like scrollers) or dichroic glass (like color wheels). UAC can work with<br />
any combination of these three and make intelligent substitutions between them if required.<br />
One of the most common modes of color control in automated lighting today is CMY color<br />
mixing. Various mechanisms are used to place pure colors in the path of white light to<br />
subtract different wavelengths out. By introducing varying amounts of interference, a huge<br />
variety of colors can be produced. One of the desirable effects these sorts of mechanisms<br />
allow is smooth transition from one color to the next. If your rig consists of various color<br />
mixing fixtures, the attributes are dealt with in a scalar fashion, similar to Zoom.<br />
Let's look at an example of mixing a color on one type of light and then ask it to be<br />
reproduced on another that doesn't possess color mix abilities. You can use varying amounts<br />
of Cyan, Magenta and Yellow to produce a hue of Red:<br />
If you copied those attributes to a fixture that did not have color mixing, but did have a<br />
color wheel, a suitable substitution needs to be made. Since the UAC Fixture Library stores a<br />
lot more data than just the name of a color, mathematical matching can be done. In a case<br />
where the destination fixture has a color wheel that looks like the one below, Slot 7 would be<br />
chosen. (By the way, it would not be stored as Slot 7, it is stored as "Light Red"):<br />
<strong>Strand</strong> <strong>Lighting</strong><br />
p30
<strong>Palette</strong> <strong>OS</strong> v10<br />
Working in the reverse direction (from wheel to mix) is of course trivial when using UAC. The<br />
library has a definition of what wavelengths make Light Red and can easily use the color<br />
mixing system to recreate it.<br />
Gobos are also problematic when using stock fixtures. Different fixtures use different numbers<br />
and types of gobos. Imagine that part of your rig has a Linear Breakup gobo that you use in<br />
Cue 1. Cue 2 then switches to a Medium Wavy Breakup. The cues were written using a fixture<br />
that has a gobo wheel with nine gobos (plus open) and the image below shows how Cue 1<br />
positions the wheel to Slot 1, and Cue 2 positions it to Slot 5.<br />
If you wanted to copy this effect to a separate part of your rig, you may not be so lucky to<br />
<strong>Strand</strong> <strong>Lighting</strong><br />
p31
<strong>Palette</strong> <strong>OS</strong> v10<br />
find the same type of fixtures available for those cues. If you use another model of fixture,<br />
sensible substitutions (and compromises) must be made. UAC can find similar gobos in the<br />
destination fixtures and use them when running the cues. In this case, Cue 1 would select<br />
Slot 4, and Cue 2 Slot 3.<br />
Conditional Abstract Attributes<br />
Automated lights are riddled with control parameters. In earlier days, many fixture<br />
manufacturers combined DMX channels to achieve separate effects in an attempt to prevent<br />
the fixture from consuming an outrageous number of channels. A common practice is to use<br />
one channel as a mode channel to modify the behaviour of another. This makes life difficult<br />
for the lighting programmer as he never knows what a handle will do when he uses it without<br />
first checking the state of the mode channels.<br />
UAC eliminates this level of confusion by not presenting you with controls that are ineffective<br />
on one channel because of the state of another. It goes further by labelling each control<br />
appropriately as to what it is doing at present.<br />
To get to the plethora of controls on today's m oving lights, all attributes are assigned into one<br />
of five families:<br />
o<br />
o<br />
o<br />
o<br />
o<br />
Position<br />
Color<br />
Gobo<br />
Lens<br />
Special<br />
Dedicated buttons or softkeys then 'bank' those attributes onto four encoders and their<br />
present purpose is displayed in the blue bubbles:<br />
<strong>Strand</strong> <strong>Lighting</strong><br />
p32
<strong>Palette</strong> <strong>OS</strong> v10<br />
In this case, a moving light with multiple gobo wheels has been selected and the user has<br />
used the Gobo button to bank the encoders to Gobo Wheel 1's controls. More blue bubbles<br />
below the encoder labels show the present value of those controls. Here the Gobo 1 Wheel<br />
Mode is dialed to Select, the current Selection is Glacier, the Gobo Mode is set to Index which<br />
has been Indexed to 15°:<br />
It reads somewhat like a book from left to right. The key thing here is that the DMX ordering<br />
has nothing to do with how the controls are laid out to the user. In fact, as you will see below<br />
in the Gobo examples, the number of DMX channels used to achieve all the effects of the<br />
attribute do not enter in the equation either.<br />
If the user were to nudge the first encoder, (the one labelled Wheel Mode) the entire wheel<br />
would Spin Forward. If so, showing you the control that allows you to choose the gobo<br />
Selection would be pointless. The entire wheel is spinning through the light path, so you will<br />
see them all, not one at a time. The controls exposed to the user change to reflect this new<br />
altered state:<br />
The Wheel Mode encoder now shows that the entire gobo wheel is Spinning Forward. The<br />
second encoder now allows you to set the speed at which the wheel spins, in Revolutions per<br />
Minute. The third encoder shows that the indexing motor is held steady, but it is pointless to<br />
say at what angle it is holding it as all gobos are rotating in a planetary system through the<br />
light path. The four encoder is not used in this case.<br />
If you then adjust the third encoder (G1 Mode) from Index to Rot CW, the fourth encoder<br />
becomes available to adjust the speed of the rotation:<br />
If the first encoder is changed back to Select, the second through fourth encoders will return<br />
to their previous function:<br />
This is where the Universal Attribute Control Model meets the Tracking benefits of this console<br />
as the Index value of 15 degrees was not destroyed as it would have been on a pure DMX<br />
desk (because typically they shared the same DMX control channel). The 15 degrees has just<br />
not been visible when it was not applicable.<br />
Nudging the second encoder from Index to Rotate Clockwise changes the purpose of the<br />
fourth from Index to Speed and the units change from degrees to RPM. Note that the actual<br />
gobo (Glacier) does not change.<br />
<strong>Strand</strong> <strong>Lighting</strong><br />
p33
<strong>Palette</strong> <strong>OS</strong> v10<br />
While this looks straight forward and concise to the user, behind the scenes UAC is mapping<br />
all of these controls to the appropriate DMX channels, regardless of how convoluted the<br />
protocol is. An added benefit of this method of masking and unmasking attributes is that<br />
controls like Speed that use RPM is not overwritten when the encoder changes to Index and<br />
uses Degrees. When you come back to Speed, the RPM value you left it at will persist. UAC<br />
essentially gives you more handles than the fixture manufacturer allotted.<br />
Phantom Abstract Attributes<br />
As seen above, exposing additional controls that the fixture manufacturer didn't allot for<br />
makes controlling some types of lights more convenient. An ideal example of this is RGB LED<br />
fixtures. Traditionally, the only controls the user can adjust are Red, Green and Blue.<br />
Distinctly absent is an Intensity attribute. The undesirable side effect of this is that if you pull<br />
down the Grand Master, the LEDs intensities remain unchanged. To blackout the fixtures, you<br />
have to adjust three parameters rather than one. This becomes inconvenient when you just<br />
want to lower LED based fixtures' level or take them out in one cue to only restore them in<br />
the next. You must look up the RGB values from the preceding cue to restore them.<br />
Horizon Control's UAC adds a phantom attribute to RGB lights. This intensity attribute does<br />
not appear any different from that of any other fixtures', but it does control the overall<br />
brightness of the LED without affecting its Hue. Another benefit of having this attribute used<br />
in cues is that if you ever do replace an RGB fixture with another, more traditional type of<br />
fixture, the Up/Down dynamics of the light are already in the cues. Color Space is a related<br />
but unique extension of this methodology and is discussed further below.<br />
Color Spaces<br />
Complimentary Color Spaces are basically different methods used to describe the individual<br />
components that make up what the eye perceives as color. None of them are right or wrong.<br />
They are individual and each one has its purpose. The selection of one over the other is<br />
primarily a matter of choice. Most consoles only allow you to work in the color space native to<br />
the fixtures you are controlling. That is, if you have a white-sourced light that has Cyan,<br />
Magenta and Yellow dichroics place before it, you would be working in the subtractive CMY<br />
space. If you have Red, Green and Blue LED lights, you would be working in the additive RGB<br />
space. Some consoles have neat color-pickers that allow you to quickly grab desired colors,<br />
but at the end of the day, they will be fading from one triplet of CMY (or RGB) to another<br />
when they run cues.<br />
When working with color mixing capable lights, UAC allows you to choose and crossfade in six<br />
different color spaces. These are CMY, RGB, HSL (Hue Saturation Luminance), HSL' (Hue<br />
Saturation Luminance Prime) and, depicted in lower case so as not to confuse it with HSL, hsv<br />
(Hue Saturation Value) and hsv' (Hue Saturation Value Prime). The difference between the<br />
two Hue based color spaces and what the Prime means is explained below.<br />
<strong>Lighting</strong> designers think of light as having three distinct properties; color, intensity of color,<br />
and brightness. (This is not a discussion on shape and movement.) In the additive RGB color<br />
space, to change the color, you need to change the ratio between the Red, Green and Blue<br />
components. If you wanted to change the intensity of the light, you would have to project the<br />
vector of the new RGB value toward the largest valued primary color (red, green or blue).<br />
With respect to color, the same could be done with CMY, but to simplify the example, we<br />
don't want to get into the effects of a dim mer in the equation. If you want to make a color<br />
brighter in RGB color space you need to keep the ratios between the Red, Green and Blue the<br />
same but increase them. Changing any of these properties on the fly would take some clever<br />
mathematics on behalf of the programmer. Horizon Control's UAC uses functions that<br />
manipulate the native color channels for you. This math transforms the data at run-time<br />
allowing you to program and fade in any one of the six color spaces mentioned above.<br />
<strong>Strand</strong> <strong>Lighting</strong><br />
p34
<strong>Palette</strong> <strong>OS</strong> v10<br />
Regardless of which of the six methods you use to choose your color, you also have the option<br />
of how the actual crossfade will execute. In the following three examples, Cue 1 is Blue and<br />
Cue 2 is Green, but in each case, we're going to crossfade in a different color space. Apart<br />
from the Color Space attribute changing in Cue 2 in each example, all other color attributes<br />
remain the same.<br />
RGB Crossfade<br />
The fixture used here could be either a CMY subtractive color light, or it could be an RGB<br />
additive color light. If it fades from Blue to Green in either the CMY or RGB color spaces,<br />
effectively a linear transition occurs on all three control channels. This is typical of what<br />
traditional lighting console do.<br />
Subtractive:<br />
Cue 1 CMY (100%, 100%, 0%) fades to Cue 2 CMY (100%, 0%, 100%). The first channel<br />
does not move and the other two move from opposite ends. The result can either be a<br />
not-so-subtle off-white or a somewhat dingy color in the middle of the fade when Magenta<br />
and Yellow are both at half and Cyan is at full. This is not surprising as there is a lot of<br />
colored glass between you and the light.<br />
Additive:<br />
Cue 1 RGB (0%, 0%, 100%) fades to Cue 2 RGB (0%, 100%, 0%). Half way through the<br />
fade, we have two LEDs producing equal amounts of energy at half their potential and the<br />
third doing nothing. The result can be a color closer to white than desired.<br />
HSL Crossfade<br />
Regardless of whether you're using Additive or Subtractive lights, at the end of the day you<br />
need to provide three control channels (see RGB Crossfade above). You don't have a choice<br />
because that is what the light needs to operate. What you can do though is move through a<br />
different color space, which does not produce the typical linear transition of the channels as<br />
described above. Instead, you will visit altogether different colors when fading from one to<br />
another, hopefully avoiding the undesirable bit in the middle.<br />
The picture below shows the entire color spectrum as it is laid out in the 'Natural' color space.<br />
Hue is the ratio between the three primary colors and is what we think of as color. Saturation<br />
is how intense the color is, or mathematically how far apart each primary is from the others<br />
or how far away from gray you are (Gray is when all three are equal in value. Note, the image<br />
below only shows fully saturated colors.) Luminance is the overall brightness of the selected<br />
color, or mathematically defined as the cumulative total of the three primary colors. Too<br />
much brightness results in white. Cue 1 shows where Blue is and Cue 2 shows Green. When<br />
<strong>Strand</strong> <strong>Lighting</strong><br />
p35
<strong>Palette</strong> <strong>OS</strong> v10<br />
you press GO on Cue 2, the CMY color flags (or LEDs) will change in such a way that you visit<br />
Cyan along the way. In some circumstances, this will be a more desirable transition than that<br />
shown above.<br />
HSL' Crossfade<br />
The Hue Primed version of the well defined HSL color space just shifts the spectrum such that<br />
each end does not include Red. It could be shifted any amount, but Horizon Control shifted it<br />
180 degrees, such that Cyan now appears at each end:<br />
In the [Cue 1/Cue 2] example, going from Blue to Green in the HSL' color space now<br />
produces a virtual rainbow of colors along the way. This can be a very powerful effect, but the<br />
transition will be different for every combination of colors recorded and it will be up to the<br />
designer to choose. If Cue 1 was Purple and Cue 2 was Yellow, going through Red might not<br />
seem like such a bad idea. To do that you would have to use this color space. If you use the<br />
more common HSL, you go through Blue, Cyan and Green to get there. Again, maybe that is<br />
desirable.<br />
hsv<br />
The Hue Saturation Value color space is also known as the 'Deep' color space. HSL works well<br />
for emissive fixtures like LEDs, but not so good for fixtures that are hitting your set. As you<br />
increase the brightness on you set, you don't want the hue to change. UAC offers the hsv<br />
color space to solve this problem where Luminance is substituted by value. As the value<br />
attribute increases, hues become more saturated. With hsv, hues never progress through the<br />
pastels to white. This is equivalent to you pouring more light on your painted set. As you<br />
bathe the set in more blue, it doesn't approach white (unless you're working in TV - then all<br />
bets are off).<br />
The choice of how to get from color A to color B is up to you. The method of attack is to write<br />
the two cues first, picking the colors using whatever method you choose. Then try running the<br />
cue. If you like the transition, you're all done. If you don't, go to Cue 2, change the color<br />
space and Update the Cue and run it again. Even though UAC literally fades in all six color<br />
spaces, you only have to change between three of them to see all the effects. Choose one of:<br />
o<br />
o<br />
o<br />
CMY or RGB<br />
HSL or hsv<br />
HSL' or hsv'<br />
<strong>Strand</strong> <strong>Lighting</strong><br />
p36
<strong>Palette</strong> <strong>OS</strong> v10<br />
<strong>Strand</strong> <strong>Lighting</strong><br />
p37
<strong>Palette</strong> <strong>OS</strong> v10<br />
Conclusion<br />
For years, designers' hands were tied when they were controlling automated lighting. The<br />
language and control structure used had been imposed upon them by the equipment<br />
manufacturers. This was not conducive to an enjoyable experience for anyone involved in the<br />
process. Horizon Control's Universal Attribute Control Model defines a common language that<br />
designers and programmers can share and the complex processes of translating this language<br />
into DMX or any other control protocol is taken care of for you.<br />
This new language has not been defined arbitrarily or in a vacuum. We use colloquial terms<br />
that have been used in the theatre for years and present them to the programmer with sense<br />
and order. Confusing mode channels that change the purpose of other channels have been<br />
eliminated and new and uniquely useful control handles have been added, such as an<br />
intensity control for LED based fixtures. UAC allows the designer to look at the lighting rig as<br />
a unified tool to aid in the design process. The designer will no longer need to conform to the<br />
language of the manufacturers and this allows them to diversify the lighting rig without the<br />
worry of adding complexity to the programming process. Every fixture now speaks the same<br />
language and increased communication and understanding will only lead to better lighting.<br />
<strong>Strand</strong> <strong>Lighting</strong><br />
p38
<strong>Palette</strong> <strong>OS</strong> v10<br />
Tracking<br />
<strong>Palette</strong> is by nature a Tracking console. With Tracking, when a cue brings a channel to a level,<br />
the channel stays at that level until it receives a specific instruction to change levels. This level<br />
tracks through all subsequent cues in the cue list until the level is increased or decreased in<br />
another cue.<br />
Levels which have tracked in a cue are displayed on the channel grid in magenta with a circular<br />
arrow symbol beside the level:<br />
If you record a hard level in Cue 2 that is exactly the same level that is in Cue 1, you will get a<br />
magenta level with a white block showing there is a redundant command:<br />
A good way to understand tracking is to think of how you use lights every day:<br />
o<br />
o<br />
o<br />
When you enter a room, you turn on a room light.<br />
Then you may turn on your desk light. You do not need to turn on the room light<br />
again.<br />
The room light and the desk light will remain on until you purposefully turn one or<br />
both off.<br />
With <strong>Palette</strong>, you record channel 1 at 80%. If nothing else sends a command to that channel it<br />
will stay at 80%, no matter what other channels might be added or changed. Channel 1 will<br />
continue at 80% through all subsequent cues until it is told to change its level by a later cue.<br />
One of the advantages of tracking desks is that you can have m ultiple cues fading simultaneously<br />
because each cue only 'talks' to the channels it has information about. That means that if a long<br />
fade is happening on, say, Channel 1, but Cue 2 runs and moves Channel 2 to different level in<br />
short time, that will not affect Channel 1's fade.<br />
Example:<br />
o<br />
o<br />
o<br />
Cue 1 is a 45 second fade up on the cyc to show a slow sunrise<br />
Cue 2 is a 2 second fade up on an actor's front light<br />
Cue 3 is a 5 second fade down on the actor's front light<br />
When running the show, you're never sure when the actor is going to decide to enter, so<br />
inherently, Cue 2 must be a called cue. Chances are that the actor will enter at some point during<br />
the sunrise. Pressing [GO] on Cue 2 should not affect the subtlety of the 45 second fade on Cue<br />
1. To really drive the point home, the actor may exit before the sunrise has even completed.<br />
<strong>Strand</strong> <strong>Lighting</strong><br />
p39
<strong>Palette</strong> <strong>OS</strong> v10<br />
There is nothing in Cue 3 that address the cyc channels so pressing [GO] on Cue 3 still does not<br />
affect the progression of the sunrise.<br />
It is important to remember that Preset style desks cannot offer you this flexibility. In Preset<br />
desks, each and every channel is recorded at its stage level in every cue. That would mean that<br />
in Cue 2, the cyc would be at its full sunrise level. So, when you press [GO] on Cue 2 midway<br />
through the subtle sunrise because the actor stepped on stage, your sunrise will complete in a<br />
not-so-subtle 2 seconds flat!<br />
If you really want to, you can operate <strong>Palette</strong> as a Preset desk. Just set the Record combo box to<br />
All Levels [Block Cue] in the record dialog box. That way, every channel will have a recorded<br />
level in every cue. This is highly undesirable because you loose the functionality as described<br />
above, but worse yet, you completely deflate the power of having multiple cue lists. If you have<br />
every channel recorded in every cue, each time you press [GO] on any cue list, the entire rig will<br />
go to the recorded levels of that cue - stealing everything away from the other cue list. (If this<br />
appeals to you, you may want to check out how to Block the Entire Cue List)<br />
Note:<br />
o<br />
o<br />
o<br />
See Also:<br />
If you are updating a cue and don't want the edits to track forward, turn OFF Edits<br />
Track Forward in the Record dialog box. The cue after the cue you are updating will be<br />
automagically updated to reverse the effects of what you just recorded.<br />
You cannot select Edits Track Forward OFF if you are updating or recording the last cue<br />
in a cue list.<br />
You can change the system default state of Edit Track Forward for the Record dialog<br />
box in [S2]Show Options|General<br />
A Note on Redundant Data<br />
Edits Track Forward<br />
Track Sheets<br />
Blocking and Un-Blocking of cues<br />
Recording a Cue<br />
Multiple Cue List Concept<br />
-o-<br />
<strong>Strand</strong> <strong>Lighting</strong><br />
p40
<strong>Palette</strong> <strong>OS</strong> v10<br />
A Note on Redundant<br />
Data<br />
Redundant and/or Blocked data in cues is displayed like this:<br />
or<br />
Sometimes this is properly Blocked data. At other times it is just plain redundant. Having<br />
redundant data in a cue is not desirable. Understanding when and why you may want these<br />
symbols appearing in your Channel Grid or Attribute Grid will make your life a lot easier.<br />
Before you move on, if you're not fully familiar with the philosophy of tracking, you may want to<br />
read the topic called Tracking first.<br />
DESIRABLE<br />
o When you write a Block cue at the top of Scene 2 so future editing session on cues in<br />
Scene 1 won't track through into Scene 2.<br />
o<br />
o<br />
When you record a cue using the State option to collect the cumulative set of data<br />
used to reproduce a cue state. You may do this at the beginning of a scene in a linear<br />
cue list, or when you are Copying or Moving cues within a cue list or to the middle of<br />
another cue list.<br />
When you have one attribute that doesn't necessarily change, but other attributes in<br />
the cue rely on it to be in a certain state. For exam ple, in a CMY colour mix system, if<br />
you are fading from pure Cyan (100%, 0%, 0%) to pure Green (100%,0%,100%) the<br />
Cyan value does not change in the second cue. When running the second cue, you<br />
would see the Block Symbol. This is definitely not redundant date because having<br />
Cyan at 100% is a necessary condition to making Green. If it were not there with a<br />
Block Symbol, it would still produce Green, but the important thing to consider is what<br />
if we change the first cue such that is does not have Cyan at 100%. Then our second<br />
cue would not be Green. <strong>Palette</strong> automatically marks co-dependant attributes with<br />
deltas when you are editing so you don't have to worry too much about this. Just don't<br />
get fussed if you do see block symbols in your attribute grid, even if you have just<br />
perform an Un-Blocked cue operation.<br />
UNDESIRABLE<br />
o When you are running a show from top to bottom and attributes are marked with<br />
block symbols, it means that those attributes will get unnecessary and sometimes<br />
harmful fades initiated on them for no good reason. For example, in the Tracking<br />
topic, there is a detailed example of a long Sunrise cue followed by an actor's entrance<br />
cue. If the cyc channels that were involved in the sunrise were blocked in the second<br />
cue, the long sunrise would be quickly collapsed by the actor's entrance cue when it is<br />
<strong>Strand</strong> <strong>Lighting</strong><br />
p41
<strong>Palette</strong> <strong>OS</strong> v10<br />
Note:<br />
o<br />
o<br />
o<br />
executed.<br />
When you are copying multiple cues from one section of a cue list to another and you<br />
use the Copy State option. This will result in many block symbols appearing because<br />
the entire cumulative state of the cue list is recorded into each and every copied cue.<br />
This means if you copy the sunrise/entrance cues from the example above, you will<br />
destroy the sunrise. If you are copying entire sections of the show within a cue list, it<br />
is best to copy the first cue in the range using the STATE option, then all the<br />
subsequent cues without that option. Alternatively, you can Unblock the section after<br />
you copy it.<br />
Putting redundant data in a cue "Because you want to make sure that if you jump to<br />
the cue it will all be there" is not necessary. <strong>Palette</strong> always maintains the state of the<br />
cue list during Goto's. (i.e., if you jump around in the cue list, it will make sure that<br />
what is on stage looks just like it would if you went to the first cue and pressed [GO]<br />
repeatedly until you got there). Some other tracking consoles are pure "Move-Fade"<br />
boards, meaning that if you jump cues, only the new fade information for the channels<br />
that are in the cue you are jumping to will be implemented. <strong>Palette</strong> does not do this.<br />
If you have redundant data in the cues, it makes it difficult to maintain the cues when<br />
you're editing them at a later date. It is much nicer knowing that the data you are<br />
examining is all 'useful' data and is necessary to get the looks on stage. If there is a<br />
lot of extra garbage in there, it makes it a lot tougher.<br />
At times you may see the Block symbol in your cue list when you didn't expect to. This may<br />
happen because you just did a Goto Cue and the values just 'happened not' to change from their<br />
last state. To 'clean up' the display in this case, Assert the cue list by pressing [SHIFT] [GO]. Also<br />
note that there is a Cue List Option to Goto cues after they are recorded, so it may happen<br />
directly after a record operation.<br />
See Also:<br />
Blocking and Unblocking of cues<br />
Move/Copy using State<br />
Recording Cues<br />
About <strong>Palette</strong><br />
-o-<br />
<strong>Strand</strong> <strong>Lighting</strong><br />
p42
<strong>Palette</strong> <strong>OS</strong> v10<br />
Timing<br />
One of <strong>Palette</strong>'s very powerful features is its ability to fade every attribute of every Channel in<br />
every cue across multiple cue lists and Sub Masters independently, simultaneously and<br />
effortlessly. Many consoles using the preset emulation philosophy are just not capable of this<br />
flexibility because they record every channel in every cue and can only fade from one cue,<br />
singularly, to another cue whereas <strong>Palette</strong> can handle any number of fades at once. The key to<br />
power is unleashed with a simple user interface that even the most novice of programmers can<br />
take advantage of immediately.<br />
This topic briefly describes different methods of controlling attribute timing but there are specific<br />
topics available that explain them more fully.<br />
See Also:<br />
Cue List Time Cells and the Blue Box<br />
Part Cues<br />
Independent Timing<br />
Command Line Syntax<br />
Hardware Setup - A/B C/D<br />
Cue List Time Cells and the Blue<br />
Box<br />
Most shows will be satisfied with the flexibility offered by editing times in the Cue List. There are<br />
multiple timing columns editable here; the main one is labeled Cue Time:<br />
Visible here is also the Down Time column, but not seen are Position Time, Color Time, Gobo<br />
Time, Lens Time and Special Time which will only be available if you have moving lights patched<br />
in your show. Follow these steps to change the timing of your cue:<br />
1.<br />
1. Using the [ARROW KEYS] move the Blue Box to the time column you want to change.<br />
2.<br />
2. Press the [EDIT] button to put the Blue Box into edit mode.<br />
Note:<br />
The QWERTY equivalent of [EDIT] is [INSERT]<br />
3.<br />
3. Either type in a new value to completely replace the text highlighted in blue or use the<br />
Wheel to roll the values up or down. (Note: Each detent on the wheel will change the<br />
value, up or down, by one second. Holding down [SHIFT] will change the value by 0.1 of a<br />
second.)<br />
4.<br />
4. If you want the attributes to hold their level for a piece of time after you press the GO<br />
<strong>Strand</strong> <strong>Lighting</strong><br />
p43
<strong>Palette</strong> <strong>OS</strong> v10<br />
5.<br />
Note:<br />
button, enter the time using the Wait/Fade syntax:<br />
5. When you are finished, press [ENTER] to close the edit box.<br />
All attributes of all the Channels recorded in the cue will fade in Cue Time unless a time is<br />
entered in the appropriate column. If you want to remove individual attribute timings, edit the<br />
cell and press [DEL] [ENTER].<br />
Part cues<br />
Complex shows need more advanced timing options. If you split a cue into different Parts, you<br />
can have different timing for different groups of Channels without writing additional cues. When<br />
working on a show, you build a cue, which is a singular look on stage and later you decide how<br />
you are going to get from one cue to another.<br />
1.<br />
1. Goto the cue in which you want to alter the timing parameters<br />
2.<br />
2. Select the Channels that need to be assigned to a different part<br />
3.<br />
3. Press the [S11]Cue Parts button to open the cue part dialog box<br />
4.<br />
4. Select the button for the desired part<br />
5.<br />
5. The Channels will show a superscript letter showing the part:<br />
6.<br />
6. Continue with Steps 2 through 5 until you have assigned all Channels to their correct part<br />
7.<br />
7. Press [UPDT] [ENTER]<br />
8.<br />
<strong>Strand</strong> <strong>Lighting</strong><br />
p44
<strong>Palette</strong> <strong>OS</strong> v10<br />
8. Use the Blue Box to alter timing on the main part or any additional parts:<br />
Note:<br />
o<br />
o<br />
o<br />
o<br />
o<br />
o<br />
The main cue part is always Part A (in this case labeled 'Dinner')<br />
Cues need not be made up of parts in specific order. You can have a cue that has just<br />
Part A and Part G<br />
<strong>Palette</strong> supports 26 parts. Press [S12] and roll the wheel to select parts greater than<br />
Part K then press [ENTER] to close the dialog box.<br />
Independent Timing<br />
The limitations of the above two methods are that all the Channels in each cue part must use<br />
the same attribute family timing and further still, individual attributes within a family are forces<br />
to use the same time. Independent Timing frees you of these limitations.<br />
1.<br />
1. Access the Independent Timing display by pressing [SHIFT][EDIT]. Alternately, you can<br />
use the mouse to press the Times button:<br />
The Channel Grid and Attribute Grid look very similar, except that the numbers that appear are in<br />
seconds rather than degrees or hertz or RPMs:<br />
2.<br />
2. To achieve the offset intensity times as shown above, type in the command line [1]<br />
[THRU] [20] [@] [0] [-] [5] [ENTER]. It will appear like this:<br />
3.<br />
3. To set the Pan timing to 3 seconds, type [1] [THRU] [20] [S2-Pan] [3] [ENTER] which<br />
would appear as:<br />
Note:<br />
<strong>Strand</strong> <strong>Lighting</strong><br />
p45
<strong>Palette</strong> <strong>OS</strong> v10<br />
All the moving light softkeys will stuff text onto the command line. That is, if you press [S<br />
5-Position], the text Position Time will appear, which will set both the Pan and Tilt times. If the<br />
individual attributes are currently not visible on [S1] through [S4], just continue pressing [S5]<br />
through [S9] until you see the attributes you want control over.<br />
4.<br />
4. When you have finished setting attributes and times, record the new cue or update an<br />
existing cue. Be sure to include the [S11] Time filter in the Attributes masking:<br />
Time on the Command Line<br />
As you directly enter attribute values on the Command Line, you can specify times as well. Not<br />
only will these times be placed in the Independent Time grid as described above, but <strong>Palette</strong> will<br />
also use the time to fade the attribute from its current value to its new value. For example, you<br />
could type [1] [THRU] [10] [@] [50] [@] [5] [ENTER], and the command line would look like<br />
this:<br />
If you want to Release a Channel (and all of its attributes) in time, or sneak it back to cue level,<br />
use the syntax [1] [SHIFT+REL] [5] [ENTER]. This appears on the command line like this:<br />
A more complex example of using time on the command line is [1] [THRU] [10] [S2] [-] [90] [-]<br />
[90] [@] [0] [-] [5] [/] [1] which would look like this:<br />
This is crazy, but looks very cool. What it does it takes Channels 1 through 10 and fans them out<br />
to make a perfect half circle, but it does it over 5 seconds, starting by m oving Channel 1 in one<br />
second and ends after six seconds with Channel 10.<br />
Using the A/B or C/D faders to<br />
specify time<br />
There is an option in the Hardware Setup - A/B C/D that allows either of the split fader pairs to<br />
control the live fade time. If you are running a show live, it is handy to have handles to control<br />
how long attributes get to their new level and how long they should take to return to their old<br />
<strong>Strand</strong> <strong>Lighting</strong><br />
p46
<strong>Palette</strong> <strong>OS</strong> v10<br />
levels once released. This option sets up the left hand fader to control the IN TIME of any<br />
attribute you set using the command line or button array. The scale is from zero to ten seconds<br />
(top to bottom). The right hand fader controls how long releases should take or what is the sneak<br />
time.<br />
Attributes set using times specified by the A/B or C/D faders are not transferred to the TIMES<br />
display (i.e., you can't use these times to write cues with).<br />
-o-<br />
<strong>Strand</strong> <strong>Lighting</strong><br />
p47
<strong>Palette</strong> <strong>OS</strong> v10<br />
Multiple Cue List<br />
Concept<br />
Multiple Cue Lists allow the console to operate completely separate and asynchronous cue lists<br />
simultaneously. This is useful if you want to have an effect running on one cue list to keep it<br />
separate from the cues in the main cue list, or if the console was controlling the lighting in a<br />
main theater as well as a space in the theater lobby, an individual cue list for each space could<br />
be developed and operated at the same time to run completely different cues.<br />
Note:<br />
<strong>Palette</strong> supports an unlimited number of Cue Lists.<br />
Using the Cue List Properties, Cue Lists can be given different names as well as different colored<br />
backgrounds to help visually differentiate one from another. Individual cue lists can be locked to<br />
prevent unauthorized modifications to cues. Cue Lists can be assigned a Priority and can be<br />
resolved either using a Highest Takes Precedence method or a Latest Takes Precedence method.<br />
The Cue List Directory appears above the Cue List Display and shows all the cue lists in your<br />
show.<br />
The Channel Grid display normally has a black background color. When Channels are being<br />
controlled by another cue list (i.e., the one that is not selected), the levels will be displayed with<br />
a dark blue background:<br />
The Attribute Grid always has light background. Attributes being controlled by other cue lists<br />
appear with blue text:<br />
Note how one Channel with multiple attributes can be controlled by more than one cue list at a<br />
time. Attributes that are at their default levels are shown in grey text.<br />
See Also:<br />
Cue List<br />
Cue List Directory<br />
Tracking<br />
Record Options<br />
HTP vs LTP<br />
<strong>Strand</strong> <strong>Lighting</strong><br />
p48
<strong>Palette</strong> <strong>OS</strong> v10<br />
Channel Colors and Symbols<br />
-o-<br />
<strong>Strand</strong> <strong>Lighting</strong><br />
p49
<strong>Palette</strong> <strong>OS</strong> v10<br />
Fade Resolution<br />
The pecking order that the fade engine uses to resolve output channels, in order of precedence,<br />
is as follows:<br />
Note:<br />
1. Parked Output levels<br />
2. Intensities controlled by the Flash, Highlight or Lowlight Tools<br />
3. Captured Channel attributes (on the keypad, with red levels)<br />
4. Inhibitive Look levels (intensities only) in order of Priority<br />
5. Additive Look levels (intensities and attributes) in order of Priority and Cue List levels<br />
(Latest Takes Precedence or Highest Takes Precedence) in order of Priority<br />
o<br />
o<br />
o<br />
See Also:<br />
The affect of the Grand Master and Black Out Button can occur before or after<br />
Captured intensity attributes based on how it is setup.<br />
<strong>Palette</strong>'s Latest Takes Precedence cue lists do not get automatically released when<br />
other cues take full control of all the attributes used in them. Their values are still<br />
valid and if the domineering 'more recent' cue list gets released, the values from the<br />
original cue list will get a chance to write to the stage again. Some may refer to this<br />
domineering behaviour as Stomping and the behaviour of re-writing to the stage after<br />
the release as Persist on Override.<br />
It's interesting to note that intensities recorded in Looks (often thought of as<br />
traditional submasters) do not always win over cue lists at the sam e priority. By<br />
default, the attributes are resolved on an LTP bases unless the Look has specifically<br />
been marked HTP. This ensures that the recorded 'look' will appear on stage when the<br />
look handle reaches the top of its travel, even if it must reduce the level of some<br />
Channels.<br />
Channel's different states<br />
Channel Colors and Symbols<br />
Priorities<br />
HTP vs LTP<br />
Cue List Properties<br />
Sub Master Types<br />
Busking<br />
-o-<br />
<strong>Strand</strong> <strong>Lighting</strong><br />
p50
<strong>Palette</strong> <strong>OS</strong> v10<br />
HTP (Highest Takes<br />
Precedent) vs. LTP<br />
(Latest Takes<br />
Precedent)<br />
Intensities are resolved either as HTP (Highest Takes Precedent) or LTP (Latest Takes<br />
Precedent).<br />
LTP<br />
Note:<br />
If multiple controls (Sub Masters or Cue Lists) are attempting to control the same attribute,<br />
the last one to move it will win. For example, if one cue sets a level to 75%, then another one<br />
is executed and it sets it to a level of 50%, the attribute will go to 50%.<br />
o<br />
o<br />
o<br />
o<br />
HTP<br />
Channel Masters are always HTP.<br />
Cue Lists and Sub Masters can be either HTP or LTP as determined by their properties.<br />
<strong>Palette</strong>'s Latest Takes Precedence cue lists do not get automatically released when<br />
other cues take full control of all the attributes used in them. Their values are still<br />
valid and if the domineering 'more recent' cue list gets released, the values from the<br />
original cue list will get a chance to write to the stage again. Some may refer to this<br />
domineering behaviour as Stomping and the behaviour of re-writing to the stage after<br />
the release as Persist on Override.<br />
For a LTP Cue List or Sub Master to gain control , the losing control must also be LTP<br />
(i.e., not marked HTP).<br />
If multiple controls (Sub Masters or Channel Masters or Cue Lists) are writing to an intensity<br />
attribute, the one with the greatest value will win. The exception to this rule is if a control<br />
with a higher priority is wanting it to go to a lower level, it will win.<br />
See Also:<br />
Tracking<br />
Releasing & Asserting Cue Lists<br />
Priorities<br />
Fade Resolution<br />
<strong>Strand</strong> <strong>Lighting</strong><br />
p51
<strong>Palette</strong> <strong>OS</strong> v10<br />
-o-<br />
<strong>Strand</strong> <strong>Lighting</strong><br />
p52
<strong>Palette</strong> <strong>OS</strong> v10<br />
Priorities<br />
<strong>Palette</strong> allows for 100 different priorities for use when you are playing back recorded items to the<br />
stage. Priorities apply to Cue Lists and Looks. The Properties box for each of these items has a<br />
number field where you can enter the desired priority. Regardless of the HTP vs LTP settings,<br />
Higher Priority items (lower number) will win.<br />
The default priority of new Cue Lists is 10 and new for Looks it is 9. In complex show files, it is<br />
good practice to bump higher priority items up to numbers like 7 or 8, rather than straight to<br />
number 1. This will give you 'room to grow' as you add more important things, like fire-safety<br />
cues, at a later date. In architectural situations, you may want to build a 'base' look that is<br />
priority 90 or so, such that if all other playback items get released, this base look will take over.<br />
Note:<br />
Only one item can win. If there are two items writing to the stage and one is 9 and the other is<br />
10, changing the #9 to a #1 will not make it win any better or faster!<br />
See Also:<br />
Cue List Properties<br />
Looks<br />
Sub Master Pages<br />
Fade Resolution<br />
HTP vs LTP<br />
-o-<br />
<strong>Strand</strong> <strong>Lighting</strong><br />
p53
<strong>Palette</strong> <strong>OS</strong> v10<br />
Tips and Tricks<br />
Reading these tips may be the fastest ay to avoid reading the entire manual. These are the Tip<br />
of the Day tips.<br />
<br />
Use the HELP button to get help on any specific button or in any dialog box. To get help on<br />
buttons, press HELP then the desired button.<br />
If your hardware is such that the A/B faders crossfade you between cues (see S3 -<br />
HARDWARE SETUP), holding down SHIFT while moving the faders moves you backwards<br />
through the cue list.<br />
<br />
<br />
<br />
<br />
<br />
<br />
<br />
<br />
<br />
<br />
<br />
<br />
<br />
If you double press the softkeys accelerator for a pull-down list in a dialog box, a large popup<br />
will appear, allowing you to use the wheel to select a value.<br />
You can add profiles to any timed fade (intensity, position, color, etc.). As you use the Blue<br />
Box to enter times, the softkeys change giving you access to profiles such as slow start,<br />
damped and zigzag.<br />
Last Action Editing (or the British Release Option) is available in Hardware Setup. This option<br />
does not release attributes to their default level, but rather leaves them static and ready to be<br />
re-asserted by advancing cues.<br />
The Universal Attribute Control Model allows you to move your moving lights in straight lines<br />
rather than arcs.<br />
<strong>Palette</strong> can read the SMPTE time off your MP3 files and you can synchronize cue lists to<br />
music.<br />
In the Hardware Setup under the Console tab, there is a check box that allows you to mute<br />
QWERTY keyboard events for controlling Cue Lists.<br />
Attribute masking can used when Moving, Copying, Recording, Loading or Updating cues and<br />
looks. Rather than opening the [S9] Attribute dialog box, hold down SHIFT and use the<br />
softkeys. Double pressing any attribute family will solo it.<br />
<strong>Palette</strong>'s Move In Black will automatically set up your moving lights ready for the next cue<br />
their used in. MIB features can be customized on a pre-cue basis using the cue Action dialog<br />
box.<br />
<strong>Palette</strong>'s ability to 'busk' moving lights is very powerful. You can change the attribute<br />
behaviour of your moving lights by VIEWing the properties of a Sub Master.<br />
The Show Options has a field where you can set the level for the FULL button. Double<br />
pressing the FULL button will always give you 100%.<br />
<strong>Palette</strong> supports 100 Priority levels for Looks and Cue Lists. The highest priority is #1 and the<br />
default priority for Cue Lists is #10.<br />
Press Edit in the Action column of any cue to add a Macro to a cue. Macros can trigger other<br />
cues or even control your Media Player or console work lights.<br />
To enter times in the HH:MM:SS format, use two dots (i.e., “ .. ”) to make the colon. This<br />
format extends from days (DD) to fractions of a second or frames (FF) in SMPTE time (i.e.,<br />
DD:HH:MM:SS.FF). Note that frames or the 100th of a second appear after a single decimal<br />
point.<br />
<strong>Strand</strong> <strong>Lighting</strong><br />
p54
<strong>Palette</strong> <strong>OS</strong> v10<br />
<br />
<br />
<br />
<br />
<br />
<br />
<br />
<br />
<br />
<br />
<br />
<br />
<br />
<br />
<br />
<br />
<br />
Moving Head fixtures can hit the same place on stage using two different sets of pan and tilt.<br />
Use the FLIP TOOL to try cues out using either.<br />
[S10] is the Select softkey. Pressing it gives you twelve methods of selecting channels in your<br />
rig, including Evens, Odds, Previous, Levels Going Up, Channels Using <strong>Palette</strong>s etc. You can<br />
even store your own selection set similar to Memory Store and Memory Recall on a calculator.<br />
Using the command line, you can alter intensity levels relative to their current position using<br />
the [1] [THRU] [10] [@] [+] [15] [ENTER] syntax. The command line will read “Up” when<br />
you press [+]. Similarly you can press [-] for “Down”. If you’re controlling moving light<br />
attributes, the [+] puts the word “Relative” in the command line.<br />
Opening the Hardware Setup allows you to assign Macros to the back panel triggers. Just<br />
short out Pins 1 & 2 or 1 & 3 to fire the macros.<br />
The Universal Attribute Control Model gives you six different Color Spaces to select and fade<br />
your color mixing Channels.<br />
The Fan tool allows you to evenly spread out attribute values using one of the following<br />
functions: Center, Right, Left, Ends, Random, Random Positive, Sine and Tangent. You can<br />
also repeat the fan throughout your selection set.<br />
If you have the Light <strong>Palette</strong> VL with the Button Array Wing Panel, you can make the buttons<br />
first select the channels, then apply their recorded levels with a second press.<br />
When controlling moving lights, double hit the softkey for an attribute to display a large<br />
pop-up with fixed attribute values. The softkeys 1 through 12 map to these values for very<br />
quick access.<br />
The command line supports relative movement of moving light attributes. For example, you<br />
can type [1] [THRU] [10] [PAN] [+] [90] [ENTER].<br />
If you want one group of channels to move at a different rate than others in the same cue,<br />
you can either move those channels to a different part or use the Independent Timing where<br />
each and every attribute of every channel can have its own wait and fade time. This is handy<br />
if you want staggered times and are not concerned about managing parts in the cue list. To<br />
access Independent Timing, press [SHIFT] [EDIT].<br />
The four round buttons below the encoders on the Light <strong>Palette</strong> open large popup lists for the<br />
attribute values currently assigned to those encoders. Spinning the encoder will highlight<br />
different values and pressing the button again will put those values live to stage.<br />
If you enter a range of cues in the Record Cue dialog box, you have the option to record<br />
values in all cues in the range, or to just record in the first cue and track through the rest.<br />
Time Events can trigger on specific days of the week or month and have hourly or daily repeat<br />
frequencies.<br />
Cues can steal away from active Sub Masters if both are at the same priority, but by default,<br />
Sub Masters are recorded with Priority 9 whereas Cues are Priority 10.<br />
Use SHIFT with the arrow keys to select multiple cells with the blue box in the Cue List. This<br />
is handy for changing many cues' times all at once. This is also how you select multiple cues<br />
to delete, move or copy (before touching the DEL, MOVE or COPY keys). Loops are easily<br />
created by highlighting multiple Action cells and pressing EDIT to add follows and links.<br />
The A/B and C/D faders can be configured with S3 - HARDWARE SETUP to either manually<br />
fade the Up and Down times, crossfade the cues, work as cue list masters or be manual<br />
two-scene masters.<br />
You can write a BLOCK cue by selecting the ALL Levels (Block Cue) Record option in the<br />
<strong>Strand</strong> <strong>Lighting</strong><br />
p55
<strong>Palette</strong> <strong>OS</strong> v10<br />
<br />
<br />
record dialog box, or just by right clicking on a cue and selecting Block Cue. A horizontal line<br />
above the cue will show you that no attributes will track into this cue.<br />
You can rearrange the columns in the Cue List by clicking and dragging the column headers.<br />
Use the Tools button to open Virtual 5X5 Button Arrays for Groups and Positions, Color and<br />
Gobo palette access.<br />
The command line supports range entry of when setting levels. For example you can type [1]<br />
[THRU] [10] [@] [10] [TO] [1] [ENTER]. To get [TO] on the command line press the [-] key.<br />
<br />
<br />
<br />
<br />
<br />
<br />
<br />
<br />
When you record groups, the selection order is preserved for fanning and staggered<br />
independent timing purposes.<br />
Configure the way the DBO (Dead Black Out) button works in S3 - HARDWARE SETUP. It can<br />
be a momentary button, a toggled or disabled.<br />
<strong>Palette</strong>'s Track Sheet can show you every parameter of the moving lights in your rig. You can<br />
expand and collapse this detail level on a per channel basis. Open the Track Sheets using [S5<br />
- Display].<br />
The release button has multiple functions. It will close any open dialog box or it will release<br />
selected channels if no dialog box is open. Press SHIFT + REL to bring back what you just<br />
cleared.<br />
DON'T USE THE TRACKPAD or MOUSE - you don't have to. Almost every function can be<br />
achieved using dedicated keys, the Softkeys (S1 - S12), the NEXT/PREV button, the wheel or<br />
the arrow buttons.<br />
If you put the forward slash character {/} at the beginning of a cue label, the text will appear<br />
italicized. If you use an exclamation point {!} it will be bold.<br />
You can drag columns around in the Cue List to suite your needs. Double clicking on column<br />
separators will automatically size the column for you.<br />
You can move any selected channels in a cue to a separate part by pressing the PART softkey<br />
and then update the cue. Move the Blue Box in the cue list to change cue part timing. <strong>Palette</strong><br />
supports 26 different parts plus individual independent timing for every attribute if you need<br />
that flexibility.<br />
The Grand Master can either include or exclude captured channels. Choose your option in S3 -<br />
HARDWARE SETUP.<br />
<br />
<br />
<br />
<br />
<br />
The NEXT/PREV button moves you through dialog boxes. Use it with SHIFT to move<br />
backwards through a dialog box.<br />
You can delete cue parts by highlighting any cell part's line with the blue box and press the<br />
DEL key. The channels in that part can either be moved to the main cue or removed from the<br />
cue altogether.<br />
While you are in a dialog box, the SOFTKEYS will take you to the individual controls. The<br />
control that currently has the focus of the WHEEL, ARROWS or NUMBER KEYS will flash the<br />
amber LED on that SOFTKEY.<br />
Releasing channels works in three stages: First time you press REL, it release the last<br />
attribute you touched. The second Release releases any currently selected (red background)<br />
channels. The third press clears all captured channels. Use it with SHIFT to make it an Oops<br />
key (also a three-stage process).<br />
The first time you press the TOOL key, you must hold it down and use the SOFTKEYS to select<br />
the desired tool. Next time, you can just touch the tools key quickly to toggle the tool on and<br />
off.<br />
<strong>Strand</strong> <strong>Lighting</strong><br />
p56
<strong>Palette</strong> <strong>OS</strong> v10<br />
<br />
<br />
<br />
<br />
<br />
<br />
<br />
<br />
<br />
<br />
<br />
<br />
<br />
<br />
<br />
<br />
<br />
<br />
<br />
Did you know that any cue with zero time will appear bold in the Next Cue column in the cue<br />
list directory?<br />
To quickly copy a Sub Master, touch COPY then the Sub Master's BUMP button, then touch the<br />
desired new BUMP button.<br />
While in BLIND, moving the Blue Box loads cues.<br />
To alter the selected channels by 1% instead of 10%, press and hold SHIFT while using the<br />
UP and DOWN buttons.<br />
Time Events can trigger based on astronomical events such as sunrise and sunset. <strong>Palette</strong> has<br />
longitude and latitude values for nearly two thousand cities around the world.<br />
<strong>Palette</strong> uses Horizon Control's Universal Attribute Control Model. This very powerful<br />
technology allows you to do things like control color mixing lights in six different color spaces.<br />
Flash Fixture (a TOOL) works whether or not you have channels selected before you initialize<br />
the tool. If you type channel # TOOLS|FLASH, that channel will start flashing. You can then<br />
type another channel number and press enter to jump to it. Use the wheel to scroll through<br />
channel quickly. Once you close the tool, the last channel will be selected and ready for you<br />
to set its level.<br />
To make the channels wait a specific amount of time after the GO button has been pressed<br />
enter a WAIT time. Do this by editing the Cue Time box using the WAIT / FADE syntax.<br />
You can remove any redundant data in your cue list by right clicking in the cue list and select<br />
Unblock Entire Cue List. Alternately, you can do it on a single cue or range of cues by<br />
selecting them with the Blue Box first before right clicking and selecting Unblock Cues.<br />
When editing wait/fade times using the blue box, use [FULL] to highlight the Wait time (start<br />
of line) and [OUT] to edit the Fade time (end of line).<br />
To enter time in HH:MM:SS format, press the decimal key twice to make the colon. This is<br />
used for VERY long fade times or when entering SMTPE times.<br />
Holding down SHIFT while rolling the WHEEL on any numeric field will change the value by<br />
0.1.<br />
If you build a look that you like on one moving light, you can use the COPY button to copy its<br />
attributes to any other light, regardless of make and model. This is on of the very powerful<br />
features of the Universal Attribute Control Model.<br />
The GOTO CUE button has two functions. Un-shifted, it is the CUE button, used when in the<br />
Record dialog box or in the command line. Shifted it opens the GOTO CUE dialog box where<br />
you can select any cue and Goto it in either recorded time or a time you enter in the dialog<br />
box.<br />
If another cue lists steals away attributes from your cue list, press SHIFT + GO to 'Assert'<br />
your cue list. The current cue will not advance.<br />
If you hold down [SHIFT] while you press [HALT/BACK] the cue list will go back to the<br />
previous cue in cue time, rather than the Halt/Back time.<br />
Busking Looks is a very powerful feature of <strong>Palette</strong>. Sub Master can be configured to give true<br />
Last Action control to moving light attributes.<br />
If you want to remove information in a cue, LOAD the cue, select the channels, release them,<br />
then press the UPDT key to update the cue.<br />
To quickly record a Sub Master, set the desired levels then press [REC] then a [BUMP] button.<br />
You can later edit the name of the Look by pressing VIEW then BUMP to get the Look's<br />
<strong>Strand</strong> <strong>Lighting</strong><br />
p57
<strong>Palette</strong> <strong>OS</strong> v10<br />
<br />
<br />
<br />
<br />
<br />
<br />
<br />
<br />
<br />
<br />
properties. If you press [REC] [SHIFT]+[BUMP] the record dialog box will remain open to<br />
allow you to label the look.<br />
If you are editing a numeric column (like time), after pressing EDIT you can use the WHEEL to<br />
change the values. If multiple cells are selected, the values will change relative to each other.<br />
Use Load to load cues or looks. You can load multiple items on top of each other to combine<br />
ideas.<br />
To quickly move a Sub Master, press MOVE then the Sub Master's BUMP button, then touch<br />
the desired location's BUMP button.<br />
Press S4 - CONTROL PANEL to change the way your track pad works. You can turn on or off<br />
features such as the tap-clicks.<br />
To release all the Playbacks, press SHIFT+REL PB.<br />
Use the File Open File Types combo to open Checkpoint files if you've made a mistake. Scroll<br />
up the Uber Status to see when the last Checkpoint file was recorded.<br />
To go to the top of a Cue List, press and hold SHIFT while pressing the STEP UP button. To<br />
get to the last cue in a Cue List, press SHIFT+STEP DOWN.<br />
To scroll the channel grid, hold down the SHIFT key while rolling the wheel. This only works<br />
when there are no channels currently selected. To deselect all channels without affecting their<br />
set level, press the BACKSPACE key until the command line is clear.<br />
To go to a cue without using the GOTO CUE dialog box, use the ARROW KEYS to move the<br />
blue box to the first column in the cue list on the desired cue and press EDIT. This is<br />
equivalent to double clicking on that cell with the mouse.<br />
Using S2 - SHOW OPTONS, you can give each Cue List their own default Step times, Back<br />
times and Release times.<br />
Light <strong>Palette</strong>'s console worklights can have separate levels. Choose the desired levels in S3 -<br />
HARDWARE SETUP.<br />
<br />
<br />
<br />
<br />
<br />
<br />
<br />
<br />
<br />
You can right click to Clear or Copy the contents of the Uber Status to the system clipboard.<br />
You can then paste this text into Notepad to save it if need be.<br />
Typing VIEW [FIXTURE NUMBER] ENTER allows you to change the labels of a channel to make<br />
your Channel Grid a little easier to understand. Alternately, you can select them and<br />
right-click with the mouse and choose Channel Label.<br />
Right click on the divider to the left of the Channel Grid to set 20 vs. 25 across.<br />
The Status Window will tell you what tool you will get if you touch the TOOLS button. To<br />
change the tool, press SHIFT and TOOLS and select a new tool using the SOFTKEYS.<br />
If you want to get back to the stage display while in the patch, just press a SELECT key.<br />
Instead of using the command line to patch channels, try using the Blue Box. Select the first<br />
cell, press EDIT, type in the desired number then just keep pressing the DOWN ARROW rather<br />
than ENTER.<br />
Press S4 - CONTROL PANEL to get to applications other than the <strong>Palette</strong>, such as MS PAINT,<br />
Internet Explorer and Media Player.<br />
Running your finger along the very right-hand side of the track pad allows you to adjust the<br />
levels of the selected channels.<br />
Why print to paper? Just e-mail your PDF output right from your desk.<br />
There is a text editor built into <strong>Palette</strong> that allows you to take notes. Get to it using S4 -<br />
<strong>Strand</strong> <strong>Lighting</strong><br />
p58
<strong>Palette</strong> <strong>OS</strong> v10<br />
<br />
<br />
<br />
<br />
<br />
<br />
CONTROL PANEL.<br />
Use the WHEEL in dialog boxes to scroll through lists, number boxes and combo boxes.<br />
Holding down SHIFT while rolling the WHEEL will change numeric fields by 0.1.<br />
Press S4 - CONTROL PANEL to change your Screen Saver. Changing the Settings of "My<br />
Pictures Slideshow" allows you to point to your own directory of images that you place on the<br />
hard drive.<br />
Create a chase easily by selecting a range of cues' ACTIONs with the Blue Box, touch EDIT<br />
and select Follow After Fade. Then select the NEXT CUE to be linked to the first.<br />
When controlling moving lights, group multiple attributes together and control them<br />
simultaneously by holding down combinations of S1-S4 and rolling the wheel.<br />
<strong>Palette</strong>s can be nested. If you build Position A from raw values, then build Position B using<br />
Position A, updating Position A will affect Position B.<br />
You can Flip moving head channels easily by using the FLIP Tool. Do this and update the cue<br />
when the light 'took the long way 'round' when running cues.<br />
<strong>Strand</strong> <strong>Lighting</strong><br />
p59
<strong>Palette</strong> <strong>OS</strong> v10<br />
Screen Layout<br />
Toolbars<br />
<strong>Palette</strong> has three different toolbars. If you are not sure about any tool’s function, position the<br />
mouse pointer on a toolbar button (without clicking). The tool is highlighted, and the Tool Tip<br />
display indicates the function:<br />
The functions of the Toolbars are detailed below. Most of these functions have QWERTY keyboard<br />
equivalents.<br />
Cue List Toolbar<br />
The Cue List Toolbar is located directly above the Cue List on the left side of the display.<br />
The Autoscroll button turns the Autoscroll Cue List function on and off . [S11] also<br />
toggles the pin.<br />
<br />
<br />
<br />
<br />
The GO button (Console Equivalent: [GO], QWERTY Equivalent: [SPACE]):<br />
activates the cue indicated by the Cue List Pointer in the cue's recorded time<br />
advances to the next cue in the recorded time (activating any Cue Actions and executing<br />
any Follow Cues)<br />
The HALT button stops any cue that are playing back on this cue list from running. Once the<br />
cue list has been stopped, hitting the Halt button again will backup to the previous cue in the<br />
default Cue List Back fade time (See [S2] Show Options). (Console Equivalent: [HALT/BACK]<br />
QWERTY Equivalent: [Z])<br />
The Go Back button is equivalent to doing a Goto on the previous cue in its own cue time. (<br />
Console Equivalent: [SHIFT] [HALT/BACK] QWERTY Equivalent: [SHIFT] [Z])<br />
The Step Back button replays the cue before the active cue in the default Step Time (See<br />
[S2] Show Options). (Console Equivalent: [STEP UP] QWERTY Equivalent: "[") Use with [SHIFT]<br />
to go to the top of a cue list.<br />
The Step Forward button goes to the cue after the active cue on the default Step Time (See<br />
[S2] Show Options). (Console Equivalent: [STEP DN], QWERTY Equivalent: "]") Use with [SHIFT]<br />
to go to the bottom of a cue list. If a long fading cue is running, pressing this button will<br />
complete the cue in Step Time.<br />
<strong>Strand</strong> <strong>Lighting</strong><br />
p60
<strong>Palette</strong> <strong>OS</strong> v10<br />
The Release Cue List button halts all cues on that Cue List and releases all channels<br />
controlled by that Cue List. (The channels will either return to their default levels, or to the levels<br />
set by any other Cue List or Sub Master that has control of them. They will fade out using the<br />
Cue List's release time). (Console Equivalent: [REL-PB] QWERTY Equivalent: [\]) Use with<br />
[SHIFT] to release all cue lists.<br />
The Goto Cue button activates the highlighted cue on the Cue List in the default time. (Console<br />
Equivalent: [SHIFT] [GOTO CUE], QWERTY Equivalent: [SHIFT] [Q] [#] [ENTER] - (Un-Check<br />
[S6]) Goto and Do Not Execute Follows)<br />
The Goto and Run button fades to the highlighted cue in the recorded time. (Console Equivalent:<br />
[SHIFT] [GOTO CUE], QWERTY Equivalent: [SHIFT] [Q] - (Check [S6]) Goto and Execute Follows)<br />
Cue Properties are accessed via the Cue Properties dialog box. [VIEW] [CUE] [#] [ENTER]<br />
QWERTY Equivalent: [V] [F10] [#] [ENTER])<br />
Channel Grid Toolbar<br />
When in Live mode, the levels you see in the Channel Grid show what is being output<br />
to the stage. Any levels with a blue background are not controlled by the Selected Cue List. Get<br />
in and out of Live mode by pressing [SHIFT] [BLIND] or on the QWERTY keyboard with [B].<br />
When in Blind mode, the Channel Grid has a grey background. See the status window<br />
to see what is currently loaded in Blind. Get in and out of Blind mode by pressing [SHIFT]<br />
[BLIND] or on the QWERTY keyboard with [B]. See Blind. While in Blind, if you use the arrow<br />
keys to move the Blue Box, the highlighted cue will automatically be loaded. When you press<br />
[LOAD] or [SHIFT] [B], the Load dialog box will be automatically stuffed with the highlighted cue<br />
number.<br />
When the Tracking button is down in Blind, the levels that have tracked into the Loaded<br />
cue are shown even though those levels are not recorded in the loaded cue. This button is only<br />
shown when in Blind.<br />
The Record button accesses the Record dialog box.<br />
Update will open the Update dialog box presenting a list of possible playback items to<br />
update.<br />
Changes the Channel and Attribute Grid displays to show Intensity Levels and Attribute<br />
Values. The Moving Light Attribute Grid (see below) must be displayed to see Attribute values<br />
such as Pan/Tilt and Color.<br />
Changes the Channel and Attribute Grid displays to show Wait/Fade Times. The<br />
keyboard shortcut to toggle between Levels and Times is [SHIFT] [EDIT].<br />
The first click of the Release button release the last altered attribute. The second click<br />
releases selected channels and the third releases all captured channels<br />
<strong>Strand</strong> <strong>Lighting</strong><br />
p61
<strong>Palette</strong> <strong>OS</strong> v10<br />
Cue List Directory Toolbar<br />
Use the Cue List Directory toolbar to switch between displaying Cue Lists, Patch and Time Events<br />
.<br />
See Also:<br />
Keyboard Shortcuts<br />
Softkeys Described<br />
-o-<br />
<strong>Strand</strong> <strong>Lighting</strong><br />
p62
<strong>Palette</strong> <strong>OS</strong> v10<br />
Channel Grid<br />
The Channel Grid is the field of numbers located in the top right pane of the display:<br />
<br />
<br />
<br />
Each Channel in the system is represented in the Channel grid in two lines.<br />
o<br />
o<br />
The top line represents Channel numbers<br />
The second line can either show levels or fade and wait times. (See Independent<br />
Timing)<br />
Channel levels are color-coded to indicate the status of the Channel. (See Channel Colors and<br />
Symbols)<br />
Channels with a small red triangle by their number are Channels that have more attributes<br />
than just intensity. The other attributes can be found in the Attribute Grid.<br />
Adjusting the Size of the Channel Grid Display<br />
1. Move the mouse over the line separating the Channel Grid from the Cue List until it<br />
turns into this symbol .<br />
2. Click on the vertical line and hold down the mouse button to adjust the width of the<br />
Channel Grid display.<br />
OR<br />
3. Right-click once the symbol appears, and select a set Channel Grid size from the<br />
right-click menu.<br />
Moving around the Channel Grid using the<br />
<strong>Strand</strong> <strong>Lighting</strong><br />
p63
<strong>Palette</strong> <strong>OS</strong> v10<br />
Wheel<br />
While no Channels are selected, you can hold down [SHIFT] and roll the Wheel to scroll the<br />
Channel grid. If you have channels selected and you don't want to release them, use the [BKSP]<br />
key to clear the command line.<br />
Moving around the Channel Grid Display with<br />
the trackpad<br />
The Scroll Bar is located along the right edge of the cue list display as well as the Channel display<br />
and it identifies whether the display is near the top, middle or bottom.<br />
<br />
<br />
<br />
<br />
<br />
<br />
<br />
<br />
Inside the Scroll Bar is the Thumb, which<br />
indicates the section displayed. (If it is<br />
near the top of the scroll bar, you are<br />
near the top of the display.<br />
Click above (or below) the thumb to<br />
move the Channelgrid will move up (or<br />
down) a page.<br />
To move up (or down) line by line, click<br />
on the arrow at the top or bottom of the<br />
scroll bar. Each click will move the<br />
display one line. If you hold down the<br />
mouse button while the mouse pointer is<br />
over the arrow, the screen will continue<br />
moving line by line.<br />
To move in big steps, put the mouse<br />
pointer on the thumb, hold down the<br />
mouse button and the drag the thumb up<br />
or down in the scroll bar.<br />
See Also:<br />
Attribute Grid<br />
Screen Resolution<br />
Toolbars<br />
Channels Colors and Symbols<br />
-o-<br />
<strong>Strand</strong> <strong>Lighting</strong><br />
p64
<strong>Palette</strong> <strong>OS</strong> v10<br />
Description of the<br />
different states of<br />
channels<br />
When you are programming your show, the channels you select and work with can be described<br />
as existing in different states. Understand the definitions of what changes these states helps<br />
explain why <strong>Palette</strong> may treat them differently at different times.<br />
Channels can be:<br />
o<br />
o<br />
o<br />
o<br />
o<br />
o<br />
o<br />
See Also:<br />
Released<br />
Selected<br />
Changed<br />
Captured<br />
Under Playback control<br />
Under Sub Master control<br />
Under Flash/Highlight/Lowlight control<br />
Channel Colors and Symbols<br />
Channels to Record<br />
Channel Resolution<br />
Show Option<br />
Released channels are channels that are not captured for use in a pending record operation.<br />
These channels may be at their default level (i.e. not controlled by anything) or they may be set<br />
to a level by a currently active Cue List or Sub Master.<br />
Examples of Released channels:<br />
Selected channels are channels that have been addressed and are pending immediate<br />
hands-on control. Selected channels that have not Changed and are not Captured can still be<br />
controlled by active Playbacks or Sub Masters.<br />
Selected channel Only:<br />
<strong>Strand</strong> <strong>Lighting</strong><br />
p65
<strong>Palette</strong> <strong>OS</strong> v10<br />
Selected and Changed:<br />
Selected, Changed and assigned new part:<br />
Under control of either Flash, Highlight or Lowlight tool:<br />
Changed channels are currently or recently under control after being selected, but not yet<br />
recorded. These channels are necessarily Captured.<br />
Changed, Selected and Captured<br />
Changed and Captured<br />
Captured channels have likely have changed and are pending a record. If you are in the LIVE<br />
display, these channels will not be controlled by Cue Lists or Sub Masters. If you do a record, the<br />
Changed delta symbol is removed, but the channels are still Captured, meaning that Cue Lists<br />
and Sub Masters will not control their level until they are released.<br />
Captured channel (not Selected but Changed):<br />
Captured channel (Selected and Changed)<br />
Captured Not Changed (not Selected, probably just Recorded, but not released)<br />
<strong>Strand</strong> <strong>Lighting</strong><br />
p66
<strong>Palette</strong> <strong>OS</strong> v10<br />
Note:<br />
o<br />
o<br />
You can control whether or not Captured channels are automatically Released after<br />
recording a cue in Show Options.<br />
There is a Console Option in Hardware Setup that allows you to use Last Action<br />
Editing. If you choose Last Action Editing, channels will remain captured until a cue<br />
takes control of them.<br />
Channels under Playback Control must be Released. If you are using Last Action Editing,<br />
attributes will automatically be Released when a Cue Lists needs to take control of them.<br />
Under Playback Control:<br />
Channel under Sub Master Control must be Released. Additive Looks can affect levels similar<br />
to Cues, either under HTP or LTP control. Inhibitive Looks negatively affecting a channel's<br />
intensity that is currently either under Cue List Control or Additive Sub Master Control.<br />
Under Additive Sub Master Control:<br />
Channel under Cue List Control being inhibited by Inhibitive Sub Master<br />
Channel under Cue List Control being inhibited by Cue List Master or Grand Master<br />
Flashing channels are Selected. It may or may not be Captured. (See: Flash Fixture or Output<br />
and Highlight/Lowlight)<br />
Flashing or Highlighted channel:<br />
-o-<br />
<strong>Strand</strong> <strong>Lighting</strong><br />
p67
<strong>Palette</strong> <strong>OS</strong> v10<br />
Attribute Grid<br />
If you have patched moving lights in your show, the Attribute Grid will appear below the Channel<br />
Grid. You can turn on or off the Attribute Grid display by using the Display menu, [S5].<br />
You can also dock a Second Window with just the Attribute Grid in it by selecting Second Window<br />
from the Display menu or selecting it from the [S5] popup.<br />
The Channel Grid shows that a channel has more attributes than just intensity by displaying a<br />
red triangle in its upper left corner:<br />
Grid:<br />
The additional attributes can be seen in the Attribute<br />
The channels are listed in rows and the attributes are show in columns. The first two columns<br />
are fixed, such that when you scroll the pane horizontally, you can always see which channel is<br />
on which row and you can see its current intensity. The other columns will shift left an right if<br />
you move the horizontal scroll bar or automatically when you address individual attributes such<br />
that the one you are working with is visible. The column order cannot be switched, but you can<br />
size the columns by placing the cursor between two column headings, clicking and dragging. The<br />
column width will be persistent between show files as it is not saved in with the show.<br />
When you select a moving light, the row in which it appears will be highlighted with a grey<br />
background.<br />
Note:<br />
Just by selecting a moving light, you do not Capture the individual attributes. They are still being<br />
controlled by cues and looks until you actually adjust their values. Check out the topic called<br />
Channel Colors and Symbols to see what the different symbols mean.<br />
The grey highlighted background shows you which attributes are available for that channel. In<br />
the image above, you can clearly see that the VL1000 does not have a Color Wheel and the<br />
VL2000 Wash does not have a Gobo Wheel.<br />
The attribute control windows at the bottom of the screen show you individual control of the<br />
various aspects of the selected attributes. Sometimes two or more of these controls are string<br />
concatenated into a full description of what the attribute is doing within a single column. The<br />
Gobo wheel on the VL1000 shown above is a great example. When you selected Gobo after<br />
selecting the VL1000, there at three controls that affect how the Gobo Wheel is going to behave:<br />
The first bubble Selects the specific gobo from the gobo wheel (in this case Pinwheel). Adjusting<br />
the Gobo Mode determines how the individual gobos will behave (in this case, the gobo will<br />
rotate Clockwise), and the third bubble shows specifically how the behaviour is configured (in this<br />
<strong>Strand</strong> <strong>Lighting</strong><br />
p68
<strong>Palette</strong> <strong>OS</strong> v10<br />
case, it shows Revolutions Per Minute, but if the behaviour was to index the gobo, it would show<br />
the angle in degrees from the home position). You can read these bubbles from left to right like<br />
this: "The Pinwheel gobo will Rotate Clockwise at 6 RPM". In the attribute grid, it appears<br />
concatenated like this:<br />
For more information on the relationship of control handles and attributes, check out the topic<br />
Universal Attribute Control Model.<br />
See Also:<br />
Channel Grid<br />
Channel Colors and Symbols<br />
Controlling Moving Lights<br />
Universal Attribute Control Model<br />
<strong>Strand</strong> <strong>Lighting</strong><br />
p69
<strong>Palette</strong> <strong>OS</strong> v10<br />
File Menu<br />
The File pull down menu on the Menu Bar provides access to the following functions.<br />
<br />
<br />
<br />
<br />
New - Use to create a new show. You will have to Save it to give it a name.<br />
Open – Useto access an existing show for playback or editing. The File Open dialog box allows<br />
you to open <strong>Palette</strong> Show files, Checkpoint files and Backup files. By default, the combo is set<br />
to open <strong>Palette</strong> Show files (*.spf). You can also open 500 Series Show files (*.ssf). The<br />
conventional patch and cue lists will be opened.<br />
Close – Use to exit the show that is currently in use. If the show file has been changed, it will<br />
ask you to save first.<br />
Save – Use to record the contents of the current show to disk. You can also press [S8] on the<br />
main softkey toolbar. Once you save the show, the old file on disk will be renamed<br />
YourShowFile.spb. The *.spb extension is used for backup files. The current show file is<br />
automatically backed up at regular intervals to a Checkpoint file. Checkpoint file use the same<br />
name as the show file, but has the extension *.spc. If your system crashes or you lose power,<br />
when you recover the Checkpoint file will be opened rather than the show file:<br />
You will need to verify you want to continue working with the Checkpoint file or the real show<br />
file. If you choose Yes to open the Checkpoint file, you will do a SaveAs the first time you choose<br />
Save. You can manually Open checkpoint files by changing the "Files of Type" combo in the<br />
File|Open dialog box to "<strong>Palette</strong> Checkpoint". Set the time interval of how often checkpoint files<br />
<strong>Strand</strong> <strong>Lighting</strong><br />
p70
<strong>Palette</strong> <strong>OS</strong> v10<br />
are written in Show Options. (Check out Mirrored Saves also found in Show Options) Checkpoint<br />
files are automatically deleted if you exit <strong>Palette</strong> manually.<br />
<br />
<br />
<br />
<br />
<br />
Save As – Use to record the current show under another name and continue working under<br />
that name.<br />
Backup - Use to make a backup copy (*.spb) of the current show to another location and<br />
continue working under the original name. Set your backup configurations in Show Save<br />
Options.<br />
Print to PDF - Opens the Print dialog box to allow you to customize what sort of document you<br />
want to create using the current show.<br />
Recent files will be listed by number. Using the QWERTY keyboard, press that number to load<br />
it.<br />
Enable Outputs - This option is a indicated by a check mark. If you disable the outputs, the<br />
console's DMX ports and Ethernet outputs will remain static until you re-enable them:<br />
Upon recovery from an improper shut down, you can choose to enable or disable outputs. If the<br />
Console Option Force Outputs upon Recovery is checked, they will always be enabled, which is<br />
desirable in architectural situations.<br />
<br />
<br />
Note:<br />
Disconnect Remote Video - If you are monitoring a console using your PC or laptop as a<br />
Remote Video terminal, you can disconnect from the main console using this options.<br />
Immediately, you will be presented with the Connect dialog box to re-connect to the same or<br />
other recently used consoles.<br />
Exit – Use to close down the lighting control software. Upon exiting, the checkpoint file for the<br />
current show will be deleted to prevent you from opening a stale show file.<br />
Any time you see a word with an underlined letter on the menu bar or in a pull-down menu, this<br />
means you can access it from the QWERTY keyboard using the ALT key and the underlined letter.<br />
For example, ALT, F, O will access the File drop down menu from the Menu Bar, and then the<br />
Open file dialog box will appear.<br />
See Also:<br />
Show Save Options<br />
Recovery - Enable Outputs<br />
Display Menu<br />
Help Menu<br />
-o-<br />
<strong>Strand</strong> <strong>Lighting</strong><br />
p71
<strong>Palette</strong> <strong>OS</strong> v10<br />
Display Menu<br />
Used to turn on and off the display of the Cue Lists/Live Display, Patch, Time Events, Macro<br />
Buttons, Virtual Sub Masters, Moving Light Attribute Grid, Running Effects Grid, Second Window<br />
and Track Sheets.<br />
A large popup display is available by pressing [S5] on the main Softkey menu:<br />
Use the wheel to select a display, then press [ENTER] to close the popup and select the new<br />
display.<br />
See Also:<br />
Softkeys Described<br />
File Menu<br />
Help Menu<br />
-o-<br />
<strong>Strand</strong> <strong>Lighting</strong><br />
p72
<strong>Palette</strong> <strong>OS</strong> v10<br />
<strong>Strand</strong> <strong>Lighting</strong><br />
p73
<strong>Palette</strong> <strong>OS</strong> v10<br />
Help Menu<br />
The Help pull down menu on the Menu Bar provides access to the following functions.<br />
<br />
<strong>Palette</strong> Help - Opens the on-line Help files.<br />
<br />
About <strong>Palette</strong>... – Displays copyright and version information for <strong>Palette</strong>, including the User<br />
Interface, Fade Engine and Show File version numbers.<br />
<strong>Strand</strong> <strong>Lighting</strong><br />
p74
<strong>Palette</strong> <strong>OS</strong> v10<br />
<br />
Upgrade <strong>Palette</strong>... - Allows you to either use Dealer Codes or go On-Line to order more<br />
control channels for your <strong>Palette</strong><br />
<br />
Tip of the Day – Use to access the Tip of The Day display, which can provide tips and notes on<br />
<strong>Palette</strong> operation. The Tip of The Day dialog box has a check box to determine if the Tips<br />
should be shown at startup.<br />
<strong>Strand</strong> <strong>Lighting</strong><br />
p75
<strong>Palette</strong> <strong>OS</strong> v10<br />
See also:<br />
File Menu<br />
Display Menu<br />
-o-<br />
<strong>Strand</strong> <strong>Lighting</strong><br />
p76
<strong>Palette</strong> <strong>OS</strong> v10<br />
Softkeys<br />
The two rows of twelve buttons at the bottom of the screen are context sensitive to what you<br />
are doing, such that at any stage of operation, you are presented with a dozen or less<br />
choices.<br />
The softkeys are Marked as S1 - S12 for the lower set of keys and M1 - M12 for the upper set<br />
of keys.<br />
For instance, if the Record Cue dialog box was open, the softkeys would be as follows:<br />
Note:<br />
The sofkeys 1 through 12 on the console are mapped to F1 through F12 on the QWERTY<br />
keyboard. The upper softkeys in Green are mapped to ALT-F1 throught ALT-F12.<br />
Popups<br />
If you are selecting from a combo list (similar to [S1] above), you can either repeatedly press<br />
the softkey to change the selection or you can double press [S1] to get a pop up list:<br />
When you get this list, [S1] through [S4] become:<br />
<strong>Strand</strong> <strong>Lighting</strong><br />
p77
<strong>Palette</strong> <strong>OS</strong> v10<br />
You can also use the Softkeys, Arrow Keys or the Wheel to select the desired choice. Once<br />
you have highlighted the right one, press [ENTER].<br />
Additional Softkeys [+]<br />
Some dialog boxes, such as the Record dialog box, have buttons that have the [+] symbol<br />
after the text, like this:<br />
. Pressing and holding the [SHIFT] key gives you<br />
additional softkeys, such as the following:<br />
In this case, pressing any of these softkeys changes the attribute masking without the need<br />
to open the Attribute dialog box.<br />
Note:<br />
o<br />
o<br />
While holding down [SHIFT], the other softkey accelerators in the dialog box will<br />
disappear (i.e., [S2] Cue List just becomes Cue List). Although it may look odd when<br />
entering labels that include capital letters, it does not prevent you from utilizing other<br />
shifted functions such as holding down SHIFT and rolling the wheel to change<br />
numerical fields by 0.1 rather than whole numbers.<br />
If you double press any of [S4] through[S11] you can solo that attribute family. This is<br />
quicker than pressing [S2] then reselecting the single desired one.<br />
Moving Light Softkeys<br />
If your show has moving lights patched, as you select channels, the softkeys will change to<br />
give you direct access to the moving light attributes:<br />
For more information on manipulating moving light attributes, check out the topic Controlling<br />
Moving Lights.<br />
Default Softkeys<br />
When no dialog boxes are open and you have no moving lights selected, you can use your<br />
mouse to press the softkey buttons. The default softkeys give additional functionality that is<br />
not available with the hard buttons on the console:<br />
<strong>Strand</strong> <strong>Lighting</strong><br />
p78
<strong>Palette</strong> <strong>OS</strong> v10<br />
If you want to access the Default Softkeys while moving lights are selected, rather than<br />
releasing the channels, just press backspace. The attributes will remain captured, but the<br />
selection will clear and you can then see the Default Softkeys.<br />
Cue Softkeys<br />
If the Command Line starts with [CUE], the softkeys change to:<br />
This allows you more traditional manipulation of existing cues (if you terminate the command<br />
line with [ENTER]) or allows you to specify some attributes of the cue before you record them<br />
(terminating the command line with [REC]).<br />
See Also:<br />
Keyboard Shortcuts<br />
Select Softkeys<br />
Profiles<br />
Display<br />
<strong>Palette</strong> Control Panel<br />
Controlling Moving Lights<br />
Command Line Syntax<br />
Blue Box<br />
-o-<br />
<strong>Strand</strong> <strong>Lighting</strong><br />
p79
<strong>Palette</strong> <strong>OS</strong> v10<br />
Status Window<br />
This box in the lower right hand corner of the display shows you various pieices of information.<br />
What is displayed in this window area is configured with the Status Softkey [S10]<br />
History<br />
In the History window a record is kept of the actions you performed when operating your console.<br />
The time of the operation is marked and the last two hundred events are shown in the list. You<br />
can right click to clear the list or copy it to the system clipboard.<br />
Some of the actions that are reported in the Status Window include:<br />
<br />
<br />
<br />
<br />
<br />
<br />
<br />
<br />
<br />
<br />
<br />
<br />
<br />
<br />
<br />
<br />
<br />
Show Open/New/Save (delineated with horizontal line placed above)<br />
Show Checkpoint<br />
Mirrored Save success or failure<br />
Go, Halt, Back (shown in green text)<br />
Assert Cue List<br />
Release Cue List<br />
Blue Box edits<br />
Triggers<br />
Show Options<br />
Hardware Setup<br />
Goto Cue<br />
Goto Top/Bottom of Cue List<br />
Move/Copy Cue<br />
Move/Copy Look<br />
Load Cue<br />
Load Look<br />
Delete Cue<br />
<strong>Strand</strong> <strong>Lighting</strong><br />
p80
<strong>Palette</strong> <strong>OS</strong> v10<br />
<br />
<br />
<br />
<br />
<br />
<br />
<br />
<br />
<br />
Delete Look<br />
Record Cue (red if recording an empty cue)<br />
Record Look<br />
Bump Buttons<br />
Sub Masters Moves<br />
DBO (shown in red text)<br />
Grand Master (shown in red text)<br />
USB On-Line status<br />
Time Events<br />
Status<br />
In the status Window, information about the last selected channel is displayed.<br />
Tool<br />
The Tool Selected shows what Tool is currently active or which tool will be active if you press<br />
the [TOOLS] button (QWERTY equivalent [T] button). When you first start your session, this<br />
will display [---] because no Tool has been selected yet. Press [SHIFT] and the [TOOLS]<br />
button and select the tool using the softkeys. When a tool is active, the LED on the Tools<br />
button on the console will illuminate.<br />
Saved<br />
After you save the current show, this marks the time at which you did that. A timer also<br />
shows you how long it has been since you last saved. The Hostory Windows marks a<br />
horizontal line where the save occurred. If checkpoint files or mirrored saving is enabled, their<br />
success or failure is also noted in the Uber Status box. [S8] Save Show is available when the<br />
default softkeys are displayed.<br />
Time<br />
The Time of Day and date is displayed. You can set the date and time of your console through<br />
the Control Panel.<br />
HW Status<br />
This will tell you if your <strong>Palette</strong> hardware is either On-Line or Off-Line or whether or not the<br />
outputs are enabled. Use the Help drop down to view the Hardware Status dialog box to view<br />
your Hardware type, serial number, and what type of processor and what amount of memory<br />
your system has. The total number of channels your system is authorized for and other<br />
additional options, such as Remote Focus Unit or Remote Video authorization, is also shown<br />
<strong>Strand</strong> <strong>Lighting</strong><br />
p81
<strong>Palette</strong> <strong>OS</strong> v10<br />
here.<br />
Playbacks<br />
A display of playbacks real or virtual is displayed.<br />
See Also:<br />
File Menu (checkpoint files and mirrored saving)<br />
Hardware Setup - Grand Master and Black Out Button<br />
Load<br />
SMPTE Time Code on Cue Lists<br />
Enable Outputs - Recovery<br />
-o-<br />
<strong>Strand</strong> <strong>Lighting</strong><br />
p82
<strong>Palette</strong> <strong>OS</strong> v10<br />
Look Pages<br />
Looks are recorded and arranged on Pages. You can see the Look pages by selecting the Looks<br />
Display Display|Looks or pressing the [S5] Display softkey and select Looks from the pop-up list.<br />
Additionally, these pages may be laid out on your hardware's sliders (via Hardware Setup) so<br />
that you can quickly playback Looks live via Sub Masters.<br />
New show files have five Look Pages (Sub Page, Group, Position, Color and Other). You can<br />
add pages by right clicking in the Cue List Directory and selecting the Add Look Page.<br />
If you want to change the name or other properties of the Look Page, press [VIEW] [S11]<br />
then press [S1] to select the Look Page. You can repeatedly press [S1] to change the<br />
highlight in the list, or use the Wheel to scroll the list. Once you have highlighted the desired<br />
page, press [ENTER].<br />
<strong>Strand</strong> <strong>Lighting</strong><br />
p83
<strong>Palette</strong> <strong>OS</strong> v10<br />
You will then be presented with the Look Page Properties box:<br />
In this dialog box you can change the name of the page. The scroll list at the bottom of the<br />
window tells you what Looks are recorded on this page (double clicking on them does<br />
nothing).<br />
The Attributes button will open the Attribute Family Masking dialog box:<br />
By de-selecting different attribute families, these will not be recorded (by default) when you<br />
records Looks to this page. Therefore, if you wanted a whole bunch of Looks that only had<br />
Pan/Tilt information in them, you would de-select all but Position. Then each time you went to<br />
<strong>Strand</strong> <strong>Lighting</strong><br />
p84
<strong>Palette</strong> <strong>OS</strong> v10<br />
record a Look on this page, the Record dialog box would already be masking out (not<br />
recording) any attributes except Position attributes. This can be overridden in the Record<br />
dialog box at will.<br />
Note:<br />
o<br />
o<br />
If you double tap [S5] (or any other softkey), it will 'solo' Position. That is, all other<br />
check marks will clear and Position will remain checked.<br />
While in the main Properties dialog box, if you press [SHIFT], the Attribute button will<br />
look like this<br />
and the softkeys will change to the following:<br />
Pressing any of these changes the attribute masking without the need to open the Attribute<br />
dialog box. You can also press [SHIFT] and double tap any attribute family to solo it.<br />
See Also:<br />
Look<br />
Recording Looks<br />
Sub Master Types<br />
Recording and Using Groups<br />
Hardware Setup - Slider Panels<br />
Hardware Setup - Button Array<br />
-o-<br />
<strong>Strand</strong> <strong>Lighting</strong><br />
p85
<strong>Palette</strong> <strong>OS</strong> v10<br />
Macro Buttons<br />
Macro buttons are a method of setting Variables which, in turn, can either run macros or change<br />
variable values to either true or false.<br />
Variables can be thought of as a meeting place for different pieces of hardware and virtual<br />
console elements. Variable Pages can be 'hard patched' to Look Pages, Cue Lists or physical<br />
Button Stations in the show file. The Macro buttons are just one method of tying user buttons to<br />
Variable Pages for the purpose of seeing the variables' current values and to provide a method to<br />
change them.<br />
You can show virtual Macro Buttons by selecting Macro Buttons in the Display menu or by<br />
pressing [S5] from the main softkey menu and selecting from the pop up list.<br />
The combo box to the left shows which Variable Page the macros buttons are assigned to. If you<br />
have multiple Variable pages, use the mouse to choose which one you want to see. To operate a<br />
Macro Button, left click on it with the mouse or using the QWERTY keyboard, hold down ALT while<br />
pressing [F1] through [F12].<br />
To change the function of the macro buttons you must change the Variables it is tied to. Do this<br />
by accessing Variables in the Display menu or press the traffic light icon in the Cue List Directory<br />
Toolbar or press [S5] from the main softkey menu and select Variables from the pop up list:<br />
Select the desired Variable Page using the mouse, then use the Blue Box and [EDIT] to change<br />
<strong>Strand</strong> <strong>Lighting</strong><br />
p86
<strong>Palette</strong> <strong>OS</strong> v10<br />
any of the parameters of the variables. The name and the value of the variable (true or false or<br />
zero or none zero show as normal or pushed in) can be seen if the Variable Page is selected.<br />
Icons also show if a button is a radio, toggle or momentary button.<br />
Momentary Buttons<br />
If a variable's type is Momentary, the corresponding Macro Button will have a red 'mushroom'<br />
button icon. These buttons are only down as long as you have your finger on them. When it goes<br />
down, Button Down, Off Zero or Value Change actions will occur and the variable's value will<br />
change from zero to 1 or 100 (depending on what is patched to it). When you release your finger,<br />
the variable's value will return to zero and any Up Action or On Zero or Value Change actions will<br />
be executed.<br />
Toggle Buttons<br />
Toggle variables, denoted by a rocker switch, make the down action of a button stick. Pressing<br />
the button again, pops the button back up. Again, macros are fired on Button Down, Button Up<br />
and Value Change events where applicable.<br />
Radio Buttons<br />
Similar to an old car radio, only one radio button (or station) can be down (or tuned in) at a<br />
time. Pressing another button down, pops the current button up. The Variable display has a<br />
column called Radio Group. The text in these fields can be anything; as long as they match the<br />
variables are in the same group. You may have as many radio groups per Variable page as need<br />
be and buttons in each group will not affect buttons in other groups. Leaving the Radio Group<br />
field blank is also valid (i.e., any Radio Variable who has no text in this column will be part of the<br />
same radio group).<br />
To learn more about Macros and Variables, check out the topics below.<br />
See Also:<br />
Macro Editor<br />
Variables<br />
-o-<br />
<strong>Strand</strong> <strong>Lighting</strong><br />
p87
<strong>Palette</strong> <strong>OS</strong> v10<br />
View Properties<br />
Pressing [VIEW] button or [V] displays the View dialog box.<br />
When the dialog box opens, the Fixture tab is active allowing you to use the syntax [VIEW] [#]<br />
[ENTER] to see the properties of a specific channel.<br />
This is the method in which you get to View and Edit the Properties of almost anything on the<br />
console. You can navigate this box using the Softkeys and the display on the right hand side will<br />
change to allow you to further narrow your selection.<br />
When on the console, there are two very handy accelerators that speed you through this box. You<br />
can press [VIEW] [BUMP] or [VIEW] [SELECT] to directly open the Properties box for either a<br />
Look or a Cue List. You can also press [VIEW] [CUE] [#] [ENTER] rather than [VIEW] [S10] [#]<br />
[ENTER] to quickly see the properties of a specific cue. Similarly, [VIEW] [LOOK] [#] [ENTER]<br />
shows you the properties of the specified Look.<br />
see also:<br />
Channel Title<br />
Cue List Properties<br />
Cue Properties<br />
Sub Master Pages<br />
Looks<br />
-o-<br />
<strong>Strand</strong> <strong>Lighting</strong><br />
p88
<strong>Palette</strong> <strong>OS</strong> v10<br />
Remote Video<br />
If you install the <strong>Palette</strong> PC software on your personal computer (available from<br />
www.strandlighting.com), one of the START Menu options is to connect (using the Local Area<br />
Network) to a console to monitor your show. Once you launch the application using this shortcut,<br />
you will be presented with the Remote Video Connection dialog box:<br />
A list of recent IP addresses can be found by clicking on the down arrow in the combo box. If you<br />
don't the know the IP address of your console, hover over the Network button in the<br />
<strong>Palette</strong> Control Panel. The tooltip will show you the current IP address. By default, your <strong>Palette</strong><br />
allows five remote connections.<br />
The remote video connection does not allow you to Select or alter Channels or change Cue<br />
Properties, but it does allow you to independently view cues in Blind just by moving the Blue Box<br />
and you can display any cue list you wish to see which cues are active. The remote can chose to<br />
display Sub Masters, Macro Buttons, Tracksheets and position the splitters in any locations they<br />
want. Most toolbars and Softkeys are disabled:<br />
<strong>Strand</strong> <strong>Lighting</strong><br />
p89
<strong>Palette</strong> <strong>OS</strong> v10<br />
If the main system exits or re-loads a show file, the remote machine will be presented with a<br />
dialog box explaining that you must close and re-connect to the main system. You can also<br />
disconnect using the File|Disconnect Remote Video option to disconnect any time and/or connect<br />
to another system on your network.<br />
-o-<br />
<strong>Strand</strong> <strong>Lighting</strong><br />
p90
<strong>Palette</strong> <strong>OS</strong> v10<br />
Screen Layout<br />
The layout of the <strong>Palette</strong> screen is flexible and allows you to look at the information you need<br />
when you need it. When <strong>Palette</strong> starts, the screen is not a busy as this:<br />
To add or remove screen components, use the Display Menu or press [S5] to show the display<br />
popup list:<br />
<strong>Strand</strong> <strong>Lighting</strong><br />
p91
<strong>Palette</strong> <strong>OS</strong> v10<br />
As well, you can resize the Channel Grid by clicking or right clicking on the splitters.<br />
For more information on what areas of the screen do what, hover and/or click on the image<br />
above.<br />
-o-<br />
<strong>Strand</strong> <strong>Lighting</strong><br />
p92
<strong>Palette</strong> <strong>OS</strong> v10<br />
Console Buttons<br />
<strong>Strand</strong> <strong>Lighting</strong><br />
p93
<strong>Palette</strong> <strong>OS</strong> v10<br />
Display Keys<br />
Live Button<br />
PRESS Release TO CL<strong>OS</strong>E THIS BOX!<br />
LIVE Press [LIVE] to enter and exit the Live display.<br />
While in Live, the channel grid has a Black background.<br />
-o-<br />
<strong>Strand</strong> <strong>Lighting</strong><br />
p94
<strong>Palette</strong> <strong>OS</strong> v10<br />
Blind Button<br />
PRESS Release TO CL<strong>OS</strong>E THIS BOX!<br />
BLIND Press [BLIND] to enter and exit the Blind display.<br />
<br />
<br />
While in Blind, the channel grid has a Grey background and the<br />
Green LED You can also see the Blind button in the Channel Grid<br />
toolbar.<br />
While in Blind, moving the Blue Box will Load cues automatically for<br />
you.<br />
-o-<br />
<strong>Strand</strong> <strong>Lighting</strong><br />
p95
<strong>Palette</strong> <strong>OS</strong> v10<br />
Pacth Button<br />
PRESS Release TO CL<strong>OS</strong>E THIS BOX!<br />
PATCH Press [PATCH] to enter the Patch display.<br />
-o-<br />
<strong>Strand</strong> <strong>Lighting</strong><br />
p96
<strong>Palette</strong> <strong>OS</strong> v10<br />
Playback Keys<br />
Dead Black Out Button<br />
PRESS Release TO CL<strong>OS</strong>E THIS BOX!<br />
DBO-A<br />
DBO-B<br />
<br />
<br />
<br />
<br />
Use this button to black out the stage.<br />
This button can be configured to work as a momentary button, a<br />
toggle button or be disabled. Choose your preference using [S3]<br />
Hardware Setup<br />
The LED flashes when the GM slider is not at 100%. It flashes rapidly<br />
when the slider is at 0%.<br />
The current level of the Grand Master can be seen in the Status<br />
Bubbles<br />
-o-<br />
<strong>Strand</strong> <strong>Lighting</strong><br />
p97
<strong>Palette</strong> <strong>OS</strong> v10<br />
Go Button<br />
PRESS Release TO CL<strong>OS</strong>E THIS BOX!<br />
GO This button will do a GO on its cue list. (Note: The Select button<br />
does not have to be active (amber LED flashing))<br />
<br />
<br />
<br />
<br />
If a cue is running, the Green LED will be flashing.<br />
If you are sitting in a cue, the LED will be solid Green.<br />
Use with [SHIFT] to assert the current cue, grabbing full control of<br />
all its attributes without advancing the cue list.<br />
If the cue list is Releasing, both the GO and the HALT/BACK LEDs<br />
will be flashing. The release time can be set in the Cue List's<br />
Properties.<br />
-o-<br />
<strong>Strand</strong> <strong>Lighting</strong><br />
p98
<strong>Palette</strong> <strong>OS</strong> v10<br />
Goto Button<br />
PRESS Release TO CL<strong>OS</strong>E THIS BOX!<br />
GOTO Press [GOTO CUE] # ENTER to take the selected cue list to the<br />
desired cue.<br />
<br />
<br />
<br />
The Cue Number edit box will be pre-stuffed with the cue number of<br />
the blue highlighted cue.<br />
If desired, you can set a desired time for the cue to execute. The<br />
recorded time is the default time.<br />
If you move the Blue Box to the first column and press [EDIT], this is<br />
equivalent to doing a GOTO on that cue.<br />
-o-<br />
<strong>Strand</strong> <strong>Lighting</strong><br />
p99
<strong>Palette</strong> <strong>OS</strong> v10<br />
Select Button<br />
PRESS Release TO CL<strong>OS</strong>E THIS BOX!<br />
SELECT Press a Select button to determine which cue list cue will be written<br />
to by default when you record cues. The 'selected' cue list will have<br />
an Amber LED flashing.<br />
<br />
<br />
<br />
Pressing this button is the same as using the mouse to highlight a<br />
cue list in the cue list directory.<br />
To quickly record cues to a cue list (even if it is not the currently<br />
selected cue list) press [REC] then [SELECT]. The new cue will be<br />
appended to the end of the cue list and the current cue list selection<br />
will not change.<br />
Use with [VIEW] to get the properties on this Cue List.<br />
-o-<br />
<strong>Strand</strong> <strong>Lighting</strong><br />
p100
<strong>Palette</strong> <strong>OS</strong> v10<br />
Halt/Back Button<br />
PRESS Release TO CL<strong>OS</strong>E THIS BOX!<br />
HALT/BACK This button will Halt any running cues or follows on its cue list. You<br />
can tell if a cue is running because the Green LED on the GO button<br />
will be flashing.<br />
<br />
<br />
<br />
If a cue list is Halted (flashing Red LED), pressing this button again<br />
will back up the cue list.<br />
Hold down [SHIFT] and press this button to go back to the previous<br />
cue using cue time.<br />
If the cue list is Releasing, both the GO and the HALT/BACK LEDs will<br />
be flashing. The release time can be set in the Cue List's Properties.<br />
-o-<br />
<strong>Strand</strong> <strong>Lighting</strong><br />
p101
<strong>Palette</strong> <strong>OS</strong> v10<br />
Step Forward/Step<br />
Back Buttons<br />
PRESS Release TO CL<strong>OS</strong>E THIS BOX!<br />
<br />
<br />
<br />
<br />
See Also:<br />
Pressing the relevant button steps you through the Selected cue list<br />
using the Step-Time set in the properties of the cue list. (Press<br />
[VIEW] [SELECT])<br />
If the cue list is active ([GO] had been pressed at some point), the<br />
effect will be seen on stage. If it is not active, only the cue list<br />
pointer will move, awaiting a Go.<br />
Use with [SHIFT] to move to the top or bottom of the selected cue<br />
list.<br />
If a long cue is running and you want to quickly complete it, press<br />
[STEP DOWN]. The cue will complete in the Cue List's Step Time as<br />
determined by the Properties of the Cue List.<br />
Cue List Pointer<br />
-o-<br />
<strong>Strand</strong> <strong>Lighting</strong><br />
p102
<strong>Palette</strong> <strong>OS</strong> v10<br />
Release Playback<br />
PRESS Release TO CL<strong>OS</strong>E THIS BOX!<br />
REL-PB Pressing this button will release the cue list on the selected playback<br />
master. The cue pointer will remain at the current cue position,<br />
therefore pressing [GO] will put you back into the same state you<br />
were in before you hit [REL PB]<br />
<br />
Press [SHIFT]+[REL PB] to release all cue lists.<br />
-o-<br />
<strong>Strand</strong> <strong>Lighting</strong><br />
p103
<strong>Palette</strong> <strong>OS</strong> v10<br />
Recording Keys<br />
Record Button<br />
PRESS Release TO CL<strong>OS</strong>E THIS BOX!<br />
REC<br />
Recording Cues<br />
<br />
<br />
To record a cue, press the [REC] button. The record dialog box will open.<br />
A default cue number is entered and the cursor is waiting for you to<br />
enter a new one (if necessary). The [ENTER] key will close the dialog<br />
box and record the cue to the Selected Cue List.<br />
To quickly record to a different playback master, press [REC] then the<br />
desired [SELECT] key on the playback.<br />
Recording Looks<br />
<br />
<br />
<br />
To quickly record a Look, press [REC] then press a [BUMP] button.<br />
Press [REC] then press [LOOK], enter a number and press [ENTER].<br />
To record a group of fixtures, press [REC] then press [GROUP], enter a<br />
number and press [ENTER]. A Look will be recorded (including the<br />
levels). Using the [GROUP] button, you can bring back the selected<br />
fixtures and set them to any level using the WHEEL or the Keypad.<br />
Note: The Red LED will be on any time there is a change that has not been<br />
recorded.<br />
See Also:<br />
[UPDATE] button<br />
Hardware Setup - Slider Panels and Looks<br />
Show Options - Group Button<br />
-o-<br />
<strong>Strand</strong> <strong>Lighting</strong><br />
p104
<strong>Palette</strong> <strong>OS</strong> v10<br />
Update Button<br />
PRESS Release TO CL<strong>OS</strong>E THIS BOX!<br />
UPDATE When you make changes live, pressing the [UPDT] button will open<br />
the Update dialog box. Pressing [ENTER] will update the current cue<br />
with the changed levels.<br />
<br />
<br />
See Also:<br />
If you have changed tracking levels or palettes, you can select<br />
different items from the list to update (i.e., Track Back and <strong>Palette</strong><br />
Update)<br />
If you have used the [LOAD] button to load a Cue or Look, once you<br />
make the changes, press [UPDT] to store the changes and release<br />
any selected channels. You will not be able to use this button if you<br />
did not use All Attributes during your load operation.<br />
Record Button<br />
Updating Cues<br />
Load<br />
-o-<br />
<strong>Strand</strong> <strong>Lighting</strong><br />
p105
<strong>Palette</strong> <strong>OS</strong> v10<br />
Cue Button<br />
PRESS Release TO CL<strong>OS</strong>E THIS BOX!<br />
CUE After pressing [RECORD], you have the option to either record a Look<br />
or a Cue. Recording a Cue is the default, if you press [LOOK], but<br />
then decide you really wanted to record a cue, press this button.<br />
<br />
While in the command line, select the channels you want then type<br />
@ [CUE] # ENTER to open the Apply Levels dialog box to set<br />
attributes to their previously recorded level.<br />
Example: [1] [THRU] [4] [@] [Cue] [6] [Enter]<br />
See Also: Command Line Syntax<br />
-o-<br />
<strong>Strand</strong> <strong>Lighting</strong><br />
p106
<strong>Palette</strong> <strong>OS</strong> v10<br />
Group Button<br />
PRESS Release TO CL<strong>OS</strong>E THIS BOX!<br />
GROUP Press [GROUP] then # ENTER to put the channels in a particular<br />
Look on the wheel. Alternately you can set them to a level using the<br />
keypad. Example: [GROUP] [4] [@] [50] [ENTER]<br />
Press [REC] then [GROUP] then a number to record a Look. The<br />
current levels will be stored in the Look, but if you only want to use<br />
the selection (group), recall the Look using the group key.<br />
If you want traditional "Group at Level" functionality use [LOOK] [#]<br />
[ENTER] to retrieve both the selection set and the recorded<br />
attributes<br />
<br />
Go to Show Options to assign what Sub Master Page will be used<br />
when this button is pressed.<br />
See Also: Command Line Syntax<br />
-o-<br />
<strong>Strand</strong> <strong>Lighting</strong><br />
p107
<strong>Palette</strong> <strong>OS</strong> v10<br />
Look Button<br />
PRESS Release TO CL<strong>OS</strong>E THIS BOX!<br />
LOOK Press [LOOK] then # [ENTER] to put the channels in a particular<br />
Look at their recorded level.<br />
<br />
<br />
<br />
<br />
<br />
<br />
<br />
Alternately you can scale their level using the keypad by typing<br />
[LOOK] # @ Level [ENTER].<br />
Select desired channels then press [@] [LOOK] [#] [ENTER] to take<br />
selected channels to their level in specified Look and apply their<br />
values as a palette reference.<br />
Press [REC] then [LOOK] then a number to record a look.<br />
Press [LOOK] [#] [REC] to record a look.<br />
If your Slider Panel hardware is setup to control Looks (rather than<br />
channels), press [REC] then a bump button to quickly record a look<br />
to a master.<br />
Groups in <strong>Palette</strong> are stored as Looks, even if you don't use the<br />
levels.<br />
Go to Show Options to assign what Sub Master Page will be used<br />
when this button is pressed.<br />
See Also: Command Line Syntax<br />
-o-<br />
<strong>Strand</strong> <strong>Lighting</strong><br />
p108
<strong>Palette</strong> <strong>OS</strong> v10<br />
Action Keys<br />
Arrow Buttons<br />
PRESS Release TO CL<strong>OS</strong>E THIS BOX!<br />
<br />
<br />
<br />
<br />
<br />
<br />
<br />
The arrow keys move the Blue Box in the cue list, Time Events<br />
and Patch displays.<br />
To change a value, press the [EDIT] button.<br />
Holding down the [SHIFT] key and pressing the up or down arrows<br />
selects a range.<br />
Once a range is selected, typing in a new value will change all cells<br />
to that value.<br />
If you are editing a numeric column (like time), after pressing<br />
[EDIT] you can use the WHEEL to change the values. If multiple<br />
cells are selected, the values will change relative to each other. In<br />
the example below, if you used the WHEEL to change the '3' to a<br />
'4', the '2' would change to a '3' and the '1' would change to a '2'.<br />
Holding down [SHIFT] while rolling the WHEEL on any numeric field<br />
will change the value by 0.1.<br />
While in [BLIND], moving the Blue Box with the Arrow keys<br />
automatically [LOADS] cues. You can tell which cue list loaded by<br />
looking to the Status Bubbles.<br />
-o-<br />
<strong>Strand</strong> <strong>Lighting</strong><br />
p109
<strong>Palette</strong> <strong>OS</strong> v10<br />
Delete Button<br />
PRESS Release TO CL<strong>OS</strong>E THIS BOX!<br />
DELETE Use this button to delete cues. Highlight the desired cue (or cues)<br />
with the Blue Box using the ARROW KEYS then press this button.<br />
You can also type in a range in the Delete Cue dialog box (i.e 1/10)<br />
<br />
To delete a Look, press [VIEW] [BUMP] then select [S10] Delete.<br />
-o-<br />
<strong>Strand</strong> <strong>Lighting</strong><br />
p110
<strong>Palette</strong> <strong>OS</strong> v10<br />
Edit Button<br />
PRESS Release TO CL<strong>OS</strong>E THIS BOX!<br />
EDIT Pressing this button allows you to change the highlighted cells in the cue<br />
list (times, labels, follows etc.), Time Events or Patch displays. Move the<br />
blue highlighted cells using the Arrow Keys.<br />
<br />
<br />
<br />
<br />
If a range is selected, typing in a new value will change all cells to that<br />
value.<br />
If you are editing a numeric column (like time), after pressing EDIT you<br />
can use the WHEEL to change the values. If multiple cells are selected, the<br />
values will change relative to each other. In the example below, if you<br />
used the WHEEL to change the '3' to a '4', the '2' would change to a '3'<br />
and the '1' would change to a '2'.<br />
If you highlight cells in the Action column in the Cue List or Settings<br />
column in the Patch, a dialog box will open allowing you to change one or<br />
more properties at once.<br />
Holding down SHIFT while rolling the WHEEL while editing cells will<br />
change numeric values by 0.1.<br />
-o-<br />
<strong>Strand</strong> <strong>Lighting</strong><br />
p111
<strong>Palette</strong> <strong>OS</strong> v10<br />
Load Button<br />
PRESS Release TO CL<strong>OS</strong>E THIS BOX!<br />
LOAD Press [LOAD] then the desired Cue number to load a cue. The status<br />
window will tell you what is loaded. The Cue Number edit box will be<br />
pre-stuffed with the cue number from where the Blue Box is sitting.<br />
<br />
<br />
<br />
<br />
<br />
<br />
<br />
Press [S5] to load the entire State of the cue (all the cumulative<br />
levels that got you to the look on stage at that point in the cue list).<br />
Edit the cue by changing levels, adding channels or releasing<br />
channels.<br />
Either press [UPDT] to Update the Loaded cue or press [REC] to<br />
record it as a new Cue or Look.<br />
Press [LOAD] [LOOK] then the desired Look number to load a Look<br />
for editing.<br />
Press [LOAD] [BUMP] to quickly load a Look for editing.<br />
In BLIND, the Clear On Load check box will clear any channels that<br />
are Captured and anything that is already Loaded as shown in the<br />
Loaded Bubble.<br />
You can Load more than one item at once to combine ideas. The first<br />
thing loaded will be Updated.<br />
-o-<br />
<strong>Strand</strong> <strong>Lighting</strong><br />
p112
<strong>Palette</strong> <strong>OS</strong> v10<br />
Move / Copy Buttons<br />
PRESS Release TO CL<strong>OS</strong>E THIS BOX!<br />
MOVE<br />
COPY<br />
The [COPY] button<br />
<br />
<br />
<br />
<br />
<br />
<br />
Use [#] [COPY] [#] [ENTER] to copy attributes from one channel to<br />
another. Attribute filtering can be applied once the dialog box is<br />
open.<br />
Highlight the cues you want to copy with the Blue Box then press<br />
[COPY] [CUE] [NUMBER] [ENTER] to copy the selected cue(s) to new<br />
cue(s).<br />
Press [COPY] [LOOK] to open the Copy Look Dialog box.<br />
Use [COPY] [BUMP] [BUMP] to copy one Look to another.<br />
[COPY] [5X5] [5X5] to move palettes around on the optional Button<br />
Array<br />
[COPY] [5X5] [BUMP] to copy a palette to a Sub Master<br />
The [MOVE] button<br />
<br />
<br />
<br />
<br />
<br />
<br />
Although you can move cues from one Cue List to another, while<br />
working in one cue list, moving cues is essentially renumber cues.<br />
Highlight the cues you want to renumber with the Blue Box then<br />
press [SHIFT]+[MOVE] [CUE] [NUMBER] [ENTER] to renumber the<br />
selected cue(s) to new cue(s).<br />
While the Move dialog box is open, you can also select a new<br />
numbering scheme.<br />
Press [MOVE] [LOOK][#] [@] [#] [ENTER] to move Looks.<br />
Press [MOVE] [BUMP][BUMP] to quickly move Looks.<br />
Use [#] [MOVE] [#] [ENTER] to move attributes from one channel to<br />
another. Attribute filtering is available in the dialog box.<br />
[MOVE] [5X5] [5X5] to move palettes around on the optional Button<br />
Array<br />
-o-<br />
<strong>Strand</strong> <strong>Lighting</strong><br />
p113
<strong>Palette</strong> <strong>OS</strong> v10<br />
Tools Button<br />
PRESS Release TO CL<strong>OS</strong>E THIS BOX!<br />
TOOLS The sofkeys display which tools are available when you press<br />
[SHIFT]+ [TOOLS].<br />
See Also:<br />
Tools<br />
<br />
Pressing Tools will toggle the Selected Tool Onand Off. The last Tool<br />
used is displayed in the Status Bubbles.<br />
-o-<br />
<strong>Strand</strong> <strong>Lighting</strong><br />
p114
<strong>Palette</strong> <strong>OS</strong> v10<br />
View Button<br />
PRESS Release TO CL<strong>OS</strong>E THIS BOX!<br />
VIEW Opens the View Properties dialog box to select properties of Cues,<br />
Looks, Cue Lists etc.<br />
<br />
<br />
<br />
<br />
Press [VIEW] [#] [ENTER] to see a channel's title dialog box.<br />
Press [VIEW] [LOOK] [#] [ENTER] to see a Look's properties box.<br />
Press [VIEW] [BUMP] to quickly get the Look's properties box<br />
Press [VIEW] [SELECT] to get a Cue List's properties.<br />
-o-<br />
<strong>Strand</strong> <strong>Lighting</strong><br />
p115
<strong>Palette</strong> <strong>OS</strong> v10<br />
Main Keys<br />
Plus, Minus, At, Full,<br />
Out buttons<br />
PRESS Release TO CL<strong>OS</strong>E THIS BOX!<br />
<br />
<br />
<br />
<br />
<br />
<br />
[FULL] and [OUT] will set the level of selected channels<br />
without having to press [ENTER] (The default Full value is<br />
set in Show Options)<br />
When editing with the Blue Box split up/down times<br />
, use [FULL] to highlight the Wait time (start of<br />
line) and [OUT] to edit the Fade time (end of line).<br />
Use [FULL] and [OUT] in dialog box edit boxes or combo<br />
boxes to take the value to its upper or lower limit<br />
Use the [/] key to select a range of channels or to specify<br />
WAIT/FADE times in any time field.<br />
Use the [-] key to remove channels from a range or to put<br />
the word TO on the command line for specifying ranges of<br />
levels or times across a series of channels.<br />
Use the [BACKSPACE] key to clear the command line and<br />
deselect the selected channels to reveal the default Soft<br />
Keys<br />
-o-<br />
<strong>Strand</strong> <strong>Lighting</strong><br />
p116
<strong>Palette</strong> <strong>OS</strong> v10<br />
Previous/Next Buttons<br />
PRESS Release TO CL<strong>OS</strong>E THIS BOX!<br />
NEXT<br />
PREV<br />
See Also:<br />
Select Softkeys<br />
<br />
<br />
<br />
<br />
Press the [Next] button to select the next channel<br />
Press the [Prev] button to select the last channel<br />
The QWERTY keyboard equivalent is TAB<br />
In dialog boxes:<br />
o Press [Next] button to go to the next control<br />
o Press [Prev] button to go to the previous control<br />
-o-<br />
<strong>Strand</strong> <strong>Lighting</strong><br />
p117
<strong>Palette</strong> <strong>OS</strong> v10<br />
Number Buttons<br />
PRESS Release TO CL<strong>OS</strong>E THIS BOX!<br />
<br />
<br />
<br />
<br />
See Also:<br />
By default, typing on an empty Command Line, these buttons will<br />
select Channels.<br />
Use in conjunction with the other keys (+, -, Thru etc.) close to<br />
these to select ranges of Channels.<br />
While in dialog boxes, these keys fill in numeric fields.<br />
To change cue times, use these buttons in conjunction with the<br />
Arrow Keys and the [EDIT] button.<br />
Command Line Syntax<br />
-o-<br />
<strong>Strand</strong> <strong>Lighting</strong><br />
p118
<strong>Palette</strong> <strong>OS</strong> v10<br />
Undo/Release Button<br />
PRESS Release TO CL<strong>OS</strong>E THIS BOX!<br />
RELEASE<br />
UNDO<br />
<br />
<br />
<br />
<br />
<br />
<br />
<br />
Note:<br />
<br />
<br />
<br />
The Undo Key is also marked as Release on some consoles and is<br />
one of the most useful buttons on the console. It can be used in two<br />
ways.<br />
Pressing the Undo key results in UNDO appearing on the command<br />
line.<br />
Once Undo has been entered, you can press:<br />
[UNDO][@] : This undoes the last level change. You can also Undo<br />
individuaal Attributes, such as Pan, Tilt....<br />
[UNDO][RECORD]Record = Undo Record : This reverses the last<br />
record action. Hndy if you accidentally over recorded a cue by<br />
mistake.<br />
[UNDO][UNDO] + RELEASE to release all selected channels.<br />
Press [SHIFT] + [UNDO] to bring back previously released items.<br />
If a dialog box is open, the LED is flashing. Pressing [UNDO] will<br />
close the dialog box without changes being committed.<br />
If channels are selected, the LED is flashing.<br />
If channels have been changed but are not selected, the LED will<br />
flash in a stepped pattern.<br />
See Also:<br />
Release<br />
Hardware Setup - Console (<br />
-o-<br />
<strong>Strand</strong> <strong>Lighting</strong><br />
p119
<strong>Palette</strong> <strong>OS</strong> v10<br />
Rem-Dim Button<br />
PRESS Release TO CL<strong>OS</strong>E THIS BOX!<br />
REM-DIM Press [Rem-Dim] with channels selected will result in all c hannels<br />
other than those selected going to Zero, excluding those from<br />
submasters.<br />
<br />
Double Pressing [Rem - Dim] takes all channels to Zero inc luding<br />
those from submasters.<br />
-o-<br />
<strong>Strand</strong> <strong>Lighting</strong><br />
p120
<strong>Palette</strong> <strong>OS</strong> v10<br />
Shift Button<br />
PRESS Release TO CL<strong>OS</strong>E THIS BOX!<br />
SHIFT Use with [UNDO] to restore previously released channel. (Note: if<br />
Last Action Editing is on, [SHIFT] + [UNDO] will fully release any<br />
captured attributes.<br />
<br />
<br />
<br />
<br />
<br />
<br />
<br />
<br />
<br />
<br />
<br />
<br />
<br />
<br />
<br />
<br />
Use with [REL PB] to release all cue lists.<br />
Use with [EDIT] to enter the Times Display.<br />
Use with [STEP UP/DN] buttons to go to the top or bottom of a cue<br />
list.<br />
Use with [ARROW KEYS] to select a range of cells with the Blue Box.<br />
Use with [PREV NEXT] to select the previous channelto the current<br />
one -or - ...<br />
Use with [PREV NEXT] in dialog boxes to move the focus of the<br />
current control.<br />
Use with [GOTO CUE] to open the Goto Cue dialog.<br />
Use with [GO] to assert the appropriate cue list.<br />
Use with [BACK] to go to the previous cue in cue time.<br />
Use with [MOVE COPY] to renumber cues or move Looks.<br />
Use with [UP/DOWN] to adjust the selected channels level by one<br />
percent.<br />
Use with Split Crossfaders or Single Crossfaders (A/B C/D fader setup<br />
under [S3] Hardware Setup) to manually move backwards through a<br />
cue list.<br />
When the command line is empty, holding down [SHIFT] and rolling<br />
the wheel will scroll the channel grid.<br />
Use after pressing [REC] and before pressing [BUMP] or [SELECT] or<br />
[5X5] to keep Record dialog box open for labeling or attribute<br />
masking.<br />
Use with [THRU] for [Thru-On] syntax<br />
When moving lights are selected, hold down [SHIFT] while double<br />
pressing [S1] through [S4] to add an Effect to the corresponding<br />
attribute<br />
-o-<br />
<strong>Strand</strong> <strong>Lighting</strong><br />
p121
<strong>Palette</strong> <strong>OS</strong> v10<br />
Soft Keys<br />
PRESS Release TO CL<strong>OS</strong>E THIS BOX!<br />
S1 The Softkeys are context sensitive to what you are doing always giving you less than a dozen<br />
choices at any stage of operation. You can always see what each button will do by reading the<br />
bubbles at the bottom of the screen.<br />
The highlighted softkey's LED will blink showing you what control currently has focus.<br />
When no dialog boxes are open or no moving lights are selected, the softkeys give additional<br />
functionality that is not available with the hard buttons on the console:<br />
If a moving light is selected, the softkeys may look like this:<br />
To show the default softkeys, press Backspace to deselect the selected moving lights.<br />
When a dialog box is open, the softkeys are used to jump to specific controls (lists, check boxes<br />
etc.). These would be the softkeys when the Record Cue dialog box is open:<br />
See Also:<br />
Softkeys Described<br />
Keyboard Shortcuts<br />
Select Softkeys<br />
Command Line Syntax<br />
Controlling Moving Lights<br />
-o-<br />
<strong>Strand</strong> <strong>Lighting</strong><br />
p122
<strong>Palette</strong> <strong>OS</strong> v10<br />
Up / Down Buttons<br />
PRESS Release TO CL<strong>OS</strong>E THIS BOX!<br />
UP Use these buttons to raise or lower the selected channels' intensity<br />
by the pre-determined level in [S2] Show Options.<br />
<br />
<br />
Use with [SHIFT] to move the selected channel one percentage point.<br />
In dialog boxes, these buttons will raise or lower number boxes by<br />
pre-determined levels (cue number by 10, time by 10)<br />
-o-<br />
<strong>Strand</strong> <strong>Lighting</strong><br />
p123
<strong>Palette</strong> <strong>OS</strong> v10<br />
Programming and Viewing Fixtures<br />
Channel Colours and<br />
Symbols<br />
<strong>Palette</strong>'s Channel and Attribute Grids use colour and graphics to help identify the status of<br />
Channel levels or attributes values. To understand the terminology in this section, make sure to<br />
read the topic called Channel's different states. It also helps to understand the information in the<br />
topic called Record Options.<br />
or<br />
A red outline or grey background shows that the channel has been selected (either with the<br />
mouse, the keypad or the Button Array). Running cues may in fact still change the level of the<br />
Channel until you alter the Channel with the wheel or the keypad. This is why selected channels<br />
are not necessarily Captured. The yellow pipe on the right hand side shows the current level.<br />
or<br />
A red outline filled in with a white level and a white triangle (delta symbol) or red text, red<br />
triangle on a grey background indicates selected channels that you have Changed and effectively<br />
Captured their values. These changes are marked to be recorded or updated.<br />
or<br />
o r<br />
A red outline filled in with purple level text and a white triangle (delta symbol) or purple text with<br />
a white triangle or cyan text with a white triangle indicates intensity levels after using the [1]<br />
[@] [ENTER] syntax to remove hard commands (knockout). These changes are marked to be<br />
recorded or updated.<br />
or<br />
A red level with a red or white triangle (delta symbol) indicates that you have changed the value<br />
but it is currently not Selected and has not been recorded yet. It is Captured.<br />
<strong>Strand</strong> <strong>Lighting</strong><br />
p124
<strong>Palette</strong> <strong>OS</strong> v10<br />
or<br />
or<br />
A time value with either the "s" indicator or the MM:SS syntax shows that you have changed an<br />
Independent Timing value and you are in the Times Display.<br />
or<br />
Just a red value indicates that the channel's attribute is Captured (probably just recorded but not<br />
released).<br />
A yellow level with a flash symbol indicates that the Channel's intensity is currently under control<br />
of the Flash Channel or Lowlight tool.<br />
Blue levels represent Channel levels that have moved up or are moving up in the active cue.<br />
Green levels represent Channel levels that have moved down or are moving down in the active<br />
cue.<br />
Blue triangle with a "C" to the right of a level in the Channel Grid show intensities that are<br />
referencing another cue. These are set using the [@] [CUE] syntax.<br />
Blue triangle with a "L" to the right of a level in the Channel Grid show intensities that are<br />
referencing a look. These are set using the [@] [LOOK] syntax.<br />
Attributes with text and a double green arrow show that the attribute has changed since the last<br />
cue. The text could be 'hard' values or the name of a palette.<br />
<strong>Strand</strong> <strong>Lighting</strong><br />
p125
<strong>Palette</strong> <strong>OS</strong> v10<br />
~ ~<br />
Attributes with text surrounded with tildes (~) and a double green arrow show that the attribute<br />
is moving towards a new value (i.e., the cue is running) The text could be 'hard' values or the<br />
name of a palette.<br />
Attributes followed by a circle with a slash through it show that the specified palette reference is<br />
empty. The attribute will not move when the cue is initiated so the output value will track<br />
although the palette name will appear in the attribute grid.<br />
Attributes followed by a double black arrow show that the specified palette reference includes a<br />
nested 'circular' reference that cannot be resolved.<br />
or<br />
Magenta levels with the circular symbol (or 'hole') represent Channel levels that did not change (<br />
Tracked) from the last cue. That means that there is no information in the current cue for that<br />
attribute.<br />
or<br />
Magenta levels with the white block symbol represent Channel levels that did not change from<br />
the last cue but had redundant cue information (i.e. a hard level in the current cue the same as<br />
the tracking level).<br />
Magenta levels with the green/magenta symbol represent intensity levels that did not change<br />
(Tracked) from the last cue but moving light attributes did change.<br />
or<br />
Dark background or blue text shows that the level is being controlled by a cue list that is not<br />
currently Selected. Check out the topic called Multiple Cue List Concept.<br />
or<br />
Yellow levels with a green handle symbol represent Channels controlled by an Additive Sub<br />
<strong>Strand</strong> <strong>Lighting</strong><br />
p126
<strong>Palette</strong> <strong>OS</strong> v10<br />
Master or Channel Master.<br />
A red border round the intensity represent Channels being inhibited by an Inhibitive Sub Master,<br />
a Playback Master or Grand Master.<br />
A red triangle next to a channel number indicates this is showing the specified moving light's<br />
intensity level. The intensity level is mirrored in the Attribute Grid below the Channel Grid along<br />
with all the channel's other attributes.<br />
Grey backgrounds on attributes show available attributes for the selected channel. Some<br />
channels may not have all attributes. In this case, there are channels patched in the show that<br />
do have Color Wheels and multiple Gobo Wheels, but the selected VL1000 does not.<br />
-o-<br />
<strong>Strand</strong> <strong>Lighting</strong><br />
p127
<strong>Palette</strong> <strong>OS</strong> v10<br />
Command Line Syntax<br />
<strong>Palette</strong> does not have Channel, Fixture or Spot buttons. Typing numbers alone will select<br />
channelss. If the command line is clear and you press [1], it will appear like this:<br />
Keywords that appear on the command line include Look, Group and Cue, but these will only<br />
appear when you press the [LOOK], [GROUP] or [CUE] buttons. Their syntax is described below.<br />
For the selection of channels, <strong>Palette</strong> can use the com mon 500 series Single and Double Digit<br />
syntax or the Lightpalette command line or Enter syntax. Intensity levels are expressed in<br />
percentages and assigned to selected fixtures with the [@] key. (More on level setting below.)<br />
The command line is not executed until you press enter, although <strong>Palette</strong> will select the channels<br />
as you type on the command line and before you press [ENTER].<br />
For example, if you typed [1] [THRU] [10], when you press [THRU], channel 1 is Selected (not<br />
Captured. For information of what that means, check out the topic called Channels' different<br />
states). If you were to type [1] [+] [2] [+] [3], each time you press [+], the channels preceding<br />
it will be selected.<br />
This is important to understand for when you are backspacing on the command line and channels<br />
become de-selected. For example, if you typed [1] [+] [10] [+] [100] [+] then started using the<br />
backspace key to correct yourself, the first [BKSP] would delete the last [+], but the next would<br />
de-select Channel 100 (not remove the last zero of the 100, making it 10). The next [BKSP]<br />
would delete the next [+] and the next would de-select Channel 10, etc.<br />
Also see the topic Recording Cues to see how to use the command line to record cues (i.e. [Cue]<br />
[1] [REC]).<br />
The following are some examples of how to use the command line. These examples assume that<br />
the console is setup in the Hardware Setup - Console dialog box to use the ENTER SYNTAX.<br />
Selecting Fixtures<br />
You can select and set levels on one line (see Setting Levels below), or you can make multiple<br />
selections pressing [ENTER] multiple times (i.e., [1] [ENTER] [2] [ENTER]). As long as you don't<br />
set an attribute, the selection set will grow. Once you change a level, a new selection set will<br />
automatically be created and the previous selection set will be de-selected, but remain Captured.<br />
[1] [ENTER] Selects channel 1<br />
[1] [+] [2] [ENTER] Selects channel 1 and 2<br />
[1] [THRU] [10] [ENTER] Selects channels 1 through 10<br />
[1] [THRU] [4] [+] [6] [THRU] [10] [ENTER] Selects channels 1 through 4 and 6 through 10<br />
[1] [THRU] [10] [-] [5] [ENTER] Selects channels 1 through 4 and 6 through 10<br />
[1] [THRU] [10] [-] [5] [-] [6] [ENTER] Selects channels 1 through 4 and 7 through 10<br />
[1] [THRU] [10] [-] [5] [THRU] ][8] [ENTER] Selects channels 1 through 4 and 9 and 10<br />
[1] [SHIFT] [THRU] [100] [ENTER] Selects any channel with an intensity greater<br />
than 0% between channels 1 and 100 (thru-on)<br />
[1] [NEXT] [NEXT] [NEXT] Selects channels 1 through 4<br />
<strong>Strand</strong> <strong>Lighting</strong><br />
p128
<strong>Palette</strong> <strong>OS</strong> v10<br />
[4] [PREV] [PREV] [PREV] Selects channels 1 through 4<br />
After selecting channels, you can roll the Wheel to adjust the level. If you hold down [SHIFT]<br />
while rolling the wheel, the level will change in finer steps (for example, when changing 8-bit<br />
intensities, it will change in decimal steps from 0 to 255, but in other cases it may be different).<br />
It is also important to know the order in which you select channels is preserved when recording<br />
group which makes a big difference for Fanning and Effects.<br />
Setting Levels<br />
You can set levels before or after you press [ENTER]. By default, Intensity Levels are depicted in<br />
percent. They can also be entered in Decimal if you precede the value by the decimal point [.].<br />
[1] [@] [55] [ENTER] Selects channel 1 and sets it to 55%<br />
[1] [@] [50] [ENTER] Selects channel 1 and sets it to 50%<br />
[1] [@] [5] [ENTER] Selects channel 1 and sets it to 50% (Note:<br />
after typing an [@], you don't need the zero in<br />
50)<br />
[1] [@] [05] [ENTER] Selects channel 1 and sets it to 5%<br />
[1] [@] [.] [127] [ENTER] Selects channel 1 and sets it to 50% or 127<br />
Decimal (Note: the [.] key puts the word<br />
Decimal on the command line)<br />
[1] [@] [FULL] [ENTER] Selects channel 1 and sets it to 100%<br />
[1] [@] [FULL] Selects channel 1 and sets it to 100%<br />
[1] [@] [@] Selects channel 1 and sets it to 100%<br />
[1] [FULL] Selects channel 1 and sets it to 100%<br />
[1] [OUT] Selects channel 1 and sets it to 0%<br />
[1] [SHIFT] [THRU] [10] [@] [5] [ENTER] Selects any channel that has a none-zero<br />
intensity between channels 1 and 10 and sets<br />
their level to 50% (thru-on)<br />
[1] [@] [+] [50] [ENTER] Selects channel 1 and raises its level 50%<br />
(Note: you must type [50], not [5])<br />
[1] [THRU] [10] [@] [-] [5] [ENTER] Selects channels 1 through 10 and lowers their<br />
levels 5%<br />
[1] [UP] Selects channel 1 and raises its level 10% (as<br />
determined in Show Options)<br />
[1] [THRU] [10] [DOWN] Selects channels 1 through 10 and lowers their<br />
levels 10%<br />
[1] [@] [50] [@] [5] [ENTER] Selects channel 1 and fades it to 50% over 5<br />
seconds<br />
<strong>Strand</strong> <strong>Lighting</strong><br />
(NOTE: you may want to stop reading here if<br />
you are not interesting in advanced command<br />
line support and Independent Timing)<br />
[1] [THRU] [10] [@] [1] [-] [10] [ENTER] Selects channels 1 through 10 and sets their<br />
levels to 1,2,3,4,5,6,7,8,9,10<br />
[1] [THRU] [10] [@] [1] [-] [10] [@] [10] Selects channels 1 through 10 and sets their<br />
p129
<strong>Palette</strong> <strong>OS</strong> v10<br />
[ENTER]<br />
[1] [THRU] [10] [@] [50][@] [1] [-] [10]<br />
[ENTER]<br />
[1] [THRU] [10] [@] [50] [@] [1] [-] [10] [/]<br />
[10] [-] [1] [ENTER]<br />
levels to 1,2,3,4,5,6,7,8,9,10 over 10 seconds<br />
Selects channels 1 through 10 and sets their<br />
levels to 50%. channel 1 will reach 50% in<br />
1second; channel 5 will reach 50% in 5 seconds<br />
and channel 10 will reach 50% in 10 seconds<br />
Selects channels 1 through 10 and sets their<br />
levels to 50 over 11 seconds. channel 1 will wait<br />
1 second before fading over 10 seconds and<br />
channel 10 will wait 10 seconds before fading<br />
for 1 second to 50%<br />
[1] [@] [ENTER] Removes the hard intensity value (knocks out)<br />
on channel 1. You may see a purple (tracking<br />
color) level and a white triangle (delta symbol).<br />
You will either need to Re-record the cue or<br />
Update it for the changes to stick.<br />
Note that the [@] [+] and [@] [-] keys put the words Up and Down on the command line. When<br />
controlling moving light attributes the [+] key puts the word Relative on the command line<br />
whereby you can then enter positive or negative number to adjust multiple channels, all having<br />
different values, by the same amount. See Moving Lights below. Even after explicitly typing<br />
levels, you can roll the Wheel to adjust levels as described above.<br />
Release Levels (Sneak)<br />
If you want to release a channel and all of its attributes, but don't want it to im mediately return<br />
to its playback level, use the command line syntax [SHIFT][@]. For example, [1] [SHIFT][@] [5]<br />
will release channel 1 and any of its captured attributes over 5 seconds. See also Captured In and<br />
Release Time in Hardware Setup - A/B C/D. Also see Independent Timing for setting wait and<br />
fade times on a per attribute basis for recording.<br />
Selecting Groups<br />
Group selection is used to select 'like' channels. It is a handy method of organizing your rig such<br />
that you can address large section of it quickly. In <strong>Palette</strong>, you don't record Groups; you record<br />
Looks and use the Group Button to bring back the selection of channels used in that Look. Check<br />
out the topic called Recording and Using Groups to see how to make Groups. The Look Page that<br />
the Group button references is specified in Show Options. See Mixing Groups and channels below<br />
too.<br />
[GROUP] [1] [ENTER] Selects the channels recorded in Look 1<br />
[GROUP] [1] [FULL]<br />
<strong>Strand</strong> <strong>Lighting</strong><br />
Sets all intensity attributes of the channels in<br />
Look 1 to 100%<br />
[GROUP] [1] [+] [GROUP] [2] [ENTER] Selects the channels in Look 1 and Look 2<br />
[GROUP] [1] [@] [5] [ENTER]<br />
[GROUP] [1] [-] [GROUP] [2] [ENTER]<br />
Selects the channels in Look 1 and sets their<br />
intensities to 50%<br />
Selects the all channels in Look 1 less any of<br />
those in Look 1 that also belong to Look 2<br />
The order in which you select channels in the command line while recording groups is retained<br />
and used for the [-] (or [TO]) syntax shown below and for Fanning.<br />
p130
<strong>Palette</strong> <strong>OS</strong> v10<br />
For traditional "Group @ Level" syntax see Using Looks below.<br />
Mixing Groups and Channels<br />
You can build selection sets from a combination of both groups and channels.<br />
Note:<br />
As there is no Channel or Fixture button, make sure you press [GROUP] each time you want to<br />
specify a Group.<br />
[GROUP] [1] [+] [20] [ENTER] Selects all channels in Look 1 and channel 20<br />
[GROUP] [1] [-] [5] [ENTER]<br />
Selects all channels in Look 1 and de-selects<br />
channel 5<br />
[1] [+] [GROUP] [8] [ENTER] Selects channel 1 and all channels in Look 8<br />
[1] [THRU] [5] [+] [GROUP] [8] [@] [5]<br />
[ENTER]<br />
Selects channels 1 through 5 and all channels in<br />
Look 8 and puts them all to 50%<br />
Using Looks<br />
Looks are complete recorded channel selections and their attributes. You can use recorded Looks<br />
to bring back a group of channels to a desired level, or extend them to include moving light<br />
attributes as well. Check out the topic Recording Looks to see the Look record options and how<br />
you can filter different attribute families when recording Looks. The Look Page that the Look<br />
button references is specified in Show Options.<br />
[LOOK] [1] [ENTER]<br />
[LOOK] [1] [@] [FULL] [ENTER]<br />
[LOOK] [1] [@] [50] [ENTER]<br />
Selects all the channels in Look 1 and puts all of<br />
their attributes to their recorded level<br />
Selects all the channels in Look 1 and puts all of<br />
their attributes to their recorded level<br />
Selects all the channels in Look 1 and puts all of<br />
their attributes to their recorded level, but<br />
scales the intensity attributes by 50%<br />
[1] [@] [LOOK] [5] [ENTER] Selects channel 1 and opens the Apply Levels<br />
dialog box to the Look tab allowing you to set<br />
channel 1's levels to the recorded level in Look<br />
5. You can either set the levels as raw numbers<br />
or as a palette reference based on the Apply As<br />
<strong>Palette</strong> check box in the dialog box. If you apply<br />
as a palette, the levels will be marked with a<br />
blue triangle with an "L" in it.<br />
[GROUP] [1] [@] [LOOK] [5] [ENTER]<br />
Selects all the channels recorded in Look 1 and<br />
opens the Apply Levels dialog box, open to the<br />
Look tab allowing you to set their attributes as<br />
recorded in Look 5.<br />
Cue Button and the Command Line<br />
The Cue button is used to capture a set of channels from a particular cue and set them to their<br />
<strong>Strand</strong> <strong>Lighting</strong><br />
p131
<strong>Palette</strong> <strong>OS</strong> v10<br />
recorded level.<br />
Note:<br />
Un-Shifted, the button is the Cue button. Holding down [SHIFT] while pressing this button opens<br />
the Goto Cue dialog box.<br />
[CUE] [10] [ENTER]<br />
[CUE] [10] [@] [50] [ENTER]<br />
Selects the channels recorded in Cue 10 and<br />
puts all of their attributes to their recorded<br />
level. This may not necessarily be the total<br />
cumulative look of Cue 10, it is only the<br />
channels that are in Cue 10 with the attributes<br />
recorded in Cue 10. If you want the cumulative<br />
look of Cue 10, Load Cue 10 and check the<br />
STATE checkbox.<br />
Selects all the channels recorded in Cue 10 and<br />
puts all of their attributes to their recorded level<br />
(not their tracking level), and scales their<br />
intensity attributes by 50%<br />
[1] [THRU] [5] [@] [CUE] [10] [ENTER] Selects channels 1 through 5 and puts ALL of<br />
their attributes to the level they were recorded<br />
at in Cue 10. The Apply Levels dialog box will<br />
open and you can choose to put in raw data or<br />
reference Cue 10 as a palette. Doing so would<br />
mean that if you record these values in a new<br />
cue, that cue's affect would change if Cue 10<br />
were to change. When you do this, the levels<br />
will be marked with a blue triangle with a "C" in<br />
it.<br />
If you precede the command line with either [CUE], [LOOK] or [GROUP] the Softkeys change to<br />
give you additional methods of manipulating and/or recording items.<br />
[CUE] [1] [REC]<br />
Records Cue 1 in the selected cue list using<br />
default times and no label.<br />
[CUE] [1] [S9] [6] [REC] Records Cue 1 in the selected cue list using a 6<br />
second Cue Time.<br />
[CUE] [1] [S9] [6] [/] [10] [REC] Records Cue 1 in the selected cue list using a 6<br />
second Up Time and a 10 second Down Time.<br />
[CUE] [10] [S9] [6] [ENTER]<br />
[CUE] [10] [S5] Blocks Cue 10.<br />
Changes Cue 10's fade time to 6 seconds.<br />
<strong>Strand</strong> <strong>Lighting</strong><br />
Moving Light Softkeys<br />
When moving lights are selected, [S5] through [S9] are used to control the function of [S1]<br />
through [S4]. For more information on this functionality, check out the topic Controlling Moving<br />
Lights. If you are in the Levels display and type in the command line, pressing any of [S5]<br />
through [S9] after pressing the [@] button will open the Apply Levels dialog box. It will open to<br />
the Look tab, but the Look Page selected will be the first Look page that uses the default attribute<br />
p132
<strong>Palette</strong> <strong>OS</strong> v10<br />
masking that best matches the button (i.e., If you press [@] [S5-Pos], the Apply Levels dialog<br />
box will be open to the Look Page called Position). While in the Times display, pressing these<br />
buttons puts their name on the command line for setting attribute family timing. See<br />
Independent Timing for more details and examples.<br />
[1] [@] [S5-Pos] [3] [ENTER] Selects channel 1 and opens the Apply Levels<br />
Dialog box with the Position Look Page active.<br />
Pressing [3] [ENTER] will apply Position 3's<br />
values to channel 1<br />
[GROUP] [1] [@] [S5-Pos] [3] [ENTER]<br />
Puts all channels recorded in Look 1 to Position<br />
3<br />
[1] [S5-Pos] [S2-Pan] [50] [ENTER] Select channel 1 and sets its pan parameter to<br />
50 degrees<br />
[1] [S5-Pos] [S2-Pan] [50] [@] [5] [ENTER] Select channel 1 and fades its pan parameter to<br />
50 degrees from its current location over 5<br />
seconds<br />
[1] [S7-Gobo] [S2-Select] [4] [ENTER] Select channel 1 and sets selects the fourth<br />
gobo in the gobo wheel (Note: slot 1 is open)<br />
[1] [S4-Gobo Index] [90] [ENTER] Select channel 1 and sets its gobo index to 90<br />
degrees. (Note: if the [GOBO] attributes are<br />
already on [S1] through [S4] (see step above),<br />
then you do not need to press [S7])<br />
[1] [THRU] [10] [S4-Gobo Index] [+] [90]<br />
[ENTER]<br />
Selects channels 1 through 10 and relatively<br />
indexes all their gobo wheels 90 degrees<br />
clockwise from their current index position<br />
(Note: the word Relative appears on the<br />
command line when you press [+])<br />
[1] [S2-Pan] [+] [-] [45] [ENTER] Pans channel 1 forty-five degrees<br />
counter-clockwise from its current location<br />
(Note: the [+] puts the word Relative on the<br />
command line whereas the [-] directly following<br />
it depicts a negative relative movement.)<br />
[1] [THRU] [10] [S2-Pan] [0] [-] [90] [ENTER] Pans the range of channels 1 through 10 from 0<br />
degrees to 90 degrees such that the first<br />
channel is at 0 degrees and the last is at 90<br />
degrees and the remaining channels are spread<br />
evenly through the range. Note: The [-] key<br />
puts the word TO on the command line.<br />
[1] [THRU] [10] [S4-Gobo Index] [+] [-] [90]<br />
[-] [90] [ENTER]<br />
Takes channels 1 through 10 and adds or<br />
subtracts a scaled gobo index angle from -90<br />
degrees to 90 degrees from their current<br />
position (Note: the first [+] puts the word<br />
Relative on the command line and the [-]<br />
directly after it denotes a negative sign rather<br />
than the word To. The single [-] between the<br />
two [90]'s puts the word To in the command<br />
line.)<br />
For some more examples showing what the command line actually looks like, see the help topic<br />
Controlling Moving Lights under the heading Command Line Control of Attributes. Remember, the<br />
order in which you type in the command line reflect any ranges (i.e., the [-] or [TO] syntax) you<br />
<strong>Strand</strong> <strong>Lighting</strong><br />
p133
<strong>Palette</strong> <strong>OS</strong> v10<br />
apply levels to. See also Fanning and Recording and Using Groups.<br />
Command Line in the Patch<br />
While in the Patch display, the command line is used to assign channels of type Dimmer to<br />
Outputs or vice a versa. Read the topic on Patch to see why using the Blue Box may be faster<br />
than using the command line.<br />
Patch By Fixture<br />
[S1] [425] [ENTER]<br />
[S2] [21] [THRU] [25] [ENTER]<br />
[S3] [1] [ENTER]<br />
Add a new channel to the channel Grid<br />
Deletes channels 21 through 25 and leaves a<br />
vertical spacer bar between channel 20 and 26<br />
Unpatches channel 1's outputs<br />
[S3] [1] [THRU] [5] [ENTER] Unpatches channel 1 through 5<br />
[1] [@] [8] [ENTER] Patches channel 1 (intensity only) to output 8<br />
Patch By Output<br />
[S1] [1] [ENTER] Unpatches output 1<br />
[S1] [1] [THRU] [5] [ENTER] Unpatches output 1 through 5<br />
[1] [@] [8] [ENTER] Patches output 1 to channel 8's intensity<br />
attribute<br />
See Also:<br />
Selecting and Setting channels<br />
Using the Mouse to Select channels and Set Levels<br />
Controlling Moving Lights<br />
Independent Timing<br />
Show Options - Look and Group Button<br />
Fanning<br />
Patch<br />
-o-<br />
<strong>Strand</strong> <strong>Lighting</strong><br />
p134
<strong>Palette</strong> <strong>OS</strong> v10<br />
Channel Title<br />
The Channel Title function lets you assign text titles instead of a number for a channel on the<br />
channel grid display. You may have a Center Title and/or a Top and Bottom title. You can also<br />
select the color in which any title is displayed.<br />
In the above example, CYC is the Center title and 1 is the Top title for channel 22.<br />
To add channel titles, select the channel(s) you wish to name. Right click the mouse to display<br />
the right-click menu and choose Channel Title to open the Channel Properties:<br />
Note:<br />
<br />
<br />
<br />
<br />
If you want to label one channel at a time, you can use the [VIEW] [#] [ENTER] syntax.<br />
2 or 3 characters are recommended for titles to maintain clarity on the monitor.<br />
If you want to restore the default number, delete any text you put in the Center Title.<br />
If you want to reduce the font size, preppend the text with leading spaces<br />
-o-<br />
<strong>Strand</strong> <strong>Lighting</strong><br />
p135
<strong>Palette</strong> <strong>OS</strong> v10<br />
Captured Attributes<br />
Any channel attributes that have been adjusted with the keypad or the mouse is considered to<br />
be “captured”. The attributes of the channel are now controlled solely by the keypad (or mouse or<br />
encoder) and not by any Cues or Sub Masters. A red level identifies captured attributes.<br />
or<br />
To return a channel to normal control, select the channel and Release it.<br />
Note:<br />
o<br />
o<br />
o<br />
See Also:<br />
Release<br />
If you are using the Hardware Setup|Console option called Last Action Editing,<br />
pressing Release will only deselect the channel. The attributes will remain captured<br />
until a cue list asserts them (or you press [SHIFT] [UNDO])<br />
Simply selecting a channel does not make it Captured. You must change the level of<br />
an attribute to capture it.<br />
You can easily capture the LIVE values of any selected Moving Light's attributes using<br />
the Select Softkey called Attribute Family.<br />
Channel's different states<br />
Selecting and Setting Channels<br />
Select Softkeys<br />
Record Options<br />
Hardware Setup - Console<br />
-o-<br />
<strong>Strand</strong> <strong>Lighting</strong><br />
p136
<strong>Palette</strong> <strong>OS</strong> v10<br />
Selecting and Setting<br />
Channels<br />
Intensity information for channels is shown in the Channel Grid with the channel number on the<br />
top row of numbers and the level on the bottom row. Selecting a channel is the first step towards<br />
setting or modifying levels. Channels may be selected with either the mouse or with keystrokes<br />
or you may use the Light<strong>Palette</strong> VL Button Wing Panel.<br />
Note:<br />
Moving Light Attributes are shown in the Attribute Grid. Also see Controlling Moving Lights<br />
Selected channels are identified in the channel grid by a red highlight around the channel number<br />
and level or in the attribute grid as text with a light blue background:<br />
or<br />
The level may still be controlled by other means (i.e, Cue Lists or Sub Masters). Until you specify<br />
that you want to change the level, you do not have control over it with the wheel or keypad.<br />
Once you alter the level, the red outline will fill in and a white triangle (delta symbol - meaning<br />
changed) will appear. Attributes will get red a red triangle and text:<br />
or<br />
Using the Keypad<br />
For a full description of check out the topic Command Line Syntax.<br />
Note:<br />
If you want to use the QWERTY keyboard on the processor make sure that the Num Lock key is<br />
on before using the numeric keypad.<br />
Note:<br />
<strong>Strand</strong> <strong>Lighting</strong><br />
1. Enter the number of the channel(s) you wish to select on the keypad. You can see<br />
what you are typing in the Command Line.<br />
2. Use the + (And), / (Through) and – (Minus) keys to select multiple channels.<br />
3. Press [@] or [*] on the QWERTY keyboard to set a level in percent.<br />
4. Enter the percentage value. If you just enter a single number, it will be multiplied by<br />
10 (example hitting [5] [ENTER] results in 50%).<br />
5. Complete the action by pushing [ENTER] .<br />
o<br />
Alternately, you can select your channels and roll the wheel to increase or decrease<br />
p137
<strong>Palette</strong> <strong>OS</strong> v10<br />
o<br />
o<br />
their level from its current position.<br />
Holding down [SHIFT] while rolling the wheel changes the values in Decimal rather<br />
than Percent.<br />
If you want to set a level of 5%, you must enter [05] [ENTER].<br />
o If you want to set a decimal level, enter [.] [127] [ENTER] for a intensity of 50%<br />
o<br />
Use the [@] [LOOK] syntax to open the Apply Levels dialog box to reference<br />
pre-recorded Looks as palette references.<br />
Level Setting Shortcut Keys<br />
o [UP] or [PGUP] - Increases channel level by 10<br />
Note:<br />
o [DOWN] or [PGDN] - Decreases channel level by 10<br />
o [SHIFT] [UP] or [SHIFT] [PGUP] - Increases level by 1%<br />
o [SHIFT] [DOWN] or [SHIFT] [PGDN] - Decreases level by 1%<br />
o [FULL] or [HOME] - Sets channel level to full (100%)<br />
o [OUT] or [END]- Sets channel level to out (0%)<br />
The Show Options dialog box has a place to set the level for the [FULL] key, which by default is<br />
100%. Regardless of what this level is set to, double pressing the [FULL] key will take the<br />
intensity to 100%.<br />
Using the Mouse to Select Channels<br />
For a full description, check out the topic Using the Mouse to Select Channels and Levels.<br />
1. Position the mouse pointer on the channel number and left click. The red outline<br />
appears.<br />
2. Multiple channels can be selected with the mouse by left clicking on the first channel,<br />
holding the left button down and dragging the mouse to the last channel number in<br />
the group.<br />
3. Use the mouse wheel to change the level of the selected channels.<br />
Using the Optional Button Wing to Select<br />
Channels<br />
With the optional Button Wing you can select a channel by pressing the corresponding numbered<br />
button. The red LED will begin to flash. To deselect it, press the button again. (Note: You do not<br />
need to deselect channels if you change the preceding selection's attributes before making a new<br />
selection.) To select a range of channels, press and hold the first channel in the range, then press<br />
the last. This works for deselecting ranges in the middle of selected channels.<br />
Using the Select Softkeys<br />
There is a whole topic that describes the use the [S10] Select softkey called Select Softkeys.<br />
<strong>Strand</strong> <strong>Lighting</strong><br />
p138
<strong>Palette</strong> <strong>OS</strong> v10<br />
These are very fast ways to select all odd or even channels or all channels going up or all<br />
channels in blue.<br />
NEXT/PREV Button<br />
While selecting channels, touching the [NEXT] button will Select the next channel. Holding down<br />
[SHIFT] and pressing the [NEXT/PREV] button will select the previous channel number. You will<br />
not see these selections in the command line.<br />
See Also:<br />
Controlling Moving Lights<br />
Select Softkeys<br />
Command Line Syntax<br />
Fanning<br />
Apply Levels<br />
Channel's States<br />
Fade Resolution<br />
Releasing Channels<br />
-o-<br />
<strong>Strand</strong> <strong>Lighting</strong><br />
p139
<strong>Palette</strong> <strong>OS</strong> v10<br />
Using the Mouse to<br />
Select Channels and Set<br />
Levels<br />
The mouse can be used to select channels and set thier levels.<br />
To select one or more channels<br />
1. Before selecting a channel it will look like this: (may be magenta, blue or<br />
green)<br />
2. Left click the Mouse on the Channel Grid to select a channel. It should look like this:<br />
Note:<br />
3. Hold the left button down and drag across the Channel Grid to select several adjoining<br />
channels.<br />
4. Touch channels again to de-select them.<br />
o<br />
o<br />
Even if a channel is selected, running cue lists can still alter its level until you capture<br />
it.<br />
You can also select moving lights with the mouse by touching them in the Attribute<br />
Grid.<br />
To set levels<br />
1. Select a channel as described above.<br />
2. Roll the wheel in the middle of the mouse (or the wheel on the console). The level<br />
changes in the same direction you roll the wheel. The channel will get a white triangle<br />
Note:<br />
(delta symbol) showing the changes to be recorded. It will look like this:<br />
3. Each detent (or bump) on the wheel will adjust the level by 1%. Holding down [SHIFT]<br />
while rolling the wheel will give you finer control.<br />
<strong>Strand</strong> <strong>Lighting</strong><br />
p140
<strong>Palette</strong> <strong>OS</strong> v10<br />
If you then go and select other channels, the previous channel will look like this: The<br />
channel is still Captured and has changes that need to be recorded. Running Cue Lists or Sub<br />
Masters cannot affect this channeluntil you release it (unless you are using Last Action Editing as<br />
determined by settings in Hardware Setup - Console)<br />
You may also want to purchase ELO Touch Screens for your console as selecting channels just as<br />
easy using your finger.<br />
See Also:<br />
Command Line Syntax<br />
Channel's different states<br />
Channel Colors and Symbols<br />
Channel Grid<br />
Attribute Grid<br />
Selecting and Setting Channels<br />
Button Array Described<br />
Controlling Moving Lights<br />
-o-<br />
<strong>Strand</strong> <strong>Lighting</strong><br />
p141
<strong>Palette</strong> <strong>OS</strong> v10<br />
Controlling Moving<br />
Lights<br />
All Channels in <strong>Palette</strong> have the possibility of having more than one attribute. Conventional<br />
dimmer channels only have one attribute which is their level (0-100%). You can see these levels<br />
in the Channel Grid:<br />
Channels that have additional attributes can be identified in the Channel Grid by the red triangle<br />
next to the channel number. These triangles will appear after you patch channels other than<br />
those of type Dimmer. The additional attributes of the channel are shown in the Attribute Grid:<br />
The Intensity value is repeated in this grid for convenience. As you select different attributes to<br />
control, the columns will autoscroll to show your their values, but the Channel column and the<br />
Intensity column remain on the left hand side.<br />
Note:<br />
The Display Menu allows you to park an attribute grid on a second monitor. If you are displaying<br />
both the Attribute Grid below the Channel Grid as well as the Second Attribute Grid, only the one<br />
on the main screen will autoscroll.<br />
Attribute Control<br />
To take control of a moving light, select it and set its intensity level using any of the methods<br />
described in the topic Selecting and Setting Channels. The softkeys will then change to look like<br />
this:<br />
<strong>Strand</strong> <strong>Lighting</strong><br />
p142
<strong>Palette</strong> <strong>OS</strong> v10<br />
After selecting the desired channels, softkeys [S5] through [S9] allow you to change the function<br />
of [S1] through [S4]. For example, pressing [S5] will change [S2] and [S3] to Pan and Tilt:<br />
Note the text in the box above the A/B and C/D Playback Bubbles. This text (in this case Position)<br />
describes the Encoder Bank for all of [S1] through [S4]. Each time you press any of the softkeys<br />
[S5] through [S9], the encoder bank switches. In some case, there is only one bank available for<br />
a channel, but in other cases there may be three or four banks. Pressing the button repeatedly<br />
will loop you around from the last to the first bank. Pressing [SHIFT] plus one of [S5] through<br />
[S9] will back you up on bank.<br />
In the example shown above, if you hold down [S2] and roll the Wheel, you will be Panning the<br />
selected channel. If you let go of [S2], the Wheel will revert back to Intensity control. If you want<br />
to use the wheel to adjust the moving light attributes, you must hold down the attribute you<br />
want to change.<br />
Note:<br />
o<br />
o<br />
Sometimes the attribute that appears in [S2] through [S4] may depend on the<br />
attribute value set in the bubble to its left.<br />
Notice that [S4] is Position Time. This attribute is not in the Position family, but rather<br />
in the Special family and is only placed on [S4] for convenience.<br />
Mouse Control for Pan/Tilt<br />
If you want, you can use the console's trackpad or an external mouse or trackball to control the<br />
movement of automated fixtures. To Pan a channel, hold down [S2] and move the mouse side to<br />
side. To Tilt the channel, hold down [S3] and move the mouse up and down. You can also hold<br />
down both keys and roll the wheel or move the mouse freely to change them in tandem.<br />
Fine Attribute Control<br />
Sometimes the ticks on the wheel don't give fine enough control. For instance, if you are<br />
panning a light, each tick is one degree. At a distance, that can be too much of a move. To get<br />
finer resolution, hold down [SHIFT] when you roll the attribute.<br />
On some attributes, like Position and Zoom, the display won't necessarily change, but the<br />
channel will respond with finer movements. Other attributes, like color wheels, will show you the<br />
steps between full ticks. Rolling the wheel on Color Select takes you between whole colors, but<br />
holding down SHIFT takes you to fractions of a whole move:<br />
<strong>Strand</strong> <strong>Lighting</strong><br />
p143
<strong>Palette</strong> <strong>OS</strong> v10<br />
Attribute Pop-ups<br />
Rather than rolling the wheel and changing values Live on stage, you can also double-press [S1]<br />
through [S4] and an appropriate list of options will pop up. For example, if you are on the Color<br />
encoder bank:<br />
and double-press [S2] a large list will pop-up:<br />
Note:<br />
To open the large popups, you can click on the [S1] through [S4] attribute softkey bubbles with<br />
the mouse (or touch screen).<br />
When the pop-up is displayed, the softkeys [S1] through [S12] will display:<br />
You can use the console's softkeys directly or navigate the popup using the mouse, the arrow<br />
keys or the wheel to select the desired value then press [ENTER] to choose it. Pressing [UNDO]<br />
will close the list without changing the value. While the popup is open, you cannot use the mouse<br />
or touchscreen to click the softkeys.<br />
Command Line Control of Attributes<br />
The first four softkeys that give you wheel control of the moving lights may also put text in the<br />
<strong>Strand</strong> <strong>Lighting</strong><br />
p144
<strong>Palette</strong> <strong>OS</strong> v10<br />
command line. (We say 'may' because some parameters like Color Space, Strobe values or Gobo<br />
Mode attributes must be adjusted by the wheel or Attribute Pop-ups.) Here are some examples of<br />
attribute command line syntax:<br />
o<br />
[1] [S6-Color][S2-Color A Cyan] [50] [ENTER] appears as<br />
o<br />
[1] [THRU] [10] [S2-Pan] [90] [ENTER] appears as<br />
and sets the Cyan value of channel 1 to 50%<br />
of channels 1 through 10<br />
and will enter a hard value of 90 degrees in all<br />
o [1] [S2-Pan] [+] [90] [ENTER] appears as and<br />
will pan channel 1 positive 90 degrees from its current location<br />
o<br />
[1] [THRU] [10] [S2-Pan] [-] [90] [-] [90] [ENTER] appears as<br />
o<br />
o<br />
o<br />
o<br />
o<br />
and enters scaled pan values evenly<br />
spaced from -90 degrees to 90 degrees for channels 1 through 10<br />
[1] [THRU] [10] [S2-Color Select] [1] [-] [10] [ENTER] appears as<br />
and selects colors 1 through 10 on the<br />
color wheel such that each channel has a different color<br />
[10] [THRU] [1] [S4-Gobo Index] [0] [-] [90] [ENTER] appears as<br />
and enters scaled gobo index<br />
values evenly spaced from -90 degrees to 90 degrees for channels 10 through 1 (Note<br />
the reverse order)<br />
[1] [THRU] [10] [S8-Lens] [S3-Iris][+] [50] [ENTER] appears as<br />
1 through 10's current live iris value<br />
[1] [THRU] [10] [S1-Zoom][+] [-] [5] [ENTER] appears as<br />
through 10 by 5 degrees<br />
and adds 50% more iris to channels<br />
and zooms in channels 1<br />
[1] [THRU] [10] [S4-Gobo Index] [+] [-] [90] [-] [90] [ENTER] appears as<br />
. This syntax can be handy if<br />
ten channels are projecting corporate logos on the wall and you've already lined them<br />
up so they are all square. Typing this command line will adjust their relative positions<br />
such that the logos appear as an arc with the one on the left readable when you tilt<br />
your head to the left and similarly with the one on the extreme right as the one in the<br />
middle will remain square.<br />
For more examples, see the help topic called Command Line Syntax. Remember, the order in<br />
which you select channels or type in the command line is used by the [TO] syntax, Fanning and<br />
Effects. Also see Recording and Using Groups and Independent Timing on how to adjust timing<br />
on a per attribute basis for recorded cues.<br />
Encoder Banks<br />
<strong>Strand</strong> <strong>Lighting</strong><br />
p145
<strong>Palette</strong> <strong>OS</strong> v10<br />
As mentioned above, multiple press of [S5] through [S9] will bank you through encoder pages.<br />
Using a VL3500 as an example, this is how the encoder banks would be laid out:<br />
P1<br />
Position<br />
C1<br />
Color<br />
Mixing<br />
C2<br />
Color<br />
Correction<br />
C3<br />
G1<br />
G2<br />
Color<br />
Wheel<br />
Gobo<br />
Wheel 1<br />
Gobo<br />
Wheel 2<br />
L1<br />
Lens<br />
L2<br />
L3<br />
L4<br />
Top&<br />
Bottom<br />
Shutters<br />
Left &<br />
Right<br />
Shutters<br />
All<br />
Shutters<br />
S1<br />
Control<br />
S2<br />
Timing<br />
Conditional Abstract Attributes<br />
The images above only tell half the story on how to control all parameters of the VL3500 (or any<br />
other channel for example). <strong>Palette</strong> uses Horizon Control's Universal Attribute Control Model and<br />
one of the benefits of that is Conditional Abstract Attributes (describe fully in the topic called<br />
Universal Attribute Control Model). Conditional attributes split complex control that is typically<br />
shared on DMX channel down to individual real-world concepts. For example, if you are rotating a<br />
gobo continuously at 5 RPM, you don't need to see the control that gives you indexing from 0 to<br />
360 degrees. Instead, you have the option to change the RPMs or the direction (Clockwise vs.<br />
Counterclockwise). Typically, the units of a tweeker are determined by the mode of the bubble<br />
directly to its left. For example, if the gobo mode is to rotate, then the units are RPM. If the mode<br />
is index, then the units are Degrees.<br />
<strong>Strand</strong> <strong>Lighting</strong><br />
p146
<strong>Palette</strong> <strong>OS</strong> v10<br />
Attribute Filtering on Record<br />
When you record cues and looks, you have many options including the ability to filter out<br />
different attribute families. In the record dialog box, you will find the [S9] button marked<br />
Attributes. When you select this button, you will be presented with the Attribute Fam ilies' dialog<br />
box:<br />
Select which families you want included in the record operation and press OK to return to the<br />
record dialog box.<br />
Note:<br />
o<br />
o<br />
o<br />
These attribute options are also available when copying and moving cues, looks or<br />
channel attributes or when updating Looks or Cues.<br />
You can easily capture the LIVE values of any selected Moving Light's attributes using<br />
the Select Softkey called Attribute Family.<br />
Any dialog box that has Attribute Filtering allows you to press and hold [SHIFT] to<br />
change the Attribute button to look like this<br />
. The attribute family dialog<br />
box will not open, but the softkeys will change to the following:<br />
Pressing any of these changes the attribute masking without the need to open the Attribute<br />
dialog box. You can also double tap any attribute family to solo it.<br />
Independent Timing<br />
Independent Timing is an extremely powerful method of assigning individual wait and/or fade<br />
times to any attribute regardless of cue or part timing. To access the TIMES display, press<br />
[SHIFT][EDIT].<br />
See Also:<br />
<strong>Strand</strong> <strong>Lighting</strong><br />
p147
<strong>Palette</strong> <strong>OS</strong> v10<br />
Universal Attribute Control Model<br />
Attribute Grid<br />
Controlling Colour<br />
Independent Timing<br />
Move In Black<br />
Tools (Flip and Highlight)<br />
Fanning<br />
Patch<br />
Part Cues<br />
Select Softkeys<br />
<strong>Strand</strong> <strong>Lighting</strong><br />
p148
<strong>Palette</strong> <strong>OS</strong> v10<br />
Controlling Colour<br />
<strong>Palette</strong> provides a number of ways of working with channels that have colour mixing control.<br />
This can be done either using the rotary encoders or the Colour Picker Tool.<br />
Most usefull of all, is the <strong>Palette</strong>'s ability to choose colours directly from a list of your favourtite<br />
Gells. Pallette does this by having a library of a range of Colours from manufacturers such as<br />
Lee, Rosco and Gam.<br />
Using these colours is achieved using a Text Match softkey, which become available when you<br />
select the colour control.<br />
From "Text Match" a selection of Manufacturers, eg Roscolux, Roscolene, Gam, Lee appears and<br />
allows the entry of either the Colour Number, Name or the ability find the closest colour to where<br />
you are.<br />
Colour Match - closest by current Colour<br />
Select by Name<br />
<strong>Strand</strong> <strong>Lighting</strong><br />
p149
<strong>Palette</strong> <strong>OS</strong> v10<br />
Select by Number.<br />
Pressing M1 - M12 then selects the colour. Pressing and holding SHIFT allows you to try out the<br />
colour on the output without deselecting the colour selection mode.<br />
-o-<br />
<strong>Strand</strong> <strong>Lighting</strong><br />
p150
<strong>Palette</strong> <strong>OS</strong> v10<br />
Independent Timing<br />
The topic Timing discusses three methods of setting cues times. Independent timing is the most<br />
exacting way of giving each attribute of each channel its own fade and wait times. This method,<br />
although not complicated, is most often used in advanced programming situations.<br />
Timing Methods<br />
Generally, when you write a cue, each attribute family will use fade and wait times as specified<br />
in the cue list columns:<br />
If any attribute family does not have a time (such as the Lens family shown in this example),<br />
then these attributes will use Cue Time. Although this timing method is very convenient, its<br />
limitations are that all attributes of all channels in the cue must use the time specified.<br />
Alternately, you can use Part Cues to separate groups of channels involved in the cue into new<br />
rows to give slightly more flexibility:<br />
Again, the limitation is that all the channels in each part must use the same attribute family<br />
timing and further still, individual attributes within a family are forces to use the same time.<br />
Note, <strong>Palette</strong> is limited to 26 cue parts. Independent Timing frees you of these limitations.<br />
Accessing the Independent Time Display<br />
To access the Independent Timing display, press [SHIFT][EDIT]. Alternately, you can use the<br />
mouse or touch screen to press the Times button:<br />
The Channel Grid and Attribute Grid look very similar, except that the numbers that appear are in<br />
seconds rather than degrees or hertz etc.<br />
<strong>Strand</strong> <strong>Lighting</strong><br />
p151
<strong>Palette</strong> <strong>OS</strong> v10<br />
The topics Selecting and Setting Channels and Controlling Moving Lights outlines methods of<br />
setting attributes of channels. Once you understand the Command Line Syntax for addressing<br />
individual attributes of channels, much of the same syntax is used to set individual times.<br />
For example, while in the Times display, to set the Pan fade time to 3 seconds, you could type<br />
[1] [THRU] [20] [S2-Pan] [3] [ENTER] which would appear as:<br />
To achieve the fanned (or spread out) intensity times as shown in the image of the grid above,<br />
you would type in the command line [1] [THRU] [20] [@] [0] [-] [5] [ENTER] which would<br />
appear as:<br />
All moving light softkeys put text into the command line. That is, if you press [S5-Position], the<br />
text Position Time will appear, which will set both the Pan and Tilt times. If the individual<br />
attributes are currently not visible on [S1] through [S4], just continue pressing [S5] through [S<br />
9] until you see the specific attributes you want control over.<br />
When you have finished setting attributes and times, record the new cue or update an existing<br />
cue. Be sure to include the TIME filter in the Attributes masking:<br />
Relatively Shifting Times from their Current<br />
Values<br />
Often, when teching a show, you may have just run a cue and want to add a second or two to a<br />
fade. If you have a large number of channels already using staggered independent times, such as<br />
in the image of the channel grid above, adding one second to each channel's fade would be a<br />
monumental task. The command line syntax to add a second to a range of channels, using their<br />
current values as the starting place is [1] [THRU] [20] [@] [+] [1] [ENTER] which would appear<br />
<strong>Strand</strong> <strong>Lighting</strong><br />
p152
<strong>Palette</strong> <strong>OS</strong> v10<br />
as:<br />
This would make the cue shown in the grid above appear like this:<br />
Taking this one step further, you can stagger the relative offset by typing [1] [THRU] [20] [@]<br />
[+] [2] [-] [0] [ENTER] which would appear as:<br />
If you used the grid above as a base, the result would be:<br />
Note how Channel 1 had 2 seconds added to it and Channel 20 had nothing added to its time.<br />
You can also shift a range of channels in the negative directions using the syntax [1] [THRU] [20]<br />
[@] [+] [-] [3] [ENTER]. This is a little odd to type because you have a [+] followed immediately<br />
by a [-] but on the command line it looks like this:<br />
That would make the above grid look like this:<br />
Adding Wait Times to Fade Timing<br />
The Independent Time command line syntax for Wait and Fade times is the same as you would<br />
use when editing with the Blue Box. The notation is Wait/Fade. So, if you wanted to set Channels<br />
1 through 20 to Wait 1 second then fade in 4, you would type [1] [THRU] [20] [@] [1] [/] [4]<br />
[ENTER] which would appear as:<br />
The Channel grid would look like this:<br />
<strong>Strand</strong> <strong>Lighting</strong><br />
p153
<strong>Palette</strong> <strong>OS</strong> v10<br />
Using staggered timing, you can have all channels in the cue finish their fades at the same time if<br />
you typed [1] [THRU] [20] [@] [0] [-] [5] [/] [5] [-] [0] [ENTER] which would look like this:<br />
This would result in this Channel grid:<br />
Note how Channel 1 does not wait at all but takes 5 seconds to fade, whereas Channel 20 waits a<br />
full 5 seconds then snaps to its value.<br />
Now, say you wanted to add a 1 second Wait to all of these channel and not fuss with the Fade<br />
times. Type [1] [THRU] [20] [@] [+] [1][/] [ENTER] which would look like this:<br />
Note that the syntax is [Wait] [/] [ENTER]. The [Fade] entry is intentionally left blank. The<br />
Wait/Fade times would then appear as:<br />
The combinations of this syntax are almost endless. One more example that shows the power of<br />
this command line would be [1] [THRU] [20] [@] [+] [/] [-] [2] [-] [0] [ENTER] which would<br />
look like this:<br />
This will leave the current Wait times alone while Relatively Shifting the Fade times down using a<br />
fanned range:<br />
All these examples only used Intensity Time on the command line. This was achieved by using<br />
the [@] key. If you wanted to use any other attribute or attribute family, you would use or [S1]<br />
through [S10] as described above or in the topic called Command Line Syntax. Note that [S10]<br />
is All Time.<br />
<strong>Strand</strong> <strong>Lighting</strong><br />
p154
<strong>Palette</strong> <strong>OS</strong> v10<br />
[S11-Cue Time] (described below) is used for removing independent timing.<br />
Time Display When Running Cues<br />
If you run cues while in the Times display, you will see live countdowns on both the waits and<br />
fades. When the cue has completed, the white numbers on the screen represent the recorded<br />
independent times whereas the grey numbers are the times that come from the time columns in<br />
the Cue List. Only the most recent fades appear; that is, tracking attributes do not show Wait or<br />
Fade times.<br />
Times shown with a dark blue background are from currently un-selected cue lists. See Channel<br />
Colors and Symbols.<br />
Deltas in the Time Display<br />
If you are in the Times display and you adjust an attribute value, you will see a white delta<br />
triangle:<br />
If you have not already adjusted the Level in the Levels display, the attribute will get a delta on<br />
its level value too. The reverse is not true. That is, just because you are adjusting an attribute<br />
value, it does not mean that you will see deltas in the Times display.<br />
If you do have deltas in both the Levels display and the Times display, you can still filter either<br />
out TIME during record, update, move and copy commands using the Attribute Filtering button<br />
Removing Independent Timing from an<br />
Attribute<br />
In some instances, you may want to remove the Independent Timing from an attribute. While in<br />
the Times display, the [S11] softkey is Cue Time:<br />
<strong>Strand</strong> <strong>Lighting</strong><br />
p155
<strong>Palette</strong> <strong>OS</strong> v10<br />
The syntax above suggests you enter a number after using the [@] key for setting Intensity<br />
times (or any of [S1] through [S9] to set other moving light attributes). If you want to remove<br />
the independent time that is already in place, press [S11-Cue Time][ENTER].<br />
Tip:<br />
If you want to remove all the independent timing for a specific channel, press[S10-All Time]<br />
[S11-Cue Time][ENTER].<br />
Clearing All Independent Timing from a Cue<br />
If a cue has channels using Independent Timing, the Cue Time field will have a clock icon in it:<br />
If you move the Blue Box to this field and press [EDIT], [S11-Clear Ind. Time] will to remove all<br />
Independent Timing in the cue. A confirmation dialog box will appear:<br />
If you are sure you want to have all channels follow the times as set out in the Cue List columns,<br />
press [ENTER]. If you want to cancel the operation, press [UNDO].<br />
Note:<br />
o<br />
o<br />
See Also:<br />
Timing<br />
Part Cues<br />
Blue Box<br />
The [S11-Clear Ind. Time] softkey is only visible when you are editing the Cue Time<br />
field in the cue list.<br />
If you specify Time in the Command Line when typing in specific attribute values,<br />
these times will be entered in the TIMES display as well.<br />
Command Line Syntax<br />
Follow Cues<br />
Fanning<br />
-o-<br />
<strong>Strand</strong> <strong>Lighting</strong><br />
p156
<strong>Palette</strong> <strong>OS</strong> v10<br />
Effects<br />
Accomplishing complex programming task like marquees, ballyhoos and rainbows is simple with<br />
<strong>Palette</strong>'s effects. There are many standard effects that are available at the press of a button, or<br />
you can get a little deeper and create some stunning looks using the supplied simple math<br />
functions along with a host parameter controls.<br />
Intensity Effect<br />
To add a new intensity effect, select the desired channels and press [S10] - Effects. If no other<br />
effects are running, you will see a single option to Add New Intensity Effect. (If another effect is<br />
already running, double press [S10]) Press [ENTER], then choose the desired effect from the list:<br />
Once you have selected the effect, the attributes of that effect are displayed on [S1] through<br />
[S4]:<br />
Pressing the corresponding softkey puts the attribute on the command line where you can type in<br />
a new value or press and hold the key to roll in the value. Pressing [S10] will bank you through<br />
pages of effect attributes. Some of the attributes will not be exposed until you select specific<br />
modes, typically determined by encoders to the left of the attribute.<br />
Pressing [S10] will bank you through the pages of effect attributes as there may be more than 4<br />
perimeters to your effect. Some of these attributes will not be exposed until you select specific<br />
<strong>Strand</strong> <strong>Lighting</strong><br />
p157
<strong>Palette</strong> <strong>OS</strong> v10<br />
modes, typically determined by encoders to the left of the attributes<br />
To add an effect to any attribute, press [SHIFT] and Double Press the attribute's softkey. A<br />
similar popup list will be presented with appropriate effects available.<br />
To edit a running effect, double press [S10] to get a list of running effects and highlight the<br />
desired one in the popup list. (You can also highlight the desired effect with the mouse in the<br />
Effects Grid.) The effect attributes will appear on [S1] through [S4] and by pressing [S10] again,<br />
you will be shown more attributes of the effect. The banks are labeled to the left of the first<br />
bubble. Effects always start off with the MAIN bank of tweekers. These four attributes of the<br />
effect will appear on other banks as well. If you keep pressing the Effect softkey you will<br />
eventually wrap around to see the MAIN attributes again. Pressing downs [SHIFT] [S10] takes<br />
you backwards through the banks of effect attributes<br />
If you edit a running effect, you will see red delta symbol next to it in the Effects Grid. This<br />
means the changes must be recorded to a new cue or updated in the current cue. Make sure that<br />
Effects are not filtered out of the update or record process.<br />
The attributes of an effect are faded in Cue Time.<br />
Effects cannot be recorded to Looks. (version 3.1).<br />
COLOUR EFFECTS<br />
Note:<br />
These rainbow effects will only appear on equipment with CMY colour mixing capabilities.<br />
To add a new colour effect, select the desired fixtures and then press [S6] – Colour<br />
The softkeys should now change to show the properties of colour on [S1] – [S4] .<br />
To access the rainbow effect hold down the shift key and press any of the colour softkeys<br />
between [S2] – [S4], or alternatively available on the light palette range are 4 buttons above the<br />
encoder wheels which access the effects of each area by one push.<br />
Again, as with an intensity effect, you will notice that [S1] – [S4] display particular components<br />
of the effect, which can be manipulated to make the effect personal.<br />
If you now select [S10] – Effects you will now be able to manipulate the saturation and<br />
luminance of the colours in your effect.<br />
RECORDING AN EFFECT using the shape generator<br />
When recording an effect into a cue it is advised that a base cue be recorded first and then<br />
subsequently the effect is recorded on top.<br />
With the base cue ready, start the required effect and then m anipulate the perimeters until the<br />
desired look onstage is complete. Pressing the [ UPDATE ] key twice will now update that effect<br />
into the cue you are currently working on, or you can choose the following syntax;<br />
[UPDATE] [ CUE] [#] [*]<br />
RECORDING AN EFFECT that is taken from states onstage i.e. steps<br />
1. Create a new cue list. You have the option to rename the cue list if required using the view<br />
function.<br />
2. Go into the new cue list<br />
3. Take the first batch of channels to their required levels<br />
4. Record cue – changing the record type to block levels if you do not want the levels to track<br />
into each other.<br />
5. Repeat steps 3 and 4 until you have all of your steps recorded<br />
<strong>Strand</strong> <strong>Lighting</strong><br />
p158
<strong>Palette</strong> <strong>OS</strong> v10<br />
6. Go into the cue stack – starting in cue 1 double click the action column<br />
7. The dialog box above should appear where you can change the follow mode from ‘Wait for Go’<br />
to the required action. Repeat for all of your cues<br />
8. When editing the last cue in the action dialogue box change the follow mode but instead of<br />
having [F3] checked untick the box and choose cue 1 to link back to the beginning of the<br />
chase if required.<br />
Now you have you separate effect you are able to link this to your main cue, allowing you to start<br />
your effect on any desired cue form your main cue list. This is done by following the next set of<br />
steps.<br />
1. Enter the main cue list and go to the cue which you want to generate the effect from.<br />
2. Open the action Colum as previously mentioned<br />
3. Select [S5] MACRO.<br />
<strong>Strand</strong> <strong>Lighting</strong><br />
p159
<strong>Palette</strong> <strong>OS</strong> v10<br />
4. Select the required action – which to start an effect – would ‘CueListGo’. Insert the command.<br />
The dialogue box below will appear.<br />
Select the effect cue list you have created and ok the dialog box.<br />
You will now have an effect cue list linked to your main cue list.<br />
To stop your effect from this particular set-up follow steps 1 to 4, instead choosing<br />
‘CueListRelease’.<br />
REMOVING AN EFFECT<br />
There are two situations to releasing an effect.<br />
<strong>Strand</strong> <strong>Lighting</strong><br />
p160
<strong>Palette</strong> <strong>OS</strong> v10<br />
1. User is still in the programmer mode. This means that the screen is not in a recorded state<br />
such as a cue or a look, and you have selected the fixtures, which are in the effect and were<br />
the last item to have been commanded.<br />
Pressing RELEASE once will drop the last effect added.<br />
Pressing RELEASE twice will drop the channel intensities and<br />
Pressing RELEASE a third time will drop everything that has been changed and not recorded.<br />
Or…<br />
1. You are in a recorded state. Thus meaning you are situated in a cue or look state.<br />
The principal to removing an effect whilst in this state is to always re-visit the area, which the<br />
effect is being controlled by. This would be either the colour function for colour effects or the<br />
intensity level for new intensity effects etc..<br />
To remove an intensity effect the channels with the effect need to have their intensity level<br />
adjusted.<br />
To remove a colour effect you need to enter the colour control [S6] and adjust the colour .<br />
In both cases you will see the effect stop automatically.<br />
Effects Grid<br />
Effects grid can be turned on and off in the Display Menu.<br />
Right click in the Effects grid to expose the popup list:<br />
<strong>Strand</strong> <strong>Lighting</strong><br />
p161
<strong>Palette</strong> <strong>OS</strong> v10<br />
Double Press [S10] to change highlighted effect or use the mouse to change highlight.<br />
Highlighted effect's attributes will appear on [S1] through [S4] and by pressing [S10] again, you<br />
will be shown more attributes of the effect.<br />
Chase Effects<br />
Chase options include Hard, Soft and Variable crossfades, Forward, Backwards, Bounce and<br />
Random order<br />
Chase effects recorded in your main cue list use other pre-recorded source cue lists (or look<br />
pages) to pull values from.<br />
Good practice dictates that you change the source's properties to filter out any unwanted<br />
attributes before you start recording chase steps as all attributes in the source will be used by<br />
the chase.<br />
Select the required fixtures.<br />
Select [S10] – Effects.<br />
Select New Intensity Effect.<br />
Select the last option in the list, which is Chase.<br />
[S1] – [S4] will now show a new set of attributes for this effect<br />
[S1] changes where the information for the chase is being abstracted from i.e. groups, looks,<br />
etc.<br />
<strong>Strand</strong> <strong>Lighting</strong><br />
p162
<strong>Palette</strong> <strong>OS</strong> v10<br />
[S2] Is the order in which the chase is run i.e. forward, backwards, random and bounce.<br />
[S3] Is the rate of the chase.<br />
[S4] The style of the fade<br />
[S10] Next cue list<br />
[S5] Items – All to subs etc<br />
Change from to ____ by holding the shift key. Then turn the encoder wheel.<br />
Even if channels 1 through 10 are recorded in the source, selecting only channel 1 through 5 and<br />
putting a chase FX on them will only affect those channels.<br />
-o-<br />
<strong>Strand</strong> <strong>Lighting</strong><br />
p163
<strong>Palette</strong> <strong>OS</strong> v10<br />
Undo/Release<br />
Releasing a Channel means to return it to normal control after Selecting and working with it. To<br />
release Channels, press [UNDO] or [ESC] on the QWERTY keyboard. You can also use the Release<br />
button<br />
Note:<br />
on the ChannelGrid Tool Bar<br />
If you have selected Last Action Editing from the Hardware Setup none of this apply. Please read<br />
the topics in the Console section of Hardware Setup.<br />
For simplicity, describing how release works is done two different ways. Conventional Lights use<br />
a two-stage release, whereas mixed selections including Moving Lights use a multi-stage<br />
release.<br />
Conventional Lights<br />
o 1st press releases the Selected channel(s)<br />
o<br />
o<br />
Next press releases all Captured channels<br />
Press [SHIFT] [UNDO] to undo these actions (in two stage)<br />
Selections including Moving Lights<br />
o 1st press releases the last Changed attribute<br />
o<br />
o<br />
o<br />
o<br />
Next press releases the entire attribute family (if the first press did not release the<br />
entire attribute family)<br />
Next press releases the selected Channel(s) (including all of its Captured Attributes)<br />
Final press releases all other Captured channels and their attributes<br />
Press [SHIFT] [UNDO] to undo these actions (in all stage)<br />
Release in Time<br />
Regardless if a channel is a moving light or a conventional dimmer, if you want to release it or a<br />
selection of channels in time (or sneak it back to cue level) use the syntax [1] [SHIFT+REL] [5]<br />
[ENTER]. This appears on the command line like this:<br />
Note:<br />
o<br />
This syntax will release the channel(s) and all of its attributes.<br />
o You can setup your A/B or C/D fader pairs to control the amount of time (from 0 to 10<br />
seconds) that attributes fade to their captured levels and release. This is very handy if<br />
<strong>Strand</strong> <strong>Lighting</strong><br />
p164
<strong>Palette</strong> <strong>OS</strong> v10<br />
See Also:<br />
you have pre-programmed a large number of looks (or palettes) and want to play<br />
them back live.<br />
Hardware Setup - Console (Last Action Editing)<br />
Hardware Setup - A/B C/D<br />
Load (Removing channels or attributes from a Cue or Look)<br />
Channel's States<br />
Selecting and Setting Channels<br />
Select Softkeys<br />
Controlling Moving Lights<br />
-o-<br />
<strong>Strand</strong> <strong>Lighting</strong><br />
p165
<strong>Palette</strong> <strong>OS</strong> v10<br />
Select Softkeys<br />
The [S10] button on the main Softkey menu is Select. Pressing this button changes the softkeys<br />
to the following:<br />
[S1] - If you want to select any channels that is on, choose Levels > 0%.<br />
[S2] - Often, you may run a cue and notice the lights that came on had something wrong with<br />
them (i.e. wrong gobo or too bright etc.). To select these channels, choose Levels Going Up.<br />
[S3] - Similar to Levels Going Up, you may want to select channels with Levels Going Down<br />
(maybe to adjust their Independent Timing)<br />
[S4] - Selecting channels that currently have Captured Attributes is an easy way to grab<br />
everything you're currently working with.<br />
[S5] - Use Select Attributes if you want to capture the Live values of a channel that is currently<br />
being played back by either Cues or Looks. This is often handy if you are doing 'surgery' on cues.<br />
Start by first selecting the channels and then press Select Attributes to open the dialog box:<br />
Note:<br />
The Effects check box is disabled as Effects are owned by the cues, not the selected channels.<br />
Check off the Attribute Families that you want to capture and select OK. The selected channels'<br />
attribute families will become captured at their current levels and they will be marked with a<br />
delta symbol, ready to be recorded. (Also check out the Record Options called Cue List State and<br />
All Levels (Block Cue). Sometimes those options may be more appropriate if you want to address<br />
all channels in the cue on-mass.)<br />
[S6] - When discussing automated lighting looks, you often refer to channels by the state they<br />
are currently in. It would not be odd to hear: "Take all the blue dot gobos and make them stars."<br />
Using Select Using <strong>Palette</strong>s is the easiest way to select and alter these channels. The syntax is:<br />
[SELECT] [USING PALETTE] [BLUE] which will select the blue channels, then you would apply the<br />
<strong>Strand</strong> <strong>Lighting</strong><br />
p166
<strong>Palette</strong> <strong>OS</strong> v10<br />
[STARS] palette. Pressing Select Using <strong>Palette</strong>s opens a dialog box:<br />
Select the desired palette and select OK to select channels using that palette Live.<br />
[S7] - Reserved<br />
[S8] - The [Store] and Recall selection set is a useful places to temporally stuff a group of<br />
channels that you're currently working with. If you know you will be coming back, time and time<br />
again, to a selection of channels, press [SELECT] [SHIFT] [STORE]. Then when you want to get<br />
them back, press [SELECT] [RECALL].<br />
[S9] - Typing a selection in the Command Line and pressing Odds will only select the odd<br />
numbered channels. For example, if you type [1] [THRU] [10] [SELECT] [ODD] you will end up<br />
with 1 + 3 + 5 + 7 + 9 selected. If no channels are selected and you select Odd, all the odd<br />
Captured channels will be selected. (If nothing is captured or selected, pressing Select Odd will<br />
do nothing.)<br />
[S10] - Even works exactly like Odd does.<br />
[S11] - If you have a number of channels Captured and some of them are Selected, choosing<br />
Invert will make the non-selected Captured channel selected.<br />
[S12] - While you are working on an idea, you may be juggling a number of different channels or<br />
channel groups. The Select Previous button allows you to quickly grab the channels you were<br />
working with just before the ones you are working with now. Making adjustments, then pressing<br />
this button, then making adjustments and repeating will switch you between the last two<br />
selection sets ad infinitum. Alternately, you can press and hold [S12] to get a pop up list of the<br />
last ten selections:<br />
When you get this list, [S1] through [S10] become the different selections. You can also use the<br />
mouse, the arrow keys or the wheel to select the desired channels in the list. Once you have<br />
highlighted the right line, press [ENTER].<br />
See Also:<br />
Softkeys Described<br />
<strong>Strand</strong> <strong>Lighting</strong><br />
p167
<strong>Palette</strong> <strong>OS</strong> v10<br />
Selecting and Setting Channels<br />
Channels' different states<br />
-o-<br />
<strong>Strand</strong> <strong>Lighting</strong><br />
p168
<strong>Palette</strong> <strong>OS</strong> v10<br />
Recording and Editing Cues<br />
Recording a Cue<br />
Fast Description<br />
1. Select Channels and set levels.<br />
2. Press [REC] [ENTER] or [REC] [SELECT] on the Playback you want to use.<br />
3. A cue with the next available number will be appended to the cue list. This cue will use the<br />
default timing as determined in Default Cue List Options<br />
Note:<br />
o<br />
o<br />
If you want to keep the Record Cue dialog box open to add label or change the record<br />
options, hold down [SHIFT] before pressing [SELECT]. (i.e., [REC] [SHIFT]+[SELECT])<br />
If the Blue Box is resting on the last cue of the cue list, the Record dialog box will be<br />
automatically stuffed with a sensible new cue number.)<br />
Detailed Description<br />
1. Set the levels you want to record in a cue. The levels can be set by any method<br />
(using the mouse, the keypad, Looks, Groups, etc.)<br />
2. Press [SHIFT][REC] or [R] or click the Record button on the Tool Bar.<br />
3. The Record dialog box appears:<br />
<strong>Strand</strong> <strong>Lighting</strong><br />
p169
<strong>Palette</strong> <strong>OS</strong> v10<br />
4. Enter a cue Number. (The number in the [S2] box should be the next available cue at<br />
the end of your cue list or it will be cue number highlighted by the Blue Box.) The Cue<br />
Number box is active by default, so you can just enter a number and press [ENTER].<br />
(Also see note below about recording ranges of cues.)<br />
The following properties are optional:<br />
[S1] - If needed, select the Cue List to record to. The default is the cue list you currently have<br />
selected.<br />
[S3] - Change the Record option if needed. The default option is to record your Changed<br />
Attributes or those marked by the delta symbol: . Read what the other Record Options are<br />
and when to use them here. Read about other channel states here.<br />
[S4] - Enter a Cue Label. This label will appear in the Cue List next to the cue. (optional)<br />
[S5] - Change the Default Cue Time. This box will automatically be stuffed with the value from<br />
the Default Cue List Options.<br />
[S6] - If you don't enter a Down Time, the Down Time will be the Cue time. If you do enter a<br />
Down Time, the Cue Time is equivalent to the Up Time. If you need the cue to wait a specified<br />
amount of time before it starts to fade (either Up or Down), use the Wait/Fade syntax in the time<br />
field.<br />
[S7] - If you are recording to an existing cue and want to Update in the changes, select Update.<br />
Updating means that the new data will be overlaid on the existing cue, not destroying data that<br />
is currently there. If you are recording to an existing cue and don't select Update, you will see the<br />
dialog box shown below after you press [ENTER].<br />
[S8] - Check Exclude Sub Masters if you don't want to suck in levels from recorded Looks that are<br />
active on stage.<br />
[S9] - Opens the Attribute dialog box to allow you to filter what will be recorded in this cue:<br />
Note:<br />
<br />
<br />
If you double tap [S5] (or any other softkey), it will 'solo' Position. That is, all other check<br />
marks will clear and Position will remain checked.<br />
You don't necessarily have to open this box to change the attribute filtering. While in the<br />
main Record dialog box, press [SHIFT] and the Attribute button will change to this<br />
and the softkeys will change to the following:<br />
<strong>Strand</strong> <strong>Lighting</strong><br />
p170
<strong>Palette</strong> <strong>OS</strong> v10<br />
Pressing any of these changes the attribute masking without the need to open the Attribute<br />
dialog box. You can also double tap any attribute family to solo it.<br />
[S10] - De-select Edits Track Forward if you are updating a cue which is not the last cue in the<br />
cue list and you don't want the changes you've just made to go past this cue. This option is ON<br />
by default. You can change the default in [S2] Show Options. This option is disabled if you are<br />
appending to the cue list.<br />
4.<br />
4. Press [ENTER] to close the dialog box. If you are attempting to record over an existing<br />
cue and you have not selected Update as described in [S7] above, you will be presented<br />
with the following dialog box.<br />
<br />
<br />
<br />
Update (see above) is the default. Pressing [ENTER] or [S2] will close this dialog box and<br />
update the existing cue, not losing old cue data.<br />
Pressing [S1] Delete and Replace will delete the existing cue and record the new cue data to<br />
this cue number using the record options specified in [S3] and [S9]above.<br />
Cancel will close this dialog box and return you back to the Record dialog box.<br />
5.<br />
Tips:<br />
5. The recorded cue appears on the cue list.<br />
o<br />
o<br />
You can use the [WHEEL] to change many of the controls in this dialog box. Holding<br />
down [SHIFT] while using the Wheel changes numeric values by 0.1.<br />
You can quickly append a cue to a cue list that is not currently selected by pressing<br />
[REC] [SELECT].<br />
Using the Command Line to Record<br />
Cues<br />
If you prefer, you can record cues without opening the Record dialog box by using the command<br />
line. To do this, you must press [CUE] first followed by the cue number then terminate the<br />
command line with [REC]:<br />
<strong>Strand</strong> <strong>Lighting</strong><br />
p171
<strong>Palette</strong> <strong>OS</strong> v10<br />
[CUE] [5] [REC]<br />
The Record and Exclude Sub Masters options are taken from the Record dialog box (see [S3] and<br />
[S8] above), so whatever they were last set at will be used when using the command line to<br />
record cues.<br />
Note that as soon as you start the command line with [CUE], the softkeys will change to:<br />
This allows you to specify some other options before committing a record operation:<br />
[CUE] [5] [S9 - TIME] [4] [REC]<br />
[CUE] [5] [S9 - TIME] [2] [/] [4] [REC]<br />
[CUE] [5] [S2 - Follow] [3] [REC]<br />
Recording a Ranges of Cues:<br />
If you want to record values through a range of cues, either type [CUE] [X] [THRU] [Y] [REC] or,<br />
by pressing [REC] first to open the Record Dialog box, enter the range using the X/Y syntax in<br />
the [S2] field:<br />
As soon as you type the "/" symbol for Thru, the Label, Cue Timing and Update control become<br />
inactive. When recording through a range of cues, new cues will never be created as this type of<br />
recording is necessarily an Update operation. When you press OK, you will be presented with this<br />
dialog box:<br />
<strong>Strand</strong> <strong>Lighting</strong><br />
p172
<strong>Palette</strong> <strong>OS</strong> v10<br />
If you select Block new values into cue range, each cue in the range will get the new values as<br />
determined by the Record Options you selected with [S3] in the Record dialog box. This may<br />
result in Redundant Data which may or may not be desirable (normally only desirable in multiple<br />
cue list environments where you want to be sure each cue will be in total control of those lights,<br />
regardless of what other cue lists are doing). By default, [S2] Track new values through cue<br />
range is selected (so pressing [ENTER] will close this dialog box using this option). If you select<br />
this option, the values will be recorded in the first cue in the range and they will track until the<br />
end of the range. You can still un-check [S10] Edit Track Forward in the Record dialog box to not<br />
track beyond the end of the range, even when using the [S2] Confirmation option.<br />
See Also:<br />
Cue List<br />
Multiple Cue List Concept<br />
Selecting and Setting Channels<br />
Record Options<br />
Edits Track Forward<br />
Tracking<br />
A Note on Redundant Data<br />
Part Cues<br />
-o-<br />
<strong>Strand</strong> <strong>Lighting</strong><br />
p173
<strong>Palette</strong> <strong>OS</strong> v10<br />
Record Options<br />
When recording Cues and Looks, the Record dialog box has an option called Record. <strong>Palette</strong><br />
makes some pretty good guesses at the situations you are in and attempts to default to sensible<br />
configurations, but sometimes it is desirable (and very powerful) to change the Record Option.<br />
Understanding when and why is key.<br />
Record Options for Recording Cues<br />
The options for recording cues are as follows:<br />
Changed Attributes (deltas)<br />
This is the default record option when recording cues. When you are appending news cues to a<br />
cue list or even editing existing cues, this is probably the option that will keep you out of trouble.<br />
Since <strong>Palette</strong> is a tracking console, and cues inherently only alter attributes that are changing in<br />
a cue, recording the changes you've just made normally makes sense. If you're not familiar with<br />
the concept of tracking, it is well worth reading the topic called Tracking.<br />
As you are playing around with your lights, you will notice that values get tagged with a delta<br />
symbol (or triangle):<br />
or<br />
This symbol is often used in mathematics to show that there has been a change of state.<br />
Attributes tagged with the delta symbol are ear-marked for recording with this option.<br />
This is considered the 'cleanest' way of building and editing a show. Some of the other options<br />
described below have their place, but if you make changes, you probably want to record them.<br />
The other record options (such as Cue List State and All Levels [Block Cue]) often carry extra<br />
un-needed baggage. This can be seen in the Fixture Grid as the block symbols depicting<br />
redundant data that has been recorded in the cue that does not add to the look on stage:<br />
or<br />
After you Record attributes that were marked Changed, the delta symbol disappears. Those<br />
attributes are now considered just Captured. There is a Cue List Option that can automatically<br />
Release the channels after a record is completed.<br />
<strong>Strand</strong> <strong>Lighting</strong><br />
p174
<strong>Palette</strong> <strong>OS</strong> v10<br />
Cue List State<br />
Recording the Cue List State means to stuff all the data needed to get to where you are now in<br />
this cue. It specifically does not mean record all channels and attributes right now. That option is<br />
called All [Block] and is described below. State is much more selective and for many of the<br />
reasons described in the topic called A Note on Redundant Data, it is more desirable to record<br />
State than it is to record All.<br />
Recording the state gives you a snapshot of what is on stage right now vis à vie the current cue<br />
list. It also includes any Changes or Captured channels that you may currently be working with.<br />
You would choose this option when the designer says, "Right - I love this - make sure we can<br />
come back to this." The reason you choose to record State vs. recording using Changed is that<br />
recording State gives you what you have and also Blocks the cue. The Block it does is better than<br />
using the Block command because it only puts hard values in for channels that you have used in<br />
this cue list. If you are running a multiple cue list show, you don't want to record the entire rig<br />
into this cue list. Doing so would necessarily 'steal' channels away from other cues lists when you<br />
run this cue. This may be desirable when working in a theatre, but imagine you are programming<br />
a museum. Just because the designer said, "I love this. Snapshot it.", you have to appreciate<br />
he's only in one room right now. There could be many other things happening on other cue lists<br />
that are not involved in what he is looking at right now. For that reason, you record State. It's<br />
not a stretch to come up with other scenarios that are applicable to a stage show.<br />
Make note that when you Move, Copy or Load Cues, you have the State option too.<br />
Selected Fixtures (all attributes)<br />
Imagine that you, as the programmer, are working away at some cue that you just have not<br />
managed to crack. The designer promised to leave you alone to sort it out and walks on stage.<br />
After a very short period of time, he asks you to bring up some lights. You politely do, knowing<br />
that you can just release them after he's had a quick look. After some time, you realize that he<br />
really wants what he asked for recorded somewhere. You can either select and release everything<br />
you were working on to record his pet project, or you can release his stuff and deal with it later.<br />
The third option is to Record Selected. Being as you just grabbed his lights and set them to a<br />
level, they are still Selected. If you then wish to record them (either to a Look, a new cue, or<br />
even Merging them into an existing cue) choose the Selected option. Only the channels (and their<br />
attributes) with this symbol will be recorded:<br />
You can then release them and carry on with what you were doing. This is very handy for doing<br />
what is colloquially know as 'surgery' on cues. It is worth checking out the topic called Blind.<br />
<strong>Palette</strong> has two programmers, one for the stage and one for Blind and you can have channels<br />
Selected in each, independent of each other.<br />
All Levels (Block Cue)<br />
This is the 'big dam'. Nothing gets past it. Every attribute of every channel will get hard data in<br />
cues recorded using the All option. For many of the reasons you may want to record State (as<br />
described above), you may also want to use this option. This option is more appropriate when the<br />
whole world should listen to you when you hit [GO] on this cue. Every light in the house will be<br />
at your command.<br />
<strong>Strand</strong> <strong>Lighting</strong><br />
p175
<strong>Palette</strong> <strong>OS</strong> v10<br />
Recording with this option is identical to using the Block command in the cue list. If you record<br />
with this option on every time, you have just turned <strong>Palette</strong> into a Preset desk.<br />
Please note, if you are using multiple cue lists, recording with the All options is rarely desirable.<br />
You will 'steal' away every light from EVERY other cue list when you go into this cue!<br />
Captured Attributes<br />
Captured lights are essentially under the programmer's control. They cannot be controlled by<br />
Cues or Looks until they are released. Captured channel may be marked as Changed and be<br />
ready for recording or they may just be Captured (and not changed). A good example of how a<br />
light can be Captured and not Changed is when you don't do a Release after doing a Record.<br />
(This is a Cue List Option)<br />
One example of when you may want to record using the Captured option is when you have just<br />
completed a record command, but also want to record the same stuff to a different place.<br />
Record Option for Recording Looks<br />
The options for recording Looks are as follows:<br />
Changed Attributes (deltas)<br />
This is the default record option when recording looks. This is probably the option that will keep<br />
you out of trouble because you won't be dragging in a bunch of stuff you don't want.<br />
As you are building looks by Selecting and Setting Channels, you will notice that values get<br />
tagged with a delta symbol (or triangle):<br />
or<br />
Values or attributes tagged with the delta symbol are ear-marked for recording with the Changed<br />
option.<br />
Some of the other options described below have their place, but if you make changes, you<br />
probably want to record them. The other record options (such as All Levels) all carry baggage<br />
that you must understand if you are going to use them.<br />
After you Record channels and attributes that were marked Changed, the delta symbol<br />
disappears. Those channels are now considered Captured. You may want to Release them, or<br />
record them elsewhere using the Captured option.<br />
Selected Fixtures (all attributes)<br />
Selected Channels look like this.<br />
<strong>Strand</strong> <strong>Lighting</strong><br />
p176
<strong>Palette</strong> <strong>OS</strong> v10<br />
or<br />
The one on the left is just Selected and the one on the right is Selected, and its intensity<br />
attribute is Captured and Changed. In either case, you may find something you like and want to<br />
record it to a Look. Just use the mouse to select it or type the numbers in the command line,<br />
then record using this option. Other channels may be Changed (below on the left) or merely<br />
Captured (on the right) but not Selected:<br />
or<br />
These will not be recorded if you choose the Selected option.<br />
Captured Attributes<br />
Captured attributes are essentially under the programmer's control.<br />
or<br />
They cannot be controlled by Cues or Looks until they are released. Captured channel may be<br />
marked as Changed and be ready for recording or they may just be Captured (and not changed).<br />
A good example of how a light can be Captured and not Changed is when you don't do a Release<br />
after recording a cue. (This is a Cue List Option). Also, when recording Looks, channels are not<br />
automatically released.<br />
One example of when you may want to record using the Captured option is when you have just<br />
completed a record command, but also want to record the same stuff to a different place.<br />
Captured Attributes + Selected Fixtures<br />
It is possible to Select a channel and not Capture its attributes (intensity being just one of its<br />
attributes). Selected channels look like this:<br />
This channel has been Selected, but the intensity attribute was not Captured. (In this case, it is<br />
being controlled by a cue list.) It may have been Selected because you were Panning and Tilting<br />
it. It may have also been Selected because somebody just called for Channel 16, but has not said<br />
what to do with it yet. Therefore you have not touched the Wheel to Change its level.<br />
This is often how Groups are recorded. You may type [10] [THRU] [20] [REC] [GROUP] [5]<br />
[ENTER]. By typing that, we did not Capture anything. That is why when you press [REC]<br />
followed by the [GROUP] button, this is the option that gets put in the Record dialog box<br />
automatically.<br />
All Levels<br />
Every channel and every attribute of every channel will get hard data in looks recorded using the<br />
<strong>Strand</strong> <strong>Lighting</strong><br />
p177
<strong>Palette</strong> <strong>OS</strong> v10<br />
All Levels option. The exception to this is that any attribute that is at it's default value will be<br />
filtered out. For intensities on conventional channels, this is at a level of 0%. As Looks are<br />
normally run HTP, this just cleans things up. If you are going to run a look using LTP and<br />
specifically want default values in there, you will have to mark them Changed.<br />
Note:<br />
The topics Recording Cues and Recording Looks discuss three very important options not<br />
described here. They are Update, Exclude Sub Masters and Attributes.<br />
See Also:<br />
A Note on Redundant Data<br />
Move/Copy<br />
Fade Resolution<br />
Softkeys Described<br />
<strong>Strand</strong> <strong>Lighting</strong><br />
p178
<strong>Palette</strong> <strong>OS</strong> v10<br />
Updating Cues<br />
Cues can be modified in the Live or Blind display modes. When you modify a cue in the Live<br />
display, the channels you alter will be seen on both the screen and the stage. Working in the<br />
Blind display lets you modify cues without affecting any active stage levels.<br />
Note:<br />
These methods described here do not use the Load method.<br />
Modifying Cues in the Live Display<br />
1. Goto the cue you want to alter.<br />
2. Select and Modify the attributes of the channels you want to change.<br />
3. Press [UPDT] or [U].<br />
4. The Update dialog box will open:<br />
5.<br />
5. If you have just changed values that were going up or going down in the cue (i.e., not<br />
tracking and not palettes) the only option will be to update the current cue.<br />
6.<br />
6. Select Edits Track Forward if you want the changes to continue to track from this cue<br />
onwards. Uncheck the box if you want the changes to revert to their old levels in the next<br />
cue.<br />
7.<br />
7. Press [ENTER] to update the selected items.<br />
<strong>Strand</strong> <strong>Lighting</strong><br />
p179
<strong>Palette</strong> <strong>OS</strong> v10<br />
Note:<br />
<br />
<br />
<br />
<br />
<br />
<br />
<br />
<br />
<br />
<br />
<br />
<br />
If you change values that have been tracking, you will have the option to change them in<br />
the current cue or in the cue they have been tracking from (Track Back cue). You would<br />
do this for example if you were part way into the scene and the designer ask "Why is the<br />
chandelier so hot?" You could then make the adjustment and have it track from the<br />
beginning of the scene.<br />
If you change the value of an attribute that was set by a palette, you have the option to<br />
update the current cue with raw values or update the original palette. You will also be<br />
presented with Track Back options for palettes too.<br />
The Attributes+ button will open the Attribute Masking dialog box allowing you to<br />
selectively update portions of your changes. Hold down [SHIFT] to change the softkeys<br />
and short-circuit opening the Attribute dialog box.<br />
Anything that does not get updated (either by Attribute Masking or by de-selecting items<br />
in the Update List) will not be Released allowing you to make further changes and<br />
subsequent updates.<br />
If a Sub Master is running a recorded Look and that master is at 100% and you change<br />
the value, you will have the option to update the recorded Look.<br />
If you press [S4] to Select All, <strong>Palette</strong> will update in this order ensuring that redundant<br />
data is not recorded:<br />
o<br />
o<br />
o<br />
o<br />
o<br />
o<br />
o<br />
o<br />
o<br />
o<br />
Looks<br />
Track Back <strong>Palette</strong>s<br />
Track Back Cues<br />
Current <strong>Palette</strong>s<br />
Current Cue<br />
<strong>Strand</strong> <strong>Lighting</strong><br />
p180
<strong>Palette</strong> <strong>OS</strong> v10<br />
Notes:<br />
<br />
<br />
<br />
<br />
<br />
<br />
You can use the syntax [1] [@] [ENTER] to remove hard values from channels. You will<br />
see a white triangle (delta symbol) and a purple level indicating the level coming from<br />
some previous cue. You must update the cue to commit these changes.<br />
Other methods of removing values from cues are to use Blind as described below or the to<br />
use the Load method described in the Load topic.<br />
If a Look is being played back at 100%, and you alter attributes under its control, the<br />
Look will also appear in the list above.<br />
Modifying Cues in the Blind Display<br />
1.<br />
1. Select from Channel Grid Tool Bar or press [SHIFT] [BLIND].<br />
2.<br />
2. Highlight the Cue in the Cue List to be modified. Note that as you move the Blue Box, the<br />
highlighted cues automatically get loaded.<br />
3.<br />
3. Make the changes required by Selecting Channels and if necessary Releasing them to<br />
remove them from the cue.<br />
4. Press [UPDT] or [U] - or -<br />
<strong>Strand</strong> <strong>Lighting</strong><br />
p181
<strong>Palette</strong> <strong>OS</strong> v10<br />
5.<br />
5. When you move the Blue Box, a dialog box will ask you if you want to save changes.<br />
Click Yes to keep the changes, No to discard them.<br />
Note:<br />
<br />
<br />
<br />
<br />
See Also:<br />
Load<br />
Blind<br />
You can return to LIVE at any time when working in BLIND. When you return to BLIND,<br />
everything will be just as you left it. You can go back and forward between Live and Blind<br />
as often as you like.<br />
You can use Load to load multiple things to combine idea. The first item loaded (the one<br />
shown in the Loaded Status Bubble) will be updated when you press [UPDT].<br />
Selecting and Setting Channels<br />
Edits Track Forward<br />
-o-<br />
<strong>Strand</strong> <strong>Lighting</strong><br />
p182
<strong>Palette</strong> <strong>OS</strong> v10<br />
Load<br />
Loading Cues and Sub Masters is the most effective method of examining, changing and<br />
updating the stored data.<br />
Updating a Cue from the LIVE Display using<br />
Load<br />
1. Select from the channel grid Tool Bar .<br />
2. Press [LOAD], enter a cue number. The QWERTY equivalent to hitting [LOAD] is<br />
[SHIFT][B] (Load is Shift Blind).<br />
Note:<br />
The Cue Number box is active when you enter this dialog. If you roll the wheel you can scroll<br />
through the list to select a cue. The Cue Number is pre-stuffed with the cue number where the<br />
Blue Box was sitting, so it is fastest to move the Blue Box to the cue you want to load before<br />
pressing [Load].<br />
1. If desired press [S5] to load the cue's State or the cumulative effect of all cues up to<br />
that point in the cue list as hard values.<br />
2. Press [ENTER] to load the Cue.<br />
3. Note the Loaded Status Windows shows which cue is loaded. The Cue List is on the top<br />
line and the cue number (or label if set) is below.<br />
Note:<br />
The first item you Load gets shown in the Loaded Status Bubble. If you do subsequent loads<br />
(essentially layering ideas), then press [UPDT], the item shown in the Loaded Bubble is the one<br />
<strong>Strand</strong> <strong>Lighting</strong><br />
p183
<strong>Palette</strong> <strong>OS</strong> v10<br />
that gets Updated. In the LIVE display, loading multiple things does not clear what is loaded<br />
automatically. Check to see if the Loaded Bubble is clear first. To clear it, press [UNDO] or [ESC]<br />
until it is clear.<br />
Note:<br />
1. Make the changes to the cue as necessary. You can remove or 'knock out' channels<br />
from a cue by selecting them and hitting [UNDO] or [ESC]. See the Release topic for<br />
methods of releasing individual attributes.<br />
2. Press [UPDT] or [U] to update the cue. The Captured channels will be released and<br />
the Loaded Status Bubble will be cleared. If the loaded cue is the active cue, the stage<br />
will not change. If the loaded cue is prior to the active cue, the changes will fade when<br />
you hit [GO]. If the loaded cue is after the current cue, when you press [UPDT] the<br />
channels will be release immediately and return to their proper levels as determined<br />
by the console's Fade Resolution.<br />
[S9] - Opens the Attribute dialog box to allow you to filter what will be loaded:<br />
o If you double tap [S5] (or any other softkey), it will 'solo' Position. That is, all other<br />
check marks will clear and Position will remain checked.<br />
o<br />
While in the main Load dialog box, if you press [SHIFT], the Attribute button will look<br />
like this<br />
and the softkeys will change to the following:<br />
Pressing any of these changes the attribute masking without the need to open the Attribute<br />
dialog box. You can also double tap any attribute family to solo it.<br />
o If you do any Attribute Masking during the load process, the Loaded Status Bubble<br />
will not be filled and you will not be able to use [UPDT]. You will have to use [REC]<br />
and specifically determine where you are going to record what was loaded.<br />
o<br />
You can use the syntax [1] [@] [ENTER] to remove hard values from channels. You<br />
will see a white triangle (delta symbol) and a purple level indicating the level coming<br />
from some previous cue. You must update or re-record the cue to commit these<br />
changes. If you are updating the cue, you do not have to load it first to remove<br />
commands if you use this syntax.<br />
<strong>Strand</strong> <strong>Lighting</strong><br />
p184
<strong>Palette</strong> <strong>OS</strong> v10<br />
Updating a Cue from the BLIND Display using<br />
Load<br />
1. Select from the channel grid Tool Bar .<br />
2. Press [LOAD], enter a cue number. The QWERTY equivalent to hitting [LOAD] is<br />
[SHIFT][B] (Load is Shift Blind).<br />
Note:<br />
The Cue Number box is active when you enter this dialog. If you roll the wheel you can scroll<br />
through the list to select a cue. The Cue Number is pre-stuffed with the cue number where the<br />
Blue Box was sitting, so it is fastest to move the Blue Box to the cue you want to load before<br />
pressing [Load].<br />
Note:<br />
1. If desired press [S4] to clear all Captured channels before loading your selected cue. If<br />
you don't do this, whatever is Captured or Loaded before you load this cue will stay<br />
Captured allowing you to 'layer' bits and pieces from different objects before<br />
Re-Recording or Updating.<br />
2. If desired press [S5] to load the cue's State or the cumulative effect of all cues up to<br />
that point in the cue list as hard values.<br />
3. If desired press [S9] to load filter Attributes from the Loaded item.<br />
If you don't do any Attribute filtering, the item Loaded get shown in the Loaded Status Bubble. If<br />
you do subsequent loads in Blind before making any changes and Clear on Load is checked, the<br />
first item gets released and the new item gets loaded. You can layer ideas if you Load one item,<br />
make a change and don't update before loading another (make sure to clear the [S4] check<br />
mark).<br />
1. Press [ENTER] to load the Cue.<br />
2. Note the Loaded Status Bubble shows which cue is loaded. The Cue List is on the top<br />
line and the cue number (or label if set) is below.<br />
Note:<br />
<strong>Strand</strong> <strong>Lighting</strong><br />
p185
<strong>Palette</strong> <strong>OS</strong> v10<br />
You can either see or hide values that are tracking into the loaded cue by toggling the Track<br />
Toolbar Button. If you have NOT selected the Clear on Load option (i.e., you are layering<br />
ideas) or HAVE selected Load Cue's State option (i.e., you are collapsing cues), this toggle has no<br />
affect.<br />
1. Make the changes to the cue as necessary. You can remove channels from a cue by<br />
selecting them and hitting [UNDO] or [ESC]. Also see the topic called Release for<br />
examples of how to Release individual attributes.<br />
2. Press [UPDT] or [U] to update the cue:<br />
After choosing OK, the Captured channels will be released and the Loaded Status Bubble will be<br />
cleared. If the loaded cue is prior to the active cue, the changes will fade when you hit [GO]. If<br />
the loaded cue is after the current cue, when you press [UPDT] the channels will be released<br />
immediately and return to their proper levels as determined by the console's Fadel Resolution.<br />
Note:<br />
o<br />
o<br />
See Also<br />
Updating Cues<br />
Blind<br />
Status Window<br />
Edits Track Forward<br />
To record the changes as a different cue number, use the Record button and enter the<br />
new number in the appropriate text box.<br />
You can return to LIVE even when you are working on things in BLIND. When you<br />
come back to BLIND, things will be just as you left them.<br />
<strong>Strand</strong> <strong>Lighting</strong><br />
p186
<strong>Palette</strong> <strong>OS</strong> v10<br />
Blind Display<br />
The Blind display lets you, load, create, preview or modify Cues and Looks without affecting the<br />
current look on stage.<br />
To Access the Blind Display Using the Mouse<br />
Click the Blind icon.<br />
To Access the Blind Display Using the Console<br />
Press [BLIND].<br />
To Access the Blind Display Using the Keyboard<br />
Press the Blind key [B].<br />
To View and/Or Change the Contents of A Cue in<br />
the Blind Display<br />
To display a cue in Blind, select the Blind display by either method shown above.<br />
1. Move the Blue Box in the Cue List (either with the arrow keys or using the mouse), and the<br />
contents of the cue are shown on the Channel Grid.<br />
2. You can either see or hide values that are tracking into the loaded cue by toggling the Track<br />
Toolbar Button.<br />
3. Alter the cue by Selecting and Setting Channels (or Releasing Attributes) making any changes<br />
you like to its contents. When you select another cue, a dialog box will appear asking you if<br />
you want to save the changes. Click Yes to save changes, No to discard them.<br />
Note:<br />
<br />
Press [UPDT] or [U] to update the selected cue. The dialog box will ask if you want to commit<br />
the changes and track the changes forward. If you select OK, the channel grid will clear and<br />
the Loaded Status Bubble will clear.<br />
<strong>Strand</strong> <strong>Lighting</strong><br />
p187
<strong>Palette</strong> <strong>OS</strong> v10<br />
<br />
<br />
<br />
To record the changes as a different cue number, use the Record button and enter the new<br />
number in the appropriate text box.<br />
You can return to LIVE even when you are working on things in BLIND. When you come back<br />
to BLIND, things will be just as you left them.<br />
To see how to work with Looks in Blind, enter Blind and follow the instruction discussed in<br />
the Load topic.<br />
To View and/Or Change the Contents of A Look<br />
in Blind<br />
1. Select the Blind display by either method shown above.<br />
2. Press [LOAD] or [SHIFT]+[B] to open the Load dialog box.<br />
3. Press [LOOK] or [S12] to display the Look tab:<br />
4. Choose the desired Look Page and Look and select OK. The contents of the look are shown on<br />
the Channel Grid.<br />
5. Alter the look by Selecting and Setting Channels (or Releasing Attributes) making any<br />
changes you like to its contents.<br />
6. Press [UPDT] or [U] to update the loaded Look.<br />
Note:<br />
<br />
<br />
<br />
To record the changes to a different Look or Cue, use the Record button rather than Update.<br />
You can return to LIVE even when you are working on things in BLIND. When you come back<br />
to BLIND, things will be just as you left them.<br />
To quickly load a Look, press [LOAD] [BUMP].<br />
See Also:<br />
Load<br />
Updating Cues<br />
Recording A Cue<br />
Edits Track Forward<br />
<strong>Strand</strong> <strong>Lighting</strong><br />
p188
<strong>Palette</strong> <strong>OS</strong> v10<br />
-o-<br />
<strong>Strand</strong> <strong>Lighting</strong><br />
p189
<strong>Palette</strong> <strong>OS</strong> v10<br />
Edits Track Forward<br />
When updating an existing cue that is not at the end of your Cue List, you can uncheck the Edits<br />
Track Forward option in the Record dialog box. This will mean that any changes you make in this<br />
cue will be undone in the next existing cue (the next cue is updated behind the scenes<br />
automatically).<br />
For example:<br />
Note:<br />
o Channel 5 is set to 60% in Cue 1.<br />
o Channel 5 is tracking at 60% through Cues 2 and 3.<br />
o<br />
You change channel 5 to 40% and update Cue 2 with Edits Track Forward OFF.<br />
o When Cue 3 is run, it puts Channel 5 back at 60%.<br />
o<br />
o<br />
See Also:<br />
Tracking<br />
You cannot select Edits Track Forward OFF if you are updating or recording the last cue<br />
in a cue list.<br />
You can change the system default state of this option in [S2]Show Options.<br />
A Note on Redundant Data<br />
Blocking and Unblocking of cues<br />
Recording a Cue<br />
Deleteing Cues<br />
Show Options<br />
<strong>Strand</strong> <strong>Lighting</strong><br />
p190
<strong>Palette</strong> <strong>OS</strong> v10<br />
Track Sheets<br />
As <strong>Palette</strong> is by nature a tracking console, a useful tool for seeing the dynamics of a channel is<br />
the Track Sheet. This popup windows can be seen by selecting Track Sheets from the Display<br />
Menu.<br />
When you enter the dialog box, the Cue List combo box will be empty. Press [S1] to select the<br />
desired Cue List. As the cues are read into the Track Sheet, the progress and total number of<br />
cues retrieved will be displayed to the right of the Cue List combo.<br />
All the channels in your show are displayed along in the rows, and the recorded cue in the<br />
selected Cue List are displayed in the columns. If a column header's text ends in "..." then there<br />
is more text to the cue's label than can't be displayed because of the width of the column. Either<br />
re-size the column by double clicking on the column separators, or hover over the text and a tool<br />
tip will display the entire cue label.<br />
You can move around the display by using the horizontal and vertical scroll bars at the bottom<br />
and right hand side.<br />
Channel that have a plus symbol to their left have more attributes than just intensity. The<br />
intensity is displayed on the row, but if you want to examine the movements of the other<br />
attributes, just click on the plus symbol. The channel will explode to show you the additional<br />
attributes.<br />
<strong>Strand</strong> <strong>Lighting</strong><br />
p191
<strong>Palette</strong> <strong>OS</strong> v10<br />
If you see the green/magenta track symbol , in a moving light's intensity row, this is a clue<br />
that you might want to expand to see what attributes are changing. All other symbols in the grid<br />
are the same symbols used in the channel grid. A full description of what they mean can be found<br />
in the topic called Channel Colors and Symbols.<br />
The Track Sheet is a display only view.<br />
See Also:<br />
Tracking<br />
Channel Colors and Symbols<br />
-o-<br />
<strong>Strand</strong> <strong>Lighting</strong><br />
p192
<strong>Palette</strong> <strong>OS</strong> v10<br />
Move In Black (MIB)<br />
Half of the trick of using multi-parameter channels is not showing the audience how you use<br />
them. Each time a light is needed to illuminate some piece of scenery or an actor, they need to<br />
be setup (i.e., positioned correctly, colored right, have the right gobo in it and finely tuned the<br />
edge so it's just the right sharpness). This process is sometimes called 'marking the light' or<br />
'locating the light'. <strong>Palette</strong> does all of this work for you automagically and it's called Move in<br />
Black.<br />
How does it happen? The rules are:<br />
o<br />
o<br />
o<br />
o<br />
Here is a scenario:<br />
The channel must have 0% intensity in the cue before it is used.<br />
The channel must have an intensity greater than 0% recorded in the next cue (the cue<br />
it will be seen again).<br />
There must be time for the MIB to occur AFTER the last cue completes and BEFORE<br />
you [GO] into the cue it is used.<br />
The MIB attributes (discussed below) belong to the cue that the light comes up in<br />
although the affect will be seen before the cue is run.<br />
1. Channel A is on the cyc in blue in Cue 1.<br />
2. It tracks for the next 4 cues then fades out (intensity only) in Cue 5.<br />
3. It does nothing for Cues 6 through 9 (so essentially, if you brought it up, it would be<br />
on the cyc in blue).<br />
4. Cue 10 uses the light to Down Stage Center, the color is Open White and it is irised in<br />
on an actor's head.<br />
What happens when you are building this sequence is that you move along, as expected, from<br />
Cues 1 through 9. When building Cue 10, the first thing you probably do is grab Channel A, bring<br />
up it up and see it on the cyc. Then you say, "Hey, what is that doing there?". Then you<br />
remember, "Oh ya, that is where it was last. But that is not where I want it now." You then<br />
move it as described in Step 4 above.<br />
Now, if you didn't have MIB and you ran this sequence, one of two things would happen.<br />
A) You sit happily in Cue 9 feeling very proud of yourself, then press Go for Cue 10 and say,<br />
"Ewph, what a mess!" as the light moves from the cyc, clears its color and irises in on the actor's<br />
head.<br />
B) You are clever and write a cue 9.5 that sets up all the parameters of Channel A that you steal<br />
from Cue 10, but you leave out the intensity and just bring that up in Cue 10.<br />
The issue with item B) above is that if you ever decide to alter Cue 10 (maybe because the actor<br />
moves - they do that), then you also have to update Cue 9.5. This is dull.<br />
With MIB, what happens is this:<br />
1. Channel A is on the cyc in blue in Cue 1.<br />
2. It tracks for the next 4 cues then fades out (intensity only) in Cue 5.<br />
3. It does nothing for Cues 6 through 9.<br />
4. Once Cue 9 is complete, a Move In Black occurs to setup up all of Channel A's<br />
parameters.<br />
<strong>Strand</strong> <strong>Lighting</strong><br />
p193
<strong>Palette</strong> <strong>OS</strong> v10<br />
5. You press [GO] for Cue 10 and Channel A fades up nicely in cue time: Down Stage<br />
Center, in Open White on the actor's head.<br />
The important thing to remember here is that magic happened AFTER Cue 9 completed, but it is<br />
Cue 10 that has the MIB properties in its Action dialog box:<br />
Move In Black Time<br />
The Move In Black Time is the fade time that the attributes use (while in black, of course). In<br />
this case, there is a one second wait after all the fades in Cue 9 have completed (this insures that<br />
any residual tungsten filament glow has cooled off) and then there is a 2 second move. Even<br />
though we're in black, a 2 second move is a little more subtle than a snap. This could either be<br />
because the audience can actually see the moving heads, or it is an attempt to reduce noise.<br />
Another example may have a much longer wait and fade time, particularly if scrollers are<br />
involved, as you often want to move them very slowly to reduce noise. You may also do the<br />
whole thing in zero time if Cue 10 follows on from Cue 9 in a hurry. Remember, this adjustment<br />
can be made on a cue by cue bases. The defaults come from the Show Options.<br />
Suppress Move In Black<br />
Using the scenario above, let's say you wanted to see the light move off the cyc and change<br />
color as it move towards the actor's head before properly landing on him in Cue 10. You could do<br />
one of two things:<br />
A) Suppress the MIB on Cue 10. This will suppress ALL channels from automatically setting<br />
themselves up for Cue 10.<br />
B) Update Channel A to have an intensity level of 1% in Cue 9. Following the rules set out above,<br />
Channel A cannot MIB before Cue 10 because it has an intensity. This may be the desired 'fudge'<br />
if you want other channels to take advantage of MIB for Cue 10.<br />
MIB on the Command Line<br />
If you start a command line with [CUE], the softkeys become cue specific and [S7] is labeled<br />
MIB. If you type [CUE][5] [S7 - MIB] [ENTER], it will toggle the MIB check box in the Cue Actions<br />
<strong>Strand</strong> <strong>Lighting</strong><br />
p194
<strong>Palette</strong> <strong>OS</strong> v10<br />
dialog box. That is, if MIB is on, it will be turned off and vice versa. (If the Cue List has MIB<br />
Suppressed - see below - the Use MIB checkbox will be toggled). You can also type [CUE][5] [S7<br />
- MIB] [5] [ENTER] to turn on MIB and set it to a fade time of 5 seconds. [CUE][5] [S7 - MIB] [2]<br />
[/] [5] [ENTER] would put a 2 second wait before the 5 second fade. Cue ranges are also allowed.<br />
If you omit the Cue Number, the current cue number will be used.<br />
MIB Global Suppression<br />
The Channel Grid Toolbar has a MIB Global Suppression button . If you press this button, it<br />
is like turning on Suppress MIB for each and every cue. During editing sessions, where you may<br />
be inserting new cues, it may be desirable to turn this option off because sometimes when you<br />
turn a light back on, it may not be in the position you thought you left it. Do not run shows with<br />
this option set!<br />
MIB Cue List Property<br />
If you prefer not to use MIB, or only call for it when desired, the easiest thing to do is adjust the<br />
Cue List Properties to Suppress MIB on the entire Cue List. If you choose this option, the<br />
Suppress Move In Black check box in the Cue Action dialog box becomes Use MIB and it not<br />
checked by default.<br />
In Show Options - Cue List there is an option to turn on Suppress MIB for all new Cue Lists.<br />
See Also:<br />
Controlling Moving Lights<br />
<strong>Strand</strong> <strong>Lighting</strong><br />
p195
<strong>Palette</strong> <strong>OS</strong> v10<br />
Cue Lists<br />
Cue List Directory<br />
The cue list directory in the upper left pane of the screen is the place where you manage your<br />
cue lists:<br />
The columns provide you with live feedback on what each cue list is doing. If you right click on a<br />
row you get a menu to move the position of the cue list, get its properties or add and delete<br />
them:<br />
Each columns in the cue list is described below:<br />
Current<br />
The Cue Number (and Label if labeled) shown in this column is where the Cue List Pointer is<br />
located. The Cue List may or may not be active. The current and pending cues can also been<br />
seen in the Playback Bubbles.<br />
Next<br />
The Next column shows which Cue is pending. (This cue can also been seen in the lower half of<br />
the Playback Bubble.) If the next cue is a 'Button' (all fade times are zero), the cue will be shown<br />
in Bold text just to let you know something dramatic will happen when you press the [GO]<br />
<strong>Strand</strong> <strong>Lighting</strong><br />
p196
<strong>Palette</strong> <strong>OS</strong> v10<br />
button.<br />
Remaining<br />
This column shows you how many seconds are remaining in the last cue that was run. The total<br />
time is considered the sum of the longest Wait and the Longest Fade times. This value may be 0,<br />
but other cues could still be running in the background if you ran multiple cues at once (i.e., you<br />
stepped on the [GO] button).<br />
Follow<br />
If the current cue has a Follow Action to automatically execute the next cue, the time before the<br />
next cue's Go is shown here.<br />
Fading<br />
This column shows you the total number of cues currently fading for this cue list. You can see<br />
the total number of cues fading on the entire console by looking at the Fading bubble in the<br />
Status Bubbles. If you have more than one cue currently running, the current Cue Pointer will be<br />
a Green Light and the others will have a Yellow Light.<br />
# Cues<br />
This value is the total number of cues in the this cue list (including all point cues).<br />
Sizing Columns<br />
You can re-size the columns in the cue list by clicking between two columns and dragging left or<br />
right. When you click down, the cursor will change from an arrow to a double arrow like this:<br />
If you double-click, the column will size to fit the cell with the largest text.<br />
See Also:<br />
Playback Bubbles<br />
Cue List Properties<br />
Cue List Pointer<br />
Cue List<br />
Blue Box<br />
-o-<br />
<strong>Strand</strong> <strong>Lighting</strong><br />
p197
<strong>Palette</strong> <strong>OS</strong> v10<br />
Cue List<br />
The Cue List is shown in the lower left pane of the display. <strong>Palette</strong> allows you as many cue lists<br />
as you like. All Cue Lists are managed from the Cue List Directory pane above the Cue List<br />
display.<br />
The Cue List presents all recorded cues in numerical order with their cue attributes. Each cue is<br />
shown with a small lighting instrument symbol on the left. These symbols indicate the status of<br />
the cues.<br />
Note:<br />
You can have 999 cues between two cue num bers. (i.e., 1.001 through 1.999). For more<br />
information on cue numbering, check out the topic called Cue Number Scheme.<br />
The cue currently running is shown with a green lighting symbol:<br />
The last active cue in the Cue List, once it com pletes its fade, is shown with a red lighting<br />
symbol:<br />
If you press Halt/Back, a yellow lighting symbol with the pause sign shows that the Cue List has<br />
paused the current fade:<br />
If more than one fade is active at once (by auto-follows or 'stepping' on cues), the additional<br />
overlapping fades are shown with yellow lighting symbols, with the last cue still running shown in<br />
green:<br />
Follow Cues appear indented in the cue list (i.e. Stage Management will not call these cues). The<br />
cue that initiates the Follow Action is marked with a wrap-around arrow and the Follow time<br />
marked with an 'F'. If the cue is marked to 'Follow After Fade', only the arrow will be present:<br />
<strong>Strand</strong> <strong>Lighting</strong><br />
p198
<strong>Palette</strong> <strong>OS</strong> v10<br />
Linked Cues have a chain-link symbol in the Action column with the cue it is linking to marked<br />
with a 'Q':<br />
If a Cue List is released (not writing to the stage), the cue where the Cue List Pointer is set is<br />
shown with a pink lighting symbol. You can move this pointer using the [STEP UP] or [STEP DN]<br />
buttons (QWERTY equivalent "[" and "]" ). Pressing [GO] will run the cue list from the cue list<br />
pointer in cue time:<br />
Cues that have fade Profiles have a profile icon preceding the time in the time column that uses<br />
the profile.<br />
Asserting Cue Lists<br />
If a Cue is active (green light), but other cues have stolen away from it, the channels, as<br />
recorded in this cue, may not be making it to stage. If you want this cue to take full control<br />
again, you must Assert this cue list. To do this press [SHIFT] [GO].<br />
Go Back<br />
If you press [HALT/BACK] while a cue is running, it will pause it. If a cue list is Halted, and you<br />
press [HALT/BACK] it will go to the previous cue in the time determined by the Back Time in<br />
Default Cue List Options. If you want the cue you are going back to to run in its own cue time,<br />
press [SHIFT] [HALT/BACK].<br />
Auto Scroll Cue List - The Pin<br />
The Cue List can be set to scroll automatically as Cues are executed. To enable or disable this<br />
function, click the Autoscroll Cue List button in the Cue List Toolbar. The Autoscroll button<br />
changes appearance as it turns the Autoscroll Cue List function on or off . The [S11]<br />
softkey mimics the state of this pin.<br />
Rearranging and Hiding Columns<br />
You can re-size the columns in the cue list by clicking between two columns and dragging left or<br />
right. When you click down, the cursor will change from an arrow to a double arrow like this:<br />
<strong>Strand</strong> <strong>Lighting</strong><br />
p199
<strong>Palette</strong> <strong>OS</strong> v10<br />
If you double-click, the column will size to fit the cell with the largest text.<br />
You can change the order of the columns in the cue list by clicking on the column header and<br />
dragging it left or right. When you click down, the cursor will change from an arrow to a box with<br />
a double arrow like this: . The first two column cannot be moved.<br />
You can hide individual columns by right clicking and unchecking the desired one in the list:<br />
The order and size of columns will be persistent between sessions. This information is not stored<br />
in the show file.<br />
See Also:<br />
Cue List Pointer<br />
Editing cells in the Cue List with the Blue Box<br />
Releasing & Asserting Cue Lists<br />
Profiles<br />
Playback Bubbles<br />
Cue List Directory<br />
Autoscroll Cue List<br />
-o-<br />
<strong>Strand</strong> <strong>Lighting</strong><br />
p200
<strong>Palette</strong> <strong>OS</strong> v10<br />
Cue List Properties<br />
To Modify Cue List Properties<br />
There are three ways to get the Cue List Properties dialog box up:<br />
1.<br />
1. Right-click on the Cue List you want to change in Cue List Directory and select Properties.<br />
2.<br />
2. Press [VIEW] or [V] then [S9] to select Cue Lists, then [S1] to select the desired list.<br />
Press [ENTER] to display the dialog box.<br />
3.<br />
3. Press [VIEW] the [SELECT] button over the cue list playback.<br />
<strong>Strand</strong> <strong>Lighting</strong><br />
p201
<strong>Palette</strong> <strong>OS</strong> v10<br />
Auto Run<br />
If Auto Run is on this Cue List will execute its lowest-numbered cue automatically when <strong>Palette</strong><br />
starts or the show is loaded.<br />
Reset to Start on Release<br />
When the cue list is Released, the cue list pointer will go to the first cue.<br />
HTP<br />
The Cue List will act on a Highest Value Takes Precedence (HTP) basis. Channels will take the<br />
highest level of all other HTP or LTP Cue Lists or Chases with equal or lesser priority.<br />
Example: If channel one is set 50% on Cue List 1 (HTP) and then later Cue List 2 (HTP or LTP)<br />
sets it to 25%, channel one will stay at 50%. This is true if both are at the same Priorities.<br />
Locked For Editing<br />
If this is checked the Cue List may not be modified. The Cue List Toolbar will display the locked<br />
icon.<br />
Clicking this icon turns on and off this feature.<br />
Priority<br />
The topic called Priorities that explains how there are 100 different priorities (with #1 being the<br />
highest). By default, new cue lists have a priority of 10.<br />
Attributes<br />
The Attributes dialog box determine what attribute families will be recorded by default in cues on<br />
this Cue List. (You may always change from these default in the Record dialog box.) Selecting<br />
[None] will clear all check marks, where selecting [All] will add checks to all attribute families.<br />
SMPTE<br />
<strong>Strand</strong> <strong>Lighting</strong><br />
p202
<strong>Palette</strong> <strong>OS</strong> v10<br />
If SMPTE is checked this Cue List can have SMPTE Time Code associated with it and will respond<br />
to SMPTE time. A SMPTE column will appear in the cue list. You can use the Blue Box to add<br />
SMPTE time stamps to cue or use the Learn SMPTE Time Tool. The SMPTE time from the source is<br />
displayed in the Status Bubbles.<br />
SMPTE Offset<br />
If you pre-program a song using SMPTE, but later find that on-site the audio guy has re-stripped<br />
the SMPTE on the track (as they often do), you can offset the entire cue list using this value. For<br />
example, if you programmed your song starting at SMPTE time 1:00:01.00 and when you hear<br />
the first beat of the track the time now reads 2:00:01.00, you would enter a value of 1:00:00.00<br />
in this field and then not have to adjust any cues.<br />
Suppress MIB (Move In Black)<br />
If you check this option, the Cue List will not use Move In Black on new cues. You still have the<br />
option to edit the Cue Action with the Blue Box to Use MIB. Note, where by default this Cue<br />
Action check box says Suppress MIB, when the entire cue list is told to Suppress MIB, the Cue<br />
Action check box is labeled Use MIB.<br />
Midi Show Control (MSC) Out<br />
Check off this option if you have the optional MIDI / SMPTE Interface and want to transmit MSC<br />
so other devices follow this cue list. You may need to label your cue list so that it stars with a<br />
number (i.e. "1 - Main") as MSC uses numbered cue lists. For more information, see the topic<br />
MIDI Show Control.<br />
Override Value in Show Options<br />
Cue Lists will inherit options set in Show Options. If you want to override specific settings, click<br />
the check box and set its value here. For more information on each option, see Show Options.<br />
See Also:<br />
Fade Resolution<br />
Action on GO within Cue Loop<br />
SMPTE Time Code on Cue Lists<br />
View Properties<br />
HTP vs LTP<br />
Priorities<br />
-o-<br />
<strong>Strand</strong> <strong>Lighting</strong><br />
p203
<strong>Palette</strong> <strong>OS</strong> v10<br />
Cue List Pointer<br />
If a Cue List is currently released, and you want to start that cue list running at a certain cue,<br />
you may use the Set Cue Pointer option. The Cue List Pointer is shown by a pink light in the<br />
Cue List. Using the [STEP UP] & [STEP DN] buttons or "[" and "]" while the cue list is released to<br />
move the pointer. Pressing [GO] will execute the current cue in its cue time.<br />
You may also see:<br />
- A red light shows that a cue list is active and currently not running<br />
- A yellow light shows that fades are still happening on these cues although the cue list pointer<br />
is elsewhere<br />
Tip:<br />
- A yellow light with the pause symbol in it shows that the cue list has been halted<br />
- A green light shows that this cue is currently fading and this is where the cue list pointer is<br />
<br />
<br />
<br />
<br />
<br />
<br />
<br />
If you hold down [SHIFT] while pressing the [STEP UP] or [STEP DN] buttons the Cue List<br />
Pointer will jump either to the first or the last cue in the Cue List.<br />
If you hold down [SHIFT] and press [GO], the cue list pointer will not advance, but the<br />
cue list will assert.<br />
If you hold down [SHIFT] and press [HALT/BACK], instead of backing up in Back Time as<br />
set in the Default Cue List Options, you will go to the previous cue in Cue Time.<br />
If you quickly want to complete a cue that is running, press [STEP DN] .<br />
See Also<br />
Cue List<br />
Releasing & Asserting Cue Lists<br />
Playback Bubbles<br />
-o-<br />
<strong>Strand</strong> <strong>Lighting</strong><br />
p204
<strong>Palette</strong> <strong>OS</strong> v10<br />
Autoscroll Cue List<br />
(Scroll Lock)<br />
By default, Cue Lists are set to scroll automatically as Cues are executed. To enable or disable<br />
this function, click the Autoscroll Cue List button in the Cue List Toolbar or press [S9] when no<br />
channels are selected.<br />
If this icon shows, Autoscroll is on (Scroll Lock is off). Cues will automatically scroll as they<br />
are executed. The current cue will be third from the top of the list. The softkey will look like this:<br />
Note:<br />
The Blue Box will follow the Green Cue List Pointer for running cues in the Cue Time column if<br />
scroll lock is off. This allows you to easily change the fade time on the last cue run if necessary.<br />
If this icon shows, Scroll Lock is on (Autoscroll is off) (i.e, You've 'stuck' the cue list to<br />
where you want it to be - where you're working) You can use the Blue Box or the scroll bar at the<br />
right of the Cue List to scroll through the cues manually. The softkey will look like this:<br />
When you turn Scroll Lock off, the cue list will refresh to show you the current cue, third from the<br />
top.<br />
Note:<br />
If you move the Blue Box with the arrow keys, the Scroll Lock will turn on automatically so that<br />
the current cue does not keep trying to refresh the position of the cue list.<br />
See Also:<br />
Toolbars<br />
Cue List<br />
-o-<br />
<strong>Strand</strong> <strong>Lighting</strong><br />
p205
<strong>Palette</strong> <strong>OS</strong> v10<br />
Blue Box<br />
The lower left pane of the main window displays the currently selected Cue List. The arrow keys<br />
will always move the Blue Box between cells. It is with this Blue Box that you will do most of the<br />
cue management, including labeling cues, change cue properties such as times, inserting follow<br />
commands, adding macros, moving and deleting cues and cue parts.<br />
See Also:<br />
Timing<br />
Part Cues<br />
Independent Timing<br />
Labeling a Cue<br />
1.<br />
1. Using the [ARROW KEYS] move the Blue Box to the cell you want to change.<br />
2.<br />
Note:<br />
2. Press the [EDIT] button to put the Blue Box into edit mode.<br />
The QWERTY equivalent of [EDIT] is [INSERT]<br />
3.<br />
Notes:<br />
3. Type in a new value to completely replace the text highlighted in blue.<br />
<br />
After you press [EDIT] and the whole text gets highlighted , but you only<br />
want to change one word, press the left Arrow Key to unhighlight the cell<br />
<br />
[BACKSPACE].<br />
and allow you to move freely around. Delete characters with<br />
If you want to make the text BOLD, prepend the label with the exclamation point "!"<br />
<br />
If you want the text to appear ITALICIZED, prepend the label with the forward slash "/"<br />
<br />
<br />
4.<br />
Tips:<br />
All "Button" cues or cues with zero time will appear BOLD automatically in the "Next"<br />
column of the Cue List Directory just to let you know something dramatic is going to<br />
happen when you hit [GO]<br />
4. When you are finished, press [ENTER] to close the edit box.<br />
To quickly label a bunch of cues, move the Blue Box to the first cell, press [EDIT], type in a new<br />
<strong>Strand</strong> <strong>Lighting</strong><br />
p206
<strong>Palette</strong> <strong>OS</strong> v10<br />
label, but rather than pressing [ENTER], press the Down Arrow Key to move you to the next cell.<br />
The cell will automatically be open for editing.<br />
Changing a Cue's Time<br />
The Cue List has multiple columns for time including Cue Time (which all attributes will use<br />
unless specified), Down Time, Position Time, Color Time, Gobo Time, Lens Time, Special Time<br />
and SMPTE Time. The SMPTE Time does not relate to the fade, but rather to when the cue should<br />
be executed.<br />
1.<br />
1. Using the [ARROW KEYS] move the Blue Box to the time column you want to change.<br />
2.<br />
2. Press the [EDIT] button to put the Blue Box into edit mode.<br />
Note:<br />
The QWERTY equivalent of [EDIT] is [INSERT]<br />
3.<br />
Note:<br />
3. Either type in a new value to completely replace the text highlighted in blue or use the<br />
Wheel to roll the values up or down. Each detent on the wheel will change the value, up or<br />
down, by one second. Holding down [SHIFT] will change the value by 0.1 of a second.<br />
(For SMPTE, it is 1 second or 1 frame.)<br />
<br />
<br />
If you are editing a Wait/Fade time, the entire cell is highlighted in blue.<br />
Directly typing a new value will replace both values. If you just want to change the Wait<br />
Time, press [FULL] or [HOME] to take you to the front of the line<br />
(highlighting<br />
only the Wait time). If you want to change the Fade Time, press [OUT] or [END] likewise.<br />
<br />
<br />
4.<br />
Tips:<br />
To enter times in the HH:MM:SS format, use two dots (i.e., “ .. ”) to make the colon. This<br />
format extends from days (DD) to fractions of a second or frames (FF) in SMPTE time<br />
(i.e., DD:HH:MM:SS.FF). Note that frames or the 100th of a second appear after a single<br />
decimal point.<br />
4. When you are finished, press [ENTER] to close the edit box.<br />
To quickly edit numbers, move the Blue Box to the first cell, press [EDIT], type in a new number,<br />
but rather than pressing [ENTER], press an Arrow Key to move you to the next cell. The cell will<br />
automatically be open for editing.<br />
<strong>Strand</strong> <strong>Lighting</strong><br />
p207
<strong>Palette</strong> <strong>OS</strong> v10<br />
Note:<br />
The Blue Box will follow the Green Light (cue running indicator) if the Autoscroll Cue List pin is<br />
out.<br />
Independent Timing<br />
If you want to adjust the time of particular attributes independent of the time specified in the<br />
cue, press [SHIFT] [EDIT] to change the Channel and Attribute grid to the<br />
Press [SHIFT] [EDIT] again to return to the<br />
display.<br />
display.<br />
Changing Multiple Cells to the Same Label or<br />
Time<br />
1.<br />
1. Move the Blue Box to the first cell you want to change using the arrow keys.<br />
2.<br />
2. Hold down [SHIFT]<br />
3.<br />
3. Continue to press the [DOWN ARROW] or [UP ARROW] to increase the size of the Blue<br />
Box to highlight all wanted cells<br />
4.<br />
4. Let go of [SHIFT]<br />
5.<br />
5. Press [EDIT] on the console or [INSERT] on the QWERTY keyboard and follow Steps 3-4<br />
above.<br />
Changing Multiple Cells' Values Relative to Each<br />
Other.<br />
1.<br />
1. Move the Blue Box to the first cell you want to change using the arrow keys.<br />
2.<br />
2. Hold down [SHIFT]<br />
3.<br />
3. Continue to press the [DOWN ARROW] or [UP ARROW] to increase the size of the Blue<br />
Box to highlight all wanted cells.<br />
4.<br />
4. Let go of [SHIFT]<br />
5.<br />
<strong>Strand</strong> <strong>Lighting</strong><br />
p208
<strong>Palette</strong> <strong>OS</strong> v10<br />
Tip:<br />
5. Press [EDIT] on the console or [INSERT] on the QWERTY keyboard.<br />
6.<br />
6. An edit box will open on the last cell you selected. Roll the [WHEEL] to change its value up<br />
or down.<br />
7.<br />
7. Press [ENTER] to close the edit box. Note how all values changed up or down relative to<br />
the amount of the change you made to the open cell.<br />
Holding down [SHIFT] while rolling the [WHEEL] changes numeric values by 0.1. It will change<br />
SMPTE times by 1 frame.<br />
Changing a Cue's Action<br />
1.<br />
1. Move the Blue Box to the Action column of the cue that you want to add a link, follow or<br />
macro. You may also want to adjust the Move In Black parameters.<br />
2.<br />
2. Press [EDIT] on the console or [INSERT] on the QWERTY keyboard.<br />
3.<br />
3. The Cue Action dialog box will open (see Cue Properties):<br />
4.<br />
4. Make any changes as necessary and choose OK.<br />
This (very busy) cue has a Link to Cue 4, a follow in 2 seconds, a macro and MIB is suppressed.<br />
Adding a Cue Profile<br />
<strong>Strand</strong> <strong>Lighting</strong><br />
p209
<strong>Palette</strong> <strong>OS</strong> v10<br />
1.<br />
1. Using the [ARROW KEYS] move the Blue Box to the time column you want to add a<br />
profile to.<br />
2.<br />
2. Press the [EDIT]button to put the Blue Box into edit mode.<br />
3.<br />
3. Enter a new time if necessary and/or press the appropriate softkey to add a profile to the<br />
fade:<br />
4.<br />
4. The edit box will close and the fade time along with a profile icon will be displayed in the<br />
cue list:<br />
Note:<br />
o<br />
o<br />
While the edit box is open, you can press [S12] to open the Cue List Properties dialog<br />
box.<br />
See the topic called Profiles for images of what each profile looks like.<br />
Clearing Independent Timing<br />
If some of the channels recorded in the cue are using Independent Timing, the Cue Time field<br />
will have a clock icon in it:<br />
If you move the Blue Box to this field and press [EDIT], the Cue Profiles softkeys (see above) are<br />
displayed. If you want to remove all Independent Timing in the cue, press [S11]. If you do, a<br />
confirmation dialog box will be displayed:<br />
If you are sure you want to have all channels follow the times as set out in the Cue List columns,<br />
press [ENTER]. If you want to cancel the operation, press [UNDO].<br />
Note:<br />
The [S11-Clear Ind. Time] softkey is only visible when you are editing the Cue Time field in the<br />
cue list.<br />
Asserting or Going to a Cue<br />
<strong>Strand</strong> <strong>Lighting</strong><br />
p210
<strong>Palette</strong> <strong>OS</strong> v10<br />
If you move the blue box to the first column of the cue list, positioning it over the Cue List<br />
Pointer, and press [EDIT], you will assert the desired cue.<br />
-o-<br />
<strong>Strand</strong> <strong>Lighting</strong><br />
p211
<strong>Palette</strong> <strong>OS</strong> v10<br />
Profiles<br />
As <strong>Palette</strong> executes cues, you have an awful lot of control over how you get from Point A to Point<br />
B (whether that be intensity levels or position on stage or from one color to another). <strong>Palette</strong><br />
allows you to have independent wait and fade times on intensity levels going up in a cue, levels<br />
going down, and on each attribute family (Position, Color, Gobo, Lens and Special attributes).<br />
You can also split cues into different Parts giving you more timing options.<br />
Profiles allow you to also affect the method in which a cue goes from Point A to Point B (using the<br />
allotted time).<br />
Note:<br />
Apart from simple profiles, Horizon Control's Universal Attribute Control Model gives you greater<br />
control on how to execute fades from one Position to another, or from one Color to another using<br />
the Pan/Tilt Movement option or the Color Space options.<br />
To assign a profile to a cue (or Cue Part), move the Blue Box to the appropriate timing column<br />
(either Cue Time, Down Time, Position, Color, Gobo, Lens or Special) and press [EDIT] or<br />
[INSERT]. You can now enter a time (as described in the topic called Blue Box) and/or add a<br />
profile to that timing parameter. When the Blue Box is open for editing, the softkeys change to<br />
the following:<br />
Pressing any softkey will close the edit box and assign that profile:<br />
If you want to remove a profile, just add a Linear profile to the cue (which is that default).<br />
Note:<br />
<br />
<br />
<br />
<br />
[S11] will clear all Independent Timing from the cue. This softkey is only visible when you<br />
are editing the Cue Time field.<br />
[S12]will open the Cue Properties dialog box allowing you to add profiles to more than<br />
one timing parameter at a time.<br />
Below are images of the available profiles:<br />
<strong>Strand</strong> <strong>Lighting</strong><br />
p212
<strong>Palette</strong> <strong>OS</strong> v10<br />
This is the default profile. If the profile icon does not appear in the time column, this is the profile<br />
used.<br />
Using Snap at Start is equivalent to using a zero time; the attribute goes to the recorded value<br />
as soon as the cue is executed.<br />
<strong>Strand</strong> <strong>Lighting</strong><br />
p213
<strong>Palette</strong> <strong>OS</strong> v10<br />
Using a fade time of 5 seconds with the Snap at End profile is equivalent to assigning a wait time<br />
of 5 seconds and a fade time of zero.<br />
The Squares Law profile is a modified power consumption curve that produces a perceived linear<br />
output of a dimmed tungsten source. This is generally only used when fading dimmed intensity<br />
values up.<br />
<strong>Strand</strong> <strong>Lighting</strong><br />
p214
<strong>Palette</strong> <strong>OS</strong> v10<br />
The Slow Start curve can be used on dimmers or mechanical attributes of moving lights (such as<br />
Position). Apply it when you want to subtly start a change.<br />
Often used when repositioning a moving light, the Slow End very subtly slows and stops the<br />
channel at the end of the fade.<br />
<strong>Strand</strong> <strong>Lighting</strong><br />
p215
<strong>Palette</strong> <strong>OS</strong> v10<br />
Similar to the EIS curve, the Fast Start is useful when you want to make a real statement at the<br />
beginning of a fade.<br />
The Fast End curve can be used as a sort of exclamation mark at the end of a fade; really<br />
asserting the final position. Think of a light fading out at the end of a long and dramatic death<br />
scene.<br />
<strong>Strand</strong> <strong>Lighting</strong><br />
p216
<strong>Palette</strong> <strong>OS</strong> v10<br />
Best used for moving light repositioning, the Damped profile gives a more organic movement;<br />
more like that of a follow-spot operator. The problem with the Linear fade being used on Pan/Tilt<br />
moves is that the channel is moving at the same rate all the way from point A to point B. The<br />
Damped profile slowly starts it up and then slowly parks it at the end. Use it with the Linear<br />
Movement function provided by the Universal Attribute Control Model for real human-like moves.<br />
This silly ZigZag Profile provides a sense of humorous indecision when used on an intensity or<br />
movement transition.<br />
See Also:<br />
Blue Box<br />
Independent Timing<br />
Cue Properties<br />
<strong>Strand</strong> <strong>Lighting</strong><br />
p217
<strong>Palette</strong> <strong>OS</strong> v10<br />
Releasing & Asserting<br />
Cue Lists<br />
Cue Lists can be active (controlling channels by running cues, or sitting in a cue) or released<br />
(not talking to any channels).<br />
Release a Cue List<br />
There are multiple was to release cue lists:<br />
o<br />
o<br />
[SELECT] a cue list then press [REL-PB]<br />
Press [\] on the QWERTY keyboard<br />
o Click the Release button on the Cue List Tool Bar.<br />
o<br />
o<br />
Press [SHIFT] [REL-PB] or [SHIFT] [\] to release all cue lists.<br />
Use a Macro to release a specified cue list.<br />
Asserting a Cue List<br />
Asserting a Cue List means making it fully active again. You will want to do this if another Cue<br />
Lists 'steals' channels away from you and you want to regain control of them. To do this, press<br />
[SHIFT] [GO] (or [SHIFT] [SPACE]). The Cue List Pointer will not move, but the all channels<br />
(including tracking channels) will fade to their correct value in the time set in Show Options.<br />
Note:<br />
You can also double click in the first column of the cue list on the desired cue or move the Blue<br />
Box to the first column, positioning it over the Cue List Pointer and press [EDIT].<br />
See Also<br />
Cue List<br />
Cue List Pointer<br />
GoTo Cue<br />
Default Cue List Options<br />
-o-<br />
<strong>Strand</strong> <strong>Lighting</strong><br />
p218
<strong>Palette</strong> <strong>OS</strong> v10<br />
Step Forward and Back<br />
You can use the buttons on the console<br />
cues.<br />
or the Cue List Toolbar buttons to step between<br />
Step Back a Cue<br />
Click the Step Back button on the Cue List Tool Bar to fade back to the cue prior to the active<br />
cue. Step Back uses the default Step fade time as set up in Cue List Properties. The QWERTY<br />
equivalent is "[".<br />
Step Forward a Cue<br />
Use the Step Forward button to fade to the next cue after the active cue on the Cue List.<br />
Step Forward uses the default Step fade time as set up in Cue List Properties. The QWERTY<br />
equivalent is "]".<br />
See Also:<br />
Cue List Properties<br />
Cue List Pointer<br />
Releasing & Asserting Cue Lists<br />
-o-<br />
<strong>Strand</strong> <strong>Lighting</strong><br />
p219
<strong>Palette</strong> <strong>OS</strong> v10<br />
Cue Numbering<br />
Scheme<br />
Cues number is determined when recording a cue by filling in the Cue Number field. Cue<br />
numbers can have three decimal places (i.e., you can have 999 cues between cue 1 and cue 2,<br />
up to 1.999). If you are appending to the end of a cue list, <strong>Palette</strong> will suggest a new cue number<br />
for you automatically based on the last cue number.<br />
Note:<br />
The record dialog box's Cue Number field is automatically filled in with the number of the cue<br />
where the Blue Box is sitting.<br />
If you want to re-number existing cues, see the topic called Renumber Cues for information on<br />
how to use the Move command.<br />
-o-<br />
<strong>Strand</strong> <strong>Lighting</strong><br />
p220
<strong>Palette</strong> <strong>OS</strong> v10<br />
Renumber Cues<br />
To renumber cues within the same cue list, the process is done using the Move command.<br />
1. Highlight the cues you want to move using the Blue Box. Use [SHIFT] and the Up and<br />
Down Arrows to extend the range of the Blue Box.<br />
2. Press [SHIFT][MOVE] or [M] on the QWERTY keyboard to open the Move dialog box.<br />
Note:<br />
3. Note the cues you highlighted appear in the title of the dialog box. Enter a new<br />
starting cue number. You can use the wheel to scroll through the list looking for the<br />
gap in which you want to move these cues.<br />
If you select existing cues to move your cues to, you will be warned:<br />
You can either cancel out at this point by pressing [UNDO] or press [ENTER] to delete the old<br />
cues and move these cues into their spot. Be careful!<br />
o<br />
o<br />
If desired, change the Cue Increment. By default this value is 1. This is handy if you've<br />
just written a bunch of cues using point numbering and you want to clean it up. In<br />
other cases, you may have to squeeze a bunch of cues between two existing cues and<br />
may want to use a number less than 1. (Remember, there can be 999 point cues<br />
between two whole numbers.)<br />
Select Move Cue State, if the cue numbering is actually moving the cues out of<br />
<strong>Strand</strong> <strong>Lighting</strong><br />
p221
<strong>Palette</strong> <strong>OS</strong> v10<br />
See Also:<br />
Move/Copy<br />
sequence (not simply renumbering them). Then the first cue will Move using its<br />
cumulative state from its old running order which was the cumulative effect of cues 1<br />
through 10 (i.e., if you move Cue 10 to Cue 100 and there are cues in between, when<br />
you get to the new Cue 100, it will look the same as it did when it was cue 10). This is<br />
the default option, but that may not always be the desired intent.<br />
Cue Number Scheme<br />
-o-<br />
<strong>Strand</strong> <strong>Lighting</strong><br />
p222
<strong>Palette</strong> <strong>OS</strong> v10<br />
Blocking and<br />
Unblocking of Cues and<br />
Cue Lists<br />
Blocked data in cues looks like this:<br />
or<br />
Knowing when it is appropriate to have these symbols is key to understand how to use a tracking<br />
console properly. It is fully explained in the topic called A Note on Redundant Data.<br />
Block cues are best explained as a 'dam' that does not let things pass through them. If you are<br />
working on a long cue list and are jumping around while you are editing it, it is handy to put<br />
block cues at the top of each scene. Imagine this:<br />
o<br />
o<br />
o<br />
o<br />
o<br />
You're building a traditional theatrical GO show in a single cue list.<br />
You start out by doing a tiny bit of work on the first scene. You know you're going to<br />
return to clean it up later.<br />
You then do a lot of work on the second scene of the show and are quite pleased with<br />
yourself.<br />
You then go back to Scene 1 and continue working.<br />
When you get around to running Scene 2 later, there are things in there you didn't<br />
expect to see. They 'tracked' from the first scene.<br />
To prevent this from happening, what you should do is BLOCK the first cue of Scene 2. You can<br />
either choose to do it before you start working on Scene 2 or after you're happy with it. It doesn't<br />
matter. Just do it before you go back to work on cues in Scene 1. When you do, a horizontal line<br />
will be drawn above the cue you blocked. No information will track past that line, but rest<br />
assured, the cue below the line has all the information to make sure that there are no surprises<br />
on stage.<br />
Blocking Cues<br />
To block a cue click on the desired cue then right click to open the Cue List Right-Click menu:<br />
<strong>Strand</strong> <strong>Lighting</strong><br />
p223
<strong>Palette</strong> <strong>OS</strong> v10<br />
Choose Block Cues.<br />
Note:<br />
o<br />
o<br />
Warning:<br />
You can also select multiple cues using the Blue Box to Block more than one cue at a<br />
time.<br />
The syntax [CUE] [75.5] [S5 - BLOCK] is also valid (cue ranges are also allowed)<br />
If you are using multiple cue lists in your show, you may want to reconsider blocking cues.<br />
Blocking a cue puts hard values for every attribute of every channel in your show into the cue. If<br />
you are running a linear show, this is a great way to stop things from tracking from one scene to<br />
the next, but be aware, it may 'steal' channels away from other cues with long fade times that<br />
are still running or more dangerously other cue lists. You may consider Going to this cue Live and<br />
re-record it using the Record Option called State.<br />
Unblocking Cues<br />
Get into the habit of 'cleaning up' cues by Unblocking them. This makes it easier when you are<br />
maintaining the show at a later date. Knowing that all the information in the cue is needed to<br />
produce the desired look on stage allows you to 'clear the clutter'. To Unblock a cue, move the<br />
Blue Box to the row of the desired cue, right click and select Unblock Cues. You can also select<br />
multiple cues using the Blue Box to Unblock more than one cue at a time. The syntax [CUE] [5]<br />
[THRU] [10] [S6 - UNBLOCK] is also valid.<br />
Unblocking the Entire Cue List<br />
Sometimes it is desirable to 'clean shop' and get rid of all the redundant data that may be<br />
cluttering up your cue list. To do it all in one fowl swoop, right click anywhere in the cue list and<br />
select Unblock Entire Cue List. If you are running multiple cue lists and each cue list is a specific<br />
section of a greater show, this is good habit to get into as you'll be sure that Unblocked Cue Lists<br />
will not 'steal' away from other cues lists. All the data they have is needed for the effect you were<br />
building.If you intentionally Blocked a cue within the cue list, be aware that it will no longer<br />
function as a Block Cue.<br />
The syntax [CUE] [0] [THRU] [1000] [S6 - UNBLOCK] works even if you don't have a Cue 0 or<br />
1000.<br />
Blocking the Entire Cue List<br />
If you for some reason you want every attribute of every channel recorded in every cue (i.e., a<br />
like a Preset Desk would have), you can Block the entire cue list. Select the Block Entire Cue List<br />
option from the right click menu.<br />
Blocking an entire cue list can be counter-productive and prohibits you from taking advantage of<br />
multiple cue lists and unlimited simultaneous fades within a single cue list. Blocking the cue list<br />
will put hard values into every cue for every attribute. If you then edit or insert a cue, any<br />
changes made will not track through your show. While editing cues, if you don't want data to<br />
track when you update or insert new cues, uncheck the Edits Track Forward check box in the<br />
<strong>Strand</strong> <strong>Lighting</strong><br />
p224
<strong>Palette</strong> <strong>OS</strong> v10<br />
Record dialog box. Read the topic called A Note on Redundant Data for more information and<br />
examples.<br />
See Also:<br />
Tracking<br />
Edits Track Forward<br />
Record Options<br />
A Note on Redundant Data<br />
-o-<br />
<strong>Strand</strong> <strong>Lighting</strong><br />
p225
<strong>Palette</strong> <strong>OS</strong> v10<br />
Cue Properties<br />
Many of a cue's properties can be set when you are recording the cue using the Record Cue<br />
dialog box. You can easily edited timing properties using the Blue Box in the cue list or other<br />
properties by editing the Action Column or you may want to adjust more than one property of the<br />
cue at once by using the cue's property dialog box. All cue properties are described here,<br />
including the ones found in the Cue Action dialog box.<br />
To view a cue's property box, use the [VIEW][CUE][##][ENTER] syntax (or<br />
[V][F10][##][ENTER] on the QWERTY keyboard).<br />
After hitting the [VIEW] button, the View dialog box will appear.<br />
Note:<br />
If you highlight the cue with the Blue Box then press [VIEW] [CUE] this dialog box will be<br />
pre-loaded with correct cue number.<br />
You can use either [F10][S10] or the [CUE] button to show you cue selection options. You can<br />
also highlight the cue with the Blue Box and hit the Properties button<br />
in the Cue List toolbar.<br />
Once you select Cue, the Cue Number edit box is active. Enter a number or use the wheel to<br />
scroll through the list of available cues. Use [S1] to change the cue list if you want to view cues<br />
that are not in your currently Selected cue list. When you have found the cue you want, press<br />
[ENTER]. The Cue Properties dialog box will appear:<br />
<strong>Strand</strong> <strong>Lighting</strong><br />
p226
<strong>Palette</strong> <strong>OS</strong> v10<br />
Use the softkeys, move to any box and change the properties that you wish. To select a Profile,<br />
use the softkeys to select a Time field then press [NEXT] to move over to the Profile combo.<br />
When you are finished, press [ENTER].<br />
Note:<br />
You can change some of these parameters by moving the Blue Box to the Action column and<br />
pressing [EDIT] or [INSERT]. The Cue Action dialog box will then open:<br />
<strong>Strand</strong> <strong>Lighting</strong><br />
p227
<strong>Palette</strong> <strong>OS</strong> v10<br />
See Also:<br />
Follow Cues<br />
Linking Cues<br />
Profiles<br />
Macro Editor<br />
Move In Black<br />
Blue Box<br />
Renumber Cues<br />
-o-<br />
<strong>Strand</strong> <strong>Lighting</strong><br />
p228
<strong>Palette</strong> <strong>OS</strong> v10<br />
Deleting Cues<br />
Deleting single cues<br />
Position the Blue Box over the cue and press [DEL] to show the Delete Cue dialog box:<br />
The cue highlighted will be automatically be stuffed in the Cue Number field, but you can type<br />
any other cue number before pressing Enter. Rolling the Wheel will scroll through the cues in the<br />
list allowing you to read the labels to ensure you delete the correct cue.<br />
If you want to remove a Cue Part, see the description below.<br />
Retain Cue Data<br />
Sometimes this option is referred to as Delete Cue-Only. What it actually means is that any<br />
important data in this cue will be moved to the next cue as this cue is deleted. The exception to<br />
the rule is that it will not overwrite data that exists in the next cue and the deleted data will be<br />
lost. You use this check box if stage management says that the cue has been cut.<br />
Deleting Multiple Cues<br />
You can enter a cue range in the Cue Number edit box (i.e., 1/10) to remove multiple cues from<br />
a Cue List. You can also preselect the cues to be deleted by using [SHIFT] plus the [ARROW<br />
KEYS] to highlight multiple cues with the Blue Box. Then press [DEL] to show the Delete Cues<br />
Dialog box:<br />
<strong>Strand</strong> <strong>Lighting</strong><br />
p229
<strong>Palette</strong> <strong>OS</strong> v10<br />
Again, you have the options selecting to Retain Cue Data as described above.<br />
Deleting Cue Parts<br />
If you want to remove a Cue Part, you must highlight the Part with the Blue Box and press [DEL]<br />
. You will then be presented with the Delete Cue Part dialog box:<br />
You then have the option to either remove the part and any channel that is in it or just move the<br />
channels into the main part so they will assume the normal cue timing parameters. If you want<br />
to delete the entire cue, highlight the main part before pressing [DEL].<br />
See Also:<br />
Blue Box<br />
Part Cues<br />
Move/Copy<br />
Tracking<br />
-o-<br />
<strong>Strand</strong> <strong>Lighting</strong><br />
p230
<strong>Palette</strong> <strong>OS</strong> v10<br />
Goto Cue<br />
The Goto Cue dialog box is opened by pressing [SHIFT][GOTO CUE] or [SHIFT][Q] on the<br />
QWERTY keyboard.<br />
Cue List<br />
The selected Cue List will be displayed by default. If you want to Goto a cue on a different cue<br />
list, press [S1] until the desired cue list is displayed. The cues belonging to that Cue List will be<br />
displayed in the box below.<br />
Tip<br />
o<br />
o<br />
Cue<br />
Use the mouse to select a cue list from the pull-down list.<br />
Once you select a Cue List using [S1], all of the cue list's cues are displayed in this box. Using<br />
the wheel, you can scroll through this list to find the cue you want to go to. Pressing [ENTER] will<br />
take you to that cue. For timing options, see below.<br />
Cue Number<br />
This edit box is active by default when you enter this dialog box. That means that you can press<br />
[SHIFT] [GOTO CUE] [#] [ENTER] to quickly go to a cue directly.<br />
Note:<br />
The cue number of where the Blue Box is sitting before this dialog box is opened will<br />
automatically be inserted into the field.<br />
Use Cue Time<br />
If this box is checked, when you press [ENTER], the cue will execute in its recorded time.<br />
Note<br />
The Goto Time box may not update to the proper cue time if you are just entering a cue number<br />
until you 'leave' the Cue Number edit box. This is because the dialog box does not know what<br />
number you are entering (i.e., if you type "12" and expect the Goto Time to change to cue 12's<br />
time, how is it to know that you didn't want to continue typing to Goto cue "122".) Don't worry,<br />
<strong>Strand</strong> <strong>Lighting</strong><br />
p231
<strong>Palette</strong> <strong>OS</strong> v10<br />
even if the Goto Time number does not change, if the Use Cue Time check box is checked, when<br />
you press [ENTER] to close the dialog box, it will use Cue Time. If you want to check the time<br />
before pressing [ENTER], enter your desired Cue Number then press [NEXT] or [TAB] to change<br />
fields in the dialog box. The Goto Time box will then display the recorded time.<br />
Goto Time<br />
When Use Cue Time is checked, this edit box is grayed out, but it will show you the recorded<br />
time of the cue selected in the Cue Number edit box. If you want to use a different time,<br />
uncheck Use Cue Time and enter the desired time here. Pressing [S4] to uncheck the Use Cue<br />
Time box will move you to this box automatically. You can also press [S5] directly and it will<br />
uncheck [S4] for you.<br />
Goto Cue and Execute Follows<br />
By default, this check box is checked, meaning that once you Goto the desired cue, any Follows<br />
on the recorded cue will be executed. If you want to go to a cue and sit there, uncheck this<br />
box. If there are no follows on the cue, this box has no affect.<br />
Tip:<br />
You can move the Blue Box to the first column of any cue and press [EDIT] and you will GOTO<br />
that cue. This is equivalent to double clicking on the light in the first column.<br />
See Also:<br />
Releasing & Asserting Cue Lists<br />
Follow Cues<br />
-o-<br />
<strong>Strand</strong> <strong>Lighting</strong><br />
p232
<strong>Palette</strong> <strong>OS</strong> v10<br />
Follow Cues<br />
Follow enables you to program cues to run automatically. A Follow time on a cue is the length of<br />
time the system pauses after the cue’s activation before automatically starting the next cue. A<br />
Follow uses the next cue on the Cue List, unless the cue with the follow time is Linked to a<br />
different cue number.<br />
Follow cues are shown indented on the cue list as a visual reminder that they don't need to be<br />
executed by the board operator:<br />
Setting a Follow Time for a New or Existing<br />
Cue<br />
1.<br />
1. Using the Blue Box, highlight the Action cell for the cue that is going to trigger the follow<br />
and press [EDIT]<br />
2.<br />
2. Choose a Follow type from the drop-down list box.<br />
2.<br />
o<br />
o<br />
o<br />
o<br />
o<br />
o<br />
o<br />
Wait for Go: Normal cue - runs fade and stops waiting for the operator to press Go<br />
again.<br />
Follow After Fade: the follow will happen after the longest fade time of the cue is<br />
complete. If you change the fade time, you will not have to adjust the follow time.<br />
Follow In Time: After pressing GO, the follow to the next cue happens after a time you<br />
specify.<br />
o Follow Immediate: The follow happens exactly as the cue is executed (follow in 0<br />
time).<br />
<strong>Strand</strong> <strong>Lighting</strong><br />
p233
<strong>Palette</strong> <strong>OS</strong> v10<br />
3.<br />
3. If you selected Follow In Time, enter a time in the Follow Time text box.<br />
4.<br />
4. Click press Enter to close the dialog box and complete the action.<br />
Using the Command Line to add Follows<br />
If you start a command line with [CUE] the softkeys change to Cue specific functions:<br />
Typing [CUE][5] [S2 - FOLLOW] [ENTER] allow you to apply a Follow After Fade on Cue 5. [CUE]<br />
[5] [S2 - FOLLOW] [10] [ENTER] sets Cue 5 to Follow In a Time of 10 seconds to the next cue. If<br />
the cue already has a Follow set (any type of Follow), typing [CUE][5] [S2 - FOLLOW] [ENTER]<br />
will clear the follow (making it Wait for Go). If you omit the Cue Number, the current cue number<br />
will be used.<br />
See Also:<br />
Linking Cues<br />
Cue List Properties<br />
Creating Playback Loops<br />
-o-<br />
<strong>Strand</strong> <strong>Lighting</strong><br />
p234
<strong>Palette</strong> <strong>OS</strong> v10<br />
Linking Cues<br />
In some situations you may want to link one cue to another in the same cue list, effectively<br />
jumping over some cues. You do this by editing the Action of a cue.<br />
1. Using the arrow keys, move the Blue Box to the Action column of the last cue before the<br />
jump.<br />
2. Press [EDIT] or [INSERT] to change the cue's action.<br />
3. The Cue Action dialog box will appear.<br />
4. Press [S3] to disable the Run next Cue option. The focus will move to the edit box below.<br />
5. Type in or use the wheel to select the Next Cue. The cue labels will appear to the right of this<br />
edit box.<br />
6. Press [ENTER] to close the dialog box.<br />
7. The cue list will now show the Link icon with the cue to which the next [GO] will link to:<br />
Note:<br />
You can also use the [VIEW][CUE][##][ENTER] syntax to get the Cue List Properties dialog box.<br />
Using the Command Line to Links Cues<br />
If you start a command line with [CUE] the softkeys change to Cue specific functions:<br />
<strong>Strand</strong> <strong>Lighting</strong><br />
p235
<strong>Palette</strong> <strong>OS</strong> v10<br />
Typing [CUE][5] [S3 - LINK TO] [10] [ENTER] allow you link Cue 5 to Cue 10. If the cue already<br />
has a Link, typing [CUE][5] [S3 - LINK TO] [ENTER] will delete the link. If you omit the Cue<br />
Number, the current cue number will be used.<br />
See Also:<br />
Creating Playback Loops<br />
Cue Properties<br />
Cue Action - Macros<br />
-o-<br />
<strong>Strand</strong> <strong>Lighting</strong><br />
p236
<strong>Palette</strong> <strong>OS</strong> v10<br />
Playback Loops<br />
Links and Follows can be combined to create playback loops. If you are running a Cue List and<br />
press [GO] you can jump out of the loop and go to the next cue. Other actions can happen if you<br />
press [GO] too. Check out the topic called Action on GO within Cue Loop.<br />
Creating a Loop Within a Cue List<br />
To create a loop, you need to link the last cue of the loop to a cue higher in the list and make<br />
all cues Follow on from each other. The easiest way to do this is use the Blue Box to highlight<br />
the Action cells of the cues in the loop.<br />
1. Move the Blue Box to the cue with the lowest number<br />
2. Hold down [SHIFT] and press the [DOWN ARROW] until you reach the last cue in the<br />
loop:<br />
3. Then press [EDIT] to open the Cue Action dialog box:<br />
4. Select the Follow Mode and uncheck [S3] Run Next Cue.<br />
5. Roll the wheel or type in the Next Cue number. The cue label will appear to the right<br />
<strong>Strand</strong> <strong>Lighting</strong><br />
p237
<strong>Palette</strong> <strong>OS</strong> v10<br />
as you roll the wheel.<br />
6. Select OK. The cue list will now looks something like this:<br />
See Also:<br />
Follow Cues<br />
Linking Cues<br />
Action on GO within Cue Loop<br />
Blue Box<br />
-o-<br />
<strong>Strand</strong> <strong>Lighting</strong><br />
p238
<strong>Palette</strong> <strong>OS</strong> v10<br />
Action on GO Within<br />
Cue Loop<br />
When the GO button is pressed while a loop of Cues is going, the Cue List can be configured<br />
to behave differently. A loop is defined as a series of Cues that all have Follow times and a<br />
Link back from the last Cue in the Loop to the first Cue in the Loop. See Playback Loops.<br />
1. View the properties of the Cue List by pressing [VIEW] [SELECT] OR right click on a<br />
Cue List in the Cue List directory and select Properties. The Cue List Properties dialog<br />
box will appear.<br />
2. To Override the value defined in Show Options, check the box to the left of Go Action<br />
Inside Loops.<br />
3. Select from the list to the right:<br />
o<br />
Next cue<br />
<strong>Strand</strong> <strong>Lighting</strong><br />
p239
<strong>Palette</strong> <strong>OS</strong> v10<br />
o<br />
o<br />
o<br />
o<br />
o<br />
o<br />
Go to the next Cue within the Loop. This is what the Go button does normally in a cue<br />
list if you press Go when a fade is executing.<br />
Fall out of loop<br />
Execute all remaining cues within the loop in their cue time, then execute the cue after<br />
the loop.<br />
Jump out of loop<br />
Execute the first cue after the loop in its cue tim e. If you are running a normal 'Go<br />
Show' and a continula loop was built for a specific effect, this is the best way to stop<br />
the loopedeffect and continue with the show.<br />
Restart<br />
Execute the first Cue in the Loop (i.e., Goto top).<br />
See Also:<br />
Cue List Properties<br />
Program List Properties<br />
Playback Loops<br />
-o-<br />
<strong>Strand</strong> <strong>Lighting</strong><br />
p240
<strong>Palette</strong> <strong>OS</strong> v10<br />
Part Cues<br />
Part cues are a method of adding different timing for different groups of channels to use in a<br />
single cue. Generally, you build a cue which is a look on stage and then you decide how you are<br />
going to get from one cue to another. The Blue Box allows you to change timing of different<br />
attribute families without using parts, but it does it for all channels in the cue. For example,<br />
using the different columns in the cue list, you can have separate times for channels going up in<br />
intensity than those going down. You can also change times for Position fades vs. Color fades etc.<br />
If you want one group of channels to move at a different rate than others in the same cue, you<br />
can move those channels to a different part. (You may also want to use the alternate method<br />
called Independent Timing where each and every attribute of every channel can have its own<br />
wait and fade time. This is handy if you want splayed offsets and are not concerned about<br />
managing parts in the cue list.)<br />
You can do this either at record time, or when updating the cue.<br />
Putting channel in a different part when<br />
recording a cue<br />
1. Select the channels that will be in the main part and set their levels. This may include<br />
applying palettes or manually adjusting attributes. These channels need no further<br />
attention before recording the cue.<br />
2. Select the channels for the next part and adjust their levels.<br />
3. Press the [S11]Cue Parts button to open the cue part dialog box.<br />
Note:<br />
4. Select the button for the desired part.<br />
There is a main cue part that is not assigned a letter<br />
Cues need not be made up of parts in specific order. You can have a cue that has just<br />
a main part and a Part G.<br />
Press [S12] and roll the wheel to select parts greater than Part K then press [ENTER]<br />
to close the dialog box.<br />
If you select any part between A and K, the dialog box will close automatically.<br />
<strong>Strand</strong> <strong>Lighting</strong><br />
p241
<strong>Palette</strong> <strong>OS</strong> v10<br />
5. The Selected Channels will remain selected but will now show a superscript letter<br />
showing the part:<br />
Continue with Steps 2 through 5 until you have built the cue.<br />
Record the cue.<br />
Use the Blue Box to alter timing on the main part or any additional parts.<br />
Reassigning channels to different parts when<br />
updating a cue (without loading the cue)<br />
1. Goto the cue you want to alter.<br />
2. Select the channels that need to be assigned to a different part.<br />
3. Press the [S11]Cue Parts button to open the cue part dialog box.<br />
4. Select the button for the desired part.<br />
5. The channels will show a superscript letter showing the part:<br />
6. Continue with Steps 2 through 5 until you have assigned all channels to their correct<br />
part.<br />
7. Press [UPDT] [ENTER].<br />
8. Use the Blue Box to alter timing on the main part or any additional parts.<br />
See Also:<br />
Timing<br />
Follow Times<br />
<strong>Strand</strong> <strong>Lighting</strong><br />
p242
<strong>Palette</strong> <strong>OS</strong> v10<br />
Independent Timing<br />
Deleting Cues (including Cue Parts)<br />
Tracking<br />
Fanning<br />
-o-<br />
<strong>Strand</strong> <strong>Lighting</strong><br />
p243
<strong>Palette</strong> <strong>OS</strong> v10<br />
SMPTE Timecode on Cue<br />
Lists<br />
Cue Lists have a property to accept SMPTE Time Code.<br />
o<br />
o<br />
o<br />
o<br />
o<br />
Any number of Cue Lists may have SMPTE Time Code.<br />
Each Cue on the Cue List will GO when the recorded SMPTE Time Code is received.<br />
If the SMPTE source is rewound or advanced, <strong>Palette</strong> will sync the Cue List when the<br />
clock advances through the first cue that has the new time.<br />
SMPTE Times can be manually added or edited for each cue using the Blue Box. The<br />
SMPTE Learn Mode Tool can be used to automatically assign or change SMPTE Times in<br />
each Cue.<br />
<strong>Palette</strong> has Macros that allow you to control the Processor's Media Player to play CD's,<br />
Wave files, MP3's or MPEG's.<br />
You can read the current media file's play head location in the Status Bubbles:<br />
When using MP3 files, the SMPTE Hour place holder is determined by the MP3 track number. If<br />
you are using multiple songs, you probably want each song to have its own hour. To change it,<br />
you must change the properties of your MP3 file. Under the Summary tab, press the Advanced<br />
>> button:<br />
<strong>Strand</strong> <strong>Lighting</strong><br />
p244
<strong>Palette</strong> <strong>OS</strong> v10<br />
The Advanced button will show you properties that look like this:<br />
<strong>Strand</strong> <strong>Lighting</strong><br />
p245
<strong>Palette</strong> <strong>OS</strong> v10<br />
You can click on and change the Track Number and Apply the changes. When you open this MP3<br />
file with <strong>Palette</strong>, the SMPTE Hour will relate to this Track Number.<br />
Note:<br />
To read Time Code from the Windows Media Player, the <strong>Palette</strong> Media Player Communications<br />
Plug-in must be enabled:<br />
See Also:<br />
Cue List Properties<br />
SMPTE Learn Mode<br />
Media Player Control<br />
Macro Editor<br />
<strong>Strand</strong> <strong>Lighting</strong><br />
p246
<strong>Palette</strong> <strong>OS</strong> v10<br />
Tools<br />
-o-<br />
<strong>Strand</strong> <strong>Lighting</strong><br />
p247
<strong>Palette</strong> <strong>OS</strong> v10<br />
Recording and Using Looks and Groups<br />
Looks<br />
The virtual Sub Master display can be added to or removed from the display by selecting<br />
Display|Sub Masters from the Menu Bar or pressing [S5] from the main Softkey menu and<br />
selecting Sub Masters from the large pop-up display.<br />
Note:<br />
When dealing with just intensities, you may want to think of Sub Masters as conventional<br />
submasters. The term Sub Master more accurately describes how these controls adjust intensity<br />
attributes while still recording and playing back other attributes such as Pan and Tilt (i.e, when<br />
addressing a Look via the command line, the Level wheel will adjust the channels' intensities<br />
while not affecting other attributes. Likewise, when playing a Look back using the Sub Masters,<br />
different attribute families can be mapped to the handle in different ways.)<br />
The colored triangle on the virtual Sub Masters is there to indicate the Sub Master type.<br />
o<br />
o<br />
Green up arrows indicate an additive Sub Master.<br />
Red down arrows indicate an inhibitive Sub Master.<br />
A virtual Sub Master Handle appears when you place the Mouse pointer on a Sub Master and<br />
left click (and hold).<br />
o<br />
o<br />
To change channel levels, hold the left mouse button down while moving the mouse<br />
up and down, raising and lowering the handle.<br />
Release the left mouse button to release the handle. It will stay where you left it.<br />
The order in which you select channels is preserved when you Record a Look. This order is<br />
restored when you use the Look to recall a group of channels and matters when you are using<br />
Fanning and effects.<br />
<strong>Strand</strong> <strong>Lighting</strong><br />
p248
<strong>Palette</strong> <strong>OS</strong> v10<br />
You can get a Look's Properties by either right-clicking on the Virtual Look Display (see Display<br />
Menu) or using the [VIEW] or the [V] button on the QWERTY keyboard then selecting [S12]Sub<br />
Master.<br />
Select the Look Page then type in the Look Number to get the Look's Properties box:<br />
Label<br />
The Label can be any text field you want. This text will appear in the bubbles in the Look Display<br />
, in the Virtual Sub Master Handle, cues that reference this Look and in any dialog box that<br />
identifies the Look.<br />
Additive or Inhibitive<br />
When you record a Look, you can choose whether or not it will be additive (pile-on) or inhibitive<br />
(reducing the level). Levels that are affected by an inhibitive Sub Master appear like this:<br />
<strong>Strand</strong> <strong>Lighting</strong><br />
p249
<strong>Palette</strong> <strong>OS</strong> v10<br />
Note:<br />
Assuming you are dealing with Looks with similar Priorities, unless you choose HTP Intensity, the<br />
last look activated will take all levels to their new recorded level, even if that means lowering<br />
their level. Inhibitive Looks can hold cue levels lower than their recorded level.<br />
HTP Intensity<br />
Intensities can either be LTP or HTP. By default, when you record a Look, the Sub Master will<br />
control the intensities in an LTP fashion, allowing you to Busk looks, taking levels up or down,<br />
with the last one winning. You can also make Looks resolve in a Highest Takes Precedence<br />
fashion by checking this box. An HTP Look will not lose its intensity to other LTP Looks unless the<br />
LTP Looks have a higher priority.<br />
Priority<br />
You change the priority of this Look to any value between 1 and 100 (highest priority is Priority<br />
1). Higher Priority Looks (lower numbers) win. The exception is if another Sub Master or Cue List<br />
with the same priority sets the attribute to a different level (again resolved HTP or LTP as<br />
determined by the properties of that other control). The default priority is 9 such that Looks win<br />
over Cue Lists which have a default priority of 10.<br />
Attribute Behaviour<br />
Each Attribute Family can have a different behaviour when this Look is activated. By default,<br />
Intensity attributes are set to <strong>Manual</strong> control, meaning that the level will be scaled by the<br />
handle's position from 0% to 100%. Other options are Snap Off Zero and Snap At Full. That<br />
means that the attribute will go to it's recorded level without fading as soon as the handle moves<br />
off the bottom or hits the top.<br />
Note: These behaviours are set to automatically at record time. If both Intensities and other<br />
attributes are recorded into the Look, the Intensity Behaviour will be <strong>Manual</strong> and all the others<br />
will be set to Snap Off Zero. If you are recording attributes besides intensity (and specifically<br />
NOT Intensity attributes), the behaviours will be set to <strong>Manual</strong>.<br />
See Also:<br />
Sub Master Types (Additive and Inhibitive)<br />
Busking<br />
Apply Levels/<strong>Palette</strong>s<br />
Fanning<br />
Priorities<br />
Recording Looks<br />
Updating Looks Live<br />
Fade Resolution<br />
-o-<br />
<strong>Strand</strong> <strong>Lighting</strong><br />
p250
<strong>Palette</strong> <strong>OS</strong> v10<br />
Sub Master Types<br />
<strong>Palette</strong>'s virtual Look Masters can be used in either an additive or inhibitive mode. The operating<br />
mode for a Sub Master is determined at record time.<br />
Additive<br />
<br />
<br />
An additive Sub Master provides proportional control of its recorded channel levels. If a<br />
channel is recorded into a Sub Master at 80%, the channel will be at 80% when the Sub<br />
Master is at 100%.<br />
Additive Sub Masters pile-on (add to) the active stage levels in a highest takes precedence<br />
manner.<br />
The home position for an additive Sub Master is zero (0%).<br />
The levels of attributes controlled by additive Sub Masters are displayed in yellow .<br />
<br />
<br />
The LED on the bump button for sliders that have Looks recorded to them will be illuminated.<br />
The sliders must be setup to hold Looks.<br />
Your hardware can be setup to control Looks via the sliders.<br />
Inhibitive<br />
<br />
Inhibitive Sub Masters proportionally scale the intensity attribute of a channel. If the intensity<br />
of a channel is set to 50% by some other means, if you pull the inhibitive Sub Master at 50%<br />
the output will be 25%.<br />
The home position for a Inhibitive Sub Master is Full (100%).<br />
<br />
<br />
The intensities of channels being limited by inhibitive Sub Masters are displayed in yellow<br />
with a red box .<br />
The LED on a bump button that is setup to control an Inhibitive Look will flash if its slider is<br />
not at the top. It will flash rapidly if the slider is sitting at the bottom.<br />
See Also:<br />
Recording Sub Masters<br />
Hardware Setup - Slider Panels<br />
Channel Colors and Symbols<br />
Busking<br />
-o-<br />
<strong>Strand</strong> <strong>Lighting</strong><br />
p251
<strong>Palette</strong> <strong>OS</strong> v10<br />
<strong>Strand</strong> <strong>Lighting</strong><br />
p252
<strong>Palette</strong> <strong>OS</strong> v10<br />
Recording Looks<br />
For a complete description of Looks and different Look types, check out the topic Looks. <strong>Palette</strong><br />
does not have a collection of things called Groups. Groups are built using the Record Look Syntax<br />
and used by pressing the [GROUP] key or [G] and referencing a recorded Look number.<br />
Your hardware can be setup to control Looks via the sliders.<br />
Note:<br />
1.<br />
o<br />
o<br />
o<br />
o<br />
The very fastest way to record a Look is to build a look on stage then press [REC]<br />
[BUMP] on the desired Sub Master.<br />
If you want to keep the Record Look dialog box open to add label or change the record<br />
options, hold down [SHIFT] before pressing [BUMP].<br />
If you want to change the properties of the Look after it has been recorded, press<br />
[VIEW] [BUMP].<br />
You can also use the syntax [MOVE] [BUMP] [BUMP], [COPY] [BUMP] [BUMP] and<br />
[LOAD] [BUMP] which are very quick. See the Using Looks topic. (Make sure your<br />
hardware is setup to have Looks on the slider panels first.)<br />
1. Select either or from the Channel Grid Tool Bar.<br />
2.<br />
2. Select the channels to be assigned to the Sub Master.<br />
3.<br />
3. Set the levels or attributes.<br />
4.<br />
4. Click the Record button on the Tool Bar or press [REC]. The QWERTY equivalent is [R].<br />
5.<br />
5. Press [LOOK] or [F12] to record a Look.<br />
<strong>Strand</strong> <strong>Lighting</strong><br />
p253
<strong>Palette</strong> <strong>OS</strong> v10<br />
5.<br />
The following properties can be edited:<br />
[S1] - Select the Look Page in which you wish to record this Look into from the drop down list<br />
box. The last page you recorded to will already be active, so if you are working on position<br />
palettes, you will not have to change to the Position Look Page on every record operation.<br />
[S2] - Enter the number of the Sub Master you wish to record.<br />
Note:<br />
This edit field is active when you enter the dialog box, so you can just type [REC] [LOOK] [#]<br />
[ENTER] if you want to go fast.<br />
[S3] - From the drop down list box select the Record options.<br />
Note:<br />
The default Record Option is to record your Changed Attributes or those marked with the delta<br />
symbol: . Read what the other Record Options are and when to use them here. Read<br />
about other channel states here.<br />
[S4] - Enter a Sub Master label in the text box.<br />
[S5] - Check of Inhibitive if you want this to be Master to be inhibitive. See Look Types for<br />
details.<br />
[S7] - If you are recording to an existing Look and want to Merge in the changes, select Merge.<br />
Merging in data means that the new data will be recorded to an existing cue, not destroying data<br />
that is currently there. If you are recording to an existing look and don't select Merge, you will<br />
see the dialog box shown below after you press [ENTER]:<br />
<strong>Strand</strong> <strong>Lighting</strong><br />
p254
<strong>Palette</strong> <strong>OS</strong> v10<br />
[S8] - Use the Exclude Sub Masters check box to select if you don't want to record levels set by<br />
other active Sub Masters. This option is ON by default.<br />
[S9] - The Attribute button opens a dialog box that allows you to filter what will be recorded in<br />
this look (double press any key to solo that attribute):<br />
Note:<br />
o<br />
o<br />
o<br />
o<br />
If you double tap [S5] (or any other softkey), it will 'solo' Position. That is, all other check<br />
marks will clear and Position will remain checked.<br />
While in the main Record dialog box, if you press [SHIFT], the Attribute button will look<br />
like this<br />
and the softkeys will change to the following:<br />
Pressing any of these changes the attribute masking without the need to open the Attribute<br />
dialog box. You can also double tap any attribute family to solo it.<br />
6.<br />
Note:<br />
6. Click OK (or push [Enter] on the keypad) to record the Look.<br />
o<br />
<strong>Strand</strong> <strong>Lighting</strong><br />
p255
<strong>Palette</strong> <strong>OS</strong> v10<br />
o<br />
o<br />
o<br />
See Also:<br />
You can use the Command Line to record Looks too. Adjust your levels, then type [LOOK]<br />
[#] [REC]. The Look will be recorded to the current Look Page and Merge data if the look<br />
already exists. Other Sub Masters' levels will not be included in the record operation.<br />
If you want to modify a Look Live and use the [UPDT] button, the Look Handle must be at<br />
100%. See Updating Cues - Modifying Cues in the Live Display.<br />
Recording and Using Groups<br />
Command Line Syntax<br />
Apply Levels<br />
Selecting and Setting Channels<br />
Record Options<br />
Sub Master Pages<br />
Sub Master Types (Additive, Inhibitive and Attributes)<br />
Channel's different states<br />
<strong>Strand</strong> <strong>Lighting</strong><br />
p256
<strong>Palette</strong> <strong>OS</strong> v10<br />
Busking<br />
One of the very powerful features of <strong>Palette</strong> is the ability to very quickly record ideas to Looks<br />
(i.e., [REC] [BUMP]) that can later be called back by the command line, or referenced by cues as<br />
palettes or even played back on Sub Masters as easily as pushing up a slider. Using multiple Sub<br />
Masters in a live situation to layer pre-recorded ideas is what we call Busking.<br />
<strong>Palette</strong>'s Fade Resolution allows you to continue writing to the stage with many many different<br />
playbacks and Sub Masters and it keeps track of them all, even if only the latest or highest is<br />
winning. You can pile look upon look continually and then pull it all apart again, not just in<br />
reverse order, but in any order. With the flexibility of using multiple cue lists, look handles and<br />
bump buttons all used in combination with Priorities and Look Attribute Behaviors (described<br />
below), <strong>Palette</strong> makes a great live desk.<br />
After recording Looks to Sub Master Pages, <strong>Palette</strong> gives you many possibilities of how to bring<br />
that Look back up on stage. These are discussed fully in the topic called Looks under the section<br />
about the Look's properties, but it is worth showing the Look Properties' options here to<br />
exemplify two possible ways of using Looks in a live situation:<br />
If, when recording a Look using moving lights, the intensities are included in the Record Options,<br />
the look will automatically receive the properties as shown above. That means that as you push<br />
up a Look Slider, all the moving light attributes will quickly set themselves into position and<br />
leave you with just the intensity level on the slider. Moving the handle in the opposite direction,<br />
as the slider reaches zero, all the attributes will be released and will return to whichever playback<br />
or other look was controlling them before this look was brought up.<br />
<strong>Strand</strong> <strong>Lighting</strong><br />
p257
<strong>Palette</strong> <strong>OS</strong> v10<br />
If you want to have more control of how the channels will respond, change the properties of the<br />
Look (i.e., [VIEW] [BUMP]) and alter the Attribute Behaviors. This audience blinder look, which<br />
has very high priority, will manually control the intensities of the lights coming up (and possibly<br />
others going down if they are recorded at lower levels in this look). The Position will follow your<br />
movement with the handle whereas the color will go to its recorded state as soon as you move<br />
the handle and the recorded strobe value won't start until you reach the top.<br />
If you record a Look using Linear Movement, and you set the Position behaviour to <strong>Manual</strong>, you<br />
can use the Sub Master Handle to move fixtures in straight lines. (i.e., the light will move in a<br />
straight line from where ever it is on stage to the recorded position such that if you have multiple<br />
looks set up, you can move a group of lights to any position on stage, essentially using your<br />
moving lights as manual follow spots.)<br />
Note:<br />
If you are running a show live, it is handy to setup the A/B or C/D handles to control how long<br />
attributes get to their new level and how long they should take to return to their old levels once<br />
released. In combination with Busking, this makes <strong>Palette</strong> a very flexible Live Concert desk.<br />
See Also:<br />
Hardware Setup - Slider Panels<br />
Hardware Setup - A/B C/D<br />
Recording Looks<br />
HTP vs LTP<br />
Variables<br />
-o-<br />
<strong>Strand</strong> <strong>Lighting</strong><br />
p258
<strong>Palette</strong> <strong>OS</strong> v10<br />
Recording and Using<br />
Groups<br />
Group selection is used to Select 'like' channels. It is a handy method of organizing your rig such<br />
that you can address large section of it quickly. <strong>Palette</strong> is unique in that it does not have a<br />
separate 'container' or 'place' to record groups; it just uses the Record Look function. This is done<br />
because sometimes when you use groups, you want to just Select the channels and at other<br />
times you want to select them and put them in a certain state (or at certain levels). This is<br />
achieved in <strong>Palette</strong> by first Recording a Group, then either using the [GROUP] ([G] is the<br />
QWERTY equivalent) button to just Select the channels. Using the [LOOK] button or [L] key<br />
Selects them and sets their Levels.<br />
So to summarize:<br />
o<br />
o<br />
o<br />
o<br />
Groups are recorded as Looks<br />
The [GROUP] Button can be mapped to a specific Look Page in Show Options<br />
To use a Group, use the [GROUP] or [G] button, then enter the Look number - only<br />
the channels will be selected.<br />
To set a Group to a specific level, press [GROUP] [#] [@] [%] [ENTER].<br />
o To use the traditional Group At Level syntax, press [LOOK] [#] [ENTER] or [LOOK] [#]<br />
[@] [%] [ENTER]<br />
o<br />
Channel order selection is preserved when recording Looks and is restored when<br />
calling them back. This is useful for Fanning and Effects.<br />
Check out the topic Recording Looks for information on how to record Groups.<br />
See Also:<br />
Looks<br />
Recording Looks<br />
Show Options - Group Button<br />
Command Line Syntax<br />
-o-<br />
<strong>Strand</strong> <strong>Lighting</strong><br />
p259
<strong>Palette</strong> <strong>OS</strong> v10<br />
Apply Levels/<strong>Palette</strong>s<br />
<strong>Palette</strong> does not have a separate storage container for palettes like some desks do. Likewise,<br />
Groups are not stored in a container called Groups. The Look concept is used to achieve all of<br />
these goals. That is, you record ideas to Looks, then you can later use those Looks either on the<br />
Command Line or by pushing up sliders or by referencing them indirectly and recording that<br />
reference in a Cue or another Look. The reference method is commonly referred to as <strong>Palette</strong>s.<br />
Generally you think of <strong>Palette</strong> as a noun, but in <strong>Palette</strong>, it is a verb; one 'thing' is used by<br />
another 'thing' as a palette. Those things can be either Looks or Cues, and either can be used by<br />
anything.<br />
Using Look Levels<br />
Check out the topic called Command Line Syntax on how to call up raw recorded Look levels<br />
directly by typing them in. If you want to take advantage of the indirect reference functionality,<br />
you must us the Apply Levels dialog box. To use it, select channels, then type [@] [LOOK]. The<br />
Apply Levels dialog box will open:<br />
Note:<br />
o<br />
o<br />
o<br />
o<br />
You can also use the [@] [S5-P<strong>OS</strong>] or [@] [S6-COL] etc. syntax to open the Apply Levels<br />
dialog box. Doing so will automatically select the first Look Page that uses the appropriate<br />
attribute masking.<br />
You can apply parts of the recorded Looks by using the Attribute filtering.<br />
If the desired Look Page is not already selected, use [S1] to select it, then [S3] to scroll through<br />
the Looks until you have highlighted the desired one. If you press [S5], the currently selected<br />
Look will be pumped to the stage for preview purposes. If you cancel out of this dialog box, the<br />
original levels will be restored.<br />
If you uncheck [S4]Apply As <strong>Palette</strong>, the raw data will be applied to the selected attributes like<br />
<strong>Strand</strong> <strong>Lighting</strong><br />
p260
<strong>Palette</strong> <strong>OS</strong> v10<br />
this:<br />
If you have [S4]Apply As <strong>Palette</strong> checked, than the name of the Look gets applied rather than the<br />
raw data:<br />
If you then record this delta value into a cue (or another Look), when the cue runs it will ask Sea<br />
Blue for values before putting them to the stage. That way, if Sea Blue ever changes, you don't<br />
have to update the cues using it. This practice is particularly useful on touring shows where<br />
positions may change from night to night.<br />
Using Cue Levels<br />
<strong>Palette</strong> not only allows cues to reference stored Looks, but you can also use Cues themselves as<br />
indirect references. That is, a Cue can look to another cue for a value (or in fact, a Look can look<br />
to a Cue for a value). To open the Apply Levels dialog box using the command line, select the<br />
desired channels then type [@] [CUE]:<br />
Again, you can Preview the levels live on stage by pressing [S5] and scroll through the cues. You<br />
have the choice of leaving raw data captured by unchecking [S4]Apply As <strong>Palette</strong> or leave it<br />
check to have one cue reference another.<br />
See Also:<br />
Command Line Syntax<br />
Sub Master Pages<br />
Button Array Described<br />
-o-<br />
<strong>Strand</strong> <strong>Lighting</strong><br />
p261
<strong>Palette</strong> <strong>OS</strong> v10<br />
Patching<br />
Patch<br />
<strong>Palette</strong> uses Channel numbers as the base user addressable unit.<br />
Conventional desk often refer to these as Channels and moving light desks may call them Spots.<br />
Because of <strong>Palette</strong>'s very powerful Universal Attribute Control Model , regardless of whether it is a<br />
Moving Light or Convnetional Lights, we call them all channels. That way, what was once a par<br />
can, can be converted into a VL1000, just by changing the Channel Type<br />
To enter the patch, press [PATCH] or [S1] when there are no channels selected. The default<br />
method of patching is Channel to Output. You can reverse this to patching Outputs to Channels<br />
by pressing [S11].<br />
Note:<br />
The softkeys are sensitive to your current channel selection (i.e., if you have moving lights<br />
selected, [S1] will not be Patch). To enter the patch, regardless of what the softkeys are<br />
displaying use the mouse to select the Setup icon<br />
default selection is Patch by Channel.<br />
Patching Methods.<br />
above the Cue List Directory. The<br />
There are two ways to use the patch, either using the Graphical tools, or alternatively, by using<br />
the command line.<br />
Adding and Deleting Channels<br />
When you create a new show file, the default patch contains 100 Channels of Type Dimmer and<br />
the console is patched 1:1 such that each channel is patched to the corresponding output. You<br />
can see a summary of how many control channels your console is authorized for, how many<br />
you've used and how many remaining by looking in the top left pane of the display when you<br />
enter the patch display:<br />
[S1] puts Add Channel into the command line such that you can type command like [Add<br />
Channel] [129] [Thru] [500]. Note that you can also delete channel with [S2] as simply as<br />
<strong>Strand</strong> <strong>Lighting</strong><br />
p262
<strong>Palette</strong> <strong>OS</strong> v10<br />
typing [Delete Channel] [12] [Thru] [15] [+] [19]. If you were to type that command, the<br />
Channel Grid would look like this:<br />
The Channel Allocation above will change depending on how many channels total you have. The<br />
Moving Light total is a sub-set of the total channel count. The used channels is how many DMX or<br />
Ethernet outputs you're consuming.<br />
Patching Dimmer Type Channels to<br />
Outputs<br />
To patch normal intensity channels, enter the patch in either way as described above. If you have<br />
paperwork that lists the channels in order with their respective dimmer hookup, you will want to<br />
Patch by Channel. Patching is done in two ways; either using the command line or using the Blue<br />
Box.<br />
Using the Command Line<br />
To patch using the command line, first type a single channel number followed by [@] then the<br />
output number. Complete the command by pressing [Enter].<br />
Using the Blue Box<br />
Because of the very fast editing style of the Blue Box, if you are typing more than one patch<br />
entry at a time with paperwork in front of you (or someone reading you numbers) this method is<br />
preferred. The Patch by Channel display is already sorted by channel number, so entering output<br />
numbers in a sequential fashion using the Blue Box is very fast.<br />
Using the arrow keys, position the Blue Box in the Intensity column of the patch display on the<br />
same line as the first channel number you have in your paperwork. Press [EDIT] or [Insert] to<br />
open the box for editing. Type the appropriate<br />
Patching Moving Lights to Outputs<br />
Adding moving lights to your show is as easy as patching dimmers. Just decide on which channel<br />
numbers are going to be your moving lights, then change the Type from Dimmer to whatever you<br />
have in your rig. Do this by moving the Blue Box to the Type column and pressing [EDIT] or<br />
[Insert]:<br />
<strong>Strand</strong> <strong>Lighting</strong><br />
p263
<strong>Palette</strong> <strong>OS</strong> v10<br />
Press [S1] to select the Fixture Manufacturer and [S2] to select the Model/Mode of channel you're<br />
using then press [ENTER] to close the dialog box. Then move the Blue Box to the Attribute<br />
column and enter the starting output address for each channel. You can also use the Power Patch<br />
to automatically enter a series of channels. If you have automated lighting that needs an<br />
intensity patch and an automation patch, enter each in the appropriate columns. This is typical<br />
with scrollers and tungsten sourced automated lights.<br />
Fixture Settings<br />
Sometimes when you add moving lights to your rig, you want the encoders to react a certain<br />
way; i.e., when you crank the wheel right, you want the light to move on-stage. To do this, move<br />
the Blue Box to the Settings column and press [EDIT] or [Insert] to open the Fixture Settings<br />
dialog box.<br />
<strong>Strand</strong> <strong>Lighting</strong><br />
p264
<strong>Palette</strong> <strong>OS</strong> v10<br />
After you close the box, the Setting cell will have symbols showing which setting was applied<br />
(Pan Invert, Tilt Invert and Swap Pan/Tilt shown below from left to right):<br />
Output Settings<br />
You can configure the Output (DMX or Ethernet) by tweaking its value at the very end of the<br />
Fade Resolution chain by moving the Blue Box to the Settings column in the Patch By Output<br />
display and pressing [EDIT] or [Insert]. You will be presented with the Output Patch Settings<br />
dialog box:<br />
Proportional Patch<br />
If you want the Output to be a scaled value of what is displayed in the channel grid, change this<br />
value to something other than 100%. Valid numbers are between 1% and 200%. For example, if<br />
you have Channel 1 patched to Output 1 with a Proportional Patch of 50%, when Channel 1 is<br />
showing a value of 80% in the Channel Grid, the Output will only be at a level of 40%. Or, if you<br />
have a Proportional Patch of 200% and Channel 1 is showing a value of 10% in the Channel Grid,<br />
<strong>Strand</strong> <strong>Lighting</strong><br />
p265
<strong>Palette</strong> <strong>OS</strong> v10<br />
the Output will be set to 20%. (Note: Output values will never exceed 100%).<br />
Limiting Outputs<br />
If you enter values for Output Min or Output Max, you can limit the upper and/or lower limits of<br />
an Output, regardless of how the control channel wants to affect it. The fade profile will be the<br />
same elsewhere in the fade path, but as a limit is reached, the value will cease to move. Valid<br />
entries are between 0% and 100%.<br />
Profiling the Output<br />
Select from the combo box to change the Profile of the Output. For example, if you choose<br />
Inverted, when the control channel reads 100% in the Channel Grid, the Output will actually be<br />
at 0%. The following profiles are available: Linear; Snap at Start; Snap at End; Zig Zag, Squares<br />
Law; Invert; Slow Start; Fast Start; Fast End; Damped; Slow End; Non-Dim; 35% Jump Start<br />
Parking an Output<br />
If you choose any of the Park options, the Output will never change from that value, regardless<br />
of where the control channel wants to set it. Parking Outputs is at the top of the Fade Resolution<br />
pecking order.<br />
Output Devices<br />
On new shows, the DMX outputs on the back of your console hardware are mapped to <strong>Palette</strong><br />
Outputs 1 through 1024. You can configure the Output Devices by clicking the [+] sign in the<br />
upper left hand pane of the display:<br />
The options for <strong>Palette</strong> USB (back of console) are None, 1 to 512 and 1 to 1024. You can also<br />
choose to output via Ethernet using the Pathport protocol. Just select how many XDMX universes<br />
you want to output to and configure your Pathport network to listen to those slots.<br />
See Also:<br />
Power Patch<br />
ShowNet<br />
One to One Patch<br />
Fade Resolution<br />
<strong>Strand</strong> <strong>Lighting</strong><br />
p266
<strong>Palette</strong> <strong>OS</strong> v10<br />
Setting Up Scrollers<br />
<strong>Palette</strong> uses profiles to define colour scrolls. In this way, scrolls can be named and even colours<br />
corresponding to the Gell colour can be displayed. Scroller information apprears in the Live<br />
Screen beneath the control channel number.<br />
Creating A Scroller String:<br />
1) Enter the Patch<br />
2) Choose the Profile Key (S10)<br />
3) Choose the Edit Profile Key (M10)<br />
4) Select Add Profile (S2)<br />
5) Select from the list a colour scroller and the number of frames that you want to use.<br />
6) Give the Profile a name, eg FOH Scrollers<br />
7) In the Label Column, add a description of the colour in each frame. Note if you enter the<br />
Colour Swatch number, it can be displayed on the Live Screen. eg. a label of L181 will<br />
show Congo Blue in the frame window.<br />
Patching the Scroller<br />
1) Enter Patch<br />
2) Select the circuit that has the scroller either by Double Clicking on the Type Entry, or by<br />
using a patch command line.<br />
3) Choose the Generic Device Manufacturer<br />
4) Choose Scroller Dimmer 8 bit<br />
Assigning the Scroller String<br />
1) Enter the Patch<br />
2) Select the required circuit on the command line<br />
3) Press @<br />
4) Select the DMX address of the Scroller<br />
5) Press the Attribute softkey<br />
6) Select Colour Profile<br />
7) Select Your profile defined in Step A)<br />
8) Press Enter.<br />
<strong>Strand</strong> <strong>Lighting</strong><br />
p267
<strong>Palette</strong> <strong>OS</strong> v10<br />
Your scroller has now been assigned and in the live screen, when controlling the unit, you will see<br />
your colour frames appear beneath the channel number.<br />
-o-<br />
<strong>Strand</strong> <strong>Lighting</strong><br />
p268
<strong>Palette</strong> <strong>OS</strong> v10<br />
Patching Invdividual<br />
Attributes<br />
Normally you will patch in moving lights by giving the start address in the DMX1 Column for the<br />
Channel.<br />
This will result in DMX addresses being assigned correctly. You can check this by viewing the<br />
Patch by Output Screen<br />
However there are times when you want to change the DMX address for a particular attribute. In<br />
particular, you may do this when working with RGB devices on a cyclorama.<br />
Step 1:<br />
<strong>Strand</strong> <strong>Lighting</strong><br />
p269
<strong>Palette</strong> <strong>OS</strong> v10<br />
In the Patch by Channel/Fixture assign the Type as RGB for the channel:<br />
Step 2<br />
In the Patch by Output use the command line to patch the attribute to the required channel:<br />
Notice Softkey S4 is marked as Attribute, select it to show the Attributes on the Upper softkeys<br />
Select the Upper Softkeys with the Mouse or M1 - M 12<br />
-o-<br />
<strong>Strand</strong> <strong>Lighting</strong><br />
p270
<strong>Palette</strong> <strong>OS</strong> v10<br />
Tools<br />
Tools<br />
Tools are handy utilities that make your programming easier. The [TOOLS] button or [T] button<br />
gives you access to the last tool you used and works as a toggle. While a tool is active the LED on<br />
the button will flash.<br />
To select a tool, press and hold [shift] and the [Tools] button. The command line willl show<br />
Select Tool and the softkeys will then show the available tools:<br />
Select the desired tool (if you need to see more, press [S12] while still holding down Tools). That<br />
tool will then become active and the [TOOL] LED will remain lit. Press the tools button again to<br />
disable the active tool. The Status Window will now show the last tool used:<br />
Tools and the Button Array<br />
The first four softkeys will be labeled with the Look Pages as assigned in the Hardware Setup -<br />
Button Array. If you do chose one of these first four tools, the Button Array 5x5 display will be<br />
superimposed on your main screen and you will be able to use the mouse or touchscreen to<br />
select whatever you have setup in the array. (Note: you do not have to have a physical button<br />
array to view the 5x5 array of palette buttons.)<br />
See Also:<br />
Button Array Described<br />
Channel Check<br />
Flash Fixture or Output<br />
SMPTE Learn Mode<br />
<strong>Strand</strong> <strong>Lighting</strong><br />
p271
<strong>Palette</strong> <strong>OS</strong> v10<br />
Flip<br />
Fanning<br />
Highlight/Lowlight<br />
Park Attributes<br />
Status Bubbles<br />
-o-<br />
<strong>Strand</strong> <strong>Lighting</strong><br />
p272
<strong>Palette</strong> <strong>OS</strong> v10<br />
SMPTE Learn Mode<br />
SMPTE Learn Mode is used to synchronize a Cue List with a source of SMPTE Time Code.<br />
Note:<br />
You will need to change the Cue List's properties to accept SMPTE Time Code.<br />
1.<br />
1. Build a series of cues that will need to be synchronized with SMPTE Time Code.<br />
2.<br />
2. Activate the Tool, SMPTE Learn (see the Tools topic for more information on how to use<br />
the [TOOLS] button)<br />
3.<br />
3. Be sure the Cue List is marked for SMPTE in the Cue List Properties<br />
4.<br />
4. Start the SMPTE source. Hit the [GO] button to execute the cue at the desired time. This<br />
will automatically record the SMPTE time with each Cue.<br />
5.<br />
5. Run the SMPTE Time from the beginning and each Cue will execute at the recorded SMPTE<br />
time.<br />
See Also:<br />
SMPTE Time Code on Cue Lists<br />
Media Player Control<br />
Tools<br />
-o-<br />
<strong>Strand</strong> <strong>Lighting</strong><br />
p273
<strong>Palette</strong> <strong>OS</strong> v10<br />
Flip<br />
The [S6] tool on the of the Tools softkeys allows you to Flip moving head channels:<br />
If you just ran a cue and the moving head channels went to their new position 'the wrong way',<br />
you may want to Flip them. As moving heads have two ways to reach every point on stage this<br />
sometimes happens when you're positioning a channel and you don't consider where it came<br />
from. There is no sure-fire way to avoid this happening; it is only evident after you run the cues.<br />
One rule of thumb is to always tilt the channel towards you first before you position it. Following<br />
this one rule normally keeps you out of trouble.<br />
If you do find that the cue did not position the channel elegantly (i.e., they went the wrong way<br />
around) just select the channels and use the Flip Tool and update the cue.<br />
To use Flip, press and hold the [TOOLS] button and select [FLIP]. The selected moving head<br />
channels will flip around on stage landing at the same location they were in originally, but using<br />
different pan and tilt values.<br />
Once you use the Flip tool once, it will be the 'last tool' as shown in the Tool Status Bubbles:<br />
Pressing and releasing [TOOLS] will perform the flip operation again.<br />
See Also:<br />
Tools<br />
Controlling Moving Lights<br />
Updating Cues<br />
-o-<br />
<strong>Strand</strong> <strong>Lighting</strong><br />
p274
<strong>Palette</strong> <strong>OS</strong> v10<br />
Fanning Tool<br />
When you are adjusting attributes, you can customize the way the wheel acts upon the values<br />
they are changing. Generally, as you roll the wheel a tick, the selected value changes by one unit<br />
(i.e., one percent, one degree, one second, one gobo etc.) If you activate one of the fanning<br />
Tools, differing results can be achieved. The following fan modes are available:<br />
To activate a fanning tool press [SHIFT] and the [TOOLS] button or [T] on the QWERTY keyboard<br />
. The Softkeys will display all the available tools:<br />
The Fan tool is activated by pressing [S7]. A large pop-up list (shown above) is displayed and<br />
you can choose which fanning method you want to invoke. (see examples below) Do this by<br />
rolling the wheel or using the arrow keys then press [ENTER]. The Tool bubble will then turn red<br />
and show you the active fanning method:<br />
The [TOOLS] button LED will be on and whenever you adjust multiple channels' attributes or<br />
times, their values will be fanned. To turn fanning off and change the adjustment method back to<br />
normal, press the [TOOLS] button again. The Tool bubble will turn pink and display the last<br />
active fanning tool used:<br />
If at any time you want to use fanning again, just press and release the [TOOLS] button. If you<br />
want to change the fanning method, press and hold the Tools button and press [S7] to display<br />
the large pop-up of all the fanning methods.<br />
By default, the fanning is spread out across all the selected channels evenly. When the fan tool is<br />
active, the fan effect can be m ultiplied by holding down [SHIFT] when rolling the wheel. You then<br />
see how many times the fan is spread out across your selection set.<br />
For example, if you have twenty fixtures on two pipes, if you Fan Pan Center you may get this<br />
<strong>Strand</strong> <strong>Lighting</strong><br />
p275
<strong>Palette</strong> <strong>OS</strong> v10<br />
effect:<br />
If you then hold down [SHIFT] and roll the wheel until the Pan value shows as "2x", the resultant<br />
effect is two fans across twenty fixtures:<br />
Note:<br />
o<br />
o<br />
o<br />
The order in which you select channels matters when you use fanning.<br />
Channel selection order is preserved when you record Looks and use them as Groups.<br />
The Fan tool will automatically turn off when you change attribute families or release<br />
the selected fixtures.<br />
Using different attributes and different fanning methods and multiplying the fan gives you an<br />
enormous amount of fine-tuned control of your lighting rig.<br />
Fan Right on<br />
Tilt<br />
<strong>Strand</strong> <strong>Lighting</strong><br />
p276
<strong>Palette</strong> <strong>OS</strong> v10<br />
Fan Sine on<br />
Tilt<br />
Fan Ends on<br />
Iris<br />
Fan Right on<br />
Gobo Index<br />
See Also:<br />
Tools<br />
Controlling Moving Lights<br />
-o-<br />
<strong>Strand</strong> <strong>Lighting</strong><br />
p277
<strong>Palette</strong> <strong>OS</strong> v10<br />
Highlight/Lowlight<br />
Access the HighLight or Lowlight tools by pressing and holding the [TOOLS] button (or [T] on the<br />
QWERTY keyboard) then select either [S8] for Highlight or [S9] for Lowlight (you may need to<br />
select if Highlight and Lowlight are not visible):<br />
These tools allows you identify selected channels for ease of positioning. When you use<br />
Highlight, all Gobo and Color attributes are taken to their highlight value (no gobo, no color) and<br />
the intensity is taken to full (Note: Lens attributes are not affected). This allows you to position<br />
the channel easily while not destroying cue information to see it. The Attribute Grid will show the<br />
text "HL" in place of the value that would normally be going to the stage:<br />
Although Highlight alters attributes, it does not mark these attributes as changed. If the values<br />
were changed before Highlight was turned on, you will see a red delta HL. If the values were at<br />
their default values are under the control of a cue or look, you will see a black HL. When you<br />
toggle Highlight off, all attributes except Pan and Tilt will return to their previous value.<br />
If you highlight conventional channels, their intensity it taken to full as well. Used in combination<br />
with the [NEXT]/[PREV] key, you can quickly find channels. Lights with scrollers on them will be<br />
temporarily forced to Open White (or the first color in the gel string).<br />
LowLight takes the selected channel to Full and all other channels in the current cue list to 20%.<br />
It does not affect any other attributes.<br />
See Also:<br />
Tools<br />
Flash Fixture or Output<br />
Controlling Moving Lights<br />
Channel Check<br />
-o-<br />
<strong>Strand</strong> <strong>Lighting</strong><br />
p278
<strong>Palette</strong> <strong>OS</strong> v10<br />
RemDim or Remainder<br />
Dim<br />
Access the RemDim tool by pressing and holding the [TOOLS] button (or [T] on the QWERTY<br />
keyboard) then select [S10] (you may need to select if RemDim is not visible):<br />
If RemDim was your last Tool, then just pressing and releasing [TOOLS] will perform a RemDim.<br />
If channel 1 is at 0%, typing [1] [REMDIM] will take channel 1 to 100% (or the Full level as set<br />
in Show Options) and all other channels above 0% in the current cue list to 0%. The second<br />
press of [REMDIM] will take all channels, regardless of playback, to 0%.<br />
If channel 1 is at some level set by the current cue list, typing [1] [REMDIM] will set all other<br />
channels above 0% in the current cue list to 0% and leave channel 1 at its current level.<br />
The syntax [1] [@] [5] [REMDIM] takes channel 1 to 50% and others in the current cue list<br />
above 0% to 0%. Again, the second press of [REMDIM] will take all channels to 0%.<br />
Typing [REMDIM] by itself takes all channels in the current cue list above 0% to 0%.<br />
See Also:<br />
Highlight/Lowlight<br />
Tools<br />
-o-<br />
<strong>Strand</strong> <strong>Lighting</strong><br />
p279
<strong>Palette</strong> <strong>OS</strong> v10<br />
Colour Picker Tool<br />
The fastest way to select colors with color mixing channels is to use the Color Picker tool. To use<br />
it, select the channels then press and hold the [TOOLS] button and choose [S11] - Color Picker<br />
(you may need to select if Color Picker is not visible):<br />
An image box will appear:<br />
Using the mouse, click and drag in this space and the selected color mixing channels will attempt<br />
to simulate the color under the cursor. If they are not already, they will be switch to the RGB<br />
color space. When you are happy with the color, close the Color picker by either pressing<br />
<strong>Strand</strong> <strong>Lighting</strong><br />
p280
<strong>Palette</strong> <strong>OS</strong> v10<br />
<strong>Strand</strong> <strong>Lighting</strong><br />
p281
<strong>Palette</strong> <strong>OS</strong> v10<br />
Channel Check<br />
With Channel Check, you can easily accomplish your pre-show lighting check. Your Channel<br />
Check can be done either manually or automatically.<br />
To <strong>Manual</strong>ly Perform A Channel Check<br />
1. Select the channel where you want to start the channel check.<br />
2. Press and hold the Tools Button or [T] on the QWERTY keyboard.<br />
3. Select Channel Check [S1].(you may need to select to see Channel Check on [S1]).<br />
4. The Current Channel text box will have the first Channel you have selected in it. Change it<br />
with the Wheel or by typing in a new number if needed.<br />
Note:<br />
1. If you type a value in the Current Channel box and press Enter, the Channel will raise to the<br />
High Check Value. If you then type in a new number and press Enter again, the previous<br />
number will go to the Low Check Value and the new Channel will go to the High Check Value.<br />
2. Select the High Check Value box and enter a percentage level to establish the maximum level<br />
at which Channels play during the check.<br />
3. Select the Low Check Value box and enter a percentage level to establish the minimum level<br />
Channels return to after being checked.<br />
4. Use the Go Forward or Go Back button to manually execute each step of the Channel Check.<br />
5. Click OK when the check is completed.<br />
6. Click the Release button on the Channel grid toolbar twice (or press the [UNDO] key<br />
twice) to release all Channels controlled by the keypad (shown with red levels under the<br />
Channel number).<br />
To Automate Channel Check<br />
<strong>Strand</strong> <strong>Lighting</strong><br />
p282
<strong>Palette</strong> <strong>OS</strong> v10<br />
1. Follow steps 1 through 6 above.<br />
2. Enter a time in the Advance Time text box.<br />
Note:<br />
1. The Advance Time establishes the length of time a Channel stays at the High Check Value<br />
before automatically fading down to the low check value. At the same time the next Channel<br />
fades up to the High Check level, and so on.<br />
2. Click Stop if you want to pause on a Channel.<br />
3. Press either the Go Forward or Go Back button to continue in the desired direction.<br />
4. Select OK or press Enter when your done.<br />
Note:<br />
<br />
<br />
<br />
The High Check Value can be lower than the Low Check Value.<br />
There are macro in the Macro Editor that will advance or backup the Channel check. If you<br />
assign these macros to the console's trigger buttons, you can easily make a pendant that you<br />
can use on stage for doing Channel check.<br />
The last Tool you used is assigned to the [TOOLS] button. If you select a Channel before you<br />
enter ChannelCheck, that is the Channel that the Channel Check will start at. So, when used<br />
in combination with the last Tool button, the syntax becomes [#] [TOOLS].<br />
-o-<br />
<strong>Strand</strong> <strong>Lighting</strong><br />
p283
<strong>Palette</strong> <strong>OS</strong> v10<br />
Flash Fixture or Output<br />
When you are hunting for a specific intensity channel, sometimes it is easier to flash through a<br />
bunch of them until you identify the one you want on stage. Using this Tool allows you to quickly<br />
flash lights on the stage and not affect channels that are currently captured by setting them to<br />
Full and Out repeatedly.<br />
Access the Flash tools by pressing and holding the [TOOLS] button (or [T] on the QWERTY<br />
keyboard) then select either [S2] for Flash Channel or [S3] for Flash Output (you may need to<br />
select to see Flash Channelon [S2]).<br />
Using the [S2] or [S3] buttons to step forward or backwards from the current channel. The<br />
channel that is shown in the edit box will appear like this in the Channel Grid showing that<br />
is flashing. If you are flashing Outputs (DMX), there is no change to the channel grid.<br />
Hint:<br />
Use the Wheel to roll through the channels<br />
o<br />
o<br />
o<br />
o<br />
See Also:<br />
Channel Check<br />
Tools<br />
Once you select the Flash tool once, you can toggle this tool on and off by pressing the<br />
[TOOLS] button (or [T] on the QWERTY keyboard)<br />
Select the channel first, then press Tools to autom atically fill the Channel edit box<br />
Once you press Enter to close the dialog box (or toggle the Tools button), the last<br />
channel in the edit box will be Selected.<br />
After typing in new values into the number box, if you press Enter, the selected<br />
channel (or output) will flash. You can then enter another number and press enter<br />
again and the dialog box will not close. If you press Enter twice, the dialog box will<br />
close.<br />
-o-<br />
<strong>Strand</strong> <strong>Lighting</strong><br />
p284
<strong>Palette</strong> <strong>OS</strong> v10<br />
General Information<br />
General Show Options<br />
Touching [S3] will open the Show Options dialog box. [S9] though [S12] switch you between the<br />
different setup options.<br />
See Also:<br />
Default Cue List Options<br />
Venue Setup<br />
Show Save Options<br />
[S1] - Cue Only Mode<br />
When you are recording cues in the middle of your cue list (not appending to the end of the cue<br />
list), the Record dialog box will have a check box to determine if the changes you make will track<br />
forward into the next cue or be undone for you automatically in the next cue. This option allows<br />
you turn it on or off by default.<br />
[S2] - Default Cue Record<br />
This option sets the default cue record action. Live is the most common action, however you can<br />
change this to a number of different options. See recording cues for more details<br />
<strong>Strand</strong> <strong>Lighting</strong><br />
p285
<strong>Palette</strong> <strong>OS</strong> v10<br />
[S3] - Default Look Record<br />
This option sets the default Look record action. Live is the most common action, however you<br />
can change this to a number of different optins. See Recording Looks for more details<br />
[S4] - Up / Down Percent<br />
The Console's [UP] and [DOWN] buttons or the QWERTY keyboard's [PG/UP] and [PG/DN]<br />
buttons will move Selected channels' intensities by this amount. If you hold down [SHIFT] while<br />
using those buttons, the level will change by 1% regardless.<br />
[S5] - At Full Percent<br />
When using the Command Line, you can press [FULL] or [HOME] to take the selected channels to<br />
a predetermined level. On new show, this is 100%, but you can change it here to any value. If<br />
you double hit [FULL] or [HOME] the channel will go to 100% regardless of this setting.<br />
[S6] - Default Color Space<br />
When working with moving lights that can achieve multiple colors using three color flags or gel<br />
strings or sources, you can mix in any one of six color spaces. At any time you can change the<br />
color mix mode live, but this setting determines what the default color space mix mode will be.<br />
[S7] & [S8] - Look and Group Key Look Page<br />
The console has dedicated [LOOK] and [GROUP] buttons to address certain Sub Master Pages so<br />
while in the Command Line you can call them up by number. Select which Page you want for<br />
those keys here. These dedicated console buttons also allow you to quickly navigate dialog boxes<br />
such as Record and Apply Levels, rather than using the depicted Softkeys (normally [S11] and<br />
[S12]. When in the command line, the QWERTY equivalent of these keys is [L] and [G].<br />
Default Colors<br />
These options determine what colors are used for the Cue List Directory, Cue List, Attribute Grid<br />
and Uber Status. On a per-cue list bases, you can change the colors so you can easily detect<br />
which cue list is selected.<br />
-o-<br />
<strong>Strand</strong> <strong>Lighting</strong><br />
p286
<strong>Palette</strong> <strong>OS</strong> v10<br />
Default Cue List<br />
Options<br />
Touching [S3] will open the Show Options dialog box. [S9] though [S12] switch you between the<br />
different setup options.<br />
See Also:<br />
Show Options<br />
Venue Setup<br />
Show Save Options<br />
Cue List Defaults<br />
Cue List look to these settings to get their default values. Individual cue lists can override these<br />
settings if they want to by changing settings in the Cue List Properties box.<br />
[S1] - Assert - Double Click Goto Time<br />
Asserting a cue list means to take full control again after other cue list have stolen channel from<br />
you. To do this manually, press [SHIFT] [GO].<br />
If you use the mouse to double click on the left most cell in the Cue List you will execute a GOTO<br />
on that cue. The fades on channels involved in the GOTO will happen in the time you set here.<br />
<strong>Strand</strong> <strong>Lighting</strong><br />
p287
<strong>Palette</strong> <strong>OS</strong> v10<br />
Alternately, you can move the Blue Box to this cell and press [EDIT] or [INSERT] on the QWERTY<br />
keyboard.<br />
[S2] - Cue List Release Time<br />
When your Release a Playback, the values have to fade to some other value; either their default<br />
value or the value set by some other cue list as determined by the Fade Resolution. The Cue List<br />
Release Time determines that fade time.<br />
[S3] - Cue List Step Time<br />
If you are running rehearsals, you may just want to step from cue to cue ignoring the recorded<br />
times. You have the option to set the time you step through cues using [Step Fwd] [Step Back]<br />
keys or "[" and "]".<br />
[S4] - Cue List Back Time<br />
This time is used when you press [SHIFT] [BACK] or the Go Back toolbar button<br />
backwards through the cue list using cue time.<br />
to move<br />
[S5] - Default Cue Time<br />
Use this text box to set the Default Cue Time. The default time is stuffed into the Record dialog<br />
box each time new cues are written. You can easily change individual cue times in the Record<br />
dialog box when you are writing them or just as easily afterwards using the Blue Box.<br />
[S6] - Loop Go Action<br />
Use the combo box to select the action to be taken when the GO button is hit during a loop of<br />
Cues. For an explanation of each, see Action On Go Within a Cue Loop.<br />
[S7] - Goto Cue on Record<br />
This option, if set, takes you to new cues you've just recorded when the Record dialog box closes.<br />
The default for this option is on. If you are doing a lot of editing out of sequence, you may want<br />
to turn this option off. If you do a Record Merge, the GOTO does not happen.<br />
<strong>Strand</strong> <strong>Lighting</strong><br />
p288
<strong>Palette</strong> <strong>OS</strong> v10<br />
[S8] - Release Fixtures on Record<br />
This option, if set, automatically releases all Captured Attributes when the Record dialog box<br />
closes. The default for this option is on. If you are building multi-step chases with moving lights,<br />
you may not want the channels released after recording each and every step.<br />
Move In Black<br />
The MIB time will be used on all newly recorded cues. The MIB time is found in the Cue Actions<br />
dialog box and can be altered for each and every cue.<br />
See Also:<br />
Patch<br />
Printing<br />
Move In Black<br />
Hardware Setup<br />
-o-<br />
<strong>Strand</strong> <strong>Lighting</strong><br />
p289
<strong>Palette</strong> <strong>OS</strong> v10<br />
Venue Setup/Location<br />
Touching [S3] will open the Show Options dialog box. [S9] though [S12] switch you between the<br />
different setup options.<br />
See Also:<br />
Show Options<br />
Default Cue List Options<br />
Show Save Options<br />
Time Events<br />
Show Information<br />
If you are going to do Printed Reports, you will probably want to fill in the Show Info fields.<br />
These names are used at the top of reports.<br />
Location<br />
If you are going to use the astronomical time clock features of <strong>Palette</strong> for triggering events<br />
automatically based on the Sunrise or Sunset, you need to specify where your system is located.<br />
[S6] is normally the name of the city you are in or closest to. The text in this field is arbitrary<br />
and can, for example, be "The Science Museum". It will automatically be filled in if you choose<br />
[S7] to open the Change Location dialog box:<br />
<strong>Strand</strong> <strong>Lighting</strong><br />
p290
<strong>Palette</strong> <strong>OS</strong> v10<br />
Description<br />
[S1], again, is arbitrary. You can enter anything you like in this field, but it will be filled in with<br />
the selection you make with the mouse in the list to its left.<br />
Location<br />
[S2] and [S3] will be filled in if you choose a city from the list but they also allow you to enter<br />
precises values for Latitude and Longitude if you know them. Normally choosing a city that is<br />
within a twenty minute drive will be close enough.<br />
Today's Astronomical Events<br />
For the location chosen, you can see when each of the four astronomical events will occur based<br />
on the current time of you system.<br />
To set <strong>Palette</strong>'s clock and daylight savings time parameters, check out Date and Time in <strong>Palette</strong><br />
Control Panel.<br />
-o-<br />
<strong>Strand</strong> <strong>Lighting</strong><br />
p291
<strong>Palette</strong> <strong>OS</strong> v10<br />
Show Save Options<br />
Touching [S3] will open the Show Options dialog box. [S9] though [S12] switch you between the<br />
different setup options.<br />
See Also:<br />
Show Options<br />
Default Cue List Options<br />
Venue Setup<br />
[S1] - Show Checkpoint Time<br />
If this value is non-zero, whenever a change to the show file has been made a checkpoint file<br />
(*.spc) will be saved to disk at regular intervals. The Checkpoint file is saved in the same<br />
locations as the show file. The FILE|OPEN dialog box will allow you to open a Checkpoint file by<br />
changing the "Files of Type" combo. If you do open a Checkpoint file, you will do a SAVEAS the<br />
first time you choose SAVE. The Uber Status will show you when the last Checkpoint file was<br />
written.<br />
If your system crashes or you lose power, when you recover the Checkpoint file will be opened<br />
rather than the show file:<br />
<strong>Strand</strong> <strong>Lighting</strong><br />
p292
<strong>Palette</strong> <strong>OS</strong> v10<br />
You will need to verify you want to continue working with the Checkpoint file or the real show<br />
file.<br />
[S2] - Archive on Save<br />
If you want a history of how your show has progressed as you build it, choose to Archive the<br />
show each time you save it. If you do this, a new *.spb file will also be written when your show<br />
file is updated. The show file name will be appended with a serial number that will continue to<br />
increase as your show progresses. For example, if your show file is called MyShow.spf, the first<br />
archive will be named MyShow_0001.spb. The next time you save, another file will be added<br />
called MyShow_0002.spb. The number will always increase, up to 9999, then loop. The total<br />
number of *.spb files on your disk depends on the setting in [S5] # Backup to Keep. If the<br />
number is three (the default), after your forth save, you will have just three *.spb files numbered<br />
0002, 0003 and 0004. If you need to resort to one of these files, the File|Open dialog box's "Files<br />
of Type" combo box can be changed to show you backup files.<br />
The location to where these archives are stored is either in the Show Folder or the Backup Folder.<br />
If, for instance, your show file is d:\MyShow.spf and you choose the Show Folder option, a<br />
directory will be created called d:\MyShow and it will contain serialized backups, such as<br />
d:\MyShow\MyShow_0001.spb If you choose the Backup Folder, the serialized backups will<br />
reside directly in the folder you point to in [S6] Backup Save Folder.<br />
Note:<br />
None of these settings affect the creation of regular *.spb Backup files. Regardless of what is<br />
setup, MyShow.spb (un-serialized) will reside in the same location as MyShow.spf.<br />
[S3] & [S4]- Mirrored Save<br />
Fear of a hard drive failure can be alleviated by setting up Mirrored Saves on external hard drive<br />
devices, such as a USB stick or mapped network drive. If you Enable this option and point to a<br />
valid directory, each time you save, a duplicate *.spf file will saved on the external device.<br />
[S5] - # of Backups to keep<br />
This number determines the total number of serialized *.spb files that will be saved when you<br />
select File|Backup from the File Menu and the number of archive *.spb files as setup above. For<br />
more information on serialized file formats, see the Archive on Save topic above.<br />
[S6] - Backups Save Folder<br />
You can set the default location to where the serialized *.spb files will be saved when you select<br />
File|Backup from the File Menu. When you choose File|Backup, you will be presented with the<br />
Browse for Folder dialog box:<br />
<strong>Strand</strong> <strong>Lighting</strong><br />
p293
<strong>Palette</strong> <strong>OS</strong> v10<br />
Once you select a folder, your show file will be saved with the .spb extension. If you need to<br />
resort to this file, the File|Open dialog box's "Files of Type" combo box can be changed to show<br />
you backup files.<br />
-o-<br />
<strong>Strand</strong> <strong>Lighting</strong><br />
p294
<strong>Palette</strong> <strong>OS</strong> v10<br />
Move and Copy<br />
The Move and Copy commands are identical and work for Cues, Looks and Channels. You can<br />
only move/copy Cues to Cues, Looks to Looks and Channels to Channels. If you want to copy the<br />
contents of a Cue into a Look, the best way to do that is to Load the Cue then Record the Look. If<br />
you want to copy the contents of a Look into a Cue, the best way to do that is to type [LOOK] [#]<br />
[ENTER] [REC] [#] [ENTER].<br />
Note:<br />
The Record dialog box defaults to recording cues, but you can type [LOOK] [#] [ENTER] [REC]<br />
[CUE] [#] [ENTER] for completeness.) Also see other command line methods in the topic on<br />
Looks and check out the Record Cue option called Exclude Sub Masters.<br />
To Copy press<br />
To Move press and hold while pressing .<br />
On the QWERTY keyboard, commands are launched with the [C] and [M] keys.<br />
Channels<br />
The default tab for Move and Copy is the Channel tab. One of the most powerful features of<br />
<strong>Palette</strong> as far as moving lights is concerned is the Abstract Control Model. This basically means<br />
that all moving lights, regardless of who manufactured them and what protocol they are using,<br />
are controlled the same way in <strong>Palette</strong>. Not only do they all have similar 'control handles', but the<br />
data that is stored in the cues is not raw DMX levels as traditional desk do. It is made up of 'real<br />
world' terms such as "15 Degrees", "20 RPM" and "8 Hz". This means that even if you<br />
programmed your show with one type of fixture, you can play it back with another. More<br />
commonly, you will have a rig made up of multiple fixtures and you will want to talk to them<br />
using the same language. This is where Copy/Move really works to your advantage.<br />
If you have one light doing exactly what you want and you want another to do just that same<br />
thing, you can Copy all of the attributes from the first channel to the second. If you've dialed<br />
something up really nice on one channel, then figured out that it may look better on another, you<br />
can just Move the attributes across. (The attributes you move from the first channel will be<br />
released.)<br />
When you want to copy or move attributes of a moving light, launch the command as described<br />
above to open the dialog box to the Channel tab:<br />
<strong>Strand</strong> <strong>Lighting</strong><br />
p295
<strong>Palette</strong> <strong>OS</strong> v10<br />
If you launched the command and pressed [CUE] or [LOOK], press [S10] to display the Channel<br />
tab. By default it will open to the Channel tab. Fill in the Source Channels and Destination<br />
Channels fields. If desired, you can select a group using the channels from a pre-recorded Cue or<br />
Look or Recall the Stored selection. Before closing the dialog box, you can filter out different<br />
information from the source channels to not use in the destination channels. To do this press the<br />
Attributes button:<br />
By default all check boxes will be checked. You can customize this to what is appropriate.<br />
Note:<br />
o<br />
o<br />
o<br />
o<br />
If you double tap [S5] (or any other softkey), it will 'solo' Position. That is, all other check<br />
marks will clear and Position will remain checked.<br />
While in the main Move/Copy dialog box, if you press [SHIFT], the Attribute button will<br />
look like this<br />
and the softkeys will change to the following:<br />
<strong>Strand</strong> <strong>Lighting</strong><br />
p296
<strong>Palette</strong> <strong>OS</strong> v10<br />
Pressing any of these changes the attribute masking without the need to open the Attribute<br />
dialog box. You can also double tap any attribute family to solo it.<br />
Cues<br />
To move or copy a cue, move the Blue Box to the desired cue. You can select more than one cue<br />
at a time. Launch the command and press the [CUE] button or [S11] to open the dialog box to<br />
the Cue tab:<br />
By default, the destination Cue List is the same as the selected one, but you can change that by<br />
pressing [S1]. When you enter the dialog box, the First Cue Number is highlighted allowing you<br />
to just type a new number and pressing [ENTER]. If desired, you can use [S5] New Cue<br />
Increment and change the [S4]Cue Increment so the new cues follow a specific numbering<br />
scheme rather than the original offsets.<br />
If the destination cue numbers already exist, you will be presented with this dialog box:<br />
Cue State<br />
If you Move or Copy a Cue with the Cue State option checked, <strong>Palette</strong> figures out which channels<br />
and attributes have been used in this cue list up to the source cue, then takes their current value<br />
<strong>Strand</strong> <strong>Lighting</strong><br />
p297
<strong>Palette</strong> <strong>OS</strong> v10<br />
and stuffs it in the destination. Check out the topic called A Note on Redundant Data to figure out<br />
if that is desirable.<br />
Attributes<br />
If you want, you can filter out different information from the source cue and then not use it in<br />
the destination cue. To do this press the Attributes button:<br />
By default all check boxes will be checked. You can customize this any way you like. For<br />
instance, if you had a great mixed color in Scene 1 on the cyc, but now wanted that same color<br />
on the stage, you may copy the cyc cue to a new cue using just the Color Attributes.<br />
Note:<br />
o<br />
o<br />
o<br />
o<br />
If you double tap [S5] (or any other softkey), it will 'solo' Position. That is, all other check<br />
marks will clear and Position will remain checked.<br />
While in the main Move/Copy dialog box, if you press [SHIFT], the Attribute button will<br />
look like this<br />
and the softkeys will change to the following:<br />
Pressing any of these changes the attribute masking without the need to open the Attribute<br />
dialog box. You can also double tap any attribute family to solo it.<br />
Looks<br />
The easiest way to move or copy a recorded Look is press [COPY] [BUMP] [BUMP]. You hardware<br />
must be setup to use Sub Masters. As soon as you press the [MOVE]/[COPY] button, the dialog<br />
box will appear. If you are using the Bump Buttons, you don't need to even look at it. All the<br />
correct information will be stuffed for you. (Don't forget the very quick [LOAD] [BUMP] and<br />
[VIEW] [BUMP] syntax.)<br />
When you want to copy or move a Look using the dialog box, launch the command as described<br />
above. The dialog box will open. Press the [LOOK] button or [S12] to display the Look page:<br />
<strong>Strand</strong> <strong>Lighting</strong><br />
p298
<strong>Palette</strong> <strong>OS</strong> v10<br />
Using the mouse or softkeys, select the Source Look Page and Source Look, then define a<br />
Destination Look Page and new Look Number. The current Looks are displayed in the box on the<br />
right for reference.<br />
You can overwrite an existing Look by choosing one from the list. If you do, you will be presented<br />
with this dialog box:<br />
Attributes<br />
If you want, you can filter out different information from the source look so it i not used when<br />
creating the destination Look. To do this press the Attributes button:<br />
By default all check boxes will be checked. You can customize this any way you like.<br />
Note:<br />
o<br />
<strong>Strand</strong> <strong>Lighting</strong><br />
p299
<strong>Palette</strong> <strong>OS</strong> v10<br />
o<br />
o<br />
o<br />
If you double tap [S5] (or any other softkey), it will 'solo' Position. That is, all other check<br />
marks will clear and Position will remain checked.<br />
While in the main Move/Copy dialog box, if you press [SHIFT], the Attribute button will<br />
look like this<br />
and the softkeys will change to the following:<br />
Pressing any of these changes the attribute masking without the need to open the Attribute<br />
dialog box. You can also double tap any attribute family to solo it.<br />
See Also:<br />
A Note on Redundant Data<br />
Record Options<br />
Command Line Syntax<br />
Abstract Control Model<br />
About <strong>Palette</strong><br />
-o-<br />
<strong>Strand</strong> <strong>Lighting</strong><br />
p300
<strong>Palette</strong> <strong>OS</strong> v10<br />
ShowNet DMX<br />
Your console can connect directly with any <strong>Strand</strong> <strong>Lighting</strong> ShowNet Network, transmitting levels<br />
to other <strong>Strand</strong> <strong>Lighting</strong> Nodes or <strong>Strand</strong> Dimmer Racks that are part of that Network.<br />
Note:<br />
ShowNet uses Broadcast communications in which IP addresses are not used. Regardless, it is a<br />
good idea to know what Subnet you are broadcasting on. See Control Panel - Network.<br />
The ShowNet configuration is setup in the Patch. In the top left hand pane, you can configure the<br />
Output Devices by clicking the [+] sign to expose the Output Device options. By default, the DMX<br />
ports on the back of your console (USB DMX) are mapped to Outputs 1 through 1024.<br />
Double click on the cell to the right of ShowNet. From the drop down list, select the number of<br />
universes that you wish to send over ShowNet. Here you can select up to 20 universes (10240<br />
DMX channels).<br />
In the ShowNet XDMX Start cell, enter the starting point where this information will appear on<br />
<strong>Strand</strong> <strong>Lighting</strong><br />
p301
<strong>Palette</strong> <strong>OS</strong> v10<br />
the network. This information is entered as logical network universe numbers, rather than as<br />
discrete NetSlots.<br />
XDMX Start ShowNet<br />
NetSlot<br />
XDMX Start ShowNet<br />
NetSlot<br />
XDMX Start ShowNet<br />
NetSlot<br />
XDMX Start ShowNet<br />
NetSlot<br />
1 1 10 4609 19 9217 28 13825<br />
2 513 11 5121 20 9729 29 14337<br />
3 1025 12 5633 21 10241 30 14849<br />
4 1537 13 6145 22 10753 31 15361<br />
5 2049 14 6657 23 11265 32 15873<br />
6 2561 15 7169 24 11777 33 16385<br />
7 3073 16 7681 25 12289 34 16897<br />
8 3585 17 8193 26 12801 35 17409<br />
9 4097 18 8705 27 13313 36 17921<br />
Note:<br />
o<br />
o<br />
Where the XDMX start address is omitted, the system defaults to sending the levels<br />
commencing at ShowNet Netslot 1.<br />
Where you are to be using multiple consoles on a ShowNet network, you should select<br />
different ShowNet XDMX Start values for each console to avoid any conflicts.<br />
Where more than one Universe is being sent over ShowNet, the console can be configured to<br />
send the data over mutliple XDMX start addresses. This is done by entering the XDMX start as a<br />
comma separated list. The following example sends the first three universes from the Patch over<br />
the network:<br />
The XDMX settings then post the data on the Network as follows:<br />
Output Range<br />
XDMX<br />
ShowNet NetSlot<br />
Start<br />
1-512 1 1-512<br />
513-1024 5 2049-2560<br />
1025-1536 7 3073-3584<br />
If you are using SN110 series nodes, their configuration may be set by using Internet Explorer,<br />
which can be accessed using the Control Panel.<br />
To configure your ShowNet nodes enter the IP address of the node you want to change:<br />
A web page will appear where you can then change the various parameters:<br />
<strong>Strand</strong> <strong>Lighting</strong><br />
p302
<strong>Palette</strong> <strong>OS</strong> v10<br />
See Also:<br />
Patch<br />
Pathport<br />
-o-<br />
<strong>Strand</strong> <strong>Lighting</strong><br />
p303
<strong>Palette</strong> <strong>OS</strong> v10<br />
Pathport<br />
<strong>Palette</strong> can talk directly to any number of Pathport Output Nodes installed in your venue using<br />
your LAN via the Ethernet port on the back of the processor. These units are available throughout<br />
the industry by dealers selling Pathway products. For more information on Pathport visit Pathway<br />
Connectivity. The ET Raceway and Capio racks also accept the Pathport protocol.<br />
To change the Pathport settings, enter the Patch by pressing [S1] when there are no channels<br />
selected.<br />
Note:<br />
The softkeys are sensitive to your current channel selection (i.e., if you have moving lights<br />
selected, [S1] will not be Patch). To enter the patch, regardless of what the softkeys are<br />
displaying use the mouse to select the Setup icon above the Cue List Directory. You can<br />
also press [BKSP] to deselect your channels without Releasing them.<br />
On new shows, the DMX outputs on the back of your console hardware are mapped to <strong>Palette</strong><br />
Outputs 1 through 1024. You can configure the Output Devices by clicking the [+] sign in the<br />
upper left hand pane of the display:<br />
Click on the cell to the right of Pathport to open the output configuration combo:<br />
<strong>Strand</strong> <strong>Lighting</strong><br />
p304
<strong>Palette</strong> <strong>OS</strong> v10<br />
Choose how many XDMX universes you want to output to and return to the Live display. These<br />
setting are saved in the show file. Your Pathport network will now show Active DMX on Pathport<br />
Output nodes that are configured to listen on the selected universes. In Pathport Manager, you<br />
must set up the Output nodes to either listen on these XDMX addresses OR on these Quick Patch<br />
universes.<br />
For more information on patching within XDMX universes, see ShowNet.<br />
See Also:<br />
Patch<br />
ShowNet<br />
-o-<br />
<strong>Strand</strong> <strong>Lighting</strong><br />
p305
<strong>Palette</strong> <strong>OS</strong> v10<br />
One to One Patch<br />
The default One to One Patch assigns output 1 to Channel 1's Intensity etc. Using this dialog box<br />
available via the Softkeys in the Patch Display, you can patch ranges of channels 1:1 very<br />
quickly.<br />
Tip:<br />
o<br />
o<br />
See Also:<br />
Patch<br />
Use the Wheel to adjust the values.<br />
Use [S4] to do the patch without closing the dialog box, allowing you to do more than<br />
one range at a time.<br />
-o-<br />
<strong>Strand</strong> <strong>Lighting</strong><br />
p306
<strong>Palette</strong> <strong>OS</strong> v10<br />
Power Patch<br />
Power Patch allows you to patch large groups of consecutive channels at once. For example, say<br />
you want to patch channels 97 through 125 with outputs starting at 193 (one output each).<br />
Enter the range of channels in the edit box and the starting dimmer in the First Output box.<br />
If you are patching Moving Lights, you will want to change the Fixture Type to something other<br />
than Dimmer. To do this, press [S3] to open the Select Fixture Type dialog box.<br />
<strong>Strand</strong> <strong>Lighting</strong><br />
p307
<strong>Palette</strong> <strong>OS</strong> v10<br />
Once you select the appropriate type, Select [OK] to return to the Power Patch dialog box and<br />
select [S5] to set the first Attribute Output. You can them press [S6] to Apply the changes and<br />
continue with other channels, or [OK] to apply the patch and exit Power Patch.<br />
Hint<br />
You can use the wheel to change the first output number.<br />
See Also:<br />
Patch<br />
One to One Patch<br />
-o-<br />
<strong>Strand</strong> <strong>Lighting</strong><br />
p308
<strong>Palette</strong> <strong>OS</strong> v10<br />
Printing<br />
<strong>Palette</strong> prints to PDF (Portable Document Format) files that can be e-mailed, archived or printed<br />
on any printer:<br />
Launch the Print command from the File Menu and you will be presented with the Print to PDF<br />
dialog box:<br />
Choose the Items you want to print and select a PDF File destination. You can also change<br />
whether the document will be formatted horizontally or vertically and what size of paper it should<br />
ultimately be printed on.<br />
If you console is hooked to the Internet and you have set up a Outlook Express account, you will<br />
<strong>Strand</strong> <strong>Lighting</strong><br />
p309
<strong>Palette</strong> <strong>OS</strong> v10<br />
be able to e-mail these documents right from the PDF reader's toolbar:<br />
You should also check out the topic Network Printers in the <strong>Palette</strong> Control Panel.<br />
-o-<br />
<strong>Strand</strong> <strong>Lighting</strong><br />
p310
<strong>Palette</strong> <strong>OS</strong> v10<br />
Hardware Setup<br />
Hardware Setup<br />
Selecting Hardware Setup from the main softkey menu allows you to configure how different bits<br />
of your console operate. <strong>Palette</strong> is highly configurable and it is well worth reading and<br />
understanding all of the options available to you. To find out more about each option, click on the<br />
specific area below.<br />
-o-<br />
<strong>Strand</strong> <strong>Lighting</strong><br />
p311
<strong>Palette</strong> <strong>OS</strong> v10<br />
Hardware Setup -<br />
Priority<br />
Selecting Hardware Setup from the main softkey menu allows you to configure how different<br />
parts of your console operate.<br />
Priority<br />
Default Submasters, Grandmasters and Channel Control priorities can be setup using the Priority<br />
Tab of the Hardware setup.<br />
.<br />
See Also:<br />
General Hardware Setup<br />
Variables & Button Stations<br />
Priorities<br />
-o-<br />
<strong>Strand</strong> <strong>Lighting</strong><br />
p312
<strong>Palette</strong> <strong>OS</strong> v10<br />
Hardware Setup - A/B<br />
C/D<br />
The A/B and C/D faders have multiple purposes. On a new show file the A/B are configured as<br />
Preset A/B Two Scene Masters (controlling intensity attributes on the Top and Bottom Slider<br />
banks, see Slider Panels) and the C is configured as the Intensity Master for the Cue List<br />
assigned to that Playback and D is configured as a manual crossfader for that cue list. All the<br />
modes are described below.<br />
Note: Regardless of configuration of the A/B and C/D faders, the [SELECT], [HALT/BACK] and<br />
[GO] buttons will function as normal on the appropriate cue list.<br />
Disabled<br />
If you chose this option, the sliders will do nothing. If you are just doing a "GO SHOW", this is<br />
the safest mode of operation as inadvertent moves on these faders will have no affect.<br />
Preset Two Scene Master<br />
In either case (A/B or C/D), the faders will be the overall intensity masters for the A and B<br />
Scenes. The B and D faders are inverted such that if you pull both handles together you will<br />
execute a dipless crossfade between the scenes (i.e., Fader A is full when pushed up, Fader B is<br />
full when pushed down).<br />
PB Master + Crossfader<br />
In this mode, the left hand fader is the overall intensity master of the cue list assigned to this<br />
playback and the right hand fader is, at will, a manual cross fader. The [GO] and [Halt/Back]<br />
buttons function as normal, but at any time you can grab the fade and manually complete it<br />
using this handle. If you [Halt] the cue, you can either press [GO] to complete it, or use the<br />
handle to manually complete the transition to the next cue. If you are sitting in a cue, moving<br />
the handle will initiate the transition to the next cue as seen in the Playback Bubbles:<br />
<strong>Strand</strong> <strong>Lighting</strong><br />
p313
<strong>Palette</strong> <strong>OS</strong> v10<br />
All levels going up and down will be affected. All times will be re-scaled to the distance the<br />
handle has to travel, with the greatest time in the cue being measured using that distance and all<br />
others scaled to that. Wait times will be scaled too.<br />
At any point before reaching the end of travel, you can move the handle backward to reverse the<br />
transition. Once you reach the end of travel, the next cue in the cue list will be pending. You do<br />
not have to physically reload a cue or move the fader back to it's starting position. The next cue<br />
transition will begin by moving the fade off the end of travel you just reached or by simply<br />
pressing [GO].<br />
If you hold down [SHIFT] while manually moving a Crossfader, you can move backwards through<br />
a cue list. (i.e., the cue that has just been completed will be the pending cue, rather than the<br />
next cue in the cue list). You can see which cue you are going to pull into by looking at the<br />
Playback Bubbles. In this case, the pending cue is Cue 1 - the cue just before Cue 2:<br />
PB Master + Disabled<br />
In this mode, the left hand fader is the overall intensity master of the cue list assigned to this<br />
playback and the right hand fader is disabled. You may want to use this mode if you are sure that<br />
you will never want to manually execute fades and don't want to inadvertently start a transition<br />
by touching a fader.<br />
Cue List Split Crossfader<br />
The Split Crossfader mode sets up the left-hand fader to, at will, manually control the levels<br />
moving up in the next cue while the right-hand fader manually controls the levels going down in<br />
the next cue. Moving these faders in tandem executes a standard crossfade. Both handles need<br />
to reach their end-travel destination before the cue completes. Once the cue completes, the<br />
pending cue changes and the handles are ready to execute the next manual fade. You do not<br />
need to exercise the full travel of the handles to re-load the next cue.<br />
Notes on Playback Handles:<br />
<br />
<br />
<br />
<br />
<br />
<br />
<br />
<br />
<strong>Strand</strong> <strong>Lighting</strong><br />
If you press [HALT] while a cue is in progress, you can manually complete the cue by<br />
pulling the handle.<br />
You can reverse the direction of the current fade at any time before the handle reaches it's<br />
end-point destination.<br />
If you start a cue by pressing [GO], then, while the cue is in progress, you move the<br />
handle, that is equivalent to pressing [HALT] then manually completing the cue by pulling<br />
the handle.<br />
If you move the handle to Halt a cue, but then decide you want the cue to complete in<br />
cue-time, you can simply press [GO]. You will have to park the handle at one end or<br />
another to make it active again.<br />
p314
<strong>Palette</strong> <strong>OS</strong> v10<br />
<br />
<br />
<br />
<br />
<br />
<br />
If you Halt a cue for any reason and choose to complete it using the handle, all times will<br />
be re-scaled to the distance the handle has to travel, with the greatest time in the cue<br />
being measured from top to bottom and all others scaled to that. Wait times will be scaled<br />
too.<br />
It does not matter if the handle is at the top or bottom when you start to use it. As long<br />
as it is at one end, it will function as a manual crossfader, moving you forward through<br />
the cue list.<br />
If you want to manually crossfade backwards through the cue list, hold down [SHIFT]<br />
while pulling the handle. You will notice that the pending cue in gray at the bottom of the<br />
bubble will have a lower number than the current cue in black text up top.<br />
Top & Bottom Slider Panel Lookmasters [positive]<br />
If you set up the Slider Panels to hold Look Pages (see Slider Panels), the left and right fader will<br />
control the level of the top and bottom panel's respective overall intensity. Both sliders are<br />
configured so full output is at the top of the travel.<br />
Top & Bottom Slider Panel Lookmasters [negative]<br />
If you set up the Slider Panels to hold Look Pages (see above), the left and right fader will<br />
control the level of the top and bottom panel's respective overall intensity. The right fader is<br />
inverted so that full output is achieved by positioning the fader at the bottom of travel. This<br />
allows you to, while moving both handles, execute a crossfade between two separate pages of<br />
Sub Masters.<br />
Slider Wing A & B Lookmasters [positive]<br />
Similar setup to Top & Bottom Slider Panel Lookmasters [positive] but using the first two wing<br />
panels<br />
Slider Wing A & B Lookmasters [negative]<br />
Similar setup to Top & Bottom Slider Panel Lookmasters [negative] but using the first two wing<br />
panels<br />
Captured In Time and Release Time<br />
If you are running a show live, it is handy to have handles to control how long attributes get to<br />
their new level and how long they should take to return to their old levels once released. This<br />
option sets up the left hand fader to control the IN TIME of any attribute you set using the<br />
command line or button array. The scale is from zero to ten seconds (top to bottom). The right<br />
hand fader controls how long releases should take or what is the sneak time.<br />
See Also:<br />
General Hardware Setup<br />
Playback Bubbles<br />
Captured Attributes<br />
<strong>Strand</strong> <strong>Lighting</strong><br />
p315
<strong>Palette</strong> <strong>OS</strong> v10<br />
Release<br />
Busking<br />
-o-<br />
<strong>Strand</strong> <strong>Lighting</strong><br />
p316
<strong>Palette</strong> <strong>OS</strong> v10<br />
Hardware Setup -<br />
Grandmaster and Dead<br />
Blackout Button<br />
The Grandmaster and Dead Blackout are used to control intensity channel of your rig. Channels<br />
that are affected by the Grandmaster will be displayed with a red hat, a hollow pipe and a broken<br />
arrow:<br />
Grandmaster Mode<br />
Disabled<br />
Select Disabled if you don't want the slider of the Grandmaster to have any affect. This may be<br />
set as a safety measure on shows that are strictly run from the Go button.<br />
All Channels<br />
If you select All Channels, any type of channel, conventional or automated, will be affected when<br />
you pull down the grandmaster slider.<br />
Conventional Channels<br />
<strong>Strand</strong> <strong>Lighting</strong><br />
p317
<strong>Palette</strong> <strong>OS</strong> v10<br />
Conventional Channels are defined as channels that only have one attribute and that attribute is<br />
intensity (i.e., dimmers).<br />
Moving Lights<br />
Channels included in the Moving Light category are channels with more than one attribute where<br />
one of the attributes is an intensity channel.<br />
Include Captured<br />
If this checkbox is on, any channel that has its intensity attribute captured will be affected when<br />
the grandmaster slider is pulled down.<br />
DBO<br />
The Dead Black out has multiple functions. Whenever it is enabled, it is like pulling the<br />
grandmaster slider down to 0% in zero time. There are macros that allow you to control this<br />
feature programmatically.<br />
Disabled<br />
Select this option if you don't want to accidentally plunge your stage into darkness by pressing<br />
the DBO button.<br />
Momentary<br />
If you select this option, pressing the button will black out the stage only while you have your<br />
finger on the button. Use this if you want to 'bump' the stage out for effect. If you want to keep it<br />
in darkness, press and hold the DBO while lowering the slider to 0%.<br />
Toggle<br />
If the DBO is set as a toggle, pressing it once will black the stage out and pressing it again will<br />
restore it to the level set by the grandmaster slider. While the DBO is on or the slider is at 0%,<br />
the red LED will flash rapidly.<br />
Notes:<br />
<br />
The red LED on the DBO button will flash slowly if the level of the handle is between 1%<br />
and 99%. It will be off if the handle is at full. It will flash rapidly if the handle is at the<br />
bottom or the DBO is active. Check out Status Bubbles for display information on the GM.<br />
<br />
<br />
See Also:<br />
There are Macros that allow you to set the level of the console lights. These macros can<br />
be called by cues so that your console lights dim for cues such as black-outs, then restore<br />
for the rest of the show.<br />
General Hardware Setup<br />
<strong>Strand</strong> <strong>Lighting</strong><br />
p318
<strong>Palette</strong> <strong>OS</strong> v10<br />
-o-<br />
<strong>Strand</strong> <strong>Lighting</strong><br />
p319
<strong>Palette</strong> <strong>OS</strong> v10<br />
Hardware Setup -<br />
Button Array<br />
If you have the optional Button Array, when the top left green Fixture LED is not on, the<br />
function of the four banks of twenty-five buttons are determ ined by this dialog box. If you don't<br />
have the physical hardware, you will access the array using the Tools button and pressing virtual<br />
buttons on your screen using a mouse or touch screen. Each bank of twenty-five (buttons A<br />
through Y) can have a series of Look Pages assigned to them in a stack that are accessible using<br />
the up and down arrows above each bank.<br />
Button Action<br />
As you select different Look Pages to add (and their First Button Number offset), you can decide<br />
what the action of the button is.<br />
Apply <strong>Palette</strong><br />
The selected channels will have the Look applied to them as a <strong>Palette</strong> and the affected attributes<br />
will be marked with deltas, ready to record. If the selected channels were not recorded in the<br />
Look, nothing happens when this button is pressed.<br />
Select Fixtures<br />
The channels recorded in the Look will become selected. No attributes will become captured.<br />
Apply Level<br />
The selected channels will have their attribute and intensity levels set to the values recorded in<br />
the Look and the affected attributes will be marked with deltas, ready to record.<br />
<strong>Strand</strong> <strong>Lighting</strong><br />
p320
<strong>Palette</strong> <strong>OS</strong> v10<br />
Select (1) + Apply (2)<br />
Upon the first press, the channels recorded in the Look will become selected. No attributes will<br />
become captured. If you double-press the buttons, the channels will become selected and their<br />
attributes will have the Look applied to them as a <strong>Palette</strong>. Typically, recording groups at levels<br />
and setting a Button Bank up as a Group Select nicely takes advantage of this Button Action.<br />
That way, pressing the button once just selects the channels, but if you double-press it, you have<br />
them selected and set to their pre-recorded level.<br />
See Also:<br />
Tools (used to display virtual 5x5's)<br />
Recording Looks<br />
Recording and Using Groups<br />
Button Array Described<br />
Apply Levels/<strong>Palette</strong>s<br />
Hardware Setup<br />
-o-<br />
<strong>Strand</strong> <strong>Lighting</strong><br />
p321
<strong>Palette</strong> <strong>OS</strong> v10<br />
Button Array Described<br />
The button array can be a physical piece of hardware, like the one depicted below, or a virtual<br />
pop-up version that is accessed using the Tools button.<br />
The optional Button Array Wing has two major functions:<br />
Channel Select (only available with the physical hardware)<br />
When the top left button's green LED is on, the Button Wing Panel is in Channel Select mode.<br />
The eleven remaining buttons bank the remaining 100 buttons by hundreds. For example, if the<br />
second top button from the left is illuminated yellow, the buttons select channels 1 through 100.<br />
The next yellow button along will bank the lower buttons up 100, to select channels 101 through<br />
200 and so on up to 1100.<br />
To select a channel, press the corresponding button. The red LED will begin to flash. To deselect<br />
it, press the button again. (Note: You do not need to deselect channels if you change the<br />
preceding selection's attributes before making a new selection.) To select a range of channels,<br />
press and hold the first channel in the range, then press the last. This works for deselecting<br />
ranges in the middle of selected channels.<br />
<strong>Strand</strong> <strong>Lighting</strong><br />
p322
<strong>Palette</strong> <strong>OS</strong> v10<br />
Any channel that is currently being controlled by a Cue List or Sub Master and has an intensity<br />
level greater than 0% will show a solid red LED.<br />
<strong>Palette</strong> Mode<br />
When the top left green LED is not on, the Button Wing Panel is sectioned into four groups of 25<br />
palettes (A through Y). The top left button, which is labeled "Channels" is a toggle. Press it once<br />
to change the mode to Channel Select; press it again to put the Wing Panel into <strong>Palette</strong> Mode.<br />
To assign Look Pages (or Group Selects) to the Banks A through D (left to right), check out the<br />
topic Hardware Setup - Button Array. Each bank has 25 palettes in it (A through Y) and is<br />
pageable to provide as many buttons as necessary, using the up and down arrow buttons above<br />
each bank. The amber LEDs on the arrow buttons will tell you if more pages are available. If you<br />
press down on the last page, it will wrap you back to the first page in the stack. (Note: The A<br />
Bank only has a down button as the top left button is the Channel toggle button.)<br />
Buttons with recorded looks on them will glow a steady red LED. If you forget what a button is<br />
assigned to, press the [VIEW] button above the bank:<br />
<strong>Strand</strong> <strong>Lighting</strong><br />
p323
<strong>Palette</strong> <strong>OS</strong> v10<br />
A large 5X5 grid will pop up on the screen showing you the label of the recorded look and it's<br />
corresponding button. You can also pop up this display by using the first four softkeys while<br />
holding down the [TOOLS] button. Once you select a button, the 5X5 display disappears. You can<br />
stop this behaviour by pressing the pin in the upper left hand corner in. At any time, you can<br />
press the fat up and down arrows to scroll through the stack as configured in Hardware Setup -<br />
Button Array. If you press the thinner button to the right of the title, you will page between the<br />
four Button Banks A through D.<br />
See Also:<br />
Hardware Setup - Button Array<br />
Tools<br />
Selecting and Setting Channels<br />
Select Softkeys<br />
Recording Looks<br />
Apply Levels/<strong>Palette</strong>s<br />
-o-<br />
<strong>Strand</strong> <strong>Lighting</strong><br />
p324
<strong>Palette</strong> <strong>OS</strong> v10<br />
<strong>Strand</strong> <strong>Lighting</strong><br />
p325
<strong>Palette</strong> <strong>OS</strong> v10<br />
Hardware Setup -<br />
Triggers<br />
On the back of the console is a green terminal strip connector that has three termination points.<br />
One of these points is a common, that when shorted to either of the other two triggers the<br />
execution of macros defined here. You can assign a macro to both the up and down (or short and<br />
open) states of the input or if using a double-pole single-throw switch between all three contacts,<br />
a fifth macro can be triggered. The Multiple Trigger Mute time can discard nuisance triggers.<br />
Macros are built using the Macro Editor. Each action can have an entire list of macros to execute.<br />
Note: On each side of the connector, there are test buttons. Depressing these will activate the<br />
macros assigned here. You can see the status of these inputs in the Uber Status window.<br />
See Also:<br />
Hardware Setup - Trigger Wiring<br />
Macro Editor<br />
General Hardware Setup<br />
Variables & Button Stations<br />
-o-<br />
<strong>Strand</strong> <strong>Lighting</strong><br />
p326
<strong>Palette</strong> <strong>OS</strong> v10<br />
Physical Trigger Wiring<br />
The <strong>Palette</strong> Hardware has two contact closure triggers on the back. The little buttons to the left<br />
and right of the connector are test buttons. To wire these triggers up, just follow the charts<br />
below.<br />
Once you physically wire your triggers, you program what you want them to do via the Hardware<br />
Setup dialog box. There is an Up and Down action for each trigger which each can have multiple<br />
macros assigned to it.<br />
See Also<br />
Hardware Setup -Triggers<br />
Macro Editor<br />
-o-<br />
<strong>Strand</strong> <strong>Lighting</strong><br />
p327
<strong>Palette</strong> <strong>OS</strong> v10<br />
Hardware Setup -<br />
Console<br />
The Console options set here are not part of your <strong>Palette</strong> show file. These options will be<br />
persistent for all sessions on your console.<br />
Console Lights<br />
On the back of the <strong>Palette</strong> desk are two 3-pin XLR connectors. These fit industry standard work<br />
lights. The voltage supplied to those lights is determined here. These settings are remembered<br />
for all sessions and the lights automatically go out when you exit <strong>Palette</strong>. Using the wheel and<br />
[S1] through [S3], you can adjust them individually or as a pair.<br />
Note:<br />
There are Macros that allow you to set the level of the console lights. These macros can be called<br />
by cues so that your console lights dim for cues such as black-outs, then restore for the rest of<br />
the show.<br />
Hold Active Levels<br />
This option affects the way the [UNDO] key or [ESC] key releases channels. By default on new<br />
show files, it is not checked.<br />
When it is checked, the multi-stage release and undo of released channels ([SHIFT]+[UNDO])<br />
described in the help topic called Release is disabled. Instead, pressing [UNDO] just deselects the<br />
selected channels keeping them Captured. Then, if a Cue List is advanced and has fade<br />
information for that attribute, it will become released and fade under control of the cue list. If<br />
you keep a channel Selected, running cue lists will not steal away attribute levels.<br />
If you want to truly Release the channels (rather than keeping them captured), press<br />
[SHIFT]+[UNDO].<br />
<strong>Strand</strong> <strong>Lighting</strong><br />
p328
<strong>Palette</strong> <strong>OS</strong> v10<br />
QWERTY Keyboard Cue List Control<br />
By default, the QWERTY Keyboard on the <strong>Palette</strong> Processor can control the displayed Cue List.<br />
For example, the Spacebar executes a Go; the Z key does a Pause or Halt; the Slash {\} will<br />
Release the Cue List. (For the full QWERTY mappings, see the topic Keyboard Shortcuts)<br />
If you uncheck this option, any method of controlling the cue list from the keyboard will be<br />
disabled (including pressing [EDIT] in the first column of the Cue List). To run cues, you either<br />
need to press the dedicated buttons on the console or use the Cue List Toolbar buttons with the<br />
mouse.<br />
Enable Wed Server<br />
If you want to control your console from a browser, you must author your own web based<br />
controls using hyperlinks embedded with Macro Scripts. See Browser Control for more details.<br />
Force Outputs at Startup on Recovery<br />
When this option is checked, the DMX and Ethernet outputs will be live upon startup, regardless<br />
of a proper or improper shutdown. This mode is preferable in architectural situations that can not<br />
rely on user intervention to get back up an running. In these environments, appropriate cue lists<br />
should be marked as AutoRun in the Cue List Properties.<br />
For regular live performance situations, leave this option unchecked. That way if you encounter a<br />
power failure or crash, you can gracefully recover and the audience will be none-the-wiser. See<br />
Enable Outputs - Recovery for more details.<br />
Level Entry Mode<br />
When working on the Command Line you can choose to terminate channel selection and level set<br />
commands with or without using the [ENTER] key. The options are to use Enter, Single Digit or<br />
Two Digit entry.<br />
With single digit entry the syntax [1] [THRU] [10] [@] [5] will take 1 through 10 to 50%.<br />
With Two Digit entry, you would type [1] [THRU] [10] [@] [5] [0].<br />
If you wanted 5% in single digit entry, type [1] [THRU] [10] [@] [0] [5] [ENTER].<br />
Note:<br />
Typing [1] [THRU] [10] [@] [.] [127] [ENTER] will set channels 1 through 10 to 50% in any<br />
mode.<br />
USB DMX Flavor<br />
Use this options to change the refresh rate or flavor of the DMX coming out the back of the<br />
console. You may need to alter the default to satisfy some third-party legacy devices. Ethernet<br />
DMX settings must be configured with third-party Ethernet to DMX management software.<br />
See Also:<br />
General Hardware Setup<br />
Release<br />
Keyboard Shortcuts<br />
<strong>Strand</strong> <strong>Lighting</strong><br />
p329
<strong>Palette</strong> <strong>OS</strong> v10<br />
Browser Control<br />
Enable Outputs - Recovery<br />
-o-<br />
<strong>Strand</strong> <strong>Lighting</strong><br />
p330
<strong>Palette</strong> <strong>OS</strong> v10<br />
MIDI / SMPTE Interface<br />
MIDI and SMPTE can be connected through the optional MIDI / SMPTE adapter to support Midi<br />
Show Control, Midi Notes and SMPTE in and out for synchronizing cue lists and external devices:<br />
See the Install Guide that came with your MIDI/SMPTE Interface for details on installing the<br />
interface.<br />
<br />
MIDI connects using the industry standard MIDI connector (DIN 5)<br />
<br />
<br />
<br />
<br />
SMPTE connects using a balance line level signal through standard XLR connectors.<br />
A potentiometer is provided to attenuate the incoming SMPTE level.<br />
The LEDs on the back of the unit give you status:<br />
COM LED<br />
Green Flash => no Midi/SMPTE<br />
Red Flash => transmit SMPTE<br />
Green/Red => Receive SMPTE<br />
See Also:<br />
SMPTE Time Code on Cue Lists<br />
MIDI Show Control<br />
Status LED<br />
No LED => no power<br />
Solid Green => Power, CPU not running<br />
Amber/Green slow => heartbeat, no<br />
communication to console<br />
-o-<br />
Amber/Green fast => connected to console<br />
<strong>Strand</strong> <strong>Lighting</strong><br />
p331
<strong>Palette</strong> <strong>OS</strong> v10<br />
Remote Focus Unit<br />
<strong>Strand</strong> <strong>Lighting</strong> offers an optional wired or wireless Remote Focus unit that allows users to select<br />
and set channels' intensities, run cues or looks and perform channel or output checks. There is a<br />
PC version of this software available for optional installation when you download <strong>Palette</strong> PC. Your<br />
system must be authorized to use an RFU when you are live. You can use the software when you<br />
are in off-line mode for demonstration purposes only.<br />
<strong>Strand</strong> <strong>Lighting</strong><br />
p332
<strong>Palette</strong> <strong>OS</strong> v10<br />
For more information visit www.etdimming.com.<br />
-o-<br />
<strong>Strand</strong> <strong>Lighting</strong><br />
p333
<strong>Palette</strong> <strong>OS</strong> v10<br />
Macros & Show Control<br />
Macro Editor &<br />
Commands<br />
Macros can contain Commands or Scripts. Macros are not keystroke recorders. Macros<br />
Commands are very powerful user-definable routines that <strong>Palette</strong> runs when assigned to cues,<br />
time events, macro buttons, Variables or triggers. If you need more advanced show-control<br />
automation and logical branching, check out Macro Editor and Scripts.<br />
When a Command is assigned to the Cue Action of a cue, you will see the macro icon in the<br />
Action column.<br />
You can add a Command to a cue by moving the Blue Box to the Action column and pressing<br />
[Edit] or [Insert]. A Cue Action dialog box will open:<br />
Click on Macro or press [S5] to add a Macro Command. The Macro Editor will appear.<br />
<strong>Strand</strong> <strong>Lighting</strong><br />
p334
<strong>Palette</strong> <strong>OS</strong> v10<br />
The main [S11] tab on the left should be set to Command showing the commands available in<br />
the list under [S1]. Press the softkey until the desired command is highlighted then press [S3] to<br />
insert it into the list on the right. The Edit Macro dialog box will open.<br />
Tip<br />
<br />
<br />
<br />
<br />
You can double click on any Available macro to add it to the list.<br />
[SHIFT] [S1] will move you backwards through the list of macros.<br />
Any arguments (parameters) of the command will be listed. Double click on the Value column to<br />
set an appropriate value then select OK.<br />
<strong>Strand</strong> <strong>Lighting</strong><br />
p335
<strong>Palette</strong> <strong>OS</strong> v10<br />
You can Insert as many individual commands as you like for each macro and order them by<br />
selecting their line and use [S5] and [S6] to move them Up and Down in the list.<br />
Hint<br />
o<br />
o<br />
o<br />
o<br />
See Also<br />
If you enter text in the Status String ([S8]), it will be written to the Uber Status when the<br />
macro is run.<br />
Highlight any undesired command and press [S7] to Delete it.<br />
Macro Editor - Scripts<br />
User Interface Macros<br />
Macro Buttons<br />
Time Events<br />
Variables<br />
Triggers<br />
Cue Properties<br />
Blue Box<br />
-o-<br />
<strong>Strand</strong> <strong>Lighting</strong><br />
p336
<strong>Palette</strong> <strong>OS</strong> v10<br />
Macro Editor & Scripts<br />
The Lua Language<br />
Advanced scripting in <strong>Palette</strong> uses the Lua programming language and can be constructed to<br />
execute very complex routines that access the Processor's operating system, file system or other<br />
external non-lighting related devices. Lua is a full featured programming language that offers IF<br />
THEN ELSE type routines as well as user definable functions, string manipulation and local and<br />
global variable storage.<br />
If you just want to run cues or control your media player or Power Point, you can, but do not<br />
need to use Scripts. Common tasks can be achieved using simple Macro Commands.<br />
This topic can never cover the extensiveness of what Lua has to offer. It is a very mature<br />
language that has a avid group of uses easily found on the web. To describe Lua a little more<br />
succinctly, we took this from www.lua.org:<br />
Lua combines simple procedural syntax with powerful data description constructs based on<br />
associative arrays and extensible semantics. Lua is dynamically typed, interpreted from<br />
bytecodes, and has automatic memory management with garbage collection, making it ideal for<br />
configuration, scripting, and rapid prototyping.<br />
The HC Library<br />
To make Lua capable of doing more than setting Variables in <strong>Palette</strong>, we've extended the<br />
language buy writing a specific Horizon Control library that talks directly with <strong>Palette</strong>'s fade<br />
engine. All variables and library calls in Lua are case sensitive, so we've made it easy by<br />
providing you a list of available macros calls right in the editor:<br />
Below is a list of available calls to the HC library. You will find that many of the routines are<br />
<strong>Strand</strong> <strong>Lighting</strong><br />
p337
<strong>Palette</strong> <strong>OS</strong> v10<br />
almost exactly like the common Macro Commands, but the syntax is slightly different. There are<br />
also some calls here that are not available as Commands.<br />
Cue List Execution<br />
HC.CueListGo('cue list')<br />
HC.CueListHaltBack('cue list')<br />
HC.CueListHalt('cue list')<br />
HC.CueListRelease('cue list')<br />
HC.CueListAssert('cue list')<br />
HC.CueListGotoAndHalt('cue list', cue)<br />
HC.CueListGotoAndExecuteFollows('cue list', cue)<br />
Power Point Automation<br />
HC.PowerPointFirstSlide(machine_id)<br />
HC.PowerPointLastSlide(machine_id)<br />
HC.PowerPointPrevSlide(machine_id)<br />
HC.PowerPointNextSlide(machine_id)<br />
HC.PowerPointGotoSlide(machine_id,slide_number)<br />
Media Player Automation<br />
HC.MediaPlayerPlay<br />
HC.MediaPlayerStop<br />
HC.MediaPlayerPause<br />
HC.MediaPlayerPlayFile('file name')<br />
Show Control<br />
HC.SerialOpen(1 to 16,'9600,N,8,1'[,'script'])<br />
HC.SerialClose(1 to 16)<br />
HC.SerialWrite(1 to 16,'output string')<br />
HC.SerialRead(1 to 16)<br />
HC.MidiNoteOff(channel_1_to_16,key_1_to_128[,velocity_0_to127])<br />
HC.MidiNoteOn(channel_1_to_16,key_1_to_128[,velocity_0_to127])<br />
HC.MidiWrite(midi_byte[,midi_byte ...])<br />
HC.SMPTEStart(['hh:mm:ss.fr'[,'30'|'30dr'|'25'|'24']][,interface])<br />
HC.SMPTEStop(interface)<br />
ILS Commands<br />
HC.ILSSetScene(device_id,scene)<br />
HC.ILSLockCommand(device_id,lock(1)/unlock(0)<br />
<strong>Strand</strong> <strong>Lighting</strong><br />
p338
<strong>Palette</strong> <strong>OS</strong> v10<br />
Hardware Setup<br />
HC.HardwareConsoleLights(level 0 to 10)<br />
Channel Check Automation<br />
HC.FixtureCheckForward<br />
HC.FixtureCheckBack<br />
Variable Manipulation<br />
HC.VariableGet('page','name' or order)<br />
HC.VariableSet('page','name' or order,'value' or value)<br />
HC.VariableSetDelayed('page','name' or order,'value' or value,seconds)<br />
HC.GetScriptSource('type'|'number'|'parent'|'name'[,'type'|'number'|'parent'|'name'[,'seperator']<br />
])<br />
Strings<br />
HC.Status('status string')<br />
HC.GetScriptSource('type'|'number'|'parent'|'name'[,'type'|'number'|'parent'|'na<br />
me'[,'seperator']])<br />
Sub Master Automation<br />
HC.LookFade('page',looknumber,value[,seconds])<br />
HC.LookFadeRate('page',looknumber,value[,seconds full scale])<br />
HC.LookFadeStop('page',looknumber)<br />
HC.LookGetValue('page',looknumber)<br />
Attribute Manipulation<br />
HC.AttributeGetValue(fixture[,attribute_name])<br />
HC.AttributeFade(fixture[,attribute_name],value [,time])<br />
Automation<br />
HC.PatchFixture(fixture[,intensity_dmx][,attribute_dmx,'manufacturer','model']<br />
HC.RecordLook('look_page',look_number[,'merge'|'replace'][,'IPCGLSTE'][,'label)<br />
HC.RecordCue('cue_list',cue_number[,'merge'|'replace'][,'IPCGLSTE'][,cue_time][,'label'])<br />
HC.ReleaseAll()<br />
HC.UIMacro('macro-info'[,'macro-info' ...])<br />
Below are a few examples to get you started writing Lua scripts in <strong>Palette</strong> quickly. Much more<br />
detailed examples and documentation of the language can be found on-line.<br />
<strong>Strand</strong> <strong>Lighting</strong><br />
p339
<strong>Palette</strong> <strong>OS</strong> v10<br />
Example - Raise Lower on<br />
Architectural Button Station<br />
One of the common button stations to have in an architectural installation is a 6-button scene<br />
set (On, Off, plus four scenes). These button stations also have a Raise/Lower rocker button.<br />
Making buttons 1 through 6 part of the same radio group, each fading in a look on the Button<br />
Down action, then fading it out on the Button Up action makes for an easy preset selection.<br />
Where it becomes a bit more tricky is utilizing the Raise/Lower buttons. The following code<br />
determines the currently selected scene, then applies a fade using a predetermined rate to raise<br />
and lower the current look. This code shows the actions you would put on the Raise button.<br />
Similar code would be put on the Lower buttons using HC.LookFadeRate('Main',CurBut,0,5) rather<br />
than the third parameter being 100 as shown below.<br />
-- RAISE BUTTON DOWN ACTION<br />
-- make global variable CurBut invalid<br />
CurBut = -1<br />
-- loop through first 5 buttons to see which one is down<br />
for i = 1, 5 do<br />
end<br />
-- is button i down<br />
if HC.VariableGet('Hall',i) == 1 then<br />
-- store away button number<br />
CurBut = i<br />
end<br />
-- only do if button is valid<br />
if CurBut ~= -1 then<br />
end<br />
-- start a 5 sec. rate fade of the look on the current button<br />
HC.LookFadeRate('Main',CurBut,100,5)<br />
-- RAISE BUTTON UP ACTION<br />
-- only do if button is valid<br />
if CurBut ~= -1 then<br />
end<br />
-- stop the fade started in RAISE BUTTON code<br />
HC.LookFadeStop('Main',CurBut)<br />
Example - Occupancy Sensor using<br />
File IO<br />
This example shows how scripts can access the operating system's disk input and output<br />
routines. All the Variables on this Variable Page have the same code and are tied to occupancy<br />
<strong>Strand</strong> <strong>Lighting</strong><br />
p340
<strong>Palette</strong> <strong>OS</strong> v10<br />
sensors, such that when the sensor is tripped, the macro is fired. The script finds out the name of<br />
the sensor that is tripped and writes the data to a log file.<br />
-- Code for all sensors<br />
-- opens file for appending<br />
local f = io.open('d:\\People.log', 'a')<br />
-- get variable name and write log file<br />
f:write(HC.GetScriptSource('name') .. '\t was tripped at ' .. os.date('%X') ..<br />
' on ' .. os.date('%x') ..'\n')<br />
-- close the file so other applications can access it<br />
f:close()<br />
If you had four sensors, one in the Entrance, one at the Exit, one in the Theater and one in the<br />
Great Hall, the log file may look like this:<br />
Entrance was tripped at 11:11:37 on 05/15/06<br />
Exit was tripped at 11:11:51 on 05/15/06<br />
Theater A was tripped at 11:12:40 on 05/15/06<br />
Great Hall was tripped at 11:15:52 on 05/15/06<br />
Theater A was tripped at 11:21:22 on 05/15/06<br />
Exit was tripped at 12:01:46 on 05/15/06<br />
Entrance was tripped at 12:22:17 on 05/15/06<br />
Example - Temperature Indicator<br />
using Serial Port Communication<br />
In this example an external temperature sensor is hooked to <strong>Palette</strong> using one of the serial<br />
ports. At specific intervals, the current temperature is read and different cues are run to indicate<br />
to the public, using color or movement, the temperature. A Time Event with an hourly repeat<br />
executes this code:<br />
-- open Com1: with proper parameters<br />
HC.SerialOpen(1,'9600,N,8,1')<br />
-- request temperature from gauge (hex code)<br />
HC.SerialWrite(1,'0x4b')<br />
A very short while later, (enough time for the gauge to respond) this code is called:<br />
-- sucks in temperature as a string<br />
temp = HC.SerialRead(1)<br />
-- close serial port<br />
HC.SerialClose(1)<br />
-- converts the string 'temp' to a number (adding 20)<br />
temp = temp + 20<br />
-- limit the bottom (-20F will be the coldest)<br />
temp = math.max(temp,0)<br />
<strong>Strand</strong> <strong>Lighting</strong><br />
p341
<strong>Palette</strong> <strong>OS</strong> v10<br />
-- limit the top (110F will be the hottest)<br />
temp = math.min(temp, 130)<br />
-- normalize between 1 and 12 rounding down<br />
cue = 1 + math.floor(temp * 11 / 130)<br />
-- run the cue sequence<br />
HC.CueListGotoAndExecuteFollows('Temperature', cue)<br />
See Also<br />
www.lua.org<br />
Macro Editor and Commands<br />
User Interface Macros<br />
Macro Buttons<br />
Time Events<br />
Triggers<br />
Cue Properties<br />
Blue Box<br />
PowerPoint Automation<br />
-o-<br />
<strong>Strand</strong> <strong>Lighting</strong><br />
p342
<strong>Palette</strong> <strong>OS</strong> v10<br />
User Interface Macros<br />
The Scripts in the Macro Editor are very powerful, but especially powerful is the HC.UIMacro()<br />
call. Using this call alone, properly formatted, you can almost completely automate a console as<br />
if someone was pressing the buttons (very quickly).<br />
If you have not already familiarized yourself with the syntax and operation of Scripts, it would<br />
be good to review the topic Macro Editor and Scripts. Once you have an handle on that, writing<br />
the HC.UIMacros is a snap. The format is:<br />
HC.UIMacro('macro-info'[,'macro-info'...])<br />
For example:<br />
HC.UIMacro('1/10@5{enter})<br />
HC.UIMacro('1/5{enter}','{selectodd}@0{enter}')<br />
HC.UIMacro('{M1}')<br />
The accepted characters that do not have to be enclosed in {}'s are 0 through 9 and the<br />
characters +, - , . , / , < and @. The text inside the braces is case insensitive.<br />
0<br />
delete<br />
lens<br />
release<br />
1<br />
DeleteCueOnly<br />
link<br />
ReleaseAllPB<br />
2<br />
DeleteQOnly<br />
load<br />
ReleaseInTime<br />
3<br />
DeleteRetain<br />
look<br />
RelInTime<br />
4<br />
DeleteRetainData<br />
loop<br />
remdim<br />
5<br />
DeleteTrack<br />
m1<br />
SelCap<br />
6<br />
DelQOnly<br />
m2<br />
SelDown<br />
7<br />
DelRetain<br />
m3<br />
SelectCaptured<br />
8<br />
DelRetainData<br />
m4<br />
SelectDn<br />
9<br />
DeleteTrack<br />
m5<br />
SelectDown<br />
-<br />
DelTrack<br />
m6<br />
SelectEven<br />
.<br />
DelTracking<br />
m7<br />
SelectInvert<br />
/<br />
DelAndTrack<br />
m8<br />
SelectOdd<br />
+<br />
displayattributes<br />
m9<br />
SelectOn<br />
<<br />
displayblind<br />
m10<br />
SelectPrevious<br />
@<br />
displaylevels<br />
m11<br />
SelectUp<br />
@Cue<br />
displaylive<br />
m12<br />
SelEven<br />
@level<br />
displaypatch<br />
MIB<br />
SelInv<br />
@Q<br />
displaytimes<br />
MIBTime<br />
SelOdd<br />
AtCue<br />
end<br />
move<br />
SelOn<br />
atlevel<br />
enter<br />
next<br />
SelPrev<br />
backspace<br />
FirstCue<br />
out<br />
SelUp<br />
block<br />
FlashDMX<br />
pagedown<br />
spec<br />
<strong>Strand</strong> <strong>Lighting</strong><br />
p343
<strong>Palette</strong> <strong>OS</strong> v10<br />
Clear<br />
FlashFixture<br />
pageup<br />
special<br />
ClearCommandLine<br />
FlashOutput<br />
pgdn<br />
stepback<br />
col<br />
follow<br />
pgup<br />
stepforward<br />
color<br />
gobo<br />
pos<br />
thruon<br />
colour<br />
group<br />
position<br />
unblock<br />
copy<br />
highlight<br />
prev<br />
update<br />
cue<br />
home<br />
rec<br />
updt<br />
cuetime<br />
InTime<br />
record<br />
wait<br />
del<br />
LastCue<br />
rel<br />
delay<br />
Note:<br />
There is no keystroke recorder for macros. You must manually form the HC.UIMacro script.<br />
-o-<br />
<strong>Strand</strong> <strong>Lighting</strong><br />
p344
<strong>Palette</strong> <strong>OS</strong> v10<br />
Variables, Button<br />
Stations & MIDI Notes<br />
To patch an ILS button station to a variable page, enter the button station ID in the patch edit<br />
box using the syntax B# (for example B2 would connect the variable page to Button Station 2 -<br />
the B must be capitalized). ILS button stations should be in Remote Keypad mode.<br />
o<br />
o<br />
The optional VisionNet Interface card connects a <strong>Palette</strong> product to an VisionNet<br />
network.<br />
VisionNet 6-Button, 8-Button and AV-Contact Closure devices can communicate with<br />
<strong>Palette</strong>.<br />
o ILS devices must be addressed between 1 and 255<br />
o<br />
o<br />
o<br />
o<br />
ILS 6-Button stations can also be assigned to IR Remote rooms A through D for<br />
triggering <strong>Palette</strong> using the infrared hand-held device<br />
ILS button events (down and up) are transmitted to <strong>Palette</strong> over the ILS network and<br />
can be used by <strong>Palette</strong>’s Variable (Display|Variables)<br />
<strong>Palette</strong> can have multiple Variable Pages<br />
ILS devices can be ‘patched’ to Variable Pages. The syntax is B# (where B is the<br />
capital letter ‘B’ and # is the ILS device ID)<br />
Multiple button stations can be patched to a variable page by separating devices by a comma<br />
<strong>Strand</strong> <strong>Lighting</strong><br />
p345
<strong>Palette</strong> <strong>OS</strong> v10<br />
(i.e. ‘B1,B2’)<br />
<br />
The order field can also contain comma delineated text, such as "B1.1,B2.5" which would bind<br />
together button number 1 on Button Station #1 and button #5 on Button Station #2<br />
As buttons go down, the corresponding variable (‘Order’ field) will be set to a value of ‘1’<br />
As buttons go up, the corresponding variable will be set to a value of ‘0’<br />
<br />
<br />
<br />
<br />
<br />
<br />
<br />
If a variable’s value is non-zero, the button’s LED will be illuminated<br />
Variables can be set as:<br />
o<br />
o<br />
o<br />
Momentary (only down as long as your finger is on it)<br />
Toggle (first press down, second press up)<br />
Radio (only one variable in radio group can be down at a time)<br />
Variable Pages can also be patched to Cue Lists and Look Pages (i.e. ‘Cue List 1’ or<br />
‘B1,B2,Cue List 1’ or 'Main').<br />
If you have the optional MIDI / SMPTE Interface, you can receive MIDI Notes. Patch MIDI<br />
channels using M# (for channel #'s 1 through 16). The Order field will corresponded to notes<br />
1 through 127. Receiving a NOTE-ON will set the variable to '1' while a NOTE-OFF will set it to<br />
0.<br />
When a variable leaves the zero state, the corresponding Cue or Look will be activated<br />
Variable Pages patched to Look Pages will be 0 when the look handle is at the bottom and<br />
100 when the look handle is at the top (or the bump button is pressed). Setting a variable to<br />
any value between those two numbers sets the look’s virtual handle to that level and vice<br />
versa<br />
Individual variables can have Cues or Looks specified in the order field (i.e., "Main.1,B2.5')<br />
Variables can have macros attached to them:<br />
There are eight different state-change events that can fire macros<br />
o<br />
o<br />
Button Up<br />
Button Down<br />
o On Value (when a variable reaches a certain value (i.e., ‘0’ or ‘100’ or ‘25’)<br />
<strong>Strand</strong> <strong>Lighting</strong><br />
p346
<strong>Palette</strong> <strong>OS</strong> v10<br />
o<br />
o<br />
o<br />
o<br />
o<br />
Off Value (when a variable changes from a certain value (i.e., when a look handle<br />
leaves 0)<br />
Up Through (when the look is fading up and passes by the specified value)<br />
Down Through (when the look is fading down and passes by the specified value)<br />
Pass Through (when the look crosses a certain value in either direction)<br />
Value Change (is trigged any time the value changes)<br />
You can attach any number of macro actions to a variable<br />
Macros can contain Lua Scripts that provide for IF THEN ELSE type programming capabilities.<br />
While <strong>Palette</strong> is attached to the ILS network, it can send two ILS com mands using macros:<br />
o<br />
o<br />
ILSSetScene (sends a Scene Set command to a specified device ID; useful for setting<br />
house lights to half)<br />
ILSLockCommand (lock or unlocks a specified button station; useful to lock out public<br />
buttons stations at show time)<br />
The ILS devices must be in proper ILS mode (i.e., not Remote Keypad mode) to make use of<br />
these commands:<br />
-o-<br />
<strong>Strand</strong> <strong>Lighting</strong><br />
p347
<strong>Palette</strong> <strong>OS</strong> v10<br />
Vision Net<br />
<strong>Palette</strong> <strong>OS</strong> may be controlled from a <strong>Strand</strong> <strong>Lighting</strong> Vision Net System, allowing sophisticated<br />
integration between an Architectural <strong>Lighting</strong> system and the control console.<br />
To enable this function, the Vision Net interface on <strong>Palette</strong> <strong>OS</strong> needs to be enabled. This is done<br />
in the Hardware Setup for the console and by assigning a Variable page to receive information<br />
from Vision Net.<br />
Enabling the Vision Net Interface:<br />
The port used for Vision Net is selected in Console Section of the {Hardware Setup} followed<br />
by {Console}<br />
Change the Vision Net port to COM1 as above.<br />
Note: This is a global setting and only needs to be set once, since it is stored separate from the<br />
show file<br />
Linking Vision Net actions to the console:<br />
Events from Vision Net panels appear as Variables inside the console. To make use of these<br />
variables, they need to be patched in and connected to actions inside the console.<br />
Open the Variables Display (Display - Vaiables) and Right Click to add a new Variable Page, by<br />
selecting "Add Variable Page"<br />
<strong>Strand</strong> <strong>Lighting</strong><br />
p348
<strong>Palette</strong> <strong>OS</strong> v10<br />
Having added the variable, you can give it a name by double clicking on it and setting what it<br />
refers to in the Patch column.<br />
The Patch Column entry is in the form of Bx, where "x" refers to the Vision Net Room for the<br />
Panel. So for example, if the button that we needed to interface to was in Room 5, we would<br />
enter B5 in the patch.<br />
In the above example, the Variable Page has been assigned the to Room 1. Having created that<br />
link, we need to add a separate variable for each button.<br />
Adding a new Variable is done using the {Add Variable} softkey displayed at the bottom of the<br />
screen.<br />
By adding a variable to the page, it is assigned an "Order" and a "Name". In the case of Vision<br />
Net, the Order number is the button number that you want to link to. The name is a name to<br />
reffer to the value coming from this panel in Macros Scripts etc.<br />
When you add variables to a page, they will automatically start at One and increment. You can<br />
modify the "Order" value, just by double clicking. In the above example the Order has been<br />
changed to 8 to correspond to button Number 8 in the patched Room (Room 1 (B1) from this<br />
example). It has also been give the name of "VN Button8" so that we can use this variable inside<br />
<strong>Strand</strong> <strong>Lighting</strong><br />
p349
<strong>Palette</strong> <strong>OS</strong> v10<br />
macros.<br />
Assigning a Action to the Variable<br />
Macros are set using the Macro cell for the variable. Double clicking on the Macro cell opens the<br />
macro dialogue box.<br />
Use OK to close the Macro defination screen.<br />
Mapping Submasters to Variables<br />
As well as associating a Macro to the change in the variable, you can also connect a Submaster to<br />
the variable.<br />
Start by recording a series of submasters<br />
* Display the Virtual Subs (Display Menu)<br />
* Record a Sub in “Sub Page 1” (say Sub 3)<br />
* Run the Sub by clicking on the Virtual Sub and watch the level change in the Channel Grid<br />
* Display the Variables<br />
* Change the Patch on the Variable Page to include the Look Page (example, omit the quotes:<br />
“B1,Sub Page 1”)<br />
* Double Click the Value next to the variable, type in a new number and watch the Sub change to<br />
that value<br />
Testing<br />
1. Testing a Button<br />
Press the Vision.Net button and notice the "value" for the corresponding variable goes from<br />
zero to one<br />
2. Testing a Slider<br />
Move the Vision.Net slider and notice the "value" for the corresponding variables goes from<br />
zero to 100<br />
<strong>Strand</strong> <strong>Lighting</strong><br />
p350
<strong>Palette</strong> <strong>OS</strong> v10<br />
3. Test moving a Sub from Vision.Net<br />
Move the Vision.Net Slider and watch the Variable Value change and watch the Sub Value<br />
change<br />
-o-<br />
<strong>Strand</strong> <strong>Lighting</strong><br />
p351
<strong>Palette</strong> <strong>OS</strong> v10<br />
Time Events<br />
Use the Display Menu or the [S5]softkey to change the display to Time Events. You can also<br />
press the<br />
icon in the Cue List Directory toolbar. To return to the Live Display, press [S12].<br />
Note that the upper left pane (where the Cue List Directory normally lives) now contains pages of<br />
Time Events. By default, the first pages is called "Time Events" and is Enabled.<br />
The lower left pane is where individual Time Events are added and edited. There are twenty-one<br />
column in total (ten shown here and eleven shown below):<br />
....<br />
Testing Events<br />
The first column of the time events list has the GO icon. If you move the Blue Box over this icon<br />
and press [EDIT], the Macro(s) for this time event will run immediately for testing purposes.<br />
Adding, Deleting and Naming Events<br />
To add an event, press [S1]Add Event. The new event will be named "New Time Event". To<br />
change its name, move the Blue Box to the name column and press [EDIT]. If you want to delete<br />
one or more events, position the blue box to highlight the events and press [DEL]. A confirmation<br />
box will be displayed:<br />
Press [ENTER] to confirm deletion or [UNDO] to abort the operation.<br />
Macro<br />
To add macros to the event, move the Blue Box to this column and press [EDIT]. The Macro<br />
Editor will open and you can add one or more actions to this event.<br />
Enabled<br />
This column will either have a check mark in the box or not. You can use the mouse or the blue<br />
box and [EDIT] to toggle the check mark. Events that should occur for all other reasons except<br />
that it's not enabled will appear in red text in the Today column.<br />
<strong>Strand</strong> <strong>Lighting</strong><br />
p352
<strong>Palette</strong> <strong>OS</strong> v10<br />
When<br />
Individual Time Events can be triggered based on different criteria:<br />
When you select at time the Offset column to its right will be disabled. You then set the specific<br />
time of day in the Time/Offset column two to the right. When you select any one of the four<br />
astronomical events, the Offset column become enabled (see below). Before you use any<br />
astronomical events, you must set up your location in Show Options|Venue Setup and the correct<br />
time and daylight savings time settings using the <strong>Palette</strong> Control Panel.<br />
Offset<br />
Only when the When column is set to an astronomical event will this column be active:<br />
Your choice is to fire the event exactly on time (no offset) or before or after the astronomical<br />
event. If you choose before or after, the Time/Offset column to the right will become active.<br />
Time/Offset<br />
This column will only be active if either the When column is set to at time or an astronomical<br />
event is scheduled an you have set the Offset column to before or after. If the When column is<br />
set to at time, enter in the desired time in this column using the twenty-four hour (HH:MM:SS)<br />
syntax. If you're offsetting either before or after an astronomical event, enter the desired time<br />
offset here.<br />
... ...<br />
# Repeats<br />
By default, this column is set to a value of zero. That means that once the event happens, it will<br />
only happen once. If you want the event to happen multiple times within this day, enter a<br />
none-zero value. When you edit this field, you can type a repeat value or roll one in using the<br />
wheel.<br />
Note:<br />
<strong>Strand</strong> <strong>Lighting</strong><br />
p353
<strong>Palette</strong> <strong>OS</strong> v10<br />
Regardless of the value of # Repeats, events will never roll over into the next day.<br />
Repeat Delay<br />
When the # of Repeats is none-zero, this column will become active. The default repeat time is 1<br />
hour (01:00:00). The minimum repeat time is one minute, but any value greater than 60<br />
seconds is valid (for example, 90 seconds or 00:01:30). Rolling the wheel while this box is open<br />
for editing increases the repeat time by one second. No repeats happen outside of the current<br />
day (i.e., past midnight).<br />
Today<br />
This non-editable field shows you the event's activities for today.<br />
o<br />
o<br />
o<br />
o<br />
o<br />
o<br />
o<br />
o<br />
Events missed because the show file loaded after the event was to occur appear in grey<br />
text<br />
Events that are excluded from occurring today for any reason except that the event is not<br />
enabled appear in grey text<br />
Events that are still to occur appear in green text<br />
Events that should occur today but are disabled appear in red text<br />
...<br />
Days of the Week<br />
You can easily determine which days of the week this event will occur on by adding a check<br />
mark in the appropriate column. By default, all new time events will be set to function on all<br />
seven days.<br />
Only On<br />
If you want events to occur only on certain dates, you can get more specific by editing the Only<br />
On column. Pressing [EDIT] in this column will open up a dialog box:<br />
<strong>Strand</strong> <strong>Lighting</strong><br />
p354
<strong>Palette</strong> <strong>OS</strong> v10<br />
Press [S2] to add a line to the list then move the Blue Box using the arrow keys or mouse and<br />
press [EDIT] to change the value in each of the Day, Month and Year columns. The first item in<br />
each list is the word all. You can add as many rows in the list is needed to cover all your dates. If<br />
you want to delete any rows, position the Blue Box in any column of the desired row and press<br />
[Delete].<br />
# Repeats<br />
The column to the right of Only On is called # Repeats, but has different functionality to the<br />
column with the same name to the right of Time/Offset (see above). This field is only editable if<br />
you have entered at least one row in the Only On field. If, for example, you specified only on<br />
January 1 2006, and them entered a value of 6 in the # Repeats field, the events would happen<br />
seven time (a full week) starting on the 1st of January, if and only if there are no Except On or<br />
Days of the Week exclusions.<br />
Note:<br />
Regardless of the value of # Repeats, events will never roll over into the next month.<br />
Skip Days<br />
If you have specified Only On Dates, and the # Repeats is greater than one, you can specify Skip<br />
Days. This field is similar to Repeat Delay specified above.<br />
Except On<br />
Apart from the Enabled value, this field is the upper most condition upon which an event will not<br />
fire. Regardless of your Day of Week and Only On selections, if the current day is specified here,<br />
the event will not happen. Pressing [EDIT] in this column will open up a dialog box:<br />
<strong>Strand</strong> <strong>Lighting</strong><br />
p355
<strong>Palette</strong> <strong>OS</strong> v10<br />
Press [S2] to add a line to the list then move the Blue Box using the arrow keys or mouse and<br />
press [EDIT] to change the value in each of the Day, Month and Year columns. The first item in<br />
each list is the word all. You can add as many rows in the list is needed to cover all your dates. If<br />
you want to delete any rows, position the Blue Box in any column of the desired row and press<br />
[Delete].<br />
See Also:<br />
Venue Setup<br />
Macro Editor<br />
Date & Time<br />
-o-<br />
<strong>Strand</strong> <strong>Lighting</strong><br />
p356
<strong>Palette</strong> <strong>OS</strong> v10<br />
Browser Control<br />
Using any web browser on your network, you can remotely control <strong>Palette</strong>. This is accomplished<br />
by first authoring a customized web page or site and saving it to d:\MQWeb on <strong>Palette</strong>. You can<br />
use any software to build your web site. The examples installed with the software were simply<br />
published with MS Word. The key to how it controls different functions in <strong>Palette</strong> lies in the<br />
syntax of the hyperlinks embedded in objects on your pages. The URL of the links must use the<br />
HC.#### script macros.<br />
The easiest way to ensure the syntax is correct is to run <strong>Palette</strong> PC on the same machine where<br />
you are authoring the pages. Right-click on the virtual macro buttons and, using the Macro<br />
Editor, add the commands you want for each action and check their operation using the [S4] -<br />
TEST button:<br />
Once you are sure the desired action happens correctly, copy the text from the right-hand edit<br />
area and paste it as the URL in the link in your web authoring software:<br />
<strong>Strand</strong> <strong>Lighting</strong><br />
p357
<strong>Palette</strong> <strong>OS</strong> v10<br />
You need to pre-pend the URL with the text:<br />
http://0/script.mq?<br />
then add the copied text verbatim. For example:<br />
GO on Cuelist A/B would be:<br />
http://0/script.mq?HC.CueListGo('A / B')<br />
A three second fade to Full on Look 1 on the Main look page:<br />
http://0/script.mq?HC.LookFade('Main',1,100,3)<br />
Compose your custom web page or an entire site that has linked pages and graphics and buttons<br />
etc. and save the published version (including subfolders) to the machine running <strong>Palette</strong> as<br />
described above.<br />
Note:<br />
The main page must be called index.html.<br />
In the Hardware Setup - Console page, check off [S6] - Enable Web Server:<br />
<strong>Strand</strong> <strong>Lighting</strong><br />
p358
<strong>Palette</strong> <strong>OS</strong> v10<br />
<strong>Palette</strong> will then serve up this web page (or site) when the user types in <strong>Palette</strong>'s IP address in<br />
their personal browser's address line:<br />
Any links you have to other pages or embedded graphics or animation etc. will be visible on the<br />
machine surfing the site. Any time the user clicks a <strong>Palette</strong> specific link, <strong>Palette</strong> will execute the<br />
script immediately.<br />
-o-<br />
<strong>Strand</strong> <strong>Lighting</strong><br />
p359
<strong>Palette</strong> <strong>OS</strong> v10<br />
<strong>Strand</strong> <strong>Lighting</strong><br />
p360
<strong>Palette</strong> <strong>OS</strong> v10<br />
MS Media Player<br />
Control<br />
<strong>Palette</strong> has Macros such as Play File, Pause and Stop, that allow you to control the Processor's<br />
Media Player to play CD's, Wave files, MP3's or MPEG's. <strong>Palette</strong> can also read the Time Code off of<br />
these files and use it as SMPTE for use in synchronizing Cue Lists to. You can read the current<br />
media file's play head location in the Status Bubbles:<br />
Note:<br />
To read Time Code from the Windows Media Player, the <strong>Palette</strong> Media Player Communications<br />
Plug-in must be enabled:<br />
See Also:<br />
SMPTE Time Code on Cue Lists<br />
Macro Buttons<br />
MediaPlayer<br />
-o-<br />
<strong>Strand</strong> <strong>Lighting</strong><br />
p361
<strong>Palette</strong> <strong>OS</strong> v10<br />
PowerPoint Automation<br />
<strong>Palette</strong>’s macro editor has five PowerPoint® specific macros you can assign to cues or macro<br />
buttons:<br />
You will need a separate PC to run your presentation that is connected to your <strong>Palette</strong> processor<br />
via a LAN or cross-over Cat5 cable. You must download the template PowerPoint file from the<br />
<strong>Strand</strong> <strong>Lighting</strong> web site and modify it to include your own slides. It is important to name the file<br />
ending with a number between 1 and 9. This number will match the macro's Machine ID number:<br />
In your version of PowerPoint, you may need to go into TOOLS|MACR<strong>OS</strong>|SECURITY and set the<br />
Security Level to Medium or Low. You must do this before loading and saving your presentation.<br />
<strong>Strand</strong> <strong>Lighting</strong><br />
p362
<strong>Palette</strong> <strong>OS</strong> v10<br />
When you are ready to run your show choose TOOLS|MACR<strong>OS</strong>|Macros… from the PowerPoint<br />
menus and RUN the macro called <strong>Palette</strong>:<br />
Check the Machine_ID then press the Run button. The machine running the presentation will now<br />
wait for commands from <strong>Palette</strong>. Running the show using this method does not prevent you from<br />
navigating the slides using standard methods. When the presentation is done, press the End<br />
button.<br />
Note:<br />
The first time you run the <strong>Palette</strong> macro in PowerPoint, you may be presented with a Windows<br />
Security Alert:<br />
<strong>Strand</strong> <strong>Lighting</strong><br />
p363
<strong>Palette</strong> <strong>OS</strong> v10<br />
This is Windows telling you that it notices you want to listen to <strong>Palette</strong>. Choose Unblock.<br />
See Also:<br />
Macro Editor<br />
-o-<br />
<strong>Strand</strong> <strong>Lighting</strong><br />
p364
<strong>Palette</strong> <strong>OS</strong> v10<br />
Serial Out Macros<br />
The Macro Editor has macros that you can assign to macro buttons or cues that will send serial<br />
data out the back of the processors DB9 serial connection. These can be used to trigger other<br />
show control devices such as video switchers, MP3 players or even other lighting consoles.<br />
It is a good idea to initially set up the communication parameters before sending any data. This<br />
can be done by adding a macro to the first cue in a cue list and making the cue list automatically<br />
run at load time. You will have to check with the device you are sending data to to configure the<br />
parameters properly.<br />
Make sure you specify the correct Port number. The DB9 connector on the back of the processors<br />
is Port 1. The setup string consists of four parts:<br />
[BAUD RATE], [PARITY], [DATA BITS], [STOP BITS]<br />
The default is 9600,N,8,1. If your device is expecting these settings, you will not need to run this<br />
macro. If you must change the settings, you only need to run the macro once during a session.<br />
The macro that actually send the data is called SerialOut:<br />
<strong>Strand</strong> <strong>Lighting</strong><br />
p365
<strong>Palette</strong> <strong>OS</strong> v10<br />
Again, make sure you specify the correct Port number. The Output String can be any text and<br />
does not need to be encompassed in double quotes. (Note:, ^M will send a Carriage Return, ^J<br />
sends a Line Feed and ^I sends a tab).<br />
See Also:<br />
Macro Editor and Commands<br />
Macro Editor and Scripts<br />
-o-<br />
<strong>Strand</strong> <strong>Lighting</strong><br />
p366
<strong>Palette</strong> <strong>OS</strong> v10<br />
Telnet and Serial<br />
Communications<br />
Text<br />
See Also<br />
Macro Editor and Scripts<br />
Serial Out Macros<br />
-o-<br />
<strong>Strand</strong> <strong>Lighting</strong><br />
p367
<strong>Palette</strong> <strong>OS</strong> v10<br />
MIDI Show Control<br />
<strong>Palette</strong> can respond to other consoles or show control devices using the MIDI Show Control (MSC)<br />
protocol. There is a Cue List Property that can specify that <strong>Palette</strong> outputs MSC on a particular<br />
cue list so that it can control other devices. The connection is m ade using a standard 5-Pin DIN<br />
connector on the optional MIDI / SMPTE Interface.<br />
The MSC format is as follows:<br />
F0 7F 02 F7<br />
Note:<br />
o<br />
o<br />
o<br />
o<br />
o<br />
<strong>Palette</strong> is 0 by default<br />
No more than one command can be transmitted in a Sysex (System Exclusive command).<br />
o The total number of bytes in a Show Control message should not exceed 24.<br />
o<br />
o<br />
Sysex's must always be closed with an F7H as soon as all currently prepared information<br />
has been transmitted.<br />
Q_number and Q_list are expressed as ASCII numbers 0-9 (encoded as 30H-39H) with the ASCII<br />
decimal point character (2EH) used to delineate subsections. <strong>Palette</strong> uses a 'best-match' method<br />
to determine the cue list name based on the label used in Cue List Properties. For example, a cue<br />
list named "01-Main" would be referenced by MSC as Cue List 1 or 31H.<br />
Example:<br />
On Device 0 a GO on Cue 235.6 in cue list 36.6 would be represented by the hex data:<br />
F0 7F 00 02 01 01 32 33 35 2E 36 00 33 36 2E 36 F7<br />
The MSC commands supported by <strong>Palette</strong> include:<br />
01 GO<br />
Starts a transition or fade to a cue. Transition time is determined by the cue in the <strong>Palette</strong>. If<br />
no Cue Number is specified, the next cue in numerical sequence GOes. If a Cue Number is<br />
specified, that cue GOes. Transitions "run" until complete. If the Controller wishes to define the<br />
transition time, TIMED_GO (see below) should be sent.<br />
01 GO<br />
<br />
00 delimiter<br />
<br />
A/B)<br />
Note:<br />
optional; required if Q_list is sent<br />
optional; <strong>Palette</strong> uses closest match on Cue List name (if omitted, <strong>Palette</strong> will use<br />
If a GOTO Cue 0 is sent, <strong>Palette</strong> will Release the cue list.<br />
<strong>Strand</strong> <strong>Lighting</strong><br />
p368
<strong>Palette</strong> <strong>OS</strong> v10<br />
02 STOP<br />
Halts currently running transition(s) on the active Cue List.<br />
02 STOP<br />
<br />
00 delimiter<br />
<br />
A/B)<br />
03 RESUME<br />
optional; required if Q_list is sent<br />
optional; <strong>Palette</strong> uses closest match on Cue List name (if omitted, <strong>Palette</strong> will use<br />
Causes STOPped transition(s) to continue running. If no Cue Number is specified, the current<br />
cue list will continue if Halted.<br />
03 RESUME<br />
<br />
00 delimiter<br />
<br />
A/B)<br />
04 TIMED_GO<br />
optional; required if Q_list is sent<br />
optional; <strong>Palette</strong> uses closest match on Cue List name (if omitted, <strong>Palette</strong> will use<br />
Starts a timed transition or fade to a cue. If no Cue Number is specified, the next cue in<br />
numerical sequence GOes. If a Cue Number is specified, that cue GOes. Transitions "run" until<br />
complete. Time is Standard Time Specification with subframes (type {ff}), providing anything<br />
from "instant" to 24 hour transitions.<br />
04 TIMED_GO<br />
hr mn sc fr ff Standard Time Specification<br />
<br />
00 delimiter<br />
<br />
A/B)<br />
0A RESET<br />
optional; required if Q_list is sent<br />
optional; <strong>Palette</strong> uses closest match on Cue List name (if omitted, <strong>Palette</strong> will use<br />
Is equivalent to releasing all cue lists.<br />
0A<br />
RESET<br />
See Also:<br />
MIDI / SMPTE Interface<br />
SMPTE Time Code on Cue Lists<br />
-o-<br />
<strong>Strand</strong> <strong>Lighting</strong><br />
p369
<strong>Palette</strong> <strong>OS</strong> v10<br />
<strong>Palette</strong> Control Panel<br />
<strong>Palette</strong> Control Panel<br />
The <strong>Palette</strong> console runs on a custom build Processor running the Windows XP Embedded ©<br />
operating system. An embedded operating system means that you only have what you need to<br />
run the console, none of the extra user configurable gadgets have been included in the <strong>OS</strong><br />
therefore its overall size, efficiency and stability has been greatly optimized. As an operator on<br />
the system, you have very limited control of the <strong>OS</strong>'s parameters guaranteeing that system<br />
integrity is never compromised (i.e., you can't install your own stuff or 'get' to the <strong>OS</strong>).<br />
Since we do use Windows XP, there are a lot of features that we can take advantage of, such as<br />
Internet Explorer, MS Media Player, Outlook Express, MS Paint and Windows Explorer. You can<br />
also connect this console up to your office network and take advantage of services like DHCP<br />
networking, mapped network drives and printers or Internet connectivity. Windows also offers<br />
features specifically designed with accessibility in mind for those with disabilities.<br />
To allow you at these special features, you use the <strong>Palette</strong> Control Panel. To launch the control<br />
panel from <strong>Palette</strong>, press the [S4] button or press the FAV button on the processor's keyboard.<br />
Click on the items below to find out more specific information.<br />
System date &<br />
time, DST &<br />
<strong>Strand</strong> <strong>Lighting</strong><br />
Screen resolution<br />
& screen saver Windows Explorer Windows Media<br />
Player<br />
p370<br />
Paint
<strong>Palette</strong> <strong>OS</strong> v10<br />
time-zone<br />
Keyboard setup Mouse setup Internet Explorer Outlook Express<br />
Mail<br />
Notepad text<br />
editor<br />
Network Setup<br />
Launch/Show<br />
<strong>Palette</strong><br />
Accessibility<br />
Options<br />
Monitor Power Saver<br />
Network Printer<br />
Configuration<br />
Shutdown System<br />
Note:<br />
Hardware Test<br />
Read Release Notes<br />
Additional<br />
Applications<br />
The Control Panel will automatically hide itself after 30 seconds of inactivity. You can also hide it<br />
by pressing the FAV button on the processor's keyboard or pressing the SPACE BAR.<br />
See Also:<br />
Upgrading Console Software<br />
-o-<br />
<strong>Strand</strong> <strong>Lighting</strong><br />
p371
<strong>Palette</strong> <strong>OS</strong> v10<br />
Upgrading the <strong>Palette</strong><br />
Software<br />
From time to time, Horizon Control Inc. may release updates to the software installed on your<br />
<strong>Palette</strong> Console. These may include general changes in the base code, additional library files,<br />
updated help documentation or <strong>OS</strong> changes.<br />
You may either receive the updates on CDR from your dealer or download them yourself from<br />
the <strong>Strand</strong> <strong>Lighting</strong> Web Site . In either case, what you will receive is a single .EXE file. You will<br />
not be able to run this file successfully on your system since it will be writing to protected areas<br />
of your hard drive.<br />
1. The upgrade file needs to be placed in the root directory of the D: drive.<br />
o<br />
o<br />
Download Method: Download it directly from the <strong>Strand</strong> <strong>Lighting</strong> Web Site to D:\<br />
Media Method: Copy it to D:\ from the supplied USB stick using Windows Explorer<br />
which you start from the Control Panel. Note: Remove the media before Step 2.<br />
2. Re-boot the system for the changes to take affect.<br />
3. After the system starts up, the Control Panel may appear and display the message:<br />
4. Once the new software has been installed, the <strong>Palette</strong> software will run and the process is<br />
finished.<br />
5. The .EXE file you placed on D:\ will be moved to the folder D:\SavedInstalls.<br />
Tip:<br />
If at any time you want to 'roll-back' to a previous version of <strong>Palette</strong> software, all you needed to<br />
do is launch Windows Explorer from the Control Panel and move the appropriate file from<br />
D:\SavedInstalls back to D:\ and re-boot the system.<br />
Alternate Method of Upgrading Software: You can simply place the software on a USB stick and<br />
re-boot the system. <strong>Palette</strong> always looks to removable media upon startup for software updates.<br />
This is why it is important not to leave the update USB sticks in the system. This method does<br />
not archive the install, but you can always store the USB Stick.<br />
-o-<br />
<strong>Strand</strong> <strong>Lighting</strong><br />
p372
<strong>Palette</strong> <strong>OS</strong> v10<br />
Console Group<br />
Launch/Show <strong>Palette</strong><br />
Use this button in the <strong>Palette</strong> Control Panel to Launch <strong>Palette</strong> if it is not running, or bring the<br />
main window to the front if it is. If the Control Panel is visible, pressing the [Spacebar] is<br />
equivalent to pressing this button.<br />
If this console is your backup and you want to launch a Tracking Backup session, hold down<br />
[CTRL] before clicking this button.<br />
Check the Up Time to see how long or if <strong>Palette</strong> is running.<br />
If you see this icon:<br />
the Control Panel is installing new software and you cannot launch <strong>Palette</strong> at this time.<br />
Back to <strong>Palette</strong> Control Panel<br />
-o-<br />
<strong>Strand</strong> <strong>Lighting</strong><br />
p373
<strong>Palette</strong> <strong>OS</strong> v10<br />
Hardware Test<br />
Use this button in the <strong>Palette</strong> Control Panel to start a hardware test. The <strong>Palette</strong> software cannot<br />
be running while you perform the test so you must exit <strong>Palette</strong> before selecting this option.<br />
Once you click on this button, you will be presented with an image of your console. Click it to<br />
start the test. Then choose the appropriate button in the top left of the screen to choose the<br />
section of the console you wish to test.<br />
As you enter the test screen, all the LEDs on your console should be flashing. Pressing a button<br />
will turn the square around the button blue and buttons or slider that you have visited will<br />
remain green. If you have LEDs not flashing, buttons that are not responding or buttons and<br />
sliders that turn green before you touch them, contact Entertainment Technology. If you have<br />
console lights that are not responding, check the bulb and then call ET if that doesn't fix it.<br />
Back to <strong>Palette</strong> Control Panel<br />
<strong>Strand</strong> <strong>Lighting</strong><br />
p374
<strong>Palette</strong> <strong>OS</strong> v10<br />
-o-<br />
<strong>Strand</strong> <strong>Lighting</strong><br />
p375
<strong>Palette</strong> <strong>OS</strong> v10<br />
Read Release Notes<br />
Each and every software update to <strong>Palette</strong> will have accompanying Release Notes to tell you<br />
what is new or what has changed in the latest software release. After you install the software a<br />
dialog box will pop up showing you the release notes. If you want to go back and read them at a<br />
later date, use this button in the <strong>Palette</strong> Control Panel. (Also see Release History)<br />
If there is only one set of release notes (initial install), clicking this button will open up the notes<br />
directly. Otherwise, you will be presented with a dialog box asking you to choose which notes you<br />
want to read.<br />
The notes will be sorted by date. Either double click on the desired one or select it and choose<br />
the Show Notes button.<br />
Use the scrollbar to the left to browse the notes. Click on any links in the notes for further<br />
information (some links may attempt to connect to the World Wide Web). Close this Explorer<br />
window when you are done.<br />
Back to <strong>Palette</strong> Control Panel<br />
-o-<br />
<strong>Strand</strong> <strong>Lighting</strong><br />
p376
<strong>Palette</strong> <strong>OS</strong> v10<br />
<strong>Strand</strong> <strong>Lighting</strong><br />
p377
<strong>Palette</strong> <strong>OS</strong> v10<br />
System Group<br />
System Date, Time,<br />
Time Zone, DST,<br />
Keyboard Language<br />
System Date, Time, TZ and DST<br />
Changing the system's clock is done via the Date/Time control in the <strong>Palette</strong> Control Panel. The<br />
Date and Time are set on the first tab you see when you launch the control.<br />
To adjust the Time Zone (which is important if you are using Astronomical Events or want to<br />
synchronize your system with World Time Services), select the second tab and choose the<br />
appropriate time zone. Check whether or not your region uses Daylight Savings Time or not.<br />
<strong>Strand</strong> <strong>Lighting</strong><br />
p378
<strong>Palette</strong> <strong>OS</strong> v10<br />
The last tab determines whether or not <strong>Palette</strong> will look to World Time Servers on the Internet,<br />
such as time.windows.com to synchronize your clock to World Standard Time. To do this all of<br />
the following must be true:<br />
<br />
<br />
<br />
<br />
<br />
<br />
You must be on the Internet (see Network Setup)<br />
The date (see above) must be set correctly<br />
Your time zone must be correct (see above)<br />
<strong>Strand</strong> <strong>Lighting</strong><br />
p379
<strong>Palette</strong> <strong>OS</strong> v10<br />
Note:<br />
To make Time Zones Changes take effect in the Status Bubbles, you will have to restart <strong>Palette</strong>.<br />
Keyboard/Input Language<br />
If you need to adjust the keyboard language to access special characters CTRL-Click on this icon<br />
in the Control Panel to open the Regional and Language Options:<br />
<strong>Strand</strong> <strong>Lighting</strong><br />
p380
<strong>Palette</strong> <strong>OS</strong> v10<br />
In the Languages tab, click on the Details... button to open the Text Services and Input<br />
Languages:<br />
<strong>Strand</strong> <strong>Lighting</strong><br />
p381
<strong>Palette</strong> <strong>OS</strong> v10<br />
Click on the Add... button to open the Add Input Language dialog box:<br />
Back to <strong>Palette</strong> Control Panel<br />
-o-<br />
<strong>Strand</strong> <strong>Lighting</strong><br />
p382
<strong>Palette</strong> <strong>OS</strong> v10<br />
Screen Resolution<br />
and Screen Saver<br />
When you receive you console, the screen resolution is set to 1024x768 and the screen saver is<br />
set for 15 minutes.<br />
Changing the screen resolution<br />
If you find the display difficult to read, you will want to lower the screen resolution. If you have<br />
a good monitor that can support higher resolutions, you may with to raise the screen resolution.<br />
1.<br />
1. From the <strong>Palette</strong> Control Panel, choose the Screen Resolution button.<br />
2.<br />
2. Using the trackpad, adjust the Screen resolution slider to the desired position.<br />
3.<br />
<strong>Strand</strong> <strong>Lighting</strong><br />
p383
<strong>Palette</strong> <strong>OS</strong> v10<br />
OR<br />
3. Click the OK button. The screen may blank for a moment or two and may ask you if you<br />
want to keep the settings. If you monitor cannot handle the new resolution after a short<br />
period of time, the settings will revert to their original state.<br />
4.<br />
4. Inside of the <strong>Palette</strong> software, move the mouse over the line separating the Channel Grid<br />
5.<br />
from the Cue List until it turns into this symbol .<br />
5. Click on the vertical line and hold down the mouse button to adjust the width of the<br />
Channel Grid display.<br />
Right-click once the<br />
menu.<br />
symbol appears, and select a set Channel Grid size from the right-click<br />
Setting up a Second Monitor<br />
Some older <strong>Palette</strong> Processors are purchased with the dual video option and have two 15-pin<br />
connectors on the rear. Other units use a USB-VGA adaptor. If you don't have the USB adaptor,<br />
follow these instructions. If you do have the USB adaptor, start at Step 5.<br />
1.<br />
1. Exit the <strong>Palette</strong> software.<br />
2.<br />
2. From the <strong>Palette</strong> Control Panel, choose the Screen Resolution button:<br />
<strong>Strand</strong> <strong>Lighting</strong><br />
p384
<strong>Palette</strong> <strong>OS</strong> v10<br />
2.<br />
2. Select the Advanced button and choose the Utility Manager tab:<br />
<strong>Strand</strong> <strong>Lighting</strong><br />
p385
<strong>Palette</strong> <strong>OS</strong> v10<br />
3.<br />
3. Select the Driver Mode Settings:<br />
<strong>Strand</strong> <strong>Lighting</strong><br />
p386
<strong>Palette</strong> <strong>OS</strong> v10<br />
4.<br />
4. Change the Driver mode from Mirror to Multimonitor. When you select OK, you will be<br />
asked to re-boot the system.<br />
5.<br />
5. After the system boots, choose the Screen Resolution option again from the <strong>Palette</strong><br />
Control Panel (as in Step 2 above):<br />
<strong>Strand</strong> <strong>Lighting</strong><br />
p387
<strong>Palette</strong> <strong>OS</strong> v10<br />
6.<br />
Note:<br />
6. This time, a second monitor marked '2' will be apparent. Chose monitor 2 and check off<br />
Extend my Windows desktop onto this monitor. Choose the Screen Resolution that suites<br />
you and select OK.<br />
You can click and drag the graphic representations of the monitors in the gray space shown in the<br />
dialog box above. That means that monitor 2 can be on the left. This prevents you having to plug<br />
and re-plug the connectors on the back of the processor.<br />
Changing the Screen Saver<br />
1.<br />
1. From the <strong>Palette</strong> Control Panel, choose the Screen Resolution/Screen Saver button.<br />
2.<br />
2. Select the Screen Saver tab.<br />
<strong>Strand</strong> <strong>Lighting</strong><br />
p388
<strong>Palette</strong> <strong>OS</strong> v10<br />
3.<br />
3. Choose the Setting button.<br />
<strong>Strand</strong> <strong>Lighting</strong><br />
p389
<strong>Palette</strong> <strong>OS</strong> v10<br />
4.<br />
4. Adjust the setting to suit your desire. You may change the Use pictures in this folder<br />
option to point to your own directory on the D:\ drive (the default directory is D:\Images).<br />
Place any images in that folder you want to see when your screen saver is active.<br />
5.<br />
5. Press OK<br />
6.<br />
Note:<br />
6. Press OK in the Display Properties dialog box.<br />
To change the power scheme for the monitor (auto power off), use the Monitor Power Saver<br />
. Do not choose the Power button in the Screen Saver properties box as you do not<br />
have the proper permissions to change the screen saver.<br />
See Also:<br />
ELO Touch Screens<br />
Back to <strong>Palette</strong> Control Panel<br />
-o-<br />
<strong>Strand</strong> <strong>Lighting</strong><br />
p390
<strong>Palette</strong> <strong>OS</strong> v10<br />
ELO Touchscreens<br />
<strong>Palette</strong> consoles can utilize ELO touchscreens. This makes running the console much easier and<br />
is highly suggested.<br />
Since the drivers are part of the XP Embedded build,only the ELO Touchscreens should be used.<br />
These are the same ones often used for cash registers are very durable. www.elotouch.com. Get<br />
the AccuTouch models (i.e. resistive technology which means you can use things other than your<br />
finger, like a fingernail, pen, etc.) You need to purchase the USB type, NOT serial. We<br />
recommend the 3000 series.<br />
Once you purchase your touchscreens (one or two will work), you should be able to just plug<br />
them in and boot the system (hot plugging is not suggested).<br />
You will need to calibrate the screens. To do this, choose ELO Touch Calibration from the<br />
Additional Apps button:<br />
<strong>Strand</strong> <strong>Lighting</strong><br />
p391
<strong>Palette</strong> <strong>OS</strong> v10<br />
This dialog box will let you change various options for the touchscreens, most importantly, the<br />
calibration. To do this, use the mouse to touch the Align button. The screen should go white and<br />
you will be presented with a red target to touch. Do this with your finger from a typical viewing<br />
angle. You will repeat this two more times then choose OK to exit.<br />
-o-<br />
<strong>Strand</strong> <strong>Lighting</strong><br />
p392
<strong>Palette</strong> <strong>OS</strong> v10<br />
On-Screen Keyboard<br />
If you are using Touch Screens on your console, you may want to launch the On-Screen<br />
Keyboard from the<br />
Additional Apps button in the <strong>Palette</strong> Control Panel:<br />
See Also:<br />
ELO Touch Screens<br />
<strong>Palette</strong> Control Panel<br />
Additional Apps<br />
-o-<br />
<strong>Strand</strong> <strong>Lighting</strong><br />
p393
<strong>Palette</strong> <strong>OS</strong> v10<br />
Trackpad Properties<br />
<strong>Palette</strong>'s integrated trackpad has many options that can be adjusted by selecting the<br />
Mouse/Trackpad options from the <strong>Palette</strong> Control Panel.<br />
1.<br />
1. To enable or disable tap clicks on the pad or to change the button functions, select the<br />
Taps and Buttons tab.<br />
2.<br />
2. To adjust the relative acceleration and speed of the trackpad, select the Motion tab.<br />
<strong>Strand</strong> <strong>Lighting</strong><br />
p394
<strong>Palette</strong> <strong>OS</strong> v10<br />
3.<br />
3. To turn on or off edge scrolling, select the Scrolling tab.<br />
<strong>Strand</strong> <strong>Lighting</strong><br />
p395
<strong>Palette</strong> <strong>OS</strong> v10<br />
Tip<br />
If you enable Vertical scrolling, the very right hand side of the trackpad emulates the level wheel.<br />
You can select channels by positioning the mouse pointer, tapping on the trackpad and then push<br />
along the right hand edge to set the level.<br />
Back to <strong>Palette</strong> Control Panel<br />
-o-<br />
<strong>Strand</strong> <strong>Lighting</strong><br />
p396
<strong>Palette</strong> <strong>OS</strong> v10<br />
Keyboard Options<br />
If you want to change the repeat properties of the keys on your QWERTY keyboard, choose<br />
Keyboard Options from the <strong>Palette</strong> Control Panel.<br />
Back to <strong>Palette</strong> Control Panel<br />
-o-<br />
<strong>Strand</strong> <strong>Lighting</strong><br />
p397
<strong>Palette</strong> <strong>OS</strong> v10<br />
Accessibility Options<br />
Use the Accessibility options in the Control Panel to change things such as:<br />
<br />
Sticky Keys (one press on Shift - then one press on letter to get an upper case letter)<br />
<br />
Change display to use High Contrast or change the cursor blink rate<br />
<br />
Enable MouseKeys to allow the arrow keys to move the cursor<br />
Back to <strong>Palette</strong> Control Panel<br />
-o-<br />
<strong>Strand</strong> <strong>Lighting</strong><br />
p398
<strong>Palette</strong> <strong>OS</strong> v10<br />
Network<br />
Configuration<br />
If your lighting console can be hooked to the building's network you can leverage off of standard<br />
networking capabilities such as mapped network drives, network printers and Internet<br />
connection. Most LANs have a DHCP Server (Dynamic Host Configuration Protocol) that<br />
automatically assigns network properties such as the IP address. In most network situations, you<br />
should be able to just physically hook the network cable up to the back of the processor and<br />
either surf the web or find shared drives on your network.<br />
If you have more specific needs, such as the requirement to assign a Static IP address to your<br />
lighting desk for connection to other gear (such as Pathport), then you need to manually setup<br />
your network connection. Use this button in the <strong>Palette</strong> Control Panel to launch the Network<br />
Connections dialog box.<br />
Note:<br />
If you hover over the button, the tooltip will tell you the current IP address and computer name.<br />
<strong>Manual</strong>ly setting up your network connection<br />
1.<br />
1. Click on the Network button in the Control Panel.<br />
<strong>Strand</strong> <strong>Lighting</strong><br />
p399
<strong>Palette</strong> <strong>OS</strong> v10<br />
2.<br />
2. Click the Local Area Connection (not Local Area Connection 2) icon to expand the Network<br />
Tasks menu.<br />
3.<br />
3. Click on Change settings of this connection to open the Local Area Connection Properties<br />
dialog box.<br />
<strong>Strand</strong> <strong>Lighting</strong><br />
p400
<strong>Palette</strong> <strong>OS</strong> v10<br />
4.<br />
4. Select Internet Protocol (TCP/IP) and click Properties.<br />
<strong>Strand</strong> <strong>Lighting</strong><br />
p401
<strong>Palette</strong> <strong>OS</strong> v10<br />
5.<br />
5. Choose Use the following IP address<br />
6.<br />
6. Type in the static IP address and appropriate Subnet mask provided by your network<br />
administrator.<br />
7.<br />
7. Type in a Default gateway if you need to get outside of the LAN (i.e. connect to other<br />
networks or surf the web)<br />
8.<br />
8. Type in a Preferred DNS (Domain Name Server) for computer and website lookups.<br />
9.<br />
9. Click OK.<br />
10.<br />
10. Click OK in the Local Area Connection Properties dialog box.<br />
11.<br />
Note:<br />
11. Close the Network Connections dialog box.<br />
There will be no need to reboot the processor for the network changes to take affect.<br />
If you need to change the name of your console on the network (from "<strong>Palette</strong>"), contact <strong>Strand</strong><br />
<strong>Lighting</strong> Technical Support.<br />
<strong>Strand</strong> <strong>Lighting</strong><br />
p402
<strong>Palette</strong> <strong>OS</strong> v10<br />
Back to <strong>Palette</strong> Control Panel<br />
-o-<br />
<strong>Strand</strong> <strong>Lighting</strong><br />
p403
<strong>Palette</strong> <strong>OS</strong> v10<br />
Monitor Power Saver<br />
If you leave your system running 24/7 it may be a good idea to not only use the Screen Saver,<br />
but to also turn off your monitor. Launch the Power Options Properties from the <strong>Palette</strong> Control<br />
Panel.<br />
Notes:<br />
<br />
<br />
<br />
<br />
The safest way to turn on the monitor after it has automatically turned off is to touch the<br />
SHIFT key on your console. That is assured not to change any levels on the stage (either<br />
by running cues or adjusting subs). Touching any key or handle on the console will disable<br />
the screen saver and turn the monitor back on).<br />
It is not suggested that you adjust the hard disk power scheme.<br />
Back to <strong>Palette</strong> Control Panel<br />
-o-<br />
<strong>Strand</strong> <strong>Lighting</strong><br />
p404
<strong>Palette</strong> <strong>OS</strong> v10<br />
<strong>Strand</strong> <strong>Lighting</strong><br />
p405
<strong>Palette</strong> <strong>OS</strong> v10<br />
Network Printer<br />
Setup<br />
Printing is achieved by connecting you console to a Local Area Network Printer, which saves you<br />
from having to move the printer close to your console. It also allows you to use any new printer<br />
you have successfully installed on your LAN without having to install drivers.<br />
Click on the Printer button in the <strong>Palette</strong> Control Panel to access the Printer Tasks dialog box.<br />
Using the task list on the left, select Add printer if you do not already have one installed. You will<br />
follow a wizard that allows you to browse your network for shared printers. You must make sure<br />
your system administrator has already shared a printer on the LAN and given you privileges to<br />
use it.<br />
Once you have added a printer, it will become the default printer (check marked). You can add<br />
more than one printer without issue; you will just have to choose which one you want to print to<br />
if it is not the default printer.<br />
<strong>Palette</strong> itself prints to PDF (Adobe's Portable Document Format) files. These files can be saved to<br />
the hard drive or removable media (like a USB stick) and printed elsewhere if you don't have a<br />
shared printer. You can also e-mail the PDFs right from the viewer if you've set up an Outlook<br />
Express account on your console.<br />
You can Launch Adobe's PDF reader from the Additional Applications button or just browse the<br />
hard drive with Explorer and double click on your PDF files.<br />
Back to <strong>Palette</strong> Control Panel<br />
-o-<br />
<strong>Strand</strong> <strong>Lighting</strong><br />
p406
<strong>Palette</strong> <strong>OS</strong> v10<br />
<strong>Strand</strong> <strong>Lighting</strong><br />
p407
<strong>Palette</strong> <strong>OS</strong> v10<br />
Shutdown Console<br />
Choose this button from the <strong>Palette</strong> Control Panel if you want to power off your console. You can<br />
also press the LOG OFF button on the processor's keyboard. An OK/Cancel dialog box will ask you<br />
to confirm.<br />
I you choose Yes and <strong>Palette</strong> is running, you will be asked whether or not you want to exit<br />
<strong>Palette</strong>:<br />
If you have not saved recent changes, <strong>Palette</strong> will ask if you want to save those before you exit.<br />
Note:<br />
<br />
<br />
DMX transmission will cease and the console lights will turn off when you shutdown the<br />
<strong>Palette</strong> software, even if you do not shut down the processor.<br />
Back to <strong>Palette</strong> Control Panel<br />
-o-<br />
<strong>Strand</strong> <strong>Lighting</strong><br />
p408
<strong>Palette</strong> <strong>OS</strong> v10<br />
Applications Group<br />
Windows Explorer<br />
Launch Windows Explorer from the Control Panel to manage your hard drive. The D:\ will<br />
nominally have 35 GB of space available to you for whatever purposes you choose. Store show<br />
files, pictures, MP3s, text files, etc.<br />
Because of the Embedded <strong>OS</strong> restrictions, you will NOT be able to:<br />
<br />
explore the C:\ drive<br />
<br />
format the Public drive (D:\)<br />
<br />
label the drive<br />
<br />
get the drive's properties<br />
<br />
<strong>Strand</strong> <strong>Lighting</strong><br />
p409
<strong>Palette</strong> <strong>OS</strong> v10<br />
<br />
<br />
<br />
make changes in the D:\Horizon folder<br />
perform administrative functions on the drive<br />
You can however, create your own folders and organize it as you like. It differs from regular XP in<br />
that the Right-Click menu is disabled. All of the functions that you need are available in the main<br />
menu (such as FILE|NEW|FOLDER or VIEW|DETAILS or TOOLS|MAP NETWORK DRIVE).<br />
Back to <strong>Palette</strong> Control Panel<br />
-o-<br />
<strong>Strand</strong> <strong>Lighting</strong><br />
p410
<strong>Palette</strong> <strong>OS</strong> v10<br />
Windows Media<br />
Player<br />
Windows Media Player is an easy way to play your CD's, MP3's or AVI files, directly on your<br />
console.<br />
1.<br />
1. Launch the <strong>Palette</strong> Control Panel<br />
2.<br />
2. Click on the Media Player Icon<br />
3.<br />
3. From the File Menu, choose OPEN<br />
<strong>Strand</strong> <strong>Lighting</strong><br />
p411
<strong>Palette</strong> <strong>OS</strong> v10<br />
4.<br />
4. Select either the Drive and Directory where your media files are stored or choose the CD<br />
drive (E:) to play an Audio CD<br />
5.<br />
5. From the Open Dialog box, choose the file or files you want to play (Note: To select more<br />
than one file, either hold down CTRL and click on each file, or hold down SHIFT while<br />
selecting the first and last files.)<br />
Tips<br />
6.<br />
6. Press the Play button to play the files in order as they appear in the Play List on the right<br />
hand side of the display.<br />
7.<br />
7. Double click on any file in the Play List to play it out of sequence.<br />
<br />
<br />
<br />
<br />
<br />
<br />
Note:<br />
Adjust the volume with the slider at the very bottom of the screen or Press F9 on the<br />
QWERTY keyboard to raise the volume, F10 to lower it, F8 to Mute it. Volume control is<br />
only possible when Media Player is the active window.<br />
Under the Play menu, you will find Shuffle and Repeat options.<br />
Using the Taskbar to the very left of the display, you can connect to Internet Radio (Radio<br />
Tuner) if you are connected to the Internet.<br />
<strong>Strand</strong> <strong>Lighting</strong><br />
p412
<strong>Palette</strong> <strong>OS</strong> v10<br />
If you need to make finer adjustments of the audio level, hold down Ctrl and click the Media<br />
Player icon. The Windows volume control will open.<br />
See Also:<br />
SMPTE Time Code on Cue Lists<br />
Back to <strong>Palette</strong> Control Panel<br />
-o-<br />
<strong>Strand</strong> <strong>Lighting</strong><br />
p413
<strong>Palette</strong> <strong>OS</strong> v10<br />
Internet Explorer<br />
If your <strong>Palette</strong> console is connected to a Local Area Network that is connected to the Internet,<br />
you can surf the web right on your console. Launch Internet Explorer from the <strong>Palette</strong> Control<br />
Panel or press the WWW button on the processor's keyboard.<br />
Tip:<br />
<br />
<br />
<br />
<br />
You can go directly to the Download section of the <strong>Strand</strong> <strong>Lighting</strong> web site and get<br />
software or library update directly. Just click on the update and select SAVE TO D:\. Read<br />
more here.<br />
You will not be able to download other software from the Internet and install it because of<br />
the Embedded operating system and general security restrictions.<br />
Back to <strong>Palette</strong> Control Panel<br />
-o-<br />
<strong>Strand</strong> <strong>Lighting</strong><br />
p414
<strong>Palette</strong> <strong>OS</strong> v10<br />
Outlook Express<br />
E-mail is included with your <strong>Palette</strong> Console. To launch Outlook Express, press the mail button<br />
on the <strong>Palette</strong> Control Panel or press the Mail button on the processor's keyboard. If you console<br />
is connected to a Local Area Nework that is connected to the Internet, you can send and receive<br />
mail directly on your desk. You will need your Internet Service Provider's SMPT and POP3 server<br />
names and an account name and password to set up the system. Upon first use, a wizard will<br />
guide you through the steps.<br />
Back to <strong>Palette</strong> Control Panel<br />
-o-<br />
<strong>Strand</strong> <strong>Lighting</strong><br />
p415
<strong>Palette</strong> <strong>OS</strong> v10<br />
Notepad Text Editor<br />
Launch the Notepad text editor from the <strong>Palette</strong> Control Panel if you want to make simple text<br />
based documents.<br />
Note:<br />
You can save your *.txt document anywhere on the D:\ drive except in the \Horizon folder. Feel<br />
free to make your own directory structures to suite your organizational style.<br />
Back to <strong>Palette</strong> Control Panel<br />
-o-<br />
<strong>Strand</strong> <strong>Lighting</strong><br />
p416
<strong>Palette</strong> <strong>OS</strong> v10<br />
MS Paint<br />
The basic Paint package can be launched from the <strong>Palette</strong> Control Panel to view and look at BMP,<br />
JPG, GIF, TIFF and PNG image files. This can be handy if you have digital stills of your production<br />
or mockups that you may want to refer to.<br />
Note:<br />
You can save your image files anywhere on the D:\ drive except in the \Horizon folder. Feel free<br />
to make your own directory structures to suite your organizational style.<br />
Back to <strong>Palette</strong> Control Panel<br />
-o-<br />
<strong>Strand</strong> <strong>Lighting</strong><br />
p417
<strong>Palette</strong> <strong>OS</strong> v10<br />
Additional<br />
Applications<br />
<strong>Strand</strong> <strong>Lighting</strong> may choose to install additional applications and make them available to you via<br />
this button.<br />
When you click on the button in the <strong>Palette</strong> Control Panel, a dialog box will open presenting you<br />
with a list of additional applications that have been installed.<br />
Either double click on the desired application or select it in the list and choose Run.<br />
See Also:<br />
ELO Touch Screens<br />
On-Screen Keyboard<br />
Printing<br />
Back to <strong>Palette</strong> Control Panel<br />
-o-<br />
<strong>Strand</strong> <strong>Lighting</strong><br />
p418
<strong>Palette</strong> <strong>OS</strong> v10<br />
Up Time<br />
The <strong>Palette</strong> Control Panel shows you the Up Time of the system and the <strong>Palette</strong> software. If you<br />
close the main software and re-start it, you will notice that the System Up Time is different than<br />
the <strong>Palette</strong> Up Time.<br />
Back to <strong>Palette</strong> Control Panel<br />
-o-<br />
<strong>Strand</strong> <strong>Lighting</strong><br />
p419
<strong>Palette</strong> <strong>OS</strong> v10<br />
Backup, Support and Contact Information<br />
Tracking Backup<br />
Tracking backup allows a second console or PC to stay in sync with the one that is driving the<br />
stage so in the event of a failure you can just switch to the backup and continue unscathed. The<br />
second device must have equal authorization to the main system, but it can be in the form of a<br />
second console, a Rack <strong>Palette</strong>, <strong>Palette</strong> PC or simply a <strong>Palette</strong> Key on a networked laptop. If you<br />
have installed <strong>Palette</strong> PC, you will find a <strong>Palette</strong> Backup shortcut in the <strong>Palette</strong> section of your<br />
START menu. To launch a tracking backup session from another console CTRL-Click on the<br />
<strong>Palette</strong> icon in the Control Panel.<br />
When you launch a Tracking Backup session, a dialog box will ask you for the IP address of the<br />
Host system. You can find out the IP address of the host system by hovering over the Network<br />
icon in the <strong>Palette</strong> Control Panel.<br />
Once you make a successful connection, the show file will be copied to the local machine using<br />
the name ShowFile_Tracking_Backup.spb. The *.spb indicates that it is a Backup file. Each time<br />
the show file is saved on the main system, the *.spb file will be refreshed. All cue execution, Sub<br />
Master adjustments and variable changes will track from the main system to the backup system<br />
so, if needed, the two systems will be perfectly in sync.<br />
If the main system goes down or you lose the network connection, a dialog box will be displayed:<br />
If you let the countdown timer elapse, or select Yes, the backup system will starting outputting<br />
levels to the stage using either its local DMX ports or the network DMX devices:<br />
<strong>Strand</strong> <strong>Lighting</strong><br />
p420
<strong>Palette</strong> <strong>OS</strong> v10<br />
If you choose No, the dialog box will close with all the cue etc. in sync, but the outputs will be<br />
disabled. It will then be up to you when you want to re-enable the outputs using the option in<br />
the File Menu.<br />
See also:<br />
Enable Outputs - Recovery<br />
File Menu - Backup Files and Checkpoint Files<br />
Show Save Options<br />
Network Setup<br />
-o-<br />
<strong>Strand</strong> <strong>Lighting</strong><br />
p421
<strong>Palette</strong> <strong>OS</strong> v10<br />
Recovery & Enable<br />
Outputs<br />
If for any reason your system dies (read: 'power failure' or 'crash'), when it restarts it will be<br />
restored to the same state as it was just before it went down (i.e., in the right cues, looks etc.) If<br />
you were programming channels when the system went down, anything you had captured will be<br />
lost.<br />
When the system initially restarts, the console's DMX ports and Ethernet outputs will be disabled:<br />
Answering YES gives you the option to continue on from where you left off, or by answering NO,<br />
the outputs will remain static until you re-enable them using the Enable Outputs File Menu<br />
option. Whether or not the outputs are enabled are disabled is indicated by a check mark beside<br />
the menu text:<br />
At any time during normal operation you can disable the outputs by clearing the check mark. You<br />
may want to disable the outputs if you want to run cues or looks off-line rather than working in<br />
Blind, leaving the stage unaffected. This mode of operation is equivalent to unplugging your DMX<br />
and/or Ethernet cables, but much more convenient.<br />
Any time the outputs are disabled, the Hardware Status bubble will look like this:<br />
There is a Hardware Setup - Console option called Force Outputs at Startup on Recovery that<br />
prevents this dialog box from appearing during recovery:<br />
<strong>Strand</strong> <strong>Lighting</strong><br />
p422
<strong>Palette</strong> <strong>OS</strong> v10<br />
This option should be checked in architectural situations where there is no user intervention<br />
available to get back up an running.<br />
See also:<br />
Tracking Backup<br />
Show Checkpoint Files<br />
Blind<br />
File Menu<br />
GoTo Cue<br />
Patch<br />
-o-<br />
<strong>Strand</strong> <strong>Lighting</strong><br />
p423
<strong>Palette</strong> <strong>OS</strong> v10<br />
Recalibrating, Striking<br />
and Dousing Fixtures<br />
Since each moving light manufacturer uses different methods to recalibrate, strike or douse their<br />
fixtures, <strong>Palette</strong> does not support a direct function to do this. But, you will always find the control<br />
attribute used to achieve these functions in the [S9] - SPECIAL attribute family on softkey [S2]<br />
- Control. This attribute normally include Recal, Strike and Douse but may also include Recal<br />
Color, Recal Pan/Tilt, Fan Low, Dim Display etc. Double press [S2] to open a large popup with all<br />
the applicable options then use the softkeys to select the desired one.<br />
Typically you have to set this attribute, hold it for 5 seconds or so, then Release it. See your<br />
fixture's manual for more information.<br />
See Also:<br />
Controlling Moving Lights<br />
-o-<br />
<strong>Strand</strong> <strong>Lighting</strong><br />
p424
<strong>Palette</strong> <strong>OS</strong> v10<br />
Software Revision<br />
History<br />
v10.0.0 - January 2008<br />
o Initial release<br />
-o-<br />
<strong>Strand</strong> <strong>Lighting</strong><br />
p425
<strong>Palette</strong> <strong>OS</strong> v10<br />
Console Connections<br />
<strong>Palette</strong><br />
DMX<br />
DMX female 5 pin XLR<br />
Pin<br />
Pin 1<br />
Description<br />
Ground<br />
Pin 2 Data -<br />
Pin 3 Data +<br />
Pin 4<br />
Pin 5<br />
DMX512 output, up to 512 channels.<br />
USB<br />
USB A<br />
Pin<br />
Pin 1<br />
No connection<br />
No connection<br />
Description<br />
Vcc<br />
Pin 2 Data -<br />
Pin 3 Data +<br />
Pin 4<br />
Serial Port<br />
Serial Ports (Com 1) male 9 pin D-type<br />
Ground<br />
Pin<br />
Pin 1<br />
Pin 2<br />
Pin 3<br />
Pin 4<br />
Pin 5<br />
Pin 6<br />
Pin 7<br />
Pin 8<br />
Pin 9<br />
Description<br />
Data carrier detect<br />
Receive data<br />
Transmit data<br />
Data terminal ready<br />
Ground<br />
Data set ready<br />
Request to send<br />
Clear to send<br />
Ring indicator<br />
General purpose RS232, baud rates 1200 to 38400<br />
<strong>Strand</strong> <strong>Lighting</strong><br />
p426
<strong>Palette</strong> <strong>OS</strong> v10<br />
VGA<br />
VGA female 15 pin high density D-type<br />
Pin<br />
Pin 1<br />
Pin 2<br />
Pin 3<br />
Pin 4<br />
Pin 5<br />
Pin 6<br />
Pin 7<br />
Pin 8<br />
Pin 9<br />
Pin 10<br />
Pin 11<br />
Pin 12<br />
Pin 13<br />
Pin 14<br />
Pin 15<br />
Description<br />
Analog Red 0-0.7V<br />
Analog Green 0-0.7V<br />
Analog Blue 0-0.7V<br />
No connection<br />
Self Test<br />
Red ground<br />
Green ground<br />
Blue ground<br />
No connection (key)<br />
Ground<br />
Ground<br />
No connection<br />
H sync (TTL)<br />
V sync (TTL)<br />
No connection<br />
1280 x 1024 pixels, 32M colors, 60-75Hz refresh. This port is compatible with VGA, SVGA and XVGA monitors.<br />
Port 1 is the main console display output,<br />
PS2<br />
PS2 Ports<br />
Pin<br />
Pin 1<br />
Pin 2<br />
Pin 3<br />
Pin 4<br />
Pin 5<br />
Pin 6<br />
Description<br />
Data<br />
No connection<br />
Ground<br />
+5V DC<br />
Clock<br />
No connection<br />
Ethernet<br />
Ethernet 10/100BT - RJ45<br />
Pin<br />
Description<br />
1 Data + Tx<br />
2 Data – Tx<br />
<strong>Strand</strong> <strong>Lighting</strong><br />
p427
<strong>Palette</strong> <strong>OS</strong> v10<br />
3 Data + Rx<br />
4 Data – Rx<br />
5 Not connected<br />
6 Not connected<br />
7 Not connected<br />
8 Not connected<br />
-o-<br />
<strong>Strand</strong> <strong>Lighting</strong><br />
p428
<strong>Palette</strong> <strong>OS</strong> v10<br />
Light <strong>Palette</strong><br />
DMX<br />
DMX female 5 pin XLR<br />
Pin<br />
Pin 1<br />
Description<br />
Ground<br />
Pin 2 Data -<br />
Pin 3 Data +<br />
Pin 4<br />
Pin 5<br />
DMX512 output, up to 512 channels.<br />
USB<br />
USB A<br />
Pin<br />
Pin 1<br />
No connection<br />
No connection<br />
Description<br />
Vcc<br />
Pin 2 Data -<br />
Pin 3 Data +<br />
Pin 4<br />
Ground<br />
USB B<br />
Pin<br />
Description<br />
Pin 1<br />
Vcc<br />
Pin 2 Data -<br />
Pin 3 Data +<br />
Pin 4<br />
Ground<br />
Serial Port<br />
Serial Ports (Com 1) male 9 pin D-type<br />
Pin<br />
Pin 1<br />
Pin 2<br />
Pin 3<br />
Pin 4<br />
Pin 5<br />
Pin 6<br />
<strong>Strand</strong> <strong>Lighting</strong><br />
Description<br />
Data carrier detect<br />
Receive data<br />
Transmit data<br />
Data terminal ready<br />
Ground<br />
Data set ready<br />
p429
<strong>Palette</strong> <strong>OS</strong> v10<br />
Pin 7<br />
Pin 8<br />
Pin 9<br />
Request to send<br />
Clear to send<br />
Ring indicator<br />
General purpose RS232, baud rates 1200 to 38400<br />
VGA<br />
VGA female 15 pin high density D-type (1 and 2)<br />
Pin<br />
Pin 1<br />
Pin 2<br />
Pin 3<br />
Pin 4<br />
Pin 5<br />
Pin 6<br />
Pin 7<br />
Pin 8<br />
Pin 9<br />
Pin 10<br />
Pin 11<br />
Pin 12<br />
Pin 13<br />
Pin 14<br />
Pin 15<br />
Description<br />
Analog Red 0-0.7V<br />
Analog Green 0-0.7V<br />
Analog Blue 0-0.7V<br />
No connection<br />
Self Test<br />
Red ground<br />
Green ground<br />
Blue ground<br />
No connection (key)<br />
Ground<br />
Ground<br />
No connection<br />
H sync (TTL)<br />
V sync (TTL)<br />
No connection<br />
1280 x 1024 pixels, 32M colors, 60-75Hz refresh. This port is compatible with VGA, SVGA and XVGA monitors.<br />
Port 1 is the Main Console display output.<br />
Port 2 is the additional display output in Extended Desktop mode<br />
PS2<br />
PS2 Ports<br />
Pin<br />
Pin 1<br />
Pin 2<br />
Pin 3<br />
Pin 4<br />
Pin 5<br />
Pin 6<br />
Description<br />
Data<br />
No connection<br />
Ground<br />
+5V DC<br />
Clock<br />
No connection<br />
<strong>Strand</strong> <strong>Lighting</strong><br />
p430
<strong>Palette</strong> <strong>OS</strong> v10<br />
Ethernet<br />
Ethernet 10/100BT - RJ45<br />
Pin<br />
Description<br />
1 Data + Tx<br />
2 Data – Tx<br />
3 Data + Rx<br />
4 Data – Rx<br />
5 Not connected<br />
6 Not connected<br />
7 Not connected<br />
8 Not connected<br />
Midi (Optional)<br />
MIDI male 5 pin DIN<br />
Pin<br />
Pin 1<br />
Pin 2<br />
Pin 3<br />
Description<br />
Not connected<br />
Ground<br />
Not connected<br />
Pin 4 Data +<br />
Pin 5 Data -<br />
Asynchronous serial, 1 start bit, 8 data bits, 1 stop bit, no parity, 31250 baud.<br />
SMPTE (Optional)<br />
SMPTE Input<br />
Pin Description<br />
Pin 1<br />
GND<br />
Pin 2 Audio +<br />
Pin 3 Audio -<br />
-o-<br />
<strong>Strand</strong> <strong>Lighting</strong><br />
p431
<strong>Palette</strong> <strong>OS</strong> v10<br />
Rack <strong>Palette</strong><br />
DMX<br />
DMX female 5 pin XLR<br />
Pin<br />
Pin 1<br />
Description<br />
Ground<br />
Pin 2 Data -<br />
Pin 3 Data +<br />
Pin 4<br />
Pin 5<br />
DMX512 output, up to 512 channels.<br />
USB<br />
USB A<br />
Pin<br />
Pin 1<br />
No connection<br />
No connection<br />
Description<br />
Vcc<br />
Pin 2 Data -<br />
Pin 3 Data +<br />
Pin 4<br />
USB B<br />
Pin<br />
Pin 1<br />
Ground<br />
Description<br />
Vcc<br />
Pin 2 Data -<br />
Pin 3 Data +<br />
Pin 4<br />
Serial Port<br />
Serial Ports (Com 1) male 9 pin D-type<br />
Ground<br />
Pin<br />
Pin 1<br />
Pin 2<br />
Pin 3<br />
Pin 4<br />
Pin 5<br />
Pin 6<br />
Description<br />
Data carrier detect<br />
Receive data<br />
Transmit data<br />
Data terminal ready<br />
Ground<br />
Data set ready<br />
<strong>Strand</strong> <strong>Lighting</strong><br />
p432
<strong>Palette</strong> <strong>OS</strong> v10<br />
Pin 7<br />
Pin 8<br />
Pin 9<br />
Request to send<br />
Clear to send<br />
Ring indicator<br />
General purpose RS232, baud rates 1200 to 38400<br />
VGA<br />
VGA female 15 pin high density D-type (1 and 2)<br />
Pin<br />
Pin 1<br />
Pin 2<br />
Pin 3<br />
Pin 4<br />
Pin 5<br />
Pin 6<br />
Pin 7<br />
Pin 8<br />
Pin 9<br />
Pin 10<br />
Pin 11<br />
Pin 12<br />
Pin 13<br />
Pin 14<br />
Pin 15<br />
Description<br />
Analog Red 0-0.7V<br />
Analog Green 0-0.7V<br />
Analog Blue 0-0.7V<br />
No connection<br />
Self Test<br />
Red ground<br />
Green ground<br />
Blue ground<br />
No connection (key)<br />
Ground<br />
Ground<br />
No connection<br />
H sync (TTL)<br />
V sync (TTL)<br />
No connection<br />
1024x768 pixels, 256 colours, 60 - 75Hz refresh. This port is compatible with VGA, SVGA and XGA monitors.<br />
PS2<br />
PS2 Ports<br />
Pin<br />
Pin 1<br />
Pin 2<br />
Pin 3<br />
Pin 4<br />
Pin 5<br />
Pin 6<br />
Description<br />
Data<br />
No connection<br />
Ground<br />
+5V DC<br />
Clock<br />
No connection<br />
Ethernet<br />
Ethernet 10/100BT - RJ45<br />
Pin<br />
<strong>Strand</strong> <strong>Lighting</strong><br />
Description<br />
p433
<strong>Palette</strong> <strong>OS</strong> v10<br />
1 Data + Tx<br />
2 Data - Tx<br />
3 Data + Rx<br />
4 Data - Rx<br />
5 Not connected<br />
6 Not connected<br />
7 Not connected<br />
8 Not connected<br />
Midi (Optional)<br />
MIDI male 5 pin DIN<br />
Pin<br />
Pin 1<br />
Pin 2<br />
Pin 3<br />
Description<br />
Not connected<br />
Ground<br />
Not connected<br />
Pin 4 Data +<br />
Pin 5 Data -<br />
Asynchronous serial, 1 start bit, 8 data bits, 1 stop bit, no parity, 31250 baud.<br />
SMPTE (Optional)<br />
SMPTE Input<br />
Pin<br />
Pin 1<br />
Description<br />
GND<br />
Pin 2 Audio +<br />
Pin 3 Audio -<br />
-o-<br />
<strong>Strand</strong> <strong>Lighting</strong><br />
p434
<strong>Palette</strong> <strong>OS</strong> v10<br />
Appendix<br />
Software License<br />
SET OUT BELOW ARE THE TERMS AND CONDITIONS UNDER WHICH YOU ARE PERMITTED TO USE<br />
THE BUNDLE OF SOFTWARE COLLECTIVELY CALLED THE <strong>Palette</strong> and/or PALETTE SOFTWARE<br />
(“CONTROL SOFTWARE"). PLEASE READ THIS INFORMATION CAREFULLY. IF YOU USE CONTROL<br />
SOFTWARE, YOU AGREE TO BE BOUND BY THESE TERMS AND CONDITIONS AND AS SUCH, THIS<br />
DOCUMENT WILL CONSTITUTE A LEGAL AGREEMENT BETWEEN Horizon Control Inc. ("HCI") AND<br />
YOU AND SUCH ENTITY (collectively referred to as "You" or "Your" hereinafter) GOVERNING ALL<br />
USE OF CONTROL SOFTWARE.<br />
1. Grant. HCI grants you a non-exclusive, royalty-free license to use the CONTROL SOFTWARE<br />
and all modifications and upgrades thereof.<br />
2. Copyright. HCI holds an exclusive, worldwide license to market and distribute CONTROL<br />
SOFTWARE. HCI holds and retains all worldwide rights, title and interests, including without<br />
limitation, copyright, in and to CONTROL SOFTWARE and all source code, object code,<br />
executable code, libraries and graphical representation (screen layout). You acknowledge<br />
that HCI is not selling or otherwise transferring title or any rights in CONTROL SOFTWARE to<br />
You. You may not modify, translate, adapt, reproduce, decompile, reverse engineer or<br />
disassemble CONTROL SOFTWARE.<br />
3. Use. You agree to follow the instructions contained in CONTROL SOFTWARE, and in the<br />
Materials provided with CONTROL SOFTWARE from time to time, for the installation and use<br />
of CONTROL SOFTWARE. HCI may modify CONTROL SOFTWARE at any time for any reason.<br />
4. Disclaimer of Warranty. You expressly acknowledge and agree that your use of CONTROL<br />
SOFTWARE is at your sole risk. HCI warrants that CONTROL SOFTWARE will be free from<br />
defect on the day you receive it which constitutes HCI’s sole and exclusive warranty.<br />
HCI EXPRESSLY DISCLAIMS AND EXCLUDES ALL OTHER WARRANTIES, EXPRESS AND<br />
IMPLIED, INCLUDING BUT NOT LIMITED TO THE IMPLIED WARRANTIES OF<br />
MERCHANTABILITY AND FITNESS FOR A PARTICULAR PURP<strong>OS</strong>E. HCI DOES NOT WARRANT<br />
THAT CONTROL SOFTWARE WILL MEET ALL OF YOUR REQUIREMENTS OR THAT ITS<br />
OPERATIONS WILL BE UNINTERRUPTED OR ERROR FREE, OR THAT ANY DEFECT WITHIN<br />
CONTROL SOFTWARE WILL BE CORRECTED. FURTHERMORE, HCI DOES NOT WARRANT NOR<br />
MAKE ANY REPRESENTATION REGARDING THE RESULTS OF YOUR USE OF CONTROL<br />
SOFTWARE IN TERMS OF CAPABILITY, CORRECTNESS, ACCURACY, RELIABILITY OR<br />
OTHERWISE. NO ORAL OR WRITTEN INFORMATION, REPRESENTATION OR ADVICE GIVEN BY<br />
HCI OR AN AUTHORIZED REPRESENTATIVE OF HCI SHALL CREATE A WARRANTY.<br />
5. Remedies. In the event of a breach of the express warranty provided in Section 4 above, HCI<br />
will replace CONTROL SOFTWARE with another copy of CONTROL SOFTWARE, if available;<br />
provided that you return the defective copy of CONTROL SOFTWARE to HCI within thirty (30)<br />
days of the date you receive it. You acknowledge that this Section sets forth Your SOLE AND<br />
EXCLUSIVE remedy and HCI’s SOLE AND EXCLUSIVE liability, for breach of warranty or any<br />
other duty.<br />
6. Limitation of Liability. YOU ACKNOWLEDGE THAT HCI IS PROVIDING CONTROL SOFTWARE AS<br />
IS. UNDER NO CIRCUMSTANCES, INCLUDING BUT NOT LIMITED TO NEGLIGENCE, SHALL HCI<br />
BE LIABLE FOR ANY DIRECT, INDIRECT, INCIDENTAL, SPECIAL, CONSEQUENTIAL OR OTHER<br />
DAMAGES IN TORT, CONTRACT, PRODUCT LIABILITY OR UNDER ANY OTHER THEORY OF LAW<br />
RESULTING FROM THE INSTALLATION OR REMOVAL OF CONTROL SOFTWARE, OR YOUR USE,<br />
<strong>Strand</strong> <strong>Lighting</strong><br />
p435
<strong>Palette</strong> <strong>OS</strong> v10<br />
OR INABILITY TO USE, CONTROL SOFTWARE, INCLUDING, WITHOUT LIMITATION, DAMAGES<br />
RESULTING FROM L<strong>OS</strong>S OF USE, PROFITS, DATA, OR BUSINESS, AND DAMAGE TO YOUR<br />
INTERNAL COMPUTER SYSTEMS EVEN IF HCI OR AN AUTHORIZED REPRESENTATIVE OF HCI<br />
HAS BEEN ADVISED OF THE P<strong>OS</strong>SIBILITY OF SUCH DAMAGES. THIS EXCLUSION OF<br />
DAMAGES IS EFFECTIVE EVEN IF THE EXCLUSIVE REMEDY STATED IN SECTION 5 ABOVE<br />
FAILS OF ITS ESSENTIAL PURP<strong>OS</strong>E.<br />
7. Controlling Law and Severability. This License shall be governed by and construed in<br />
accordance with the laws of the United States and the State of Pennsylvania. If for any reason<br />
a court of competent jurisdiction finds any provision of this License, or a portion thereof, to be<br />
unenforceable, that provision shall be enforced to the maximum extent permissible so as to<br />
affect the intent of the parties and the rem ainder of this License shall remain in full force and<br />
effect. Any cause of action with respect to CONTROL SOFTWARE must be instituted within one<br />
year after the claim or cause of action has arisen or be barred.<br />
8. Confidentiality. CONTROL SOFTWARE and all Materials provided by HCI under this License are<br />
confidential and proprietary to HCI. You agree to hold them in confidence, not to use them<br />
other than in connection with CONTROL SOFTWARE and the performance of this License.<br />
9. Complete License. This License constitutes the entire agreement between You and HCI with<br />
respect to CONTROL SOFTWARE, and all Materials provided to You by HCI and supersedes any<br />
prior or contemporaneous understandings, representations, statements or agreements,<br />
written or oral, regarding CONTROL SOFTWARE. No amendment to or modification of this<br />
License will be binding on HCI without HCI's consent. HCI may modify this License at any<br />
time for any reason.<br />
10. Headings. The section headings used herein are for convenience of reference only and do not<br />
form a part of these terms and conditions, and no construction or inference shall be derived<br />
therefrom.<br />
If you have questions about the CONTROL SOFTWARE License, please send email to<br />
sales@horizoncontrol.com prior to using.<br />
-o-<br />
<strong>Strand</strong> <strong>Lighting</strong><br />
p436
<strong>Palette</strong> <strong>OS</strong> v10<br />
Offices and Service Centers<br />
<strong>Strand</strong> <strong>Lighting</strong> Asia, 20/F Delta House, 3 On Yiu Street, Shatin, N.T. Hong Kong<br />
Tel: + 852 2757 3033 Fax: + 852 2757 1767<br />
<strong>Strand</strong> <strong>Lighting</strong> Europe Limited, Unit 2 Royce Road, Fleming Way, Crawley, West Sussex. United Kingdom.<br />
RH10 9JY<br />
Tel: + 44 1293 554 010 Fax: + 44 1293 554 019<br />
<strong>Strand</strong> <strong>Lighting</strong> Inc, 6603 Darin Way, Cypress, CA 90630, USA<br />
Tel: +1 714 230 8200 Fax: +1 714 230 8173<br />
The material in this manual is for information purposes only and is subject to change without notice. <strong>Strand</strong><br />
<strong>Lighting</strong> assumes no responsibility for any errors or omissions which may appear in this manual. For comments<br />
and suggestions regarding corrections and/or updates to this manual, please contact your nearest <strong>Strand</strong> <strong>Lighting</strong><br />
office.<br />
El contenido de este manual es solamente para información y está sujeto a cambios sin previo aviso. <strong>Strand</strong><br />
<strong>Lighting</strong> no asume responsabilidad por errores o omisiones que puedan aparecer. Cualquier comentario,<br />
sugerencia o corrección con respecto a este manual, favor de dirijirlo a la oficina de <strong>Strand</strong> <strong>Lighting</strong> más cercana.<br />
Der Inhalt dieses Handbuches ist nur für Informationszwecke gedacht, Aenderungen sind vorbehalten. <strong>Strand</strong><br />
<strong>Lighting</strong> uebernimmt keine Verantwortung für Fehler oder Irrtuemer, die in diesem Handbuch auftreten. Für<br />
Bemerkungen und Verbesserungsvorschlaege oder Vorschlaege in Bezug auf Korrekturen und/oder<br />
Aktualisierungen in diesem Handbuch, moechten w ir Sie bitten, Kontakt mit der naechsten <strong>Strand</strong><br />
<strong>Lighting</strong>-Niederlassung aufzunehmen.<br />
Le matériel décrit dans ce manuel est pour information seulement et est sujet à changements sans préavis. La<br />
compagnie <strong>Strand</strong> <strong>Lighting</strong> n'assume aucune responsibilité sur toute erreur ou ommission inscrite dans ce<br />
manuel. Pour tous commentaires ou suggestions concernant des corrections et/ou les mises à jour de ce manuel,<br />
veuillez s'll vous plait contacter le bureau de <strong>Strand</strong> <strong>Lighting</strong> le plus proche.<br />
Information contained in this document may not be duplicated in full or in part by any person without prior written<br />
approval of <strong>Strand</strong> <strong>Lighting</strong> Inc and Horizon Control Inc. Its sole purpose is to provide the user with conceptual<br />
information on the equipment mentioned. The use of this document for all other purposes is specifically<br />
prohibited. Certain features of the equipment described in this document may form the subject of patents or<br />
patent applications.<br />
Copyright 2008 <strong>Strand</strong> <strong>Lighting</strong> Inc. All rights reserved.<br />
Copyright 2008 Horizon Control Inc. All rights reserved.<br />
-o-<br />
<strong>Strand</strong> <strong>Lighting</strong><br />
p437
<strong>Palette</strong> <strong>OS</strong> v10<br />
Keyboard Shortcuts<br />
A QWERTY keyboard maps to most functions available on the console.<br />
Here is a list of keys and what operations they perform.<br />
<strong>Strand</strong> <strong>Lighting</strong><br />
+ Plus<br />
- Minus<br />
* At<br />
. Dot<br />
/ Thru<br />
[ Open Square Brace<br />
] Close Square Brace<br />
\ Back Slash<br />
Used in command line for fixture selection and<br />
Relative attribute adjustments<br />
Used in command line for channel selection and<br />
staggered attribute [TO] syntax<br />
Used in command line to set intensity levels or<br />
intensity times (@ is also acceptable)<br />
Used to set point times or twice to indicate a<br />
colon for the HH:MM:SS time format<br />
Used in command line to select a range of<br />
channels (> is also acceptable)<br />
Step Back in cue list. Use with [SHIFT] to take<br />
you to the top of a cue list.<br />
Step Forward in cue list. Use with [SHIFT] to<br />
take you to the bottom of a cue list.<br />
Release Cue Lists (SHIFTED = releases all cue<br />
lists)<br />
B Blind / Load Sets display to Blind mode (SHIFTED = Load)<br />
C Copy Opens Copy dialog box<br />
G Group Used for Group on command line<br />
L Look Used for Look on command line<br />
M Move Opens Move dialog box<br />
P <strong>Palette</strong> Opens Apply Levels dialog box<br />
Q<br />
R<br />
T<br />
U<br />
Cue<br />
Record<br />
Tools<br />
Update<br />
Use when using Cue on command line (SHIFTED<br />
= Goto Cue)<br />
Opens the Record dialog box for recording Cues<br />
or Looks<br />
Hold down to change softkeys to Tools menu.<br />
Strike to toggle last Tool<br />
Opens Updated dialog box or updates Loaded<br />
items<br />
V View Opens View Properties dialog box<br />
Z<br />
Back<br />
Arrow Keys<br />
Backspace<br />
Halts running cues, backs up the cue list<br />
(SHIFTED = Go Back in time)<br />
p438<br />
Move the Blue Box<br />
Used in command line to delete characters. Use
<strong>Palette</strong> <strong>OS</strong> v10<br />
Tab<br />
Delete<br />
End<br />
Escape<br />
Home<br />
Insert<br />
Page Down<br />
Page Up<br />
Next/Prev<br />
Space<br />
to deselect channel to return to the Default<br />
Softkeys.<br />
Delete's highlighted cue<br />
Levels Out<br />
Releases attributes and channels (three stage)<br />
(SHIFTED = restore)<br />
Sets selected channels' intensity to Full or the<br />
predefined level in Show Options. Double press<br />
to set Level to full regardless of Show Options.<br />
Opens Blue Box for editing, toggle controls in<br />
dialog boxes (SHIFTED = Times Display/Levels<br />
Display)<br />
Intensity levels down by specified amount<br />
(default = 10%) (SHIFTED = -1%)<br />
Intensity levels up by specified amount (default<br />
= 10%) (SHIFTED = +1%)<br />
Selects the next channel (shifted selects<br />
previous channel)<br />
Go on pending cue in selected cue list (SHIFTED<br />
= Assert current cue)<br />
-o-<br />
<strong>Strand</strong> <strong>Lighting</strong><br />
p439
<strong>Palette</strong> <strong>OS</strong> v10<br />
Index<br />
- + -<br />
+ symbol in dialog boxes 77<br />
- 1 -<br />
10-key 116<br />
16-bit resolution 142<br />
1:1 patch 306<br />
- A -<br />
A/B C/D 313<br />
abstract control 14<br />
abstract fixture library<br />
accelerators 122<br />
Accessibility Options 398<br />
action 239, 334<br />
active attributes 166<br />
active magic sheets 357<br />
adding look pages 83<br />
additional applications 418<br />
additive look masters<br />
additive looks 248<br />
additive submasters 251<br />
adjust 179<br />
all channels (block) 174<br />
apply levels 260<br />
architectural button stations 345<br />
archive 309<br />
archived show files 292<br />
assert 218<br />
asserting 218<br />
asserting cue lists 198<br />
astronomical events 352<br />
attribute behavior 257<br />
attribute grid 68<br />
attribute substitutions<br />
auto 235<br />
auto run 201<br />
auto scroll 60<br />
automate channel check 282<br />
autoscroll 205, 198<br />
- B -<br />
back 101<br />
background 201<br />
backup 420<br />
ballyhoo 157<br />
BG 201<br />
bitmap images 417<br />
blackout 97<br />
<strong>Strand</strong> <strong>Lighting</strong><br />
p440
<strong>Palette</strong> <strong>OS</strong> v10<br />
blind 112, 179<br />
Blind Button 95<br />
block cue 41<br />
blue arrow 124<br />
Blue Box 43<br />
blue triangle 124<br />
bold text 206<br />
British release key 328<br />
browser control 328<br />
build cues 169<br />
busking 257<br />
button array 322, 320<br />
button stations 86<br />
- C -<br />
capacities 12<br />
Capio 304<br />
captured channels 164<br />
caputred 174<br />
CD audio 411<br />
century array 322<br />
change 179<br />
change cue number 221<br />
changed 174<br />
channel 282, 65<br />
channel grid 63, 383<br />
channel title 135<br />
channels to record 174<br />
character sets 378<br />
chase 239<br />
chase down 201<br />
chase up 201<br />
chases 157<br />
checkpoint files 292<br />
choose 100<br />
circle 157<br />
circular reference 124<br />
clear 119<br />
clearing attributes 142<br />
clock icon 151<br />
color 124<br />
color picker 280<br />
color space 285<br />
colors and symbols 124<br />
column width 196<br />
com port 367<br />
commands 334<br />
concept 10<br />
Conclusion 38<br />
conditional abstract attributes 14<br />
console lights 328<br />
control panel<br />
Controlling Colour 149<br />
copy 113<br />
crash recovery 422<br />
crossfaders 313<br />
cue 198, 169<br />
cue 0 103<br />
Cue Button 106<br />
<strong>Strand</strong> <strong>Lighting</strong><br />
p441
<strong>Palette</strong> <strong>OS</strong> v10<br />
cue list 100<br />
cue list defaults 287<br />
cue list properties 201<br />
cue lists 206<br />
cue numbers 220<br />
cue only 190<br />
cue profiles 212<br />
cue properties 226<br />
cue-only 229<br />
cues 179<br />
- D -<br />
date 378<br />
daylight savings time 378<br />
days 206<br />
DB9 connector 365<br />
DBO 97<br />
Dead Black Out 317<br />
default values 142<br />
defaults 285<br />
Definition 15<br />
delay time 241<br />
deleting cues 110<br />
designer's remote 89<br />
DHCP 399<br />
dim display 424<br />
dimmer check 262<br />
directory 196<br />
disconnect remote video 70<br />
display 65<br />
DMX 262<br />
DMX flavor 328<br />
double black arrow 124<br />
douse lamp 424<br />
dual video 383<br />
- E -<br />
e-mail 415<br />
edit 111<br />
edit menu 221<br />
editing blind 187<br />
edits track foward 285<br />
effects 157<br />
ELO Touchscreens 391<br />
enable outputs 328<br />
enter syntax 328<br />
Ethernet 301<br />
evens 166<br />
exclude look masters 253<br />
external trackball 142<br />
external triggers 327<br />
- F -<br />
fade profile 212<br />
fade time 241<br />
fader - last one moved<br />
fader positions<br />
<strong>Strand</strong> <strong>Lighting</strong><br />
p442
<strong>Palette</strong> <strong>OS</strong> v10<br />
faders 312<br />
fan low 424<br />
fanned timing 151<br />
file 70<br />
file types 70<br />
find fixture 278<br />
fine movement 121<br />
flat fixture model 14<br />
flexi-channel 262<br />
flip 274<br />
florescent ballasts 262<br />
follow 226<br />
follows 206<br />
forward button 219<br />
full key 116<br />
function buttons<br />
- G -<br />
gaps 262<br />
GM 317<br />
GO 328<br />
GO action in loops 287<br />
GO Button 98<br />
gobo 14<br />
goto 99<br />
goto and execute follows 60<br />
goto and halt 231<br />
goto cue after record 287<br />
goto cue button 231<br />
goto/back time 231<br />
grand master 97<br />
grand masters 317<br />
graphic helper symbols 124<br />
green arrow 124<br />
grid 65<br />
groups 107<br />
- H -<br />
half colors 142<br />
halt/back 101<br />
handles 248<br />
hard drive management 409<br />
hardware setup 326<br />
hardware status<br />
hardware test 374<br />
help 74<br />
HH-MM-SS 206<br />
hiding columns 196<br />
high contrast 398<br />
high priority 53<br />
Highest Takes Precedence 248<br />
hints 54<br />
history files 292<br />
hold time 241<br />
hollow pipe 317<br />
homing a fixture 424<br />
Horizon show files 70<br />
hotkeys 438<br />
<strong>Strand</strong> <strong>Lighting</strong><br />
p443
<strong>Palette</strong> <strong>OS</strong> v10<br />
hours 206<br />
HSL 14<br />
hsv 14<br />
HTML automation 328<br />
HTP 51<br />
HTP Intensity 65<br />
- I -<br />
identify fixture 284<br />
ILS commands 345<br />
import from Horizon 70<br />
independent channels 136<br />
independent timing 43<br />
Individual Attributes 269<br />
inhibitive 253<br />
input device 378<br />
intelligent lights 142<br />
Internet Explorer 414<br />
Internet radio 411<br />
Internet Time 378<br />
invert selection 166<br />
inverted profile 262<br />
IP Address 399<br />
italic text 206<br />
- J -<br />
jpg 417<br />
jump 235<br />
- K -<br />
keyboard 393<br />
keyboard language 378<br />
keyboard repeat rate 397<br />
keyboard shortcuts 438<br />
keystrokes 343<br />
knock out 183<br />
- L -<br />
label 135<br />
large fonts 398<br />
last action editing 328<br />
Latest Takes Precedence 50<br />
launching Marquee<br />
learn mode 273<br />
level 285<br />
level setting 140<br />
library 10<br />
license 435<br />
limit 251<br />
limit output 262<br />
linear movement 14<br />
link 226<br />
list 198<br />
list of cue lists 198<br />
Little Lites (r) 328<br />
live 72<br />
<strong>Strand</strong> <strong>Lighting</strong><br />
p444
<strong>Palette</strong> <strong>OS</strong> v10<br />
Live Button 94<br />
live playback 257<br />
live programmer 43<br />
load 112<br />
loaded bubble<br />
locate cues 193<br />
location 290<br />
locked 201<br />
longitude & latitude 290<br />
look 248<br />
look master pages 83<br />
look masters 257<br />
looks 253<br />
loop 226<br />
loop go action 201<br />
low priority 53<br />
lowlight 278<br />
LTP 201<br />
Lua code 337<br />
- M -<br />
macro<br />
macro buttons 86<br />
macros 343<br />
magic sheets 328<br />
mail 415<br />
mapped network drives 409<br />
mark cues 193<br />
marquee 157<br />
Marquee USB DMX 262<br />
masking 142<br />
master 201<br />
Media Player 361<br />
menu 72<br />
MIB 287<br />
MIDI notes 345<br />
MIDI Show Control 201<br />
MIDI/SMPTE interface 331<br />
minutes 206<br />
mirrored save 292<br />
modify 179<br />
momentary buttons 86<br />
monitor power saver 404<br />
monitor resolution 383<br />
mouse 142<br />
mouse setup 394<br />
mouse/trackball 140<br />
move 113<br />
Move In Black 287<br />
move/fade 51<br />
moving lights 68<br />
mp3 411<br />
mpeg 411<br />
MSC 368<br />
multi-part 241<br />
multiple cue lists<br />
- N -<br />
<strong>Strand</strong> <strong>Lighting</strong><br />
p445
<strong>Palette</strong> <strong>OS</strong> v10<br />
network setup 399<br />
network video 89<br />
new 70<br />
next 117<br />
next cue<br />
non-dim 262<br />
note on-off 345<br />
Notepad 416<br />
number 63<br />
numbering cues 220<br />
- O -<br />
odds 166<br />
offset 201<br />
offset times 275<br />
offset timing 151<br />
on-screen keyboard 393<br />
one to one patch 306<br />
open 70<br />
out 116<br />
Outlook Express 415<br />
output devices 262<br />
overview 12<br />
- P -<br />
pages<br />
Paint 417<br />
palettes 260<br />
pan invert 262<br />
pan-tilt mode 14<br />
park 262<br />
parts 43<br />
patch 262<br />
Patch Button 96<br />
path 212<br />
Pathport 262<br />
PDF 309<br />
pecking order 50<br />
pendant 332<br />
persist on override 50<br />
phantom abstract attributes 14<br />
pile on 201<br />
pin 205<br />
playback bubbles<br />
Playback Keys 97<br />
playback master 100<br />
plus 10% 123<br />
pointer 98<br />
polar movement 14<br />
popups 77<br />
pots 248<br />
power failure recovery 422<br />
power off 408<br />
power patch 307<br />
power scheme 404<br />
PowerPoint automation 362<br />
precedence 50<br />
preset groups 260<br />
<strong>Strand</strong> <strong>Lighting</strong><br />
p446
<strong>Palette</strong> <strong>OS</strong> v10<br />
preset mode 10<br />
preview 187<br />
previous 166<br />
print 406<br />
print headers 290<br />
print screen 417<br />
priorities 248<br />
processor 370<br />
profiles 262<br />
properties 169, 88<br />
purple track symbol 124<br />
- Q -<br />
QWERTY 328<br />
QWERTY control 328<br />
- R -<br />
Raceway 304<br />
radio buttons 86<br />
rainbow 157<br />
random selection 166<br />
ranges of cues 169<br />
rate 201<br />
re-order columns 196<br />
recal 424<br />
record 169<br />
record options 174<br />
recovery 328<br />
red hat 317<br />
redundant backup 420<br />
redundant data 223<br />
reference cues 260<br />
refresh rate 328<br />
relative times 151<br />
release 328<br />
release history (software) 425<br />
release key 328<br />
release notes (control panel) 376<br />
release on record 287<br />
release playback 103<br />
Releasing 103<br />
releasing channels automatically 285<br />
rem dim 166<br />
Rem-Dim Button 120<br />
remdim 279<br />
remote focus unit 332<br />
remote triggers 327<br />
remote video 89<br />
removing attributes from cues 164<br />
removing cues 229<br />
renumber 113<br />
Renumber cues 113, 221<br />
report headers 290<br />
resolution 65<br />
retain cue data 229<br />
revision history 425<br />
RFU 332<br />
RGB 14<br />
<strong>Strand</strong> <strong>Lighting</strong><br />
p447
<strong>Palette</strong> <strong>OS</strong> v10<br />
RGB selector 280<br />
riggers remote 332<br />
RS232 367<br />
RS232 commands 365<br />
- S -<br />
save 409<br />
scratch pad 416<br />
screen layout 91<br />
screen resolution 383<br />
screen saver 383<br />
screen shot 417<br />
scripts 337<br />
scroll lock 205<br />
Scrollers 267<br />
second monitor 72<br />
select 137<br />
selected 174<br />
selects 322<br />
serial input 367<br />
serial number<br />
serial out 365<br />
serialized show files 292<br />
series of cues 169<br />
set 206<br />
setting levels 140<br />
setup 311<br />
shift button 121<br />
shifting times 151<br />
shortcut keys 77<br />
show control 367<br />
show history 292<br />
show options 290<br />
ShowNet 301<br />
shutdown 408<br />
shutter control 142<br />
single digit entery 328<br />
size 383<br />
slide shows control 362<br />
slider panels 312, 311<br />
small movements 142<br />
sneak 164<br />
softkeys 122<br />
software - current version 74<br />
software revision history 425<br />
software upgrade process<br />
sound cues 411<br />
space bar 438<br />
spade symbol 124<br />
splayed timing 151<br />
split fade times 206<br />
split up-down time<br />
squares law 262<br />
stage manager's display 89<br />
staggered timing 151<br />
state 174<br />
static IP address 399<br />
status<br />
step 102<br />
<strong>Strand</strong> <strong>Lighting</strong><br />
p448
<strong>Palette</strong> <strong>OS</strong> v10<br />
step back 102, 60<br />
step forward 219, 60<br />
stomping 51<br />
stop 60<br />
stop button 60<br />
strike lamp 424<br />
submasters 312<br />
suck 166<br />
sunrise & sunset 352<br />
suppress MIB 226<br />
surfing 414<br />
swap pan-tilt 262<br />
symbols 124<br />
synchronize 201<br />
system capacities 12<br />
system setup 370<br />
- T -<br />
telnet 367<br />
telnet connections 337<br />
testing the hardware 374<br />
text editor 416<br />
thru 116<br />
tilt invert 262<br />
time 206, 233<br />
time events 290<br />
time of day<br />
time zone 378<br />
timing 151<br />
tips 74<br />
title 135<br />
toggle buttons 86<br />
tool bar 60<br />
tools 275<br />
touchpad setup 394<br />
touchscreens 393<br />
track sheets 191<br />
trackball 142<br />
tracking 169<br />
tracking backup 420<br />
trackpad setup 394<br />
tricks 54<br />
trigger wiring 326<br />
triggers 326<br />
turn off 408<br />
twilight 290<br />
two digit entry 328<br />
two scene mode<br />
- U -<br />
uber status<br />
unblock cue 41<br />
up time (for system) 419<br />
update history 425<br />
updating cues 105<br />
upgrading software 372<br />
USB DMX flavor 328<br />
user interface macros 343<br />
<strong>Strand</strong> <strong>Lighting</strong><br />
p449
<strong>Palette</strong> <strong>OS</strong> v10<br />
- V -<br />
variables 86<br />
venue options 290<br />
video 362<br />
view 91<br />
view properties 115<br />
virtual palette access 322<br />
Vision Net 348<br />
volume 411<br />
- W -<br />
wait time 241<br />
wav 411<br />
web 414<br />
web page interface 357<br />
web server 328<br />
what to record 174<br />
wheel 140<br />
white block symbol 124<br />
- X -<br />
XDMX 301<br />
<strong>Strand</strong> <strong>Lighting</strong><br />
p450
<strong>Strand</strong> <strong>Lighting</strong>