Mounting the Basic 540 protective cell - Step four
Mounting the Basic 540 protective cell - Step four
Mounting the Basic 540 protective cell - Step four

Create successful ePaper yourself
Turn your PDF publications into a flip-book with our unique Google optimized e-Paper software.
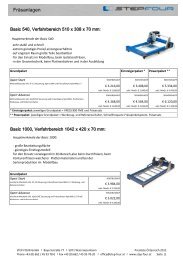
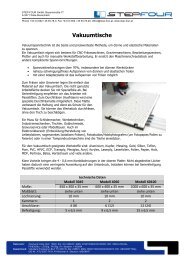
<strong>Mounting</strong> instructions:<br />
1. Put <strong>the</strong> <strong>four</strong> plates toge<strong>the</strong>r.<br />
2. Do not tighten <strong>the</strong> screws completely.<br />
3. Put <strong>the</strong> thread rod through <strong>the</strong> hole in <strong>the</strong> side panels and <strong>the</strong><br />
connecting tube.<br />
4. Put <strong>the</strong> two polycarbonate plates into <strong>the</strong> designated grooves.<br />
5. Tighten <strong>the</strong> screws now.<br />
6. Cut <strong>the</strong> thread rod so that 3mm will overlap and fix <strong>the</strong> screws.<br />
Seite 3 Datum: 02.08.2005 Pfad:G:\Neue Datenstruktur\Produkte\Fräsen\<strong>Basic</strong> <strong>540</strong>\Schutzzelle\Protective<br />
<strong>cell</strong> <strong>Basic</strong> <strong>540</strong>.doc