k157. a rolling code 2-channel uhf remote control - Kitsrus
k157. a rolling code 2-channel uhf remote control - Kitsrus
k157. a rolling code 2-channel uhf remote control - Kitsrus

Create successful ePaper yourself
Turn your PDF publications into a flip-book with our unique Google optimized e-Paper software.
K157. A ROLLING CODE 2-CHANNEL UHF REMOTE CONTROL<br />
COMPONENTS<br />
Resistors 5%, 1/4W<br />
1K brown black red R3 1<br />
2K2 red red red R6 R8 2<br />
4K7 yellow violet red R5 R7 2<br />
1M brown black green R4 1<br />
10M brown black blue R1 R2 2<br />
nut and screw set 6mm or 8mm. 1 set<br />
1N4004 D1 D2 2<br />
104 monoblok C1 2 3 4 4<br />
3pole terminal block 2<br />
3 pin SIL header 2<br />
Jumpers 2<br />
100uF/16V C5 C6 2<br />
I know it does not print well. You can also<br />
view this jpg in bigger size & in color at<br />
http://www.kitsrus.com/jpg/k157track.jpg<br />
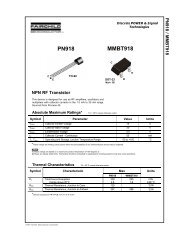
7805 IC1 1<br />
4013 IC2 1<br />
LED 5mm red 2<br />
LED 5mm green 1<br />
14 pin IC socket 1<br />
BC547B Q1 Q2 2<br />
Pins 2<br />
Zippy tact switch 1<br />
12V relays RWH-SH-112D 2<br />
Hookup wire<br />
17cm<br />
K157 PCB 1<br />
TX-3316RS 2-button TX unit 1<br />
RX-3302D2-15 10 pin RX unit 1<br />
Assembly. Solder the lowest height<br />
components first, the resistors and diodes.<br />
Bend the legs of the 7805 with needle-nosed<br />
pliers. Mount the relays and RX unit last.<br />
As mentioned there is a track to cut and link<br />
to make. Cut the track going to the zippy<br />
switch as indicated in the photo.<br />
Then use an offcut from a resistor leg to<br />
jumper across two pads as shown in the other<br />
photo. Now when the tact switch is pressed<br />
pin 7 of the RX module will go to ground and<br />
LEARNing of additional TX units will occur.<br />
Two metal pins are provided for the GND and<br />
12V+ connection<br />
Connect the other side of the tact switch to<br />
ground as shown. Use an offcut fron resistor<br />
leg. See it at<br />
http://www.kitsrus.com/jpg/k157jump.jpg<br />
You can see the cut track.<br />
Check Operation.<br />
If working properly when you depress the<br />
small button 5V will appear at pin 6 counting<br />
from the top (non-earth end) of the PCB.<br />
Pressing the big button causes an output of<br />
5V at pin 8. When you release the buttons the<br />
voltage goes to zero. This 5V is used by the<br />
4013 for latching and momentary operation.<br />
You can trace this thru on the schematic.