
You also want an ePaper? Increase the reach of your titles
YUMPU automatically turns print PDFs into web optimized ePapers that Google loves.
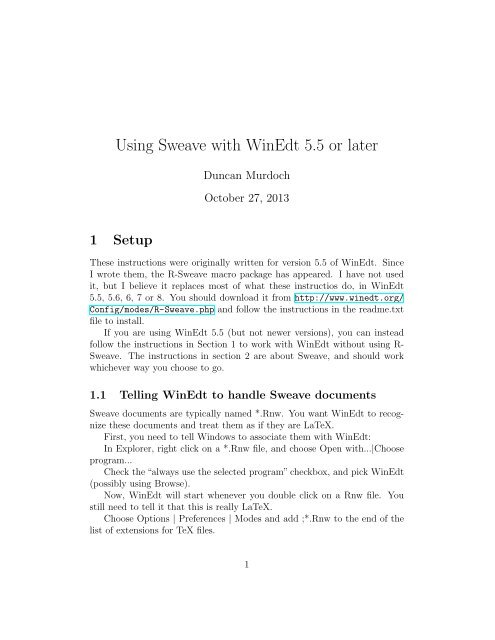
Using <strong>Sweave</strong> <strong>with</strong> <strong>WinEdt</strong> 5.5 or later<br />
Duncan Murdoch<br />
October 27, 2013<br />
1 Setup<br />
These instructions were originally written for version 5.5 of <strong>WinEdt</strong>. Since<br />
I wrote them, the R-<strong>Sweave</strong> macro package has appeared. I have not used<br />
it, but I believe it replaces most of what these instructios do, in <strong>WinEdt</strong><br />
5.5, 5.6, 6, 7 or 8. You should download it from http://www.winedt.org/<br />
Config/modes/R-<strong>Sweave</strong>.php and follow the instructions in the readme.txt<br />
file to install.<br />
If you are using <strong>WinEdt</strong> 5.5 (but not newer versions), you can instead<br />
follow the instructions in Section 1 to work <strong>with</strong> <strong>WinEdt</strong> <strong>with</strong>out using R-<br />
<strong>Sweave</strong>. The instructions in section 2 are about <strong>Sweave</strong>, and should work<br />
whichever way you choose to go.<br />
1.1 Telling <strong>WinEdt</strong> to handle <strong>Sweave</strong> documents<br />
<strong>Sweave</strong> documents are typically named *.Rnw. You want <strong>WinEdt</strong> to recognize<br />
these documents and treat them as if they are LaTeX.<br />
First, you need to tell Windows to associate them <strong>with</strong> <strong>WinEdt</strong>:<br />
In Explorer, right click on a *.Rnw file, and choose Open <strong>with</strong>...|Choose<br />
program...<br />
Check the “always use the selected program” checkbox, and pick <strong>WinEdt</strong><br />
(possibly using Browse).<br />
Now, <strong>WinEdt</strong> will start whenever you double click on a Rnw file. You<br />
still need to tell it that this is really LaTeX.<br />
Choose Options | Preferences | Modes and add ;*.Rnw to the end of the<br />
list of extensions for TeX files.<br />
1
This will work for new .Rnw files but the current file will not be recognized.<br />
To fix it, click on the block at the bottom of the screen that lists the<br />
current mode (probable “DATA”), and change it to TeX.<br />
1.2 Telling <strong>WinEdt</strong> to go straight to the previewer<br />
I don’t like to have to click the LaTeX button, then click the previewer button.<br />
I want the LaTeX button to take me straight to the previewer. To do<br />
this, use<br />
Options | Execution modes<br />
then highlight LaTeX, and check “Start viewer” and “Forward search”. Do<br />
the same for PDF LaTeX. On some systems this dialog is in a different location,<br />
i.e.<br />
Options | Configuration Wizard | Diagnosis | Execution modes<br />
but I believe the same procedure will work once you find the dialog.<br />
1.3 Telling <strong>WinEdt</strong> to use <strong>Sweave</strong> to process <strong>Sweave</strong><br />
documents.<br />
<strong>Sweave</strong> needs to run before LaTeX runs. Some people do this <strong>with</strong> Makefiles,<br />
but I don’t want to get into those. The simplest way to do this is to install<br />
a small package into R.<br />
1.3.1 Installing the patchDVI package<br />
This package is available online at http://r-forge.r-project.org/projects/<br />
sweavesearch. Start R, and run the command<br />
install.packages("patchDVI", repos="http://r-forge.r-project.org")<br />
(In current versions of R you can use the menus to select R-forge as your<br />
repository, and install completely from the menus.)<br />
If you don’t have admin authority on your PC, you’ll need to install to a<br />
local library. For example, I installed to N:/Rlibs27 in the undergrad lab.<br />
2
1.3.2 Telling <strong>WinEdt</strong> to use patchDVI<br />
I recommend changing the Texify and pdfTexify commands, and leaving the<br />
others alone.<br />
In<br />
Options | Execution modes<br />
choose Texify, and click on Browse for Executable. Find the Rterm.exe executable<br />
(version 2.7.0 or higher), and choose that.<br />
In the Switches line, put<br />
--slave -e<br />
and in the Parameters line, put<br />
"library(patchDVI);<strong>Sweave</strong>Miktex('%n%t', '%N.tex')"<br />
The quotes are necessary!!!<br />
Do similarly for the PDF Texify command, but use<br />
"library(patchDVI);<strong>Sweave</strong>PDFMiktex('%n%t', '%N.tex')"<br />
as the Parameters.<br />
A few things can go wrong in this step:<br />
ˆ If you don’t have administrative rights on your computer, you’ll need to<br />
install patchDVI into a local library, e.g. N:/Rlibs27. Then you might<br />
need to change library(patchDVI) to library(patchDVI, lib.loc="N:/Rlibs27").<br />
ˆ You might find that your version of pdflatex doesn’t support some of<br />
the options used by <strong>Sweave</strong>PDFMiktex. In that case, you can probably<br />
use the command<br />
<strong>Sweave</strong>PDFMiktex('%n%t', '%N.tex', options='')<br />
in place of what I used above.<br />
3
1.4 Telling the previewer to jump back to <strong>WinEdt</strong><br />
It is handy to be able to click on a line in the previewer, and go to that line<br />
in the source document. In the past this was not possible in PDF previewers<br />
on Windows, but you can do it <strong>with</strong> the DVI previewer Yap that comes <strong>with</strong><br />
MikTeX.<br />
Start the previewer (e.g. by texifying something), and go to View | Options<br />
| Inverse DVI search. You should see “<strong>WinEdt</strong> (auto-detected)” as an<br />
option; if so, select it. If not, create a new entry for <strong>WinEdt</strong>, and for the<br />
command line, put in<br />
"path\to\winedt.exe" "[Open(|%f|);SelPar(%l,8)]"<br />
after editing the path as necessary.<br />
Very recently the PDF previewer SumatraPDF has started to support<br />
SyncTex data to allow reverse search. This is still a little rough around the<br />
edges, but it’s good news for patchDVI. To make use of this, you need to work<br />
on the bleeding edge: use the latest patchDVI version 1.4 or later, version 0.9<br />
or better of SumatraPDF, and the latest version of MikTeX. I believe there<br />
are a few other PDF viewers that support SyncTex data, but I’ve never used<br />
them.<br />
1.5 Jumping to the .Rnw file, not the .tex file<br />
Yap uses information encoded in the DVI file to know where to jump. LaTeX<br />
puts information about the .tex file that comes out of <strong>Sweave</strong>, not the .Rnw<br />
file that went in. The patchDVI package can convert the information.<br />
To do so, put the lines<br />
\usepackage{<strong>Sweave</strong>}<br />
\<strong>Sweave</strong>Opts{concordance=TRUE}<br />
early in your .Rnw file.<br />
2 Embedding R code in your document<br />
2.1 Basics of <strong>Sweave</strong><br />
The <strong>Sweave</strong> manual gives a much more complete description; I’ll just give a<br />
very short one here.<br />
4
The idea of <strong>Sweave</strong> is that your document corresponds to a session of R.<br />
You embed text like<br />
=<br />
set.seed(123)<br />
x x y y<br />
[1] -0.56047565 -0.23017749 1.55870831 0.07050839<br />
[5] 0.12928774 1.71506499 0.46091621 -1.26506123<br />
[9] -0.68685285 -0.44566197<br />
> plot(x, y)<br />
y<br />
−1.0 −0.5 0.0 0.5 1.0 1.5<br />
●<br />
●<br />
●<br />
●<br />
●<br />
●<br />
●<br />
●<br />
●<br />
●<br />
2 4 6 8 10<br />
You don’t need to worry about the details of importing the code, the<br />
results or the figure; <strong>Sweave</strong> does that for you, by producing the figure in<br />
both EPS and PDF format, and generating LaTeX code like this:<br />
5<br />
x
\begin{Schunk}<br />
\begin{Sinput}<br />
> set.seed(123)<br />
> x y y<br />
\end{Sinput}<br />
\begin{Soutput}<br />
[1] -0.56047565 -0.23017749 1.55870831 0.07050839<br />
[5] 0.12928774 1.71506499 0.46091621 -1.26506123<br />
[9] -0.68685285 -0.44566197<br />
\end{Soutput}<br />
\begin{Sinput}<br />
> plot(x, y)<br />
\end{Sinput}<br />
\end{Schunk}<br />
\includegraphics{figs/-002}<br />
The Schunk, Sinput and Soutput macros can be customized if you want<br />
fancy colours or other things in your document.<br />
2.2 Recommended <strong>Sweave</strong> options<br />
We’ve already seen the line \<strong>Sweave</strong>Opts{concordance=TRUE} above. There<br />
are other <strong>Sweave</strong> options I often use:<br />
height=5, width=10 These allow you to specify the height and width of<br />
plots produced by R. I tend to choose values slightly larger than I want<br />
the plot to appear, because I like a slight reduction in the font sizes<br />
that results when LaTeX shrinks it.<br />
keep.source=TRUE If you don’t choose this, then R will reformat all of<br />
your carefully written source code.<br />
prefix.string=figs/ This says to store all the figures (and the concordance)<br />
in a subdirectory called figs, so they don’t mess up your main directory.<br />
You need to create that subdirectory or this will fail.<br />
These can all be combined into one \<strong>Sweave</strong>Opts{} call, by separating them<br />
<strong>with</strong> commas.<br />
6
I also set some options to the graphicx package, so my figures look consistent:<br />
\setkeys{Gin}{width=\textwidth}<br />
This says that figures should be resized so that they fit the full width of the<br />
text.<br />
And finally, an option to R:<br />
options(width=60)<br />
will shorten the output lines that R produces, so they look nicer in a document.<br />
To get this to execute <strong>with</strong>out showing up in your document, include<br />
it as<br />
=<br />
options(width=60)<br />
@<br />
early in your document.<br />
7