Linea TabTension - Draper Group Ltd
Linea TabTension - Draper Group Ltd
Linea TabTension - Draper Group Ltd

Create successful ePaper yourself
Turn your PDF publications into a flip-book with our unique Google optimized e-Paper software.
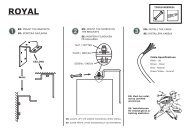
Limit setting / Gränslägen<br />
1 2 3 4 5<br />
ENGLISH: Very important!<br />
Please read through these instructions completely before you start working on the screen.<br />
Although set in the factory we cannot guarantee that the screen limits have not changed during transportation.<br />
Even the slightest change in the limits can result in damage to the screen, possibly making it unusable. To avoid the<br />
risk of damaging the screen, the following procedure must be carried through.<br />
1. Before putting up the screen in the brackets and connecting the wires., find the yellow button on the motor. The<br />
motor is by standard on the the left side of the screen (viewers perspective). Push it in to lock it in its inner position<br />
(see fig 1). This erases the upper limit. Push it in once more to release it to its outer position (see fig2). This sets the<br />
screen to the current position. You have now reset the upper limit.<br />
(If the motor is on the right side of the screen the white button should be used instead)<br />
2. Mount the screen according to the instructions.<br />
3. Run down the screen under supervision, being prepared to stop it in case something should occur. The screen<br />
has a warning mark that you should look for (see fig 3). When this marking becomes visible the screen has been<br />
lowered too far and should be stopped immediately. Run the screen back until the marking is no longer visible and<br />
stop. This is the lowest position allowed for the screen. If a higher bottom position is wanted, please run it up to the<br />
desired position and stop. Push in and out the white button (the same as with the yellow in the previous steps) to<br />
set the lower limit (see fig 4 & 5).<br />
(If the motor is on the right side of the screen the yellow button should be used insteead)<br />
SVENSKA: Mycket viktigt!<br />
Läs igenom hela denna instruktionen innan något görs med filmduken.<br />
Den vibration som filmduksmotorn utsätts för under transport kan göra att de fabriksinställda ändlägena har<br />
ändrats. Detta kan leda till att duken skadas och i värsta fall göra den helt obrukbar. För att inte riskera att duken<br />
skadas måste följande utföras innan installationen påbörjas.<br />
1. Innan monteringen eller inkopplingen påbörjas, lokalisera den gula knappen på motorn. Motorn sitter som<br />
standard på filmdukens vänstra sida (åskådarens perspektiv). Tryck in den gula knappen till sitt inre läge (bild 1) och<br />
tryck sedan ut den till sitt yttre läge igen (bild 2). Nu har det övre gränsläget ställts in på nytt.<br />
(Skulle motorn vara monterad på filmdukens högra sida är det den vita knappen som ska tryckas in/ut istället för<br />
den gula.)<br />
2. Montera filmduken enligt instruktionerna på kommande sidor.<br />
3. Efter filmduken monterats måste följande utföras. Kör ner duken mycket varsamt, ha uppsikt över duken och var<br />
beredd på att stanna den. Duken har en varningsmarkering (bild 3). Skulle motorn stanna innan denna markering<br />
blir synlig så fungerar det nedre ändläget. Skulle däremot varningsmarkeringen bli synlig så har duken körts för långt<br />
ner och måste stannas omedelbart. I detta läge är det väldigt lite dukmaterial kvar på röret och skulle duken köras<br />
ned ytterligare så kan detta medföra stora skador på filmduken. Kör upp duken så att markeringen försvinner in i<br />
filmdukskåpan och stanna den då markeringen inte syns längre. Då står duken i det lägsta tillåtna läget. Önskar du<br />
ha duken högre så kan du köra upp den till önskat läge. Lokalisera nu den vita<br />
knappen på motorn. Tryck in den vita knappen till sitt inre läge (bild 4) följt av att du trycker ut den till sitt yttre läge<br />
igen (bild 5). Du har nu ställt det nedre ändläget till aktuell position.<br />
(Skulle motorn var monterad på filmdukens högra sida är det den gula knappen som ska lokaliseras och tryckas in/<br />
ut.)<br />
3