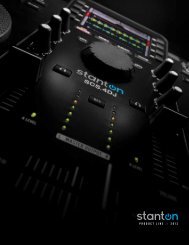
SK-5 - Stanton
SK-5 - Stanton
SK-5 - Stanton

Create successful ePaper yourself
Turn your PDF publications into a flip-book with our unique Google optimized e-Paper software.
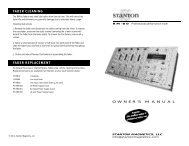
<strong>SK</strong> FIVE<br />
Professional performance mixer<br />
OWNER’S M A N U A L<br />
© 1999, <strong>Stanton</strong> Magnetics, LLC<br />
STANTON MAGNETICS, LLC<br />
2821 Evans St. Hollywood, FL 33020<br />
(954) 929-8999 - Fax: (954) 929-0333<br />
info@stantonmagnetics.com
T RO U B LE S H O OTI N G<br />
Thank you for making <strong>Stanton</strong> your first choice in professional DJ mixers.<br />
This new, innovative family of mixers has been developed with input from the professional<br />
DJ community, bringing to the marketplace a previously unavailable, affordable<br />
combination of user-friendly, functional design, rugged construction, and professional<br />
quality features.<br />
<strong>Stanton</strong> and your authorized <strong>Stanton</strong> dealer are dedicated to your complete satisfaction<br />
by offering benchmark service and support throughout the long life of your<br />
<strong>Stanton</strong> product.<br />
Again, we appreciate your patronage, and look forward to many years of making<br />
music together.<br />
PLEASE READ CAREFULLY BEFORE USE OF THIS PRODUCT<br />
FA I LU R E TO FO LLOW T H E I NST RU C TI O NS P R I N TE D B E LOW M AY VO I D WA R R A N TY<br />
• Follow all security advice printed on your mixer<br />
• When removing the unit's AC plug from the power source, grasp and pull the<br />
plug, NEVER the cord itself!<br />
Problem<br />
Excessive hum when using<br />
phono source.<br />
Low frequency hum while<br />
operating source unit.<br />
Pro g ram volume can’t be<br />
adjusted with master vo l u m e<br />
c o n t ro l .<br />
No powe r.<br />
Cause<br />
Poor ground connection.<br />
Loose cartridge/headshell<br />
connection.<br />
Poor AC source ground.<br />
Loose input/output connection.<br />
Shorted cable.<br />
Amplifier or outboard gear<br />
connected to the re c o rd output.<br />
I m p roperly connected AC cord<br />
or power line source not on.<br />
Solution<br />
Properly connect turntable<br />
ground wire to mixer ground<br />
terminal.<br />
Check cartridge connection<br />
to headshell. Check headshell<br />
connection to tonearm.<br />
Properly ground the AC<br />
source. Check all input and<br />
output connections for<br />
s e c u re fit. Isolate and re p l a c e<br />
the damaged cable.<br />
Connect amplifier or outboard<br />
gear to master output.<br />
Properly connect AC cord to<br />
AC power source. Turn powe r<br />
on.<br />
• Avoid placing your mixer near heat sources, such as power amplifiers.<br />
• When in use, place your mixer on a stable surface, away from vibration. Always<br />
use care when carrying your mixer. Impact, or heavy vibration may compromise<br />
the unit's mechanical integrity. The manufacturer is not responsible for damage<br />
resulting from an impact, or misuse.<br />
• When in use, place your mixer away from sources of hum or noise, such as<br />
transformers, or electric motors.<br />
• To prevent overheating, always provide your mixer with adequate ventilation<br />
air space.<br />
• Avoid stepping on your mixer's AC cord. Repeated compression of the cord<br />
may lead to electrical shorting.<br />
The amplifier is turned up,<br />
but there is no signal.<br />
No signal in headphones.<br />
Faulty output connections<br />
Improper level adjustment.<br />
Improper connection.<br />
Improper level or cue mix<br />
settings.<br />
Properly connect amplifier, or<br />
outboard gear to mixer.<br />
Properly set crossfader,<br />
channel faders, gain controls,<br />
and input selector toggles.<br />
Check headphone connection<br />
to mixer. Tighten if necessary.<br />
Adjust headphone level and<br />
cue mix to the proper level<br />
and channel settings.<br />
• To avoid damage due to AC voltage peaks, always disconnect your mixer from<br />
the power source during electrical storms.<br />
• Your mixer contains no user-serviceable parts. The manufacturer is not<br />
responsible for any damage or personal injury resulting from unauthorized<br />
user-servicing or modifications. In addition, the warranty will be void if any<br />
unauthorized service by the user is detected. Always return you mixer to an<br />
authorized <strong>Stanton</strong> dealer for servicing.<br />
S P E C I A L P ROTE K TI O N<br />
Your <strong>SK</strong> FIVE comes with a special PROTEKT aluminum panel designed to<br />
make the surface of the mixer is as smooth as possible while still enabling you<br />
to field-replace key components. The PROTEKT panel covers all screws that<br />
may get in the way of your performance. You can still easily remove the front<br />
panel to replace any of the modular parts which are subject to wear and tear:<br />
crossfader, input faders and input toggle switches.
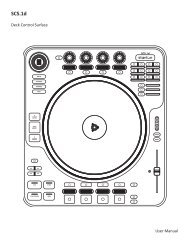
D E S C R I P TIO N OF FU N C TI O N S<br />
1. Gain control: Controls the input sensitivity of each channel.<br />
2. Input selector switches: Selects phono or line inputs.<br />
3. Master level control: Controls the overall signal output level.<br />
4. Mic gain control: Controls the overall microphone output level.<br />
5. Channel fader: Controls the input channel level.<br />
6. Crossfader Reverse LED: Bi-color LED indicates the status of the crossfader reverse<br />
function. When LED is green, the crossfader is normal. When LED is red, the crossfader<br />
direction is reversed.<br />
7. Crossfader: Fades the master output between channels 1 and 2.<br />
8. Power switch: Selects power "ON" or "OFF".<br />
9. Cue pan: Fades the headphone output between channels 1 and 2, effectively allowing<br />
the user to preview a mix.<br />
10. Headphone level control: Controls the overall headphone output level. It is recommended<br />
headphones with an impedance rating of 200 ohms or less be used for maximum<br />
volume.<br />
11. Input Level Meter: Monitors each channel’s input level.<br />
12. Microphone input: 1/4” connector<br />
13. Crossfader Curve adjustment: Adjusts the shape of the crossfader curve from a quick<br />
cut for scratching and cutting to a longer fade for mixing.<br />
14. Crossfader Reverse: Reverses the direction of the crossfader. Bi-color LED indicates<br />
the status of the crossfader reverse function. When LED is green, the crossfader is<br />
normal. When LED is red, the crossfader direction is reversed.<br />
15. Headphone Mute: Mutes the headphone signal output<br />
16. Headphone output: Connection for 1/4 inch headphone. Recommended headphone<br />
impedance is 32-200 ohms for maximum volume.<br />
17. Power supply connector: Input connection for the accompanying power supply.<br />
18. Master output: TRS balanced (1/4”).<br />
19. Master output: unbalanced RCA connector<br />
20. REC output: record output connects directly to recording source (tape deck, CD...)<br />
21/22. Channel inputs: Line and phono signal inputs. Line inputs are used to connect<br />
to line level sources such as CD players, samplers, tape players, etc. Phono<br />
inputs are used to connect to turntables.<br />
23. Ground connector: Connects to the turntable ground connector to eliminate electrical<br />
hum. Ground connectors usually supplied with turntables.
FA DER CLE A N I N G<br />
The <strong>SK</strong> FIVE faders may need lubrication from time to time. This will extend the<br />
fader life and eliminate any potential damage due to extended heavy usage.<br />
Cleaning Instructions<br />
1. Remove the 3 fader knobs and 4 screws<br />
located in the corners of the PROTEKT<br />
(see “<br />
” inside) panel<br />
and take the panel off the mixer.<br />
2 . Remove the fader to be cleaned by<br />
unscrewing the 2 outer screws (removing<br />
the 2 inner screws will detach the fader<br />
from the fader plate) and disconnect the<br />
R E PL AC E M E N T PA RTS<br />
To replace the cross or channel faders, follow steps 1 and 2 of the cleaning<br />
instructions. The following replacement parts are available from <strong>Stanton</strong> or your<br />
local <strong>Stanton</strong> dealer.<br />
PL-<strong>SK</strong>1<br />
3PL-<strong>SK</strong>1<br />
LF-<strong>SK</strong>5<br />
CF-<strong>SK</strong>5<br />
Two way input toggle switch<br />
Three way input toggle<br />
switch with FLASH<br />
Channel input fader<br />
Crossfader<br />
cable coming from the mixer.<br />
3. Spray a small amount of cleaner or<br />
lubricant into both ends of the fader and<br />
slide the fader back and forth a few times<br />
to spread the fluid evenly throughout the<br />
fader.<br />
4. Shake and wipe off excess fluid before<br />
re-assembling the fader.<br />
ROTATING AND REPLACING THE INPUT TOGGLE SWITCHES<br />
ROTATING I NST RU C TI O NS<br />
1 . Remove the PROTEKT panel<br />
2. Remove the 2 outer screws from the toggle<br />
switch plate (removing the 2 inner<br />
screws will detach the switch from the<br />
plate)<br />
3. Rotate the plate to the desired position<br />
and tighten the screws back in the top and<br />
bottom holes<br />
PP-<strong>SK</strong>5<br />
PS-13US<br />
PS-13EU<br />
PS-13UK<br />
PROTEKT panel<br />
US Power Supply (110v)<br />
European Power Supply (220v)<br />
UK only Power Supply (240v)<br />
R E PLAC I N G I NST RU C TI O NS<br />
1. Remove the PROTEKT panel<br />
2. Remove the 2 outer screws from the toggle<br />
switch plate (removing the 2 inner<br />
screws will detach the switch from the<br />
plate)<br />
3. Remove the switch assembly and disconnect<br />
the cable coming from the mixer.<br />
4. Set the replacement switch assembly in<br />
the desired position and place the screws<br />
back in the top and bottom holes.<br />
TE C H N I C A L S P E C I FI C AT I O N S<br />
Line inputs:<br />
2 (RCA), 150 mV / 27K ohm<br />
Phono inputs:<br />
2 (RCA), 3 mV / 47K ohm<br />
Master output:<br />
1 (1/4” TRS Balanced/RCA unbalanced),<br />
775 mV / 1K ohm<br />
Record output:<br />
1 (RCA), 245 mV / 10K ohm<br />
Headphone output: 1 (1/4 inch), 32 - 200 ohms recommended<br />
Frequency Response: 20 Hz - 20 kHz, +/- 2 dB<br />
Gain Control:<br />
0-20dB<br />
S/N Ratio:<br />
Less than 70dB<br />
T.H.D: less than 0.2%<br />
Dimension(LxWxD): 9” x 9.75” x 3.5” ( 226 x 248 x 87 mm)<br />
Weight:<br />
7 lbs (3.2 Kg)<br />
WA R R A N T Y<br />
This unit has been designed and manufactured using quality<br />
components. Therefore, it is warranted to be free from defects in materials<br />
(limited as specified below), and workmanship for a period of twelve<br />
(12) months from the original purchase date. During this period, all<br />
service and parts necessary to repair a defect will be free of charge. This<br />
limited warranty applies to mechanical parts which are subject to wear<br />
and tear as specified:<br />
• Faders, specified durability: 15,000 cycles<br />
• Rotary potentiometers, specified durability: 10,000 cycles<br />
• Switches, specified durability: 10,000 cycles<br />
Consequently, the parts listed above are warranted to be free from<br />
defects in materials and workmanship for a period of thirty days (30)<br />
days from the original purchase date.<br />
FOR THE WA R R A N TY TO BE VA LID, PLEASE CO M PLE TE THE<br />
O N LINE WA R R A N TY REGIST R ATION FORM FOUND AT<br />
W W W. STA N TO N M AG N E TI CS . CO M<br />
2821 Evans Street • Hollywood, FL 33020