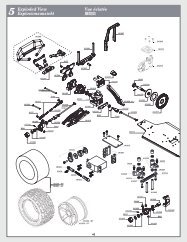
SINGLE ROTOR - Stanbridges
SINGLE ROTOR - Stanbridges
SINGLE ROTOR - Stanbridges

Create successful ePaper yourself
Turn your PDF publications into a flip-book with our unique Google optimized e-Paper software.
24076<br />
www.revell-control.de<br />
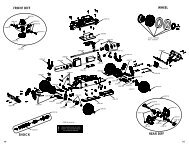
Contents<br />
© 2010 Revell GmbH & Co.KG,<br />
Henschelstraße 20 – 30, D-32257 Bünde,<br />
REVELL IS THE REGISTERED TRADEMARK<br />
OF REVELL GMBH & Co. KG, GERMANY<br />
<strong>SINGLE</strong><br />
<strong>ROTOR</strong><br />
Special Features<br />
Hue SAR Helicopter:<br />
• New single-rotor system with central and tail rotors<br />
(fi xed-pitch) together with 4-in-1 gyroscope (steering unit)<br />
for stable fl ight<br />
• 2.4 GHz, 4-channel, 2nd-generation controller with<br />
automatic binding<br />
• Finely tuned electronics, tested ex works<br />
• Detailed, replaceable fuselage, in original Revell design<br />
• Rechargeable LiPo battery with electronic<br />
discharge/charge status display<br />
Safety advice:<br />
Operating instructions<br />
• The helicopter is suitable for indoor use or use outdoors when there<br />
is no wind.<br />
• The helicopter is suitable for ages 15 and above. It should not be<br />
flown without parental supervision.<br />
• Keep hands, face, hair and loose clothing away from rotor blades.<br />
• Turn off the controller and helicopter when not in use.<br />
• Remove batteries from the controller and helicopter when not in use.<br />
• Always keep the helicopter in sight to prevent loss of control.<br />
Careless or irresponsible use may cause serious damage.<br />
• Keep these instructions for future reference.<br />
• Always follow these instructions when operating the helicopter.<br />
2.4 GHz RADIO CONTROL<br />
• Do not fly the helicopter near people, animals, water or power cables.<br />
• The LiPo battery charger is made specifically for charging the<br />
helicopter battery. Only use it for this purpose. Do not use it to charge<br />
other batteries.<br />
• This helicopter is not suitable for people with physical or mental<br />
disabilities. We recommend that inexperienced flyers start up the<br />
helicopter under the supervision of an experienced pilot.<br />
Care and maintenance:<br />
• Always use a clean, damp cloth to wipe the helicopter.<br />
• Keep the helicopter and batteries away from direct sunlight and/or<br />
direct heat sources.<br />
• Never let the helicopter come into contact with water, as this may damage<br />
the electronics.<br />
Controller battery safety advice:<br />
• Do not charge non-rechargeable batteries.<br />
• Rechargeable batteries must be removed from the controller before charging.<br />
• Rechargeable batteries must only be charged under adult supervision.<br />
• Do not use different types of batteries or mix old and new batteries.<br />
• Only use the recommended batteries or batteries of an equivalent type.<br />
• We recommend using new alkaline-manganese batteries for the controller.<br />
To help the environment, consider replacing the disposable batteries for this<br />
controller and for other household electronic items with rechargeable batteries.<br />
We recommend eneloop batteries (Sanyo).<br />
• Insert batteries following the correct polarity (+ and -).<br />
• Remove dead batteries from the controller.<br />
• Do not short-circuit the supply terminals.<br />
The helicopter comes with a rechargeable lithium-polymer battery.<br />
Always follow these safety instructions:<br />
• Never dispose of the LiPo battery in a fi re or store near sources of heat.<br />
• Only use the supplied Revell LiPo charger to recharge this LiPo battery.<br />
Using another charger may permanently damage the battery and surrounding<br />
components and may also lead to injury.<br />
• Do not use a charger for NiCd/NiMH batteries.<br />
• Batteries should only be charged on a fi reproof surface, away from any<br />
fl ammable materials.<br />
• Never leave the battery unattended when charging or discharging.<br />
• Batteries must be discharged or fully exhausted before being disposed of.<br />
Cover exposed poles with adhesive tape to prevent short-circuiting!<br />
• Never dismantle or modify battery contacts. Do not damage or puncture<br />
battery cells. Doing so would result in an explosion hazard!<br />
• Keep the LiPo battery away from children.<br />
Safety advice:<br />
• Never carry out any modifi cations or alterations to the product as this may<br />
result in damage or injury.<br />
• To keep risks to a minimum, never operate the helicopter while sitting on the<br />
fl oor or on a chair. Always ensure you are able to quickly move out of the<br />
helicopter’s fl ight path.<br />
• Always switch off the helicopter and controller after use to avoid any<br />
unintended operation.<br />
• Insert new batteries in the controller or recharge batteries as soon as any<br />
function becomes diminished.<br />
Battery requirements<br />
for the helicopter:<br />
Power supply:<br />
Rating: DC 7.4 V - 900 mAh<br />
Batteries: One 7.4 V rechargeable<br />
LiPo battery (included)<br />
Battery requirements<br />
for the controller:<br />
Power supply:<br />
DC 12 V<br />
Batteries: Eight 1.5 V “AA”<br />
(not included)<br />
6<br />
WEEE Directive: Once the product has reached the end<br />
of its useful life, remove all batteries and dispose of them<br />
separately. Take electronic appliances to local collection<br />
points for electrical waste. Other components can be<br />
disposed of in household waste. Thank you for complying<br />
with these regulations.<br />
Never touch spinning rotor blades!<br />
Do not fl y the helicopter near<br />
people, animals, water or power<br />
cables – always fl y under adult<br />
supervision.<br />
Revell GmbH & Co. KG hereby declares that this<br />
product conforms to the essential requirements<br />
and other relevant provisions of Directive<br />
1999/5/EC. The declaration of conformity<br />
is available at www.revell-control.de.
Helicopter and Controller<br />
HELICOPTER<br />
Central rotor<br />
Stabilizer<br />
Tail rotor<br />
LED indicator<br />
Fuselage fi xing pins<br />
Landing skid<br />
Battery compartment on underside<br />
English<br />
CONTROLLER<br />
Starting position<br />
Note: The throttle stick and<br />
trimming dial must be in<br />
the down position when<br />
the controller is turned on.<br />
HELICOPTER BATTERY:<br />
Removable<br />
helicopter battery<br />
Antenna<br />
Removable battery<br />
holder on underside<br />
of helicopter<br />
Hook for<br />
carry strap<br />
Handle<br />
LED display<br />
Throttle trim dial<br />
Throttle stick /<br />
left/right rotation (yaw)<br />
Yaw trim dial<br />
Forward/backward<br />
trim dial<br />
Forward/backward<br />
fl ight (pitching) /<br />
Left/right fl ight (rolling)<br />
Roll trim dial<br />
ACCESSORIES:<br />
Automatic LiPo charger<br />
Mains adapter for charger<br />
DVD with instructions<br />
ON/OFF<br />
switch<br />
Control reverse<br />
switches<br />
Spare rotor blades<br />
Mode 2 controller functions (throttle on left side)<br />
Inserting the Batteries<br />
1. To open the battery cover, slide<br />
it downwards.<br />
2. Insert eight 1.5 V AA batteries according to the<br />
polarity in the battery compartment.<br />
3. Slide the battery compartment<br />
cover back up and close.<br />
4. If the LED indicator emits a continuous green<br />
light, the battery charge is OK. A continuous<br />
red light means the batteries are too weak<br />
and must be recharged.<br />
Charging the Helicopter Battery<br />
Note: Before charging, always wait 10 to 15 minutes for the battery to cool down in order to avoid damage.<br />
1. Turn off the helicopter and the controller. Separate the red connectors on the<br />
helicopter’s fl ight cable (pic. 1).<br />
2. Remove the battery holder from the mount (pic. 2).<br />
3. Connect the 230 V mains adapter to the LiPo charger. Insert the mains adapter<br />
into a plug socket. The RED LED on the charger lights up. Connect the LiPo battery<br />
to the charger. The GREEN LED lights up (pic. 3). Do not force.<br />
4. The battery is fully charged after 60 minutes. The GREEN LED goes out.<br />
pic. 1<br />
Disconnect the battery immediately from the charger.<br />
5. Insert the battery in the battery holder and snap it into place in the helicopter<br />
(pic. 4). Make sure that the cables do not come into contact with the landing gear on landing.<br />
pic. 4<br />
pic. 2 pic. 3<br />
The helicopter can fly for about 10 minutes after approximately 60 minutes of charging.<br />
The charging process is electronically monitored and stops automatically after 60 minutes. Never leave the helicopter unattended when recharging.<br />
7
Flying the Helicopter<br />
1. GETTING STARTED:<br />
The throttle stick and throttle trim dial must be in the downward position before the controller is turned on. Move the controller’s ON/OFF switch to “ON”. Carefully<br />
connect the helicopter’s fl ight cable. The helicopter’s control LED starts fl ashing red. Wait until the control LED emits a continuous GREEN light. Place the<br />
helicopter two meters away on the ground with the tail pointing towards you. To start fl ying, move the throttle stick slowly forwards.<br />
If the control LED in the helicopter does not emit a continuous GREEN light, check the position of the throttle trim dial and the throttle stick on the controller.<br />
A green light means that the helicopter is ready for fl ight. If the control LED changes to RED during fl ight, the battery is too weak and needs to be recharged.<br />
English<br />
Distance 2 m<br />
2. TRIMMING:<br />
Correct trimming is crucial for ensuring that the helicopter fl ies smoothly. It is easy to do, but does require a little patience and a light touch.<br />
Please follow these instructions carefully: Slowly move the throttle stick up to raise the helicopter to an altitude of about 0.5 metres to 1 metre.<br />
If the helicopter spirals to the left<br />
or right, or keeps turning slowly<br />
to the left or right<br />
If the helicopter spins or<br />
rotates slowly on its own<br />
axis<br />
If the helicopter keeps moving<br />
forward or backward quickly<br />
or slowly<br />
If the helicopter drifts quickly or slowly to the left, turn the lower<br />
right trim dial gradually to the right. If the helicopter moves to the<br />
right, turn the trim dial gradually to the left.<br />
If the helicopter spins or rotates slowly to the left on its own axis,<br />
turn the lower left trim dial gradually to the right. If the helicopter<br />
turns to the right, move the trim dial gradually to the left. Checking<br />
roll trim may also help resolve these problems.<br />
If the helicopter keeps moving forward quickly or slowly, turn the<br />
upper right trim dial gradually down. If the helicopter moves down,<br />
turn the trim dial gradually upward.<br />
3. FLIGHT CONTROL:<br />
The following information describes the individual functions of the control sticks on a mode 2 controller (throttle on left side). Please note that the position of the sticks is different to those on a mode 1<br />
controller (throttle on right side). All of these functions should be used to ensure that the helicopter fl ies dynamically.<br />
Mode 2 (throttle on left side) CONTROL REVERSE SWITCH SETTINGS<br />
Mode 1 (throttle on right side)<br />
5<br />
3<br />
1<br />
7<br />
1<br />
3<br />
3<br />
1<br />
6<br />
4<br />
2<br />
8<br />
7<br />
8 5<br />
6 5<br />
6 7<br />
8<br />
2<br />
4<br />
4<br />
2<br />
The control reverse switch enables you to change the settings controlling<br />
the direction of the individual controls. However, we recommend that you<br />
retain the default settings.<br />
8
1<br />
To take off or gain altitude,<br />
carefully move the throttle<br />
stick forward.<br />
To land or descend, move<br />
the throttle stick backward.<br />
The stick only needs to<br />
be moved very slightly to<br />
ensure smooth fl ying.<br />
2<br />
3<br />
To move forward,<br />
carefully push the<br />
right stick forward.<br />
To move backwards,<br />
carefully pull the right<br />
stick back.<br />
English<br />
4<br />
5<br />
To fl y to the left, carefully<br />
push the right stick to the<br />
left, provided that the tail<br />
of the helicopter is pointing<br />
towards the pilot.<br />
6<br />
To fl y to the right, carefully<br />
push the right stick to the<br />
right, provided that the tail<br />
of the helicopter is pointing<br />
towards the pilot.<br />
To rotate the helicopter to<br />
the left, move the left stick<br />
7 to the left.<br />
8<br />
To rotate the helicopter<br />
to the right, move the left<br />
stick to the right.<br />
Safety Tips<br />
4. GENERAL FLYING TIPS: 5. SUITABLE FLIGHT LOCATIONS:<br />
• Always place the helicopter on a fl at surface. An uneven surface may affect the helicopter’s take-off.<br />
• Always move the controls slowly and gently.<br />
• Always look at the helicopter and not at the controller!<br />
• As soon as the helicopter leaves the ground, lower the throttle stick slightly. Adjust the throttle as<br />
necessary to maintain altitude.<br />
• Gently push the throttle stick up if the helicopter loses altitude.<br />
• Gently push the throttle stick down if the helicopter gains altitude.<br />
• To turn the helicopter, the direction stick usually only needs to be moved very slightly in the<br />
corresponding direction. Most fi rst-time fl yers initially tend to over-steer. Always handle the<br />
direction sticks slowly and gently. Avoid fast and jerky movements.<br />
• After adjusting trimming settings, beginners should practice using the throttle stick correctly. There is<br />
no need to keep the helicopter fl ying straight at the start – it is more important that you learn how to<br />
maintain a constant altitude of about 1 metre above the ground by slightly moving the throttle stick.<br />
Once you are able to do this, move on to practicing fl ying to the left and right.<br />
• Do not fl y the helicopter if any parts are damaged. We recommend carrying out regular inspections.<br />
Only use original spare parts. (Online tips and tricks)<br />
• Check the helicopter before every start. Damaged parts may lead to loss of control while fl ying.<br />
Choose a location that meets the following criteria:<br />
1. The helicopter can be fl own outdoors if there is no wind. There should also be little air movement if<br />
you are fl ying the helicopter indoors. Do not fl y in spaces equipped, for example, with heating or air<br />
conditioning systems that cause air movements.<br />
2. Only fl y in spacious areas that are free of obstacles.<br />
3. Before take-off, ensure that all animals and people, including the pilot, are at least 1-2 metres away<br />
from the helicopter.<br />
4. Always watch the helicopter to prevent it from fl ying into the pilot, other people or animals, or causing<br />
any other damage.<br />
IMPORTANT!<br />
Since 2005, model airplanes and helicopters that can fl y higher than 30 metres must be insured.<br />
Contact your private liability insurer to fi nd out if your new and old models are covered. Ask for written<br />
confi rmation and keep this in a safe place.<br />
Operating Tips<br />
• After a “crash landing”, immediately move the controller’s throttle stick to the down position to prevent<br />
damage to electronics and the rotor blades.<br />
• Turn off the controller and remove the battery from the helicopter before carrying out repairs or working<br />
on the helicopter.<br />
Replacing the Landing Skid<br />
1. First of all, examine the position of the fuselage fi xing pin. Then remove the pin.<br />
2. Click the landing skid out of its holder (use fl at-nose pliers if necessary).<br />
3. Insert a new landing skid in the holder and replace the fi xing pin in the fuselage.<br />
9
Replacing Rotor Blades<br />
If the helicopter’s rotor blades are damaged and need to be replaced, switch the controller to OFF and remove the connector from the helicopter battery. Proceed as follows:<br />
1. Use a Phillips head<br />
(cross-head) screw driver and<br />
carefully remove the screws<br />
holding the rotor blade.<br />
2. Carefully remove the rotor<br />
blade from the fi xture.<br />
3. Carefully insert the new rotor blade in the fi xture and<br />
replace the screw. Note: Do not screw in too tightly.<br />
There should be a certain amount of tolerance for the<br />
rotor blade.<br />
English<br />
If the helicopter’s fuselage is damaged and needs to be replaced, switch the controller to<br />
OFF and remover the connector from the helicopter battery. Proceed as follows:<br />
Replacing the Fuselage<br />
1. Remove all rotor blades from the helicopter as described above.<br />
2. Remove the stabilizer from the fi xture. To do this, use a Phillips head (cross-head)<br />
screwdriver to prise open the fi xture (pic. 1).<br />
3. Open the couplings (pic. 2).<br />
4. First of all, examine the position of the fuselage fi xing pin. Then remove the pin (pic. 3).<br />
5. Now carefully lift the fuselage off the helicopter (pic. 4).<br />
6. Place the new fuselage on the helicopter and reassemble all parts in reverse order.<br />
pic. 1<br />
pic. 2<br />
pic. 3 pic. 4<br />
Troubleshooting<br />
Safety Tips<br />
Problem: The rotor blades are not turning.<br />
Problem: The radio controller is not<br />
working correctly.<br />
Problem: The helicopter cannot be controlled<br />
using the radio controller.<br />
Cause: • The battery cable is not attached.<br />
• The battery is too weak or dead.<br />
Cause: • The ON/OFF switch is set to “OFF”.<br />
• The batteries were inserted incorrectly.<br />
• The batteries are too weak. (Control LED is red)<br />
Cause: • The radio controller is set to “OFF”.<br />
• The battery cable is not attached.<br />
Solution: • Connect the battery cable.<br />
• Charge the battery (refer to the “Charging the helicopter<br />
battery” section).<br />
Solution: • Switch on the device again as described.<br />
• Check whether the batteries are inserted correctly.<br />
• Insert new batteries.<br />
Solution: • Set the radio controller to “ON”.<br />
• Connect the battery cable.<br />
Problem: The helicopter does not take off.<br />
Cause: • The rotor blades are turning too slowly.<br />
• The battery is too weak.<br />
Solution: • Push the throttle stick forward.<br />
• Charge the battery (refer to the “Charging the helicopter<br />
battery” section).<br />
Problem: The helicopter slows during flight<br />
for no apparent reason and drops.<br />
Cause: • The battery is too weak. (Control LED is red)<br />
Solution: • Charge the battery (refer to the “Charging the helicopter<br />
battery” section).<br />
Problem: The helicopter lands too quickly.<br />
Cause: • Loss of throttle control.<br />
• Throttle pulled down too quickly.<br />
Solution: • Pull the throttle down slowly.<br />
Problem: Helicopter control settings<br />
are reversed.<br />
Cause: • The control reverse switch has been adjusted.<br />
Solution: • Reset the control reverse switch to<br />
the default settings.<br />
For further tips and tricks go to www.revell-control.de.<br />
Service information<br />
Go to www.revell-control.de for ordering information and tips on replacing spare parts, plus other useful information<br />
on all Revell Control models.<br />
www.revell-control.de<br />
10
Seite 1 von 2<br />
24076 24077<br />
Ersatzteile für Single Rotor Helikopter 24076 oder 24077<br />
Art-Nr. Ersatzteilbezeichnung Bild bestellbar<br />
bestellbar ab<br />
nicht mehr<br />
lieferbar<br />
Unverbindliche<br />
Preisempfehlung<br />
pro Stück<br />
Benötigte Anzahl<br />
44303<br />
Trägerplatte / Main frame<br />
==> 24070, 24071, 24072, 24073, 24076 & 24077<br />
10,00 €<br />
44304<br />
Hauptmotor / Main motor A<br />
==> 24070, 24071, 24072, 24073, 24076 & 24077<br />
11,00 €<br />
44306<br />
Zahnrad mit Zubehör / Gear with access.<br />
für Art.-Nr. 24070, 24071, 24072 und 24073<br />
10,00 €<br />
44307<br />
Taumelscheibe / Swashplate<br />
==> 24070, 24071, 24072, 24073, 24076 & 24077<br />
11,00 €<br />
44318<br />
44321<br />
44322<br />
44323<br />
44325<br />
44329<br />
44330<br />
44331<br />
Kugellager Set / Bearing set (4*8*3)<br />
==> 24070, 24071, 24072, 24073, 24076 & 24077<br />
LiPo 2-C Ladegerät / 2 Cell Balance Charger<br />
==> 24070, 24071, 24072, 24073, 24076 & 24077<br />
LiPo Batterie / Battery 7,4V (900 mAh )<br />
==> 24070, 24071, 24072, 24073, 24076 & 24077<br />
GHz Servo SR Helikopter / Servo<br />
==> 24070, 24071, 24072, 24073, 24076 & 24077<br />
Steckschlüssel / Binding key<br />
==> 24070, 24071, 24072, 24073, 24076 & 24077<br />
Ladeadapter (EU) / Power supply adapter (EU)<br />
==> 24070, 24071, 24072, 24073, 24076 & 24077<br />
Ladeadapter (UK) / Power supply adapter (UK)<br />
==> 24070, 24071, 24072, 24073, 24076 & 24077<br />
Ladeadapter (AUS) / Power supply adapter (Australia)<br />
==> 24070, 24071, 24072, 24073, 24076 & 24077<br />
6,00 €<br />
20,00 €<br />
27,00 €<br />
15,00 €<br />
5,00 €<br />
20,00 €<br />
ohne Abb. 20,00 €<br />
ohne Abb. 20,00 €<br />
Ihren Fachhändler oder unser Service-Team! .<br />
Ersatzteilbestellungen bitte aufgeben über unseren Webshop www.revell-shop.de,<br />
44357<br />
Hue SAR - Rumpf mit Heckmotor / Fuselage with tail motor<br />
==> Art.-Nr. 24076<br />
49,00 €<br />
44358<br />
Snake - Rumpf mit Heckmotor / Fuselage with tail motor ==><br />
Art.-Nr. 24076<br />
49,00 €<br />
44359<br />
Ausgleichhebel für Rotorkopf / Balanced lever<br />
==> 24076 & 24077<br />
10,00 €<br />
44360<br />
Kupplungen Rotterkopf / Swash linkage<br />
==> 24076 & 24077<br />
9,00 €<br />
Revell GmbH Co. KG<br />
RC-Ersatzteilliste für SR Helikopter 24076 u 24077_ UP20110426
Seite 2 von 2<br />
Ersatzteile für Single Rotor Helikopter 24076 oder 24077<br />
Art-Nr. Ersatzteilbezeichnung Bild bestellbar<br />
bestellbar ab<br />
nicht mehr<br />
lieferbar<br />
Unverbindliche<br />
Preisempfehlung<br />
pro Stück<br />
Benötigte Anzahl<br />
44361<br />
GHz SR Heckmotor / Tail motor<br />
==>#24076 & 24077<br />
17,00 €<br />
44362<br />
Zahnrad mit Außenschaft / Gear with shaft A<br />
==> Art.-Nr. 24076 & 24077<br />
11,00 €<br />
44363<br />
Kupplungen Taumelscheibe / Bell link<br />
==> 24076 & 24077<br />
6,00 €<br />
44365<br />
Schrauben für Rotorblatthalterung / Blade grip srew<br />
==> Art.-Nr. 24076 & 24077<br />
3,00 €<br />
44366<br />
44367<br />
44369<br />
44370<br />
Untere Rotorkopf / Main shaft mount<br />
==> Art.-Nr. 24076 & 24077<br />
Klemmhülse für Außenschaft / Outer shaft collar<br />
==> Art.-Nr. 24076 & 24077<br />
Rotorblatthalterungen / Blade grip set<br />
==> Art.-Nr. 24076 & 24077<br />
Rotorblätter SR / Plastic blades SR<br />
==> Art.-Nr. 24076 & 24077<br />
10,00 €<br />
5,00 €<br />
7,00 €<br />
11,00 €<br />
44371 Stabilisator SR / Stabilizer SR ==> Art.-Nr. 24076 & 24077 11,00 €<br />
44372<br />
44373<br />
GHz Empfänger SR / GHz Receiver SR<br />
==> Art.-Nr. 24076 & 24077<br />
Schrauben Set / Hardware Set SR Helicopter<br />
==> Art.-Nr. 24076 & 24077<br />
79,00 €<br />
4,00 €<br />
44374 GHz 2.4 SR Controller Mode 1 ==> Art-Nr. 24076 & 24077 79,00 €<br />
Ihren Fachhändler oder unser Service-Team! .<br />
Ersatzteilbestellungen bitte aufgeben über unseren Webshop www.revell-shop.de,<br />
44375 GHz 2.4 SR Controller Mode 2 ==> Art-Nr. 24076 & 24077 79,00 €<br />
44376 Kufengestell / Landing skid Hue SR ==> 24076 11,00 €<br />
44377 Kufengestell / Landing skid Snake SR ==> 24077 11,00 €<br />
44400 Heckrotor / Tail rotor ==> #24076 & 24077 6,00 €<br />
Farbliche und technische Änderungen bleiben vorbehalten!<br />
Bitte beachten - je nach Nachfrage können bestellbare Artikel kurzfristig auch nicht verfügbar sein. Es gelten daher<br />
grundsätzlich die Verfügbarkeitsangaben gemäß unseres Revell-Shops im Internet. Ebenso gelten die AGB's,<br />
Lieferungs-, Zahlungs- und Rücksendungsbedingungen unseres Revell-Shops für den Kauf von Ersatzteilen.<br />
Diese Informationen sind jederzeit nachzulesen unter: www.shop.revell.de<br />
Revell GmbH Co. KG<br />
RC-Ersatzteilliste für SR Helikopter 24076 u 24077_ UP20110426