P-40 Warhawk 300 ARF - Stanbridges Hobby Shop
P-40 Warhawk 300 ARF - Stanbridges Hobby Shop
P-40 Warhawk 300 ARF - Stanbridges Hobby Shop

Create successful ePaper yourself
Turn your PDF publications into a flip-book with our unique Google optimized e-Paper software.
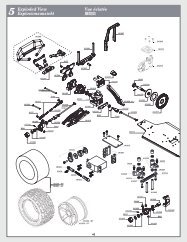
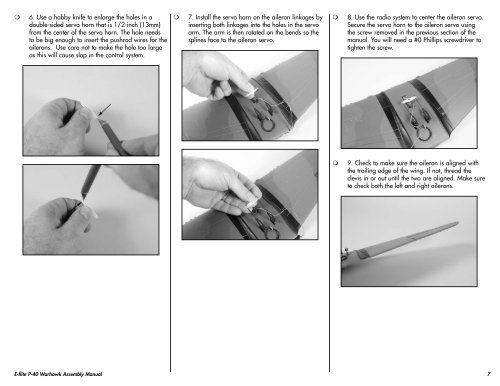
6. Use a hobby knife to enlarge the holes in a<br />
double-sided servo horn that is 1/2-inch (13mm)<br />
from the center of the servo horn. The hole needs<br />
to be big enough to insert the pushrod wires for the<br />
ailerons. Use care not to make the hole too large<br />
as this will cause slop in the control system.<br />
<br />
7. Install the servo horn on the aileron linkages by<br />
inserting both linkages into the holes in the servo<br />
arm. The arm is then rotated on the bends so the<br />
splines face to the aileron servo.<br />
<br />
8. Use the radio system to center the aileron servo.<br />
Secure the servo horn to the aileron servo using<br />
the screw removed in the previous section of the<br />
manual. You will need a #0 Phillips screwdriver to<br />
tighten the screw.<br />
<br />
9. Check to make sure the aileron is aligned with<br />
the trailing edge of the wing. If not, thread the<br />
clevis in or out until the two are aligned. Make sure<br />
to check both the left and right ailerons.<br />
E-flite P-<strong>40</strong> <strong>Warhawk</strong> Assembly Manual<br />
7