
Create successful ePaper yourself
Turn your PDF publications into a flip-book with our unique Google optimized e-Paper software.
<strong>User</strong> <strong>Manual</strong><br />
<strong>Xtreamer</strong> Prodigy Ver.4.0.0
Introduction<br />
Congratulations on your purchase of the <strong>Xtreamer</strong> Prodigy media player, a state-of-the-art<br />
consumer electronic device that will enrich your home multimedia experience.<br />
<strong>Xtreamer</strong> Prodigy is a new generation Realtek based media player equipped with<br />
enhanced top quality hardware commonly used in high-end computing and consumer<br />
electronic solution. It has an additional memory, USB 3.0 slave connection for high-speed<br />
data transfer, GB LAN and can be equipped with one 3.5” HDD.<br />
With <strong>Xtreamer</strong> Prodigy media player you can bring your movies, music and images to your<br />
living room, get rid of that bulky DVD collection and yet enjoy <strong>Xtreamer</strong> Movie Jukebox,<br />
access hundreds of internet feeds and channels, check your favorite online services and<br />
social nets, browse the web, stream from your iOS device via Airplay or DLNA streaming,<br />
use Android applications and so on.<br />
This is the first media player that incorporates the full 3D support. Enjoy a full movie<br />
theater experience at home.<br />
In <strong>Xtreamer</strong> Prodigy we also introduce Android 2.2.1 support opening you to the wide<br />
world of thousands of Android applications.<br />
Using the DVB-T tuner module (pre-installed on <strong>Xtreamer</strong> Prodigy Black) <strong>Xtreamer</strong> Prodigy<br />
supports Digital Broadcasting and has a built-in recording feature.<br />
Due to the rapid development of our product we cannot possibly guarantee that this<br />
Guide will include all its features. So if you have questions please feel free to browse the<br />
<strong>Xtreamer</strong> Knowledge base or contact our staff.<br />
Please make sure to visit our site www.xtreamer.net for the <strong>Xtreamer</strong> news, official<br />
announcements and firmware upgrade.<br />
2
Table of contents<br />
Page 5 – Hard Drive installation and connections<br />
Page 11 – Remote Control Functions<br />
Page 15 – Main Menu and Settings<br />
Page 29 – Basic Functions<br />
Movie, music and image playback<br />
Page 37 – Movie Jukebox<br />
Page 44 – Music Player<br />
Page 50 – Advanced Functions<br />
Internet, Android, Playlists etc<br />
Page 63– Network Setup<br />
Page 67 – NFS Shortcut setup<br />
Page 72 – Settings up Network Shares<br />
Page 95 – Transmission Bit-Torrent client<br />
Page 97 – DVB-T Tuner<br />
Page 106– Android App installation<br />
Page 111– Firmware Upgrade and Emergency Procedure<br />
Page 115– Useful Links
Connections
Hard-Disk Installation<br />
01.<br />
Open the hard disk cover on the<br />
front panel<br />
02.<br />
Connect the HDD guard to an HDD as shown<br />
on the picture. Fasten the screws.<br />
03.<br />
As shown here, slowly and carefully push the HDD<br />
guard together with the HDD into the main body of<br />
<strong>Xtreamer</strong> Prodigy.<br />
6
Connections<br />
Video & Audio Output Connections<br />
ㆍHDMI cable connection<br />
Connect HDMI cable to HDMI terminal at the back of product. Connect the remaining cable<br />
terminal to HDMI terminal at the back of a digital TV. Make sure to carefully distinguish<br />
between input and output terminals.<br />
ㆍComposite cable connection<br />
Connect yellow cable for video signal to the terminal located at the back of side of TV. Then,<br />
select external input of TV. Connect the remaining red and white terminal cables to the left/ right<br />
and audio output terminal at the back of the device. Then, connect red and white cables to the<br />
left/ right terminal of DTV input or component audio input located at the back of a digital TV.<br />
7
Connection<br />
ㆍComponent cable connection<br />
Connect the green, blue and red terminal cables to the <strong>Xtreamer</strong> Prodigy and TV in accordance with<br />
the color scheme; connect white AV cable to L terminal, and red AV cable to R terminal.<br />
(Component cable is an optional item)<br />
8
Connection<br />
ㆍOptical cable connection<br />
You can enjoy high-quality 5.1CH sound when connected to an amplifier or a receiver with<br />
optical cable. Connect optical cable to Optical port on <strong>Xtreamer</strong> Prodigy as shown above. Then,<br />
connect to an amplifier or a receiver. ( Optical cable is optional )<br />
ㆍCoaxial cable connection<br />
You can enjoy high-quality 5.1CH sound when connected to an amplifier or a receiver with<br />
coaxial output cable. Connect coaxial cable to coaxial port on <strong>Xtreamer</strong> Prodigy as shown above. Then,<br />
connect to an amplifier or a receiver. ( Coaxial cable is optional )<br />
9
Connection<br />
Connect to the Network<br />
ㆍWired and Wireless Network<br />
Wireless IP Sharing Router<br />
To set up your network connection please check the Settings guide below.<br />
To setup shared folders on your local network, please refer to this online guide or check<br />
a dedicated section below.<br />
10
Remote Functions
Remote Control Functions<br />
12
General Remote Control Functions<br />
1 POWER Power on / off<br />
2<br />
3<br />
4<br />
Record (DVB-T Tuner module required)<br />
Page mode in browser, special functions<br />
Bookmarks, playlist, special functions, access TV channels in DVB<br />
5 Address bar input, special functions<br />
6<br />
Special functions, playlist operations<br />
7<br />
8<br />
9 ADD Add<br />
10 EJECT Eject for DVD<br />
11 DELETE Delete<br />
12 ZOOM<br />
To enlarge and reduce screen/ repeatedly pressing for adjusting<br />
zooming percentage/moving to position of enlarged output by using<br />
direction keys./ Setup the X,Y position on screen<br />
13 GOTO<br />
To select file in the same title or to execute shortcut to the already<br />
designated chapter position/shortcut to the desired time position<br />
14 MENU<br />
15 SETUP<br />
Opens a list of available functions in Media Library and during<br />
playback, allows access to DVD menu.<br />
Function available when playing media file or using menu’s in<br />
VIDEO IN screen to display various setup screens<br />
16 FUNC Opens a list of available file functions in Media Library<br />
17 TVOUT<br />
Toggle Video Output Modes and resolution (HDMI, AV) - double<br />
press<br />
18 REFRESH Refreshes the lists<br />
19 PREVIEW<br />
20 BOOKMARK<br />
21 INFO<br />
To turn on/ off preview screen automatically displayed in media play<br />
file search mode<br />
Supports adding a file to bookmark and to show bookmark lists<br />
To display the current status function available while playback /<br />
Open information of the movie playing<br />
13
General Remote Control Functions<br />
22 RETURN Return to previous screen<br />
23<br />
NAVIGATION<br />
KEYS<br />
To move the cursor and select files<br />
24 ENTER<br />
25 PLAY/PAUSE<br />
To confirm selection / play. When used to play a file toggles singlefile<br />
playback.<br />
To play and pause a selected file. When used toggles consecutive<br />
(file-by-file) playback.<br />
26 STOP To stop playback<br />
27 HOME To return to the Main Menu.<br />
28 PGUP To move to previous chapter or file (list)<br />
29 PGDN To move to next chapter or file (list)<br />
30 VOLUME Volume adjustment<br />
31 AUDIO Option to change or select multiple audio tracks<br />
32 SUBTITLE Opens Subtitle browser<br />
33 RWD/FWD<br />
1.5x/2x/4x/8x/16x/32x speed, function available in movie files, mp3<br />
as well sound output available in 2x speed<br />
34 SHUFFLE To change play sequence to shuffle<br />
35 REPEAT<br />
To repeat file in play or to repeat all media files in the corresponding<br />
folder<br />
36 A-B To set zone repetition<br />
37 LED Turns On/Off LED part of <strong>Xtreamer</strong><br />
38 SLEEP Can be used to set the timer to turn off the player<br />
39 16:9 Screen shifts into 16:9/16:10/4:3 ratio during playback<br />
40 ANGLE Used if Angle is supported in a DVD file.<br />
41 MUTE Mutes the sound<br />
42 NTSC Change output to NTSC<br />
43 PAL Change output to PAL<br />
44<br />
SYNC<br />
SUBTITLE<br />
Adjust subtitle files to synch with a movie file(100ms/ 0.1sec)<br />
45 EJECT Eject disc<br />
46 TITLE Go to title menu (DVD-Video)<br />
47 URL<br />
48 SEARCH<br />
This function will be supported in the future.<br />
This function will be supported in the future.<br />
14
Main Menu and Settings
Main Menu<br />
Favorites<br />
Under FAVORITES you can find the shortcuts to the files and folders you<br />
added to your Favorites list as well as the playlists you created<br />
History<br />
HISTORY tab gives you a quick access to the Recently Played and Recently<br />
Added files.<br />
Media Library<br />
MEDIA LIBRARY is your getaway to the contents of your local storage and<br />
the network, as well as the <strong>Xtreamer</strong> Movie Jukebox and the new Music<br />
Player<br />
Android<br />
ANDROID tab is your conduit to the wide and exciting world of Android OS<br />
with its tens of thousands of applications.<br />
Enjoy advanced web browsers, file managers, Internet Radio, online feeds<br />
and channels, reading documents, browsing Google maps and a more.<br />
Download and install new apps.<br />
App<br />
APP screen give you access to the built-in Internet applications and the<br />
Web-Browser as well as Shoutcast radio stations, xLive and other RSS-based<br />
projects. DVB getaway to the digitally broadcasted channels is in this tab<br />
also.<br />
Settings<br />
And finally SETTINGS which are very intuitive and user-friendly and allow<br />
you to easily configure your device to suit all your multi-media needs.<br />
16
Basic Setup<br />
1. Adjusting output mode with TV output and Video output<br />
1. Automatically adjust the TV output mode when connected via HDMI cable.<br />
Cycle through available resolutions.<br />
Remote Control Key: TVOUT<br />
// Press 2 times consecutively<br />
2. . Connect Component / Composite cable<br />
Please note that video might suffer when connected via analogue.<br />
Remote Control Key: TVOUT<br />
// Press 2 times consecutively<br />
Different regions use different output standards:<br />
-- PAL(B) : HDMI Auto, 576P 50Hz, 720P 50Hz, 1080i 50Hz, 1080P 50Hz<br />
Europe, South Africa, Middle East, China, Austria, India<br />
-- NTSC : HDMI Auto, 480P 60Hz, 720P 60Hz, 1080i 60Hz, 1080P 60Hz<br />
Korea, Japan, US, Canada, Taiwan, Philippines, Colombia<br />
2. Select OSD language menu (default : English)<br />
Select the OSD language.<br />
Setting Look and Feel Menu Language Select<br />
3. Select Subtitle\ID3-Tag encoding(default : Unicode(UTF8) )<br />
Select the subtitle code.<br />
Setting Look and Feel Text Encoding Select.<br />
4. Select Audio Output.<br />
Select the audio setting according to your audio system.<br />
HDMI Outut<br />
Setting Audio HDMI Output Select<br />
SPDIF Output<br />
Setting Audio SPDIF Output Select<br />
17
Settings<br />
Video<br />
TV System<br />
You will be able to select proper display resolution and video output type.<br />
PAL (B) (50Hz)<br />
NTSC (60Hz)<br />
Display<br />
Resolution<br />
Europe, Greenland, South Africa, the Middle East, China, Austria, India, Indonesia.<br />
Korea, the USA, Japan, Canada, Taiwan, the Philippines, Colombia.<br />
HDMI Auto / NTSC / PAL / 480P / 576P / 720P 50Hz / 720P 60Hz / 1080i 50Hz / 1080i 60Hz /<br />
1080P 50Hz / 1080P Supported.<br />
※ In some cases, display resolution on your TV can not be supported due to inactivity; therefore,<br />
you should check your TV specification.<br />
1080P 24Hz<br />
This feature allows you 1080P 24Hz output when playing Blu-ray files (BD); however, this function is<br />
only available when <strong>Xtreamer</strong> is connected using a HDMI cable to a TV that supports 24Hz frame rate.<br />
Note for 1080p 24p<br />
- TV, AV amp and media file you use must support 1080P 24Hz and your media file should be<br />
encoded 1080P 23.976fps.<br />
- If video isn’t properly played by selecting *ON+, you will be required to select *Off+.<br />
- The initial TV screen can be flickering when you switch on “1080P 24Hz” mode<br />
18
Settings<br />
Video<br />
Aspect Ratio<br />
You will be able to select Aspect Ratio type of movie screen for playback.<br />
PanScan 4:3<br />
LetterBox 4:3<br />
16:9 Ratio converted to 4:3 Ratio is referred to as high definition TV. It will reduce<br />
scan lines to 4:3.<br />
16:9 Ratio converted to 4:3 Ratio is referred to as your TV. It will decompress image<br />
to 4:3.<br />
16:9 Video is fully displayed in 16:9 DVD frame as well as 4:3 Ratio fully displayed.<br />
16:10<br />
It enables you to add letterboxing bars above and below video screen, meanwhile,<br />
your TV maintains its aspect ratio of 16:9, e.g. 16:9=1920x1080 / 16:10=1920x1200.<br />
Brightness<br />
Brightness in video refers to the luminance portion of a video signal. It enables you to use Increase Brightness<br />
and Decrease Brightness commands by pressing [SETUP] button on your remote during playback.<br />
Contrast<br />
Allow you to adjust video contrast when using Increase Contrast and Decrease Contrast commands by pressing<br />
[SETUP] button on your remote during playback.<br />
Hue<br />
This option provides how to use the Hue adjustment to enhance your colors. Along the way, you will be able to<br />
use Increase Hue and Decrease Hue commands by pressing [SETUP] button on your remote during playback.<br />
Saturation<br />
This feature, saturation is one of three coordinates in the HSL and HSV color spaces. It enables you to use<br />
Increase Saturation and Decrease Saturation commands by pressing [SETUP] button on your remote while<br />
playback.<br />
19
Settings<br />
Audio<br />
HDMI Output<br />
Select a desired configuration for your digital audio output.<br />
SPDIF output<br />
Select a desired configuration for your optical audio output.<br />
Night Mode<br />
Off<br />
On<br />
Outputting raw sound.<br />
It provides high-definition audio that is identical to, and every bit as spectacular as, the master<br />
recording. In spite of decreasing volume, you will be able to experience incredible surround<br />
sound that puts you right in the middle of the action without disturbing others.<br />
Comfort<br />
You will be able to hear every tiny sound in rich detail as well as comfortable sound<br />
levels solely for you.<br />
Lip Sync<br />
Audio and video synchronization options.<br />
20
Settings<br />
Network<br />
Set up Wired or Wireless Network<br />
On the Settings -> Network screen you can setup your <strong>Xtreamer</strong> Prodigy to connect to your home network.<br />
You can use Wired or Wireless connection and give your <strong>Xtreamer</strong> a specific name under which it will appear on your<br />
Network.<br />
Refer to the dedicated section of this guide (or refer to this article) for setting up network on <strong>Xtreamer</strong> Prodigy.<br />
Accessing your Computer<br />
Please note that in order to access your home computer you will need to set up Shared folders.<br />
Check the dedicated section below.<br />
If you want learn how to setup shortcuts to NFS shares on <strong>Xtreamer</strong> Prodigy, please refer to the dedicated section ( refer<br />
to this guide).<br />
21
Settings<br />
System Configuration<br />
Time Zone<br />
Time zone selected time zone of <strong>Xtreamer</strong>. Select your time zone.<br />
HDD Format<br />
This feature supports internal HDD format function. Formatted file system is divided into Linux Swap<br />
partition and NTFS partition. By auto formatting, Linux swap partition is an independent section of hard<br />
disk used solely for swapping. The swap space is the amount of virtual memory available.<br />
Screen Saver Timing<br />
This is to set the time for automatic changing images on your screen during periods of user inactivity.<br />
BD-Lite Menu<br />
This feature toggles limited BD menu when playing a BD ISO file.<br />
Restore Default<br />
This option restores your player to the factory defaults. It will clear all the personal settings including<br />
passwords, favorites, custom skins etc.<br />
- Using this option will not damage the data on your HDD<br />
-Always reset your settings after a firmware upgrade<br />
22
Settings<br />
System configuration<br />
DVD Autoplay<br />
The feature allows you to select automatic DVD play mode when inserting a DVD disk<br />
into the DVD ROM connected to your player via USB port<br />
.<br />
OFF<br />
DVD Disk isn’t automatically played<br />
ON<br />
DDVD Disk is automatically played.<br />
Screen size<br />
Press ENTER button to adjust your video output to the size of your TV<br />
Parental Control<br />
This feature allows you to protect sensible information by assigning a password to<br />
folders.<br />
Default password: 0000<br />
23
System Service<br />
Settings<br />
NAS - Network Drive(SAMBA)<br />
Allows you to use your player as a NAS device on your network.<br />
NAS network drive provides storing and copying files services.<br />
Please note that currently on Mac OS systems you will need to use NFS Shares<br />
AutoPlay<br />
Enable if you want the device to automatically play files from the AUTOPLAY folder on your hard<br />
drive.<br />
DLNA DMR<br />
This option enables DLNA service.<br />
Airplay<br />
Enable to stream videos (Youtube) and images from your iOS device to a TV via <strong>Xtreamer</strong> player.<br />
Android<br />
You can disable Android services if you want to dedicate all the device’s resources to playing media files.<br />
Transmission<br />
Popular torrent client that can work on multiple operating systems.<br />
<strong>Xtreamer</strong> Live<br />
Enable to install a community compilation of live feeds and internet TV channels.<br />
xListnPlay Music<br />
Installs the community based project for YouTube music mixes.<br />
MiniDLNA<br />
This function allows you to use your device as a DLNA server.<br />
Note<br />
If an option is not frequently used we recommend disabling it to reserve the memory and for security<br />
reasons.<br />
24
Settings<br />
Firmware Upgrade<br />
Upgrading your Firmware<br />
Under System Firmware you can see your current firmware version.<br />
You can download the latest firmware file from our main site and install it <strong>Manual</strong>ly.<br />
Check below for details.<br />
PLEASE NOTE: Before updating your device please check the update page on the <strong>Xtreamer</strong> main site.<br />
If the recommended procedure is different from the one in the guide, Follow The Procedure On The<br />
Upgrade Page.<br />
IMPORTANT<br />
Every <strong>Xtreamer</strong> media player has its own specific firmware. Please make sure you download the correct file<br />
before running the upgrade procedure.<br />
Emergency Firmware<br />
Emergency firmware can be a great help for de-bricking an unresponsive unit and fixing various problems.<br />
The procedure can be found here.<br />
25
Settings<br />
Look and Feel<br />
Menu Language<br />
You can specify UI language and enjoy operating the <strong>Xtreamer</strong> in you native language.<br />
Text Encoding<br />
You can specify the language used in subtitle files and ID3-tag in Mp3 files. Unicode [UTF-8] is an industry<br />
standard, and is set as default . If you are not using Unicode encoded files, select your preferred language.<br />
Resume Play<br />
You can begin playing <strong>Xtreamer</strong> from the point where you previously stopped it. Your system saves a<br />
record of the scene that was playing when you stopped playback so it knows where to resume playing.<br />
Key Tone Volume<br />
Use this option to regulate the sound the player makes when you are pressing the remote buttons.<br />
Default Font<br />
Use this option to upload a custom font.<br />
26
Settings<br />
Search and Indexing<br />
Easily find your Media files<br />
Scan your local storage for media files on your local storage devices in order to be able to find them easily<br />
in the Media Library.<br />
Use Automatic scan or press Rescan Storage to manually update the database.<br />
Note: When Auto scan is enabled the player might take some additional time loading the system.<br />
27
DVBT<br />
Settings<br />
TV Region<br />
Specify your location for the scan.<br />
Channel Scan<br />
Choose auto or <strong>Manual</strong> method to scan for channels available at your location.<br />
Recording Device<br />
Set the device where the recorded files will be saved (HDD or USB storage).<br />
REC Priority<br />
Specify the priority order for <strong>Manual</strong> vs Scheduled recordings<br />
28
Basic Functions
Media Library<br />
Using Media Sources<br />
General remote functions in the Media Library<br />
Cursor keys – use them to navigate the Media sources.<br />
ENTER – to make a selection or to play a file.<br />
MENU (6) – open a list of viewing options, file filtering, 3D playback functionality, Add to favorites feature,<br />
setup NFS shares, slideshow timing and effects, background music for image viewing and much<br />
more.<br />
FUNC – this key provides you with the function of a file manager, setting passwords to folders and creation<br />
of playlists.<br />
RETURN – returns to the parent directory or the main screen<br />
HOME – returns you to the main menu.<br />
30
Play Movies<br />
Most control buttons are the same as everywhere else: Play, Pause, Stop, Fast-Forward, Next and so on.<br />
Info button opens an time-bar with a relevant information about the file you are playing (see the picture<br />
above)<br />
While watching a movie press MENU (6) to open a list of options including an access to subtitles browser,<br />
GOTO menu, repeat options, audio channels and, in relevant cases, a 3D options menu.<br />
31
Play Movies<br />
You can use LEFT and RIGHT cursor to skip – press ENTERT to jump to a desired location.<br />
ZOOM button to enlarge the picture.<br />
Audio button is used to switch between different audio channels and tracks.<br />
32
Play Movies<br />
Subtitles button will open the subtitles browser that will allow you to customize the way your subtitles<br />
look on TV and switch the subtitles file if needed. It allows you to open an external file, change the color or<br />
the font, outline, change the size and encoding etc.<br />
GOTO button provides additional options for navigation.<br />
1. Title: It shows movie title lists and change playback file.<br />
2. Chapter: It provides moving to next (or previous) Chapter.<br />
3. Time: It provides moving to the point where you want to start from.<br />
33
Play Movies. 3D playback<br />
<strong>Xtreamer</strong> Prodigy is the first media player to support full 3D home experience.<br />
Please remember that you might need to enable 3D playback on you TV in order<br />
to enjoy it. Use 3D button on your remote or the TV set.<br />
Use MENU button on <strong>Xtreamer</strong> Prodigy remote for additional options.<br />
34
Play Music<br />
While playing music press MENU (6) to open a list of options including repeat options such as play once,<br />
repeat all and so on.<br />
Press SHUFFLE to toggle random playback.<br />
Start the playback to initiate music jukebox.<br />
You can use Cursor keys to navigate or regular command buttons such as Play, Pause, Fast-forward etc.<br />
Press RETURN to go back to the media library file list.<br />
Please note, that there is a new Music Player available from the Main Menu.<br />
35
Play Photo<br />
Use MENU key to toggle view mode options.<br />
To start a Slideshow open a file (ENTER or PLAY) and press MENU of a list of advanced options.<br />
•You can set up the time intervals your images will be displayed using Slide Timing.<br />
•Slide Transition lets you to setup transition effects<br />
•Background music allows you to specify audio tracks for your Slideshow.<br />
36
Movie Jukebox
<strong>Xtreamer</strong> Movie Jukebox<br />
<strong>Xtreamer</strong> Movie Jukebox is a unique application that will allow you to enhance your<br />
enterntainment experience and provide you with the full functionality that, as a rule, exists only on<br />
HTPC and PC computers.<br />
Movie Jukebox mechanism means that you will be able to navigate your media collection on a<br />
content orientation rather than only storage path related navigation.<br />
Please note:<br />
•Local storage is required for saving the system files.<br />
•Internet connection is required.<br />
38
<strong>Xtreamer</strong> Movie Jukebox<br />
Please note that you will need to prepare your Media Library before using the full Movie Jukebox<br />
functionality.<br />
The Jukebox needs a correct file (movie) name in order to fetch the information from a server.<br />
We recommend you to go over your media library and movies folders and perform 2 tasks<br />
(1) Rename your movies to english names and give each movie a simple name<br />
Example : Avatar (2010) , Battleship (2010) etc<br />
(2) Create a separate folder for each movie.<br />
You can use this wonderful little utility to do this : Auto Folder Maker<br />
39
<strong>Xtreamer</strong> Movie Jukebox<br />
In order to fetch the movie information and poster from the Internet, select a folder with movies or<br />
any movie file on the device.<br />
In the Media sources library press 6 (Menu) to GET MOVIE INFO<br />
Choose the Scraper and Movie Poster plugins and press Search.<br />
The system then will scan your files and fetch the information from the online sources.<br />
40
<strong>Xtreamer</strong> Movie Jukebox<br />
Please note that, if the information scraped by the Jukebox is not correct you can always adjust it<br />
by pressing 6 on the remote and choosing Get Movie Info.<br />
Navigate to Title using the cursor keys and press OK to adjust the name of the movie and search<br />
again.<br />
41
<strong>Xtreamer</strong> Movie Jukebox<br />
Once the process is complete you can access your movie library from the Main Menu.<br />
Enter Media Library -> Jukebox Movie and you will be able to choose various viewing options.<br />
Press 2 to toggle various modes.<br />
42
<strong>Xtreamer</strong> Movie Jukebox<br />
To delete a movie from the Jukebox, please press 8<br />
43
Music Player
<strong>Xtreamer</strong> Music Player<br />
<strong>Xtreamer</strong> Music Player is more of a music jukebox actually that provides a wide variety of<br />
functions, including enhansed features, main sreen widget and ability to find and play YouTube<br />
clips within the player and much more.<br />
Please note:<br />
•The player currently works with local storage only.<br />
•You need to access the Music Player from the main menu. Pressing on a music file within the<br />
Media Library will initiate the old player application.<br />
45
<strong>Xtreamer</strong> Music Player<br />
You can access the player directly from the Main Menu<br />
Simply naviage to Media Library -> Music Player<br />
Then navigate the local media to your Music files.<br />
46
<strong>Xtreamer</strong> Music Player<br />
Should you return to the Main Menu you will see the Music Player widget.<br />
47
<strong>Xtreamer</strong> Music Player<br />
Press 1 to bring up the Playlists and press 2 to search for the corresponding YouTube video<br />
Choose a YouTube clip, press OK to start player.<br />
To return to the player file list press RETURN key.<br />
48
<strong>Xtreamer</strong> Music Player<br />
MENU (6) key will bring up the options.<br />
You can search for YouTube clips, change viewing modes, set cover art, edit ID3 tags, search,<br />
sort, fliter, create playlists, add to favorites etc.<br />
49
Advanced Features
Displaying Cover art<br />
In Media Sources (the library) the corresponding image files stored in the file folders will be displayed if the<br />
Preview or Thumbnail modes are activated.<br />
Same the cover art file as folder.jpg in a relevant folder.<br />
For additional information and tips please refer to this article.<br />
51
Creating a playlist<br />
You can use self-made M3U playlists on <strong>Xtreamer</strong> Prodigy. Just make sure that the paths are relative.<br />
You can also setup and save multiple playlists via <strong>Xtreamer</strong> user interface.<br />
Press FUNC button while in media library and choose Multiple Select<br />
Use the BLUE button to add files to the playlist (or to remove from the list)<br />
Use the BLUE button to add files to the playlist (or to remove from the list)<br />
52
Creating a playlist<br />
Navigate to Save Playlist and press ENTER. Pick a name for your new playlist and press OK.<br />
Now you will be able to play the playlist from the media library.<br />
53
AutoPlay function<br />
If you want your <strong>Xtreamer</strong> to automatically start playing media files after booting, you need to create a<br />
folder called Autoplay in the root of you main local storage device (internal or USB HDD) and copy\paste<br />
the files into the folder.<br />
Then simply enable AutoPlay function in the Settings -> System Service<br />
54
Parental Control<br />
To lock a resource with a password, navigate to a folder and press FUNC (8) key. Choose LOCK<br />
Now the folder can only be accessed from the <strong>Xtreamer</strong> interface using the preset password.<br />
55
Parental Control<br />
To unlock a folder, press FUNC (8), choose UNLOCK and enter the password.<br />
The default password is: 0000. You can change your parental password in the Settings -> System<br />
Configuration.<br />
56
Android on Prodigy<br />
You can use remote or a keyboard and mouse to use Android. Use the BLUE button for the Android option<br />
screen.<br />
Choose a pre-installed application or install your own. Currently we recommend manual installation.<br />
We are constantly testing and will post the our picks on the main site and our forum.<br />
For the guide on Android app installation please refer to a section below.<br />
57
DLNA on <strong>Xtreamer</strong><br />
If you enable DLNA services in the Settings, you will be able to use on your Android or iOS device such<br />
applications as iMediaShare or EyeCon in order to stream to and from your <strong>Xtreamer</strong> player the variety of<br />
local and online content.<br />
58
Web Browser<br />
When you choose Web Browser in the main menu the list of Bookmarks will open. Press LEFT or RIGHT to<br />
navigate and ENTER to load.<br />
When viewing web pages you have two options - Page mode or Navigation mode. You can switch between<br />
the two of them using RED button.<br />
When using Page mode you can move up, down, left and right using the CURSOR buttons. This mode is<br />
essentially used for reading.<br />
Navigation mode allows you to pick links, check boxes, text areas etc. You can follow links, search the Web<br />
or enter personal information to login.<br />
Pressing FUNCTION key takes you to the browsing options menu.<br />
Press ENTER to type in an URL.<br />
The left column on the virtual keyboard screen is used to store the latest Web addresses and logins.<br />
GREEN button takes you to the Bookmarks list.<br />
59
Apps<br />
You can access various internet resources via App section of the Main Menu.<br />
60
Apps<br />
Check out our amazing YouTube application.<br />
And xLive – a wonderful collection of live Internet feeds and channels.<br />
You can find other RSS based projects on our forum (you will need to register) and install them on your<br />
machine.<br />
Many projects are being updated every few days with new content.<br />
61
Apps<br />
Under App you can also find Internet Radio (alternatively, there are some Android applications) – an<br />
amazing way to listen to your favorite music, talks and news.<br />
Check the predefined stations, browse by genres or search. Add stations to favorites.<br />
<strong>Xtreamer</strong> also support PLS format so you can create files to access your own radio stations and play them<br />
from the Media Library. You can download a list of 17,000 stations HERE.<br />
62
Network Setup
Settings Up Network on <strong>Xtreamer</strong><br />
1. Setting up Wired Network<br />
DHCP IP (AUTO)<br />
The Dynamic Host Configuration Protocol DHCP is a networking protocol used to automatically retrieve IP address<br />
assignments through Wired LAN. This feature is set as a default value so that IP address is automatically assigned by RJ45<br />
connecting and rebooting. You need a network router in order to stream files from your PC.<br />
※ IP address of DHCP IP may sometimes be unstable.<br />
STATIC IP (MANUAL)<br />
Static IP is a manual way of obtaining an IP address, and is used for an assigned IP address that does not change often that<br />
being so it will most likely receive the same IP address through Wired LAN. IP will be allocated by users when a fixed IP<br />
address is needed or DHCP server isn’t available.<br />
64
Settings Up Network on <strong>Xtreamer</strong><br />
2. Wireless LAN Setup<br />
1. Choose Wireless Network option.<br />
2. Select [Infrastructure (AP)].<br />
3. Select SSID type (available wireless network), you want to use.<br />
4. Enter correct passkey, and then press [OK].<br />
Note<br />
- Only “Web hex character codes” is supported.<br />
- Web hex encoding supports 64-bit and 128-bit integers capable.<br />
- If you have the problem of unstable wireless network or low speed, check your wireless channels for<br />
optimum signal strength. Changing channel is available through your router.<br />
65
Settings Up Network on <strong>Xtreamer</strong><br />
2. Wireless LAN Setup<br />
5. Navigate to OK button and press ENTER to test the connection.<br />
Device Name<br />
Use this option to give your <strong>Xtreamer</strong> a unique name under which it will appear on your<br />
local Network.<br />
66
NFS Sharing Setup
NFS Share Setup<br />
To setup an NFS share please go to the list of Media Library resources.<br />
Go to NFS and press MENU button<br />
68
NFS Share Setup<br />
Add NFS client<br />
Enter IP address of the relevant device.<br />
69
NFS Share Setup<br />
And the path to the shared folder<br />
70
NFS Share Setup<br />
Press OK to confirm.<br />
The new entry will now be listed under NFS shortcuts in the Media Library.<br />
71
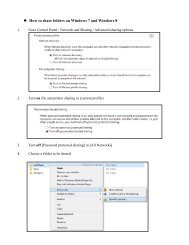
Network Sharing
Network Sharing<br />
How to set-up Folder Sharing in Windows 7<br />
This instruction is for Window 7 Ultimate.<br />
1. Click [Start] – [Control Panel] - [View network status and tasks in Network and Internet].<br />
2. Click [Change advanced sharing settings] on the right side of the screen after appearing Network and<br />
Sharing Centre.<br />
73
How to set-up Folder Sharing in Windows 7<br />
Network Sharing<br />
3. Change sharing options (refer to the above image).<br />
The sharing option needs to be applied in your home or company (Current Profile).<br />
74
How to set-up Folder Sharing in Windows 7<br />
Network Sharing<br />
4. Select a folder you want to share, and click on the right side of mouse, then click [Properties] on pop-up<br />
menu.<br />
Click<br />
5. Click *Sharing+ on tap menu, and then click *Advanced Sharing…+.<br />
75
How to set-up Folder Sharing in Windows 7<br />
Network Sharing<br />
Click<br />
Click<br />
6. Check on [Share this folder], then click [Permissions].<br />
Click<br />
Click<br />
7. Click *Add+ if there is no “Guest” account due to “Everyone” and “Guest” account is needed in order to<br />
Network sharing.<br />
76
How to set-up Folder Sharing in Windows 7<br />
Network Sharing<br />
8. Click [OK] after entering [Guest] (refer to the above image).<br />
Click<br />
9. Click [OK] - [Apply] – *OK+ in order to confirm if “Guest” account is added or not.<br />
(Both Guest and Everyone account must be present).<br />
77
How to set-up Folder Sharing in Windows 7<br />
Network Sharing<br />
Click<br />
10. Plus, add *Guest+ account on Security tap menu, then click *Edit…+ (refer to the above image).<br />
Click<br />
11. Click *Add…+ (refer to the above image).<br />
78
How to set-up Folder Sharing in Windows 7<br />
Network Sharing<br />
12. Click [OK] after typing [Guest] account.<br />
13. Complete setup as confirming “Guest” account added by selecting *OK+ – [Apply] – [OK]<br />
(Both Guest and Account must be present). If there is no “Everyone”, you should add it.<br />
79
Network Sharing<br />
How to set-up Folder Sharing in Windows Vista<br />
This instruction is for Window Visa Ultimate.<br />
1. Click [Start] - [Network] – [Properties].<br />
Click<br />
Click<br />
2. Click [Network discovery] - [Turn on network discovery] and then, click [Apply].<br />
80
Network Sharing<br />
How to set-up Folder Sharing in Windows Vista<br />
Click<br />
Click<br />
3. Click [File sharing] – [Turn on file sharing], and then click [Apply].<br />
Click<br />
Click<br />
4. Important<br />
Click [Password protected sharing] – [Turn off password protected sharing], and then click<br />
[Apply]. Once completed, close the window.<br />
81
Network Sharing<br />
How to set-up Folder Sharing in Windows Vista<br />
Click<br />
5. Move cursor to which folder you want to share and then go to the [Properties] on pop-up menu as clicking<br />
on the right side of mouse.<br />
Click<br />
6. Click [Sharing] – *Advanced sharing…+.<br />
82
Network Sharing<br />
How to set-up Folder Sharing in Windows Vista<br />
Click<br />
Click<br />
7. Check on [Share this folder], then click [Permissions].<br />
Click<br />
8. Click *Add…+ button in order to add “Guest” account.<br />
83
Network Sharing<br />
How to set-up Folder Sharing in Windows Vista<br />
9. Type [Guest], and then click [OK].<br />
Click<br />
Click<br />
Click<br />
10. Once completed, check if there is “Guest” account or not, then *OK+ – [Apply] – [OK].<br />
Click<br />
84
Network Sharing<br />
How to set-up Folder Sharing in Windows Vista<br />
11. Click [Apply] – *OK+ so you will complete adding “Guest” account on sharing tap menu.<br />
Click<br />
12. Confirm if there are both “Guest” and “Everyone” accounts or not on “Security” tap menu.<br />
If there is no “Guest” account, click *Edit…+ (Both accounts should be present).<br />
85
Network Sharing<br />
How to set-up Folder Sharing in Windows Vista<br />
Click<br />
13. Click *Add+ if there is no “Guest” account.<br />
14. Type [Guest] (refer to the above image), then click [OK].<br />
Click<br />
86
Network Sharing<br />
How to set-up Folder Sharing in Windows Vista<br />
15. Check if “Guest” account is correctly added or not, then click *Apply+ – [OK].<br />
16. Click [Close] to set completed.<br />
87
Network Sharing<br />
If folder accessing in window XP isn’t available.<br />
The instruction is subject to there isn’t any problem in Network Sharing<br />
Network Workgroup, Computer’s name, and so on. You, therefore, need to check Security set up part.<br />
Note:<br />
This instruction will be able to have effect on changing value, Network Sharing<br />
registry key correction in system, hence, you must not change other set value, incorrect setting value will be<br />
able to cause serious damage to your system].<br />
1. Click [Start] – [Control Panel] - [Administrative Tools] [Local Security Policy] – [<strong>User</strong> Rights Assignment].<br />
1-1. Everyone, <strong>User</strong>s and Guest must be included in “Access this computer from network”.<br />
1-2. Add Everyone, <strong>User</strong>s and Guest if there is missing one in there.<br />
1-3. If there are Everyone, <strong>User</strong>s and Guest in “Deny Access to this computer form the network”, delete 3 of<br />
these accounts.<br />
1-4. <strong>User</strong>s and Guest must be included in “Log on locally”.<br />
1-5. <strong>User</strong>s and Guest must not be included in “Deny log on locally”.<br />
1-6. everyone and <strong>User</strong>s must be included in “By pass traverse checking”.<br />
2. Click [Start] – [Control Panel] –[Administrative Tools] – [Local Security Policy] – [Security Option].<br />
2-1. Network Security: *Send LM & NTCM responses+ in “Authentication Level”.<br />
2-2. Network Access : *Disabled+ in “Don’t allow anonymous enumeration of SAM accounts and shares”.<br />
3. Click [Start] – [Control Panel] – [Firewall].<br />
3-1. Check on *File and Printer Sharing+ in “Exception” tap menu.<br />
4. Click [Start] – [Control Panel] – [Administrative Tools] – [Services].<br />
4-1. Computer Browser: [Started in Status ] - [Automatic in Startup type].<br />
4-2. Server: [Started in Status ] – [Automatic in Startup type].<br />
4-3. Workstation: [Status Started] – [Startup type Automatic].<br />
5. Click [Start] – [Run] and type [regedit] then click [OK].<br />
5-1 [HKEY_LOCAL_MACHINE] – [SYSTEM] – [Current Control Set] – [Control] –[Lsarestrictanonymous]<br />
“Lsarestrictanonymous” Value must be *0+. If there is no item, which means the value is the same as “0”.<br />
6. Once completed, you should reboot your computer so that setting value can be applied.<br />
88
Network Sharing<br />
How to configure Folder Sharing Permission in Windows XP<br />
This instruction is for Windows XP Professional <strong>User</strong>s.<br />
Click<br />
1. Click [My Computer] – [Tools] – *Folder Options…+.<br />
Click<br />
2. Click *Folder Options…+ – [View] – *Use Simple File Sharing (Recommended)+ in “Advanced settings” – [OK].<br />
※ Use Simple File Sharing (Recommended) must not be selected.<br />
89
Network Sharing<br />
How to configure Folder Sharing Permission in Windows XP<br />
Click<br />
3. Select a folder you want to share in Network, then click [Properties] – [Sharing].<br />
Click<br />
4. Click [Share this folder] – [Permission].<br />
If there is no “Guest” account, click *Add…+ button.<br />
90
Network Sharing<br />
How to configure Folder Sharing Permission in Windows XP<br />
5. Type [Guest], and then click [OK].<br />
Click<br />
6. As you check “Guest” account added, the setting will be completed by clicking *OK+ – [Apply] – [OK].<br />
91
Network Sharing<br />
How to configure Folder Sharing Permission in Windows XP<br />
Click<br />
7. Click [Share permissions] – [Add].<br />
8. Type [Guest] and then, click [OK].<br />
Click<br />
92
Network Sharing<br />
How to configure Folder Sharing Permission in Windows XP<br />
9. As you check “Guest” account added in Security tap, setting will be completed by *Apply+ – [OK].<br />
Tip<br />
You will be able to use this method in order to allow (or block) the access by someone.<br />
93
Network Sharing<br />
You can't access a share on your network<br />
The main reason that you cannot access a network share is that a GUEST account is not enabled on your<br />
system.<br />
In Windows 7 you might experience problems accessing your Network Shares if you have windows Live<br />
Essentials 2011 installed. In this case, try to access the folders via NET (MEDIA SOURCES)<br />
How to display “Guest” account “on” for Windows<br />
For Windows XP,<br />
(1) Select [Start] – [Control Panel] - [<strong>User</strong> accounts]<br />
(2) Change from [Guest accounts is off] to [Guest accounts is on]<br />
For Windows Vista,<br />
(1) Select [Start] – [Control Panel] – [<strong>User</strong> accounts] – [Manage another account]<br />
(2) Click [Guest]<br />
(3) Change from [Guest accounts is off] to [Turn on]<br />
Reboot PC and <strong>Xtreamer</strong>, then you will be able to connect Network.<br />
94
Transmission
If you enable Transmission in the Settings (System Services) you will be able to access it’s Web Interface using<br />
the Prodigy’s internal IP followed by :9091 (for example 192.168.0.2:9091)<br />
The interface is easy to use and is similar to all the most popular bit-torrent clients.<br />
NOTE: Please remember that a media player is not a computer. Do not expect it to handle multi-tasking.<br />
Do not run a torrent client when operating it to run media files.
DVB-T Tuner
The <strong>Xtreamer</strong> Prodigy supports Digital Broadcasting and has a built-in recording feature using<br />
a DVB-T Tuner Module.<br />
You can access it via App tab in the main menu.<br />
With the help of the DVB-T Tuner module you can watch your favorite TV programs, listen to<br />
the local radio stations , check out the programming schedule and, of course, use your<br />
<strong>Xtreamer</strong> Prodigy as a PVR machine.<br />
Please note, you need the DVB-T module installed on your <strong>Xtreamer</strong> Prodigy to use this<br />
feature. <strong>Xtreamer</strong> Prodigy Black comes with the tuner module pre-installed.
In the Settings -> DVB you can scan for available channels, set up storage device for recorded<br />
materials and more.<br />
Choose a country from the list for automatic scanning of TV channels and Radio Stations<br />
available at your location or use the manual scan.
Choose a device to store your recorded files and the priority of the recording processes.
After the scan is complete you can access the TV channels via App tab in the main menu.<br />
Channel List<br />
To access the list of available channels press the Enter button on your remote when watching<br />
TV programs within the DVB. The channel list will be displayed with the channel numbers abd<br />
names. You can edit the names if you wish.<br />
To get the to favorite channel list, press the Right / Left navigation buttons in this menu. You<br />
can add channels to the list of favorites by pressing Right navigation key and choosing the Edit<br />
option.<br />
Info Bar<br />
Press the Info button when watching TV programs, an info bar will be displayed to show the<br />
channel information including rating, language used, subtitles and Teletext if avilable and<br />
resolution.<br />
Electronic Programming Guide<br />
Press the EPG (Green) button on your remote when watching DVB-T TV programs and the<br />
Electronic Programming Guide will be displayed. Here you can get the program list of a whole<br />
day and schedule recordings.
Teletext<br />
If the broadcasted stream supports Teletext, press the TTX button to enter the Teletext menu.<br />
This option is also available from the Side panel.<br />
Subtitle List<br />
Press the Subtitle button when watching DVB-T TV programs, the Subtitle List menu will be<br />
displayed. This option is also available from the Side panel.<br />
One Touch Recording<br />
Press REC button to start the recording, recording files are automatically stored in a folder<br />
named REC by default. Press REC repeatedly to set one touch recording length: 30 MIN. / 60<br />
MIN. / 90 MIN. / 120 MIN. / 180 MIN. / 240 MIN. / Off.<br />
Time Shifting<br />
Time Shift function allows you to pause live TV and resume the program from the point you<br />
left it.<br />
While paused, the program is recorded to the internal HDD as long as the space is available.<br />
Press the TIME SHIFT button to activate the Time Shift function.<br />
Press PLAY button to resume the program.<br />
Time Shift mode remains active until you press the STOP button.<br />
Pause/FF/FR/PREV/NEXT button is available while time shift mode.
Schedule Recording<br />
To enter the Timer list, press RIGHT navigation button when watching TV programs, and<br />
select Schedule Recording from the Side Panel option menu. Here you can Add, Edit, Delete<br />
recording schedules, Change all schedule status and View schedule recording history.<br />
Create a New Schedule<br />
In timer list, press the RECORD button on the remote control to add a new schedule<br />
recording, then the schedule setting screen appears.<br />
Use the Left /Right button on the remote control to move between fields and press the Up /<br />
Down cursor buttons to adjust each setting.<br />
Source<br />
Select the video source or TV channels for the recording.<br />
Start Time<br />
Enter the date and time of the recording.<br />
Length<br />
Enter the length of the recording<br />
Preview<br />
This small preview window will show the current program of the selected channel.
Channel Edit<br />
To enter channel edit menu, press RIGHT button when watching TV programs, and select Edit<br />
from the Side Panel option menu.<br />
In this menu, you can Lock, Delete, Rename, Skip, Swap TV channels and also edit your<br />
favorite TV list. Use Up/Down buttons to select and modify the settings.<br />
Note: A password needed when you try to enter this menu, default is 0000
Android App Installation
Android App Installation<br />
To manually install a new Android application you need to download an .apk file on a SD card, USB stick or<br />
internal drive.<br />
Enter Android home screen<br />
Choose the OI FILE MANAGER from the bar on the bottom<br />
107
Android App Installation<br />
Navigate to a folder with the APK files.<br />
Choose an application to install and press ENTER.<br />
108
Android App Installation<br />
Press INSTALL<br />
109
Android App Installation<br />
Once the application is installed you can press OPEN to start it.<br />
It will also appear<br />
on the main Android screen.<br />
110
Firmware Upgrade
Firmware Upgrade<br />
We constantly working to improve our devices. Firmware upgrades bring new features and fixes and will<br />
make your Prodigy even more interesting and diverse device.<br />
Please check for new releases on our site in the Download section.<br />
Please check the upgrade page on the <strong>Xtreamer</strong> Main site for exact instructions.<br />
Download the firmware file and unzip it into the root of a USB stick. Plug the stick into one of USB ports.<br />
Go to Settings -> Firmware Upgrade and choose Check for Firmware option. The device will automatically<br />
scan the USB stick for firmware files.<br />
Note: We recommend using a stick no bigger than 2GB. Format it FAT32<br />
112
Firmware Upgrade<br />
Once the upgrade file is detected, press OK to start the procedure.<br />
Please be patient, the process takes time.<br />
Once the procedure is finished the Prodigy will reboot.<br />
Make sure to reset your player to factory default settings after a firmware upgrade (Settings -> System<br />
Configuration -> Restore Default).<br />
113
EMERGENCY FIRMWARE<br />
Emergency firmware is used for de-bricking unresponsive devices and fixing<br />
various issues. It is also often use to upgrade the device when installing a<br />
major upgrade.<br />
Please check the upgrade page on the <strong>Xtreamer</strong> Main site for exact<br />
instructions.<br />
1. Download the firmware file from the <strong>Xtreamer</strong> main site.<br />
2. Unzip the file and copy (install.img) it to the root of a FAT32 formatted USB<br />
stick (we recommend a stick no bigger than 2GB).<br />
3. Disconnect all the cables, dongles, antennas, internal and external storage<br />
devices from your Prodigy.<br />
Disconnect it from power for 10-15 minutes.<br />
4. Plug the device into power and insert the USB stick into one of the ports on<br />
the back panel.<br />
5. Make sure the device is OFF and press the Power button on Prodigy for<br />
about 10 sec.<br />
The device LED will initially turn ON and after few sec it will turn OFF.<br />
Once the blue LED is OFF release your finger from the Power button and then<br />
the upgrade process screen will appear on your TV.<br />
(This procedure and can be used to clear personal data and reset passwords)<br />
Please be patient. It might be necessary to try the procedure several times.<br />
You might have to use another USB stick if you are not successful.
Useful Links<br />
Check the Prodigy section on our Knowledge base.<br />
If you are new to the Media Players world you might consider subscribing to the<br />
<strong>Xtreamer</strong>4Dummies channel on Youtube.<br />
Check the download section of our site for firmware updates.<br />
For an updated version of this manual check here.<br />
If you are interested to become a member of the <strong>Xtreamer</strong> community please register on<br />
our forum. You might be interested in tip and opinions of your fellow <strong>Xtreamer</strong> enthusiasts.<br />
You can also find custom applications and mods on the forum.<br />
We publish all the new information and releases on the Forum Highlights page. Visit it first.