About M-400 RCS - Roland Systems Group
About M-400 RCS - Roland Systems Group
About M-400 RCS - Roland Systems Group

You also want an ePaper? Increase the reach of your titles
YUMPU automatically turns print PDFs into web optimized ePapers that Google loves.
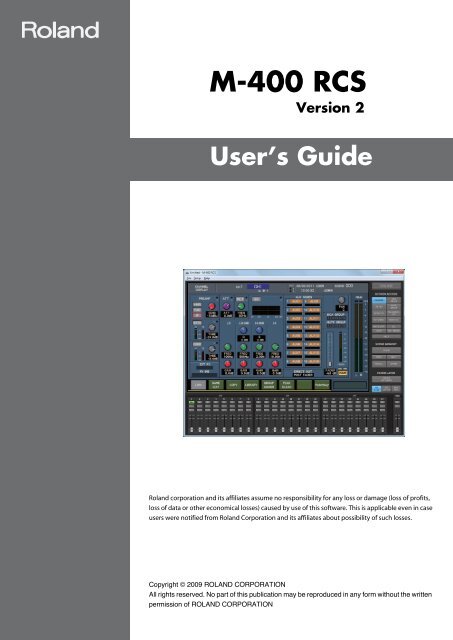
M-<strong>400</strong> <strong>RCS</strong><br />
Version 2<br />
User’s Guide<br />
<strong>Roland</strong> corporation and its affiliates assume no responsibility for any loss or damage (loss of profits,<br />
loss of data or other economical losses) caused by use of this software. This is applicable even in case<br />
users were notified from <strong>Roland</strong> Corporation and its affiliates about possibility of such losses.<br />
Copyright © 2009 ROLAND CORPORATION<br />
All rights reserved. No part of this publication may be reproduced in any form without the written<br />
permission of ROLAND CORPORATION
Contents<br />
Contents ..........................................................................................................3<br />
Introduction ....................................................................................................4<br />
<strong>About</strong> M-<strong>400</strong> <strong>RCS</strong>....................................................................................................................................................................... 4<br />
The two modes of M-<strong>400</strong> <strong>RCS</strong> ............................................................................................................................................... 5<br />
Operating requirements ......................................................................................................................................................... 6<br />
Installing M-<strong>400</strong> <strong>RCS</strong>................................................................................................................................................................. 6<br />
Uninstalling M-<strong>400</strong> <strong>RCS</strong>........................................................................................................................................................... 6<br />
<strong>About</strong> the M-<strong>400</strong> Driver .......................................................................................................................................................... 6<br />
Connection to the M-<strong>400</strong>........................................................................................................................................................ 7<br />
Starting and exiting the application .............................................................9<br />
Starting the application .......................................................................................................................................................... 9<br />
Exiting the application............................................................................................................................................................. 9<br />
Names of things and what they do............................................................. 10<br />
M-<strong>400</strong> <strong>RCS</strong> window.................................................................................................................................................................10<br />
Operations in the main screen area..................................................................................................................................14<br />
<strong>About</strong> the menus.....................................................................................................................................................................15<br />
Using M-<strong>400</strong> <strong>RCS</strong>.......................................................................................... 16<br />
Opening and saving a project.............................................................................................................................................16<br />
Switching between modes ..................................................................................................................................................18<br />
REAC input/output settings.................................................................................................................................................21<br />
Initializing the settings ..........................................................................................................................................................23<br />
Preference settings .................................................................................................................................................................24<br />
LCR System settings................................................................................................................................................................26<br />
M-48 settings.............................................................................................................................................................................27<br />
Offline mode ................................................................................................ 28<br />
Operation in offline mode....................................................................................................................................................28<br />
Work flow in offline mode....................................................................................................................................................28<br />
Online mode................................................................................................. 30<br />
Operation in online mode....................................................................................................................................................30<br />
Synchronization in online mode........................................................................................................................................30<br />
Work flow in online mode ....................................................................................................................................................30<br />
Appendix ...................................................................................................... 32<br />
Warning/error messages.......................................................................................................................................................32<br />
Troubleshooting ......................................................................................................................................................................32<br />
3
Introduction<br />
<strong>About</strong> M-<strong>400</strong> <strong>RCS</strong><br />
M-<strong>400</strong> <strong>RCS</strong> is application software that runs on Microsoft Windows XP, Microsoft<br />
Windows Vista, or Microsoft Windows 7. It lets you edit M-<strong>400</strong> project files, and<br />
remotely control the M-<strong>400</strong>.<br />
The screen of M-<strong>400</strong> <strong>RCS</strong> is designed to resemble the screen and controllers of the<br />
M-<strong>400</strong> itself, and the method of operation is also essentially the same as on the M-<br />
<strong>400</strong>. This means that the operations you’ve become familiar with on the M-<strong>400</strong> can<br />
be used on M-<strong>400</strong> <strong>RCS</strong>, and also that you can use M-<strong>400</strong> <strong>RCS</strong> to familiarize yourself<br />
with operations of the M-<strong>400</strong> itself.<br />
fig.Scr<strong>RCS</strong>.eps<br />
The contents of this document are written with the assumption that the user has all<br />
of the basic knowledge and skills required to operate a Windows computer. Please<br />
read the owner’s manual of your computer if you have questions regarding basic<br />
operations.<br />
4
Introduction<br />
The two modes of M-<strong>400</strong> <strong>RCS</strong><br />
M-<strong>400</strong> <strong>RCS</strong> has two modes: Offline mode and Online mode.<br />
Offline mode<br />
In this mode you can edit an M-<strong>400</strong> project file via USB memory. The advantage of<br />
this mode is that you can edit mixer parameters and scene memories even when the<br />
M-<strong>400</strong> itself is not at hand.<br />
fig.OfflineEdit.eps<br />
Load the project file<br />
Save the project file<br />
You can also create a new<br />
project file in M-<strong>400</strong> <strong>RCS</strong> and<br />
load it into the M-<strong>400</strong>.<br />
USB memory<br />
Edit within M-<strong>400</strong><strong>RCS</strong><br />
Save the project file<br />
USB memory<br />
Load the project file<br />
Online mode<br />
In this mode you can connect your computer to the M-<strong>400</strong> via USB, and control the<br />
M-<strong>400</strong> remotely. Since M-<strong>400</strong> <strong>RCS</strong> lets you use your mouse and keyboard to control<br />
the M-<strong>400</strong>, you can operate it in a more intuitive manner. In addition, M-<strong>400</strong> <strong>RCS</strong> can<br />
show a separate screen that is different from the screen shown on the M-<strong>400</strong> itself,<br />
letting you view and edit more information simultaneously.<br />
fig.OnlineEdit.eps<br />
Control the M-<strong>400</strong><br />
Operations on the M-<strong>400</strong> are fed back<br />
Differences from the M-<strong>400</strong> itself<br />
M-<strong>400</strong> <strong>RCS</strong> cannot monitor the audio signals within the M-<strong>400</strong>. Nor can it operate the<br />
following screens, parameters, and buttons.<br />
• SYSTEM screen<br />
• RECORDER screen<br />
• USER screen<br />
• USER FADER layer<br />
• USER button<br />
• MONITOR LEVEL knob setting<br />
• PHONES LEVEL knob setting<br />
• TALKBACK MIC LEVEL knob setting<br />
• [TALKBACK] button<br />
• [SOLO CLEAR] button<br />
The following functionality cannot be used while the M-<strong>400</strong> console displays the<br />
analyzer function or the M-48 SOURCE LEVEL/PAN popup.<br />
• The analyzer in the GEQ EDIT popup<br />
• The analyzer in the METER screen Analyzer tab<br />
• The meters of the M-48 SOURCE LEVEL/PAN popup<br />
5
Introduction<br />
Operating requirements<br />
Supported OS Microsoft Windows XP Home Edition/Professional SP 3<br />
Microsoft Windows Vista 32-bit Edition SP 1<br />
Microsoft Windows Vista 64-bit Edition SP 1<br />
Microsoft Windows 7 32-bit Edition<br />
Microsoft Windows 7 64-bit Edition<br />
Supported<br />
computers<br />
CPU/clock<br />
Memory<br />
Screen resolution<br />
and color depth<br />
* M-<strong>400</strong> <strong>RCS</strong> does not work with Microsoft Windows XP Media Center<br />
Edition.<br />
A computer that provides a USB connector complying with USB<br />
Specification Revision 1.0 or later USB<br />
Pentium/Celeron or compatible processor, 1.6GHz or faster<br />
* We cannot make guarantees regarding the compatibility of processors.<br />
512 MB or more<br />
1024 x 768 pixels or higher, 65,536 colors (16-bit color) or higher<br />
* This software has been found to work on typical computers that meet the above<br />
requirements, but we do not guarantee that it will operate on all such computers.<br />
Please be aware that differences in design or conditions of use may produce<br />
differences in the processing power of otherwise similar computers.<br />
* You can connect the M-<strong>400</strong> to a USB connector that supports USB 2.0. However, even<br />
when connected to a USB 2.0 connector, it will operate only as a USB 1.0/1.1 device.<br />
This will not affect the performance of the M-<strong>400</strong> console itself.<br />
Installing M-<strong>400</strong> <strong>RCS</strong><br />
Copy the “M-<strong>400</strong> <strong>RCS</strong>” folder to the drive of your computer.<br />
Uninstalling M-<strong>400</strong> <strong>RCS</strong><br />
Delete the “M-<strong>400</strong> <strong>RCS</strong>” folder that you copied to the drive of your computer.<br />
<strong>About</strong> the M-<strong>400</strong> Driver<br />
In order for M-<strong>400</strong> <strong>RCS</strong> to remotely control the M-<strong>400</strong> console, the M-<strong>400</strong> Driver for<br />
Windows XP, Windows Vista, or Windows 7 must be installed in your computer.<br />
Download the most recent version of the driver from the following website. For<br />
details on installing the M-<strong>400</strong> Driver, refer to the document (HTML file) included<br />
with the driver.<br />
http://www.rolandsystemsgroup.net/<br />
6
.<br />
Introduction<br />
Connection to the M-<strong>400</strong><br />
In order to remotely control the M-<strong>400</strong> console from M-<strong>400</strong> <strong>RCS</strong>, you’ll need to<br />
connect the M-<strong>400</strong> to your computer using a USB cable.<br />
Use a USB cable to connect the M-<strong>400</strong> to your computer as shown in the illustration<br />
below.<br />
fig.USBConnection.eps<br />
USB cable<br />
Use a commercially available<br />
USB cable (one that supports<br />
USB 1.1 or later, and has a<br />
male type A connector and a<br />
male type B connector).<br />
To USB Port<br />
To the rear panel<br />
USB connector<br />
Settings on the M-<strong>400</strong> console<br />
In order to remotely control the M-<strong>400</strong> from M-<strong>400</strong> <strong>RCS</strong>, make the following settings<br />
on the M-<strong>400</strong>.<br />
1<br />
Start up the M-<strong>400</strong>.<br />
2<br />
Press [SYSTEM] to access the SYSTEM screen.<br />
fig.ScrM4System.eps<br />
3<br />
Press [F4 (REMOTE)] to access the REMOTE popup.<br />
fig.ScrM4SystemRemote.eps<br />
7
Introduction<br />
4<br />
Press [F2 (USB MIDI)] to access the USB MIDI tab.<br />
fig.ScrM4SysRemUSB.eps<br />
5<br />
In the RECEIVE section, select the “Sys Ex” button.<br />
fig.ScrM4SysRemUSBSt1.eps<br />
6<br />
In the SEND section, select the “Sys Ex” button.<br />
fig.ScrM4SysRemUSBSt2.eps<br />
8
Starting and exiting the application<br />
Starting the application<br />
1<br />
In the “M-<strong>400</strong> <strong>RCS</strong>” folder, double-click “M-<strong>400</strong> <strong>RCS</strong>.exe”.<br />
fig.Icon<strong>RCS</strong>.eps<br />
fig.Scr<strong>RCS</strong>.eps<br />
The application will start up, and the M-<strong>400</strong> <strong>RCS</strong> window will appear.<br />
A new project will be opened<br />
when the application starts.<br />
Exiting the application<br />
2<br />
In the M-<strong>400</strong> <strong>RCS</strong> window, choose “Exit” from the “File” menu.<br />
A message box will appear, asking you to confirm whether you want to save the<br />
current project.<br />
fig.ScrSyncConfirm.eps<br />
• If you click “Yes,” the current project will be saved.<br />
• If you click “No,” the current project will not be saved.<br />
You will exit the application.<br />
9
Names of things and what they do<br />
M-<strong>400</strong> <strong>RCS</strong> window<br />
fig.Scr<strong>RCS</strong>Guide.eps<br />
Basic screen area<br />
Mode button<br />
Screen recall buttons<br />
Scene memory buttons<br />
Fader layer buttons<br />
Main fader module<br />
Fader modules 1–24<br />
Basic screen area<br />
fig.ScrChDisp.eps<br />
This shows a screen of the same design as the screen of the M-<strong>400</strong> console itself. You<br />
can use the mouse and keyboard to perform operations in this screen.<br />
"Operations in the main screen area" (p. 14)<br />
Mode button<br />
This switches the mode of M-<strong>400</strong> <strong>RCS</strong>.<br />
● Offline mode<br />
fig.ScrOffline.eps<br />
● Online mode<br />
fig.ScrOnline.eps<br />
"Switching between modes" (p. 18)<br />
10
Names of things and what they do<br />
Screen recall buttons<br />
fig.ScrScreenAccess.eps<br />
These buttons switch the content of the basic screen area. The button<br />
corresponding to the currently shown screen or popup is shown in blue.<br />
CH DISP button<br />
METER button<br />
EFFECTS button<br />
PATCHBAY button<br />
DCA GROUP button<br />
MUTE GROUP button<br />
TALKBACK/OSC button<br />
MONITOR button<br />
GATE/EXP button<br />
COMP button<br />
EQ button<br />
AUX SENDS button<br />
HELP button<br />
Accesses the CHANNEL DISPLAY screen.<br />
Accesses the METER screen.<br />
Accesses the EFFECTS screen.<br />
Accesses the PATCHBAY screen.<br />
Accesses the DCA GROUP screen.<br />
Accesses the MUTE GROUP screen.<br />
Accesses the TALKBACK/OSC screen.<br />
Accesses the MONITOR screen.<br />
Accesses the GATE/EXPANDER popup.<br />
Accesses the COMPRESSOR popup or LIMITER popup.<br />
Accesses the EQUALIZER popup.<br />
Accesses the AUX SENDS popup.<br />
Accesses the HELP popup.<br />
Scene memory buttons<br />
fig.ScrScene.eps<br />
These buttons perform scene memory operations for M-<strong>400</strong> <strong>RCS</strong>.<br />
SCENE button<br />
PREV button<br />
NEXT button<br />
RECALL button<br />
STORE button<br />
Accesses the SCENE screen in the basic screen area. This button is<br />
shown in blue while the SCENE screen is displayed.<br />
Decrements the scene number by one.<br />
Increments the scene number by one.<br />
Recalls the mixer parameters from the currently selected scene number.<br />
Stores the current mixer parameters to the selected scene number.<br />
11
Names of things and what they do<br />
Fader layer buttons<br />
fig.ScrLayer.eps<br />
These buttons switch the layer operated by fader modules 1–24. The currently<br />
selected layer is shown in blue.<br />
SENDS ON FADER button Accesses the SENDS ON FADER panel.<br />
CH1-24 button Assigns CH1–CH24 to fader modules 1–24.<br />
CH25-48 button Assigns CH25–CH48 to fader modules 1–24.<br />
AUX/MTX button or<br />
AUX/DCA button<br />
Assigns AUX1–AUX16 and MATRIX1–MATRIX8,<br />
or AUX1–AUX16 and DCA1–DCA8 to fader modules 1–24.<br />
Fader modules 1–24<br />
fig.ScrFader1-24.eps<br />
Use these faders to operate the input channels, AUX channels, MATRIX channels, and<br />
DCA channels.<br />
SEL button<br />
SOLO button<br />
MUTE button<br />
Fader<br />
Selects the corresponding channel. The button of the selected channel<br />
is shown in green.<br />
Turns a channel’s Solo on/off. The button is shown in orange if Solo is<br />
on.<br />
Turns a channel’s Mute on/off. The button is shown in red if Mute is on.<br />
Adjusts the signal level of the channel.<br />
Adjustments made to a<br />
selected channel strip in M-<br />
<strong>400</strong> <strong>RCS</strong> will be reflected in<br />
the appropriate M-<strong>400</strong><br />
channel strip, but the M-<strong>400</strong><br />
display will not switch its<br />
display to your selected<br />
channel strip in the M-<strong>400</strong><br />
<strong>RCS</strong>.<br />
Main fader module<br />
fig.ScrFaderMain.eps<br />
This fader controls the MAIN L/R.<br />
SEL button<br />
SOLO button<br />
Fader<br />
Selects the MAIN L/R channel. The button is shown in green when selected.<br />
Turns the MAIN L/R channel’s Solo on/off. The button is shown in orange<br />
if Solo is on.<br />
Adjusts the signal level of the MAIN L/R channel.<br />
Toggling the SEL button, you<br />
will alternate between<br />
selecting the MAIN L channel<br />
and the MAIN R channel.<br />
12
Names of things and what they do<br />
SENDS ON FADER Panel<br />
fig.Scr<strong>RCS</strong>SOF.eps<br />
This panel is shown when SENDS ON FADER button is on.<br />
AUX SELECT 1–16 buttons Selects the send-destination AUX.<br />
SENDS ON FADER button Closes the SENDS ON FADER panel.<br />
CH1-24 button Assigns CH1–CH24 to fader modules 1–24.<br />
CH25-48 button Assigns CH25–CH48 to fader modules 1–24.<br />
AUX/MTX button or<br />
AUX/DCA button<br />
Assigns AUX1–AUX16 and MATRIX1–MATRIX8,<br />
or AUX1–AUX16 and DCA1–DCA8 to fader modules 1–24.<br />
13
Names of things and what they do<br />
Operations in the main screen area<br />
The mouse and keyboard are used to perform operations in M-<strong>400</strong> <strong>RCS</strong>’s main screen<br />
area.<br />
Cursor movement<br />
• Up/down/left/right cursor keys<br />
Button operations<br />
• Click a button to turn it on/off<br />
• Move the cursor to a button and press the Enter key to turn it on/off<br />
The cursor is indicated by a<br />
red frame in the Basic screen<br />
area. In M-<strong>400</strong> <strong>RCS</strong>, the cursor<br />
exists only within the Basic<br />
screen area.<br />
Function button operations<br />
• Click<br />
• Keyboard “F1” – “F8” keys<br />
Knob operations<br />
• Drag a knob up/down or left/right<br />
• Move the cursor to a knob, and then use the mouse wheel to increase/decrease the value<br />
• Move the cursor to a knob, and press the Page Up key to increase the value or the Page<br />
Down key to decrease it<br />
• Move the cursor to a knob, and press the + key to increase the value or the - key to<br />
decrease it<br />
Fader operations<br />
• Drag a fader knob up/down<br />
• Move the cursor to a fader, and then use the mouse wheel to increase/decrease the value<br />
• Move the cursor to a fader, and press the Page Up key to increase the value or the Page<br />
Down key to decrease it<br />
• Move the cursor to a fader, and press the + key to increase the value or the - key to<br />
decrease it<br />
Send level bar operations<br />
• Drag the bar to left/right<br />
• Move the cursor to a send level bar, and use the mouse wheel to increase/decrease the<br />
value<br />
• Move the cursor to a send level bar, and press the Page Up key to increase the value or<br />
the Page Down key to decrease it<br />
• Move the cursor to a send level bar, and press the + key to increase the value or the - key<br />
to decrease it<br />
You can make fine<br />
adjustments by holding<br />
down the Shift key while you<br />
operate a knob or a fader.<br />
By clicking while you hold<br />
down the Ctrl key, you can<br />
reset the fader value to 0.0<br />
dB.<br />
By clicking while you hold<br />
down the Ctrl key, you can<br />
reset the value of the send<br />
level bar to 0.0 dB.<br />
List operations<br />
• Use the up/down cursor keys to change the selected item<br />
• Use the mouse wheel to change the selected item<br />
• Drag the scroll bar up/down to scroll the list<br />
Entering a name<br />
In the name entry field of the NAME EDIT popup, you can use the keyboard to enter<br />
a name.<br />
14
Names of things and what they do<br />
<strong>About</strong> the menus<br />
File menu<br />
● New Project<br />
Opens a new project.<br />
● Open Project...<br />
Opens an existing project (a project that was saved to USB memory by the M-<strong>400</strong><br />
console itself, or a project created by M-<strong>400</strong> <strong>RCS</strong>).<br />
● Save Project<br />
Saves the current project (by overwriting it onto the existing file).<br />
● Save Project As...<br />
Saves the current project with a different name that you specify.<br />
● Exit<br />
Exits M-<strong>400</strong> <strong>RCS</strong>.<br />
If you open a project while<br />
online, M-<strong>400</strong> <strong>RCS</strong> will switch<br />
to offline operation.<br />
Setup menu<br />
● REAC Config...<br />
Opens the REAC Config dialog box.<br />
"REAC input/output settings" (p. 21)<br />
● Initialize...<br />
Initializes the settings.<br />
"Initializing the settings" (p. 23)<br />
● Preferences...<br />
Opens the Preferences dialog box.<br />
"Preference settings" (p. 24)<br />
● LCR Setup...<br />
Opens the LCR Setup dialog box.<br />
"LCR System settings" (p. 26)<br />
The REAC Config dialog box<br />
is available only when M-<strong>400</strong><br />
<strong>RCS</strong> is operating offline.<br />
Help menu<br />
● <strong>About</strong> M-<strong>400</strong> <strong>RCS</strong>...<br />
Opens the <strong>About</strong> M-<strong>400</strong> <strong>RCS</strong> dialog box, which shows the software version of M-<br />
<strong>400</strong> <strong>RCS</strong>.<br />
15
Using M-<strong>400</strong> <strong>RCS</strong><br />
Opening and saving a project<br />
Opening a project<br />
Opening a new project<br />
1<br />
From the “File” menu, choose “New Project.”<br />
A message box will appear, asking you to confirm whether you want to save the<br />
current project.<br />
fig.ScrSyncConfirm.eps<br />
• If you click “Yes,” the current project will be saved.<br />
• If you click “No,” the current project will not be saved.<br />
A new project will open.<br />
Opening an existing project file<br />
1<br />
From the “File” menu, choose “Open Project.”<br />
A message box will appear, asking you to confirm whether you want to save the<br />
current project.<br />
fig.ScrSyncConfirm.eps<br />
• If you click “Yes,” the current project will be saved.<br />
• If you click “No,” the current project will not be saved.<br />
fig.ScrOpenProj.eps<br />
The “Open” dialog box will appear.<br />
2<br />
Select the desired project file, and click the “Open” button.<br />
Project files saved by the M-<br />
<strong>400</strong> console itself will be<br />
located in the USB memory’s<br />
“\RSS\M-<strong>400</strong>\PROJ” folder.<br />
The selected project will open.<br />
16
Using M-<strong>400</strong> <strong>RCS</strong><br />
Saving a project<br />
Saving a project under its current name (Overwrite)<br />
1<br />
From the “File” menu, choose “Save Project.”<br />
The project will be saved under its current name, overwriting the existing file.<br />
Saving a project under a different name<br />
1<br />
From the “File” menu, choose “Save Project As.”<br />
fig.ScrSaveProjAs.eps<br />
The “Save As...” dialog box will appear.<br />
2<br />
Specify the file name and location in which you want to save the<br />
project, and click the “Save” button.<br />
The project will be saved.<br />
If you want to save a project<br />
file that you intend to load<br />
into the M-<strong>400</strong> console itself,<br />
save the file in your USB<br />
memory’s “\RS\M-<strong>400</strong>\PROJ”<br />
folder.<br />
When a project file saved by M-<strong>400</strong> <strong>RCS</strong> is loaded directly by the M-<strong>400</strong> console,<br />
the following settings will not be loaded.<br />
• Settings of the SYSTEM screen (INTERNAL SAMPLING FREQ, BRIGHTNESS, FADER<br />
TOUCH SENSE)<br />
• REAC SETUP settings of the REAC CONFIG popup<br />
• REMOTE popup settings<br />
• USER settings<br />
17
Using M-<strong>400</strong> <strong>RCS</strong><br />
Switching between modes<br />
Switching to online mode<br />
1<br />
Click the ONLINE button.<br />
M-<strong>400</strong> <strong>RCS</strong> will be in offline<br />
mode when you start up or<br />
when you open a project file.<br />
fig.ScrOffline.eps<br />
fig.ScrSync1.eps<br />
Before you continue, start up<br />
the M-<strong>400</strong> console, and use a<br />
USB cable to connect it to<br />
your computer.<br />
The “Synchronize” dialog box will appear.<br />
2<br />
In the “Project” field, specify the project to which you will<br />
synchronize: the project on the M-<strong>400</strong> console or the project in M-<br />
<strong>400</strong> <strong>RCS</strong>.<br />
Read from CONSOLE The project will be loaded from the M-<strong>400</strong> console into M-<strong>400</strong><br />
<strong>RCS</strong>.<br />
Send to CONSOLE The project will be sent from M-<strong>400</strong> <strong>RCS</strong> to the M-<strong>400</strong> console.<br />
3<br />
If you selected “Send to CONSOLE” in step 2, use the “Option (Send<br />
to CONSOLE)” field to specify whether you want to send the user<br />
library.<br />
If you select the “Send User Libraries” option, the user library will be sent from M-<br />
<strong>400</strong> <strong>RCS</strong> to the M-<strong>400</strong> console.<br />
4<br />
Click “OK.”<br />
“Send User Libraries” will<br />
overwrite current libraries<br />
unless they are locked. Be<br />
sure to lock or save any<br />
needed M-<strong>400</strong> libraries to<br />
USB memory prior to<br />
sending.<br />
If you selected “Read from CONSOLE” in step 2, the current project will be closed,<br />
a new project will be opened, and then synchronization will begin.<br />
A message box will ask whether you want to save the current project.<br />
fig.ScrSyncConfirm.eps<br />
• If you click “Yes,” the current project will be saved (by overwriting).<br />
• If you click “No,” the current project will not be saved.<br />
• If you click “Cancel,” project synchronization will be cancelled.<br />
18
Using M-<strong>400</strong> <strong>RCS</strong><br />
If you selected “Send to CONSOLE” in step 2, a message box will ask you to<br />
confirm the project synchronization.<br />
fig.ScrSyncConfirm2.eps<br />
When you click “OK,” project synchronization will begin.<br />
5<br />
When project synchronization is completed, M-<strong>400</strong> <strong>RCS</strong> will switch<br />
fig.ScrOnline.eps<br />
to online mode.<br />
In online mode, you’ll be able to remotely control the M-<strong>400</strong> console from M-<strong>400</strong><br />
<strong>RCS</strong>.<br />
The M-<strong>400</strong> console will show<br />
a progress message while the<br />
project is being<br />
synchronized. Operations on<br />
the M-<strong>400</strong> will be disabled<br />
during this time.<br />
If you selected “Send to CONSOLE” in step 2 and the M-<strong>400</strong>’s scene memory or<br />
user library contains any locked data, a message box will ask you whether you<br />
want to overwrite the data. If you click “OK,” the data will be overwritten. If you<br />
click “Cancel,” project synchronization will be cancelled.<br />
fig.ScrSyncConfirmLock1.eps<br />
On the “Synchronize” dialog box, you can adjust the data transfer speed.<br />
If an error is shown while synchronization, set the “Transfer” slider to “Slow”<br />
position.<br />
19
Using M-<strong>400</strong> <strong>RCS</strong><br />
Switching to offline mode<br />
1<br />
Click the ONLINE button.<br />
fig.ScrOnline.eps<br />
2<br />
M-<strong>400</strong> <strong>RCS</strong> will switch to offline mode.<br />
fig.ScrOffline.eps<br />
20
Using M-<strong>400</strong> <strong>RCS</strong><br />
REAC input/output settings<br />
In offline mode, you can make virtual settings for an input/output unit (e.g., S-1608<br />
stage unit, S-0816 FOH unit, S-<strong>400</strong>0S 40-channel I/O modular rack) that will later be<br />
connected to the M-<strong>400</strong> console. This lets you make preamp gain settings or input/<br />
output patching ahead of time, to specify the M-<strong>400</strong>’s input/output settings that will<br />
be used at the actual performance.<br />
1<br />
From the “Setup” menu, choose “REAC Config.”<br />
fig.ScrReacConf.eps<br />
Settings in the REAC Config<br />
dialog box are used to<br />
supplement offline mode.<br />
When you load a project on<br />
the M-<strong>400</strong> console itself, or<br />
switch to online mode, the<br />
settings for the input/output<br />
units that are actually<br />
connected to the M-<strong>400</strong> will<br />
be applied.<br />
The “REAC Config” dialog box<br />
is unavailable in online<br />
mode.<br />
The “REAC Config” dialog box will appear.<br />
2<br />
Access the “REAC A tab” (or “REAC B” tab).<br />
3<br />
From the pulldown menu, select the input/output unit that you will<br />
connect to REAC A (or REAC B).<br />
The pulldown menu gives you the following choices.<br />
(No Device)<br />
No connection<br />
S-1608 S-1608 stage unit<br />
S-0816 S-0816 FOH unit<br />
S-<strong>400</strong>0S<br />
S-<strong>400</strong>0S 40-channel I/O modular rack<br />
S-0808 S-0808 8x8 I/O UNIT<br />
S-<strong>400</strong>0M<br />
REAC MERGE UNIT S-<strong>400</strong>0M<br />
S-MADI<br />
REAC MADI BRIDGE S-MADI<br />
FOH SPLIT<br />
M-<strong>400</strong> split operating as the FOH console (REAC A only)<br />
Choose FOH if the split from<br />
another M-<strong>400</strong> being<br />
operated as a FOH console<br />
will be connected to REAC A<br />
and used as a monitor/<br />
broadcast console.<br />
4<br />
Access the “REAC B” tab, and make REAC B settings as described in<br />
steps 2 and 3.<br />
21
Using M-<strong>400</strong> <strong>RCS</strong><br />
Changing the S-<strong>400</strong>0S module configuration<br />
If you choose S-<strong>400</strong>0S in the REAC Config dialog box, a 32-in/8-out configuration<br />
will be applied. To change the S-<strong>400</strong>0S module configuration, proceed as follows.<br />
fig.ScrReacConfS4KS.eps<br />
1<br />
In the REAC Config dialog box, click the “Config” button.<br />
fig.S4KSConf.eps<br />
The “S-<strong>400</strong>0S Config” dialog box will appear.<br />
2<br />
Use the Slot1–Slot10 pulldown menus to specify the module for<br />
each slot.<br />
The pulldown menu gives you the following choices.<br />
• Blank (empty slot)<br />
• SI-AD4 (4ch Analog In)<br />
• SI-AES4 (4ch Digital In)<br />
• SO-DA4 (4ch Analog Out)<br />
• SO-AES4 (4ch Digital Out)<br />
3<br />
Press the “OK” button to close the S-<strong>400</strong>0S Config dialog box.<br />
If an error is displayed in step 3, one of the following situations may have<br />
occurred. Correct the mistake, and click “OK” once again.<br />
• A module of a differing type is incongruously located between modules; e.g., input<br />
module, output module, input module<br />
• A module of a differing type begins at an even-numbered slot<br />
• Only the odd-numbered slot of adjacent odd-numbered/even-numbered slots is<br />
blank<br />
22
Using M-<strong>400</strong> <strong>RCS</strong><br />
Initializing the settings<br />
1<br />
From the “Setup” menu, choose “Initialize.”<br />
fig.ScrInit.eps<br />
The “Initialize” dialog box will appear.<br />
2<br />
Place a check mark in the sections that you want to initialize.<br />
• Mixer Parameter<br />
• System Setting<br />
• Scene Memory<br />
• User Library<br />
3<br />
Click “OK.”<br />
A message box will ask you to confirm the initialization operation.<br />
fig.ScrInitConf.eps<br />
4<br />
Click “OK” to execute the initialization.<br />
23
Using M-<strong>400</strong> <strong>RCS</strong><br />
Preference settings<br />
Here’s how to make preference settings within M-<strong>400</strong> <strong>RCS</strong>. The settings you make<br />
here will not be reflected in the M-<strong>400</strong> console.<br />
1<br />
From the “Setup” menu, choose “Preferences.”<br />
fig.ScrPref.eps<br />
The “Preferences” dialog box will appear.<br />
2<br />
Select the desired items in the “Preferences” dialog box.<br />
● Level Meter<br />
If you select this, level meter data will be received in online mode.<br />
● Confirmation<br />
These enable/disable various confirmation messages that appear in the basic<br />
screen area. A particular type of confirmation message can be enabled by<br />
selecting the corresponding check box.<br />
If the processing load of M-<br />
<strong>400</strong> <strong>RCS</strong> is too great in online<br />
mode, you can lighten it by<br />
clearing the Level Meter<br />
check box.<br />
Scene/Library Store<br />
Scene/Library Recall<br />
Patchbay Change<br />
Confirmation messages when storing a scene or library<br />
Confirmation messages when recalling a scene or library<br />
Confirmation messages when changing the input/output<br />
patchbay settings<br />
● Ch Select<br />
These items specify what will happen when you select a channel. The items you<br />
select will be enabled.<br />
Channel SELECT follows SOLO button<br />
Channel SELECT changes with Layer<br />
Selection<br />
CHANNEL DISPLAY follows CH SE-<br />
LECT button<br />
When you press [SOLO], that channel will be selected.<br />
When you select a fader layer, the most recently<br />
selected channel of that layer will be selected.<br />
Pressing [SEL] will make the CHANNEL DISPLAY<br />
screen appear.<br />
● Home Screen<br />
This chooses the home screen. The screen you select here will be the home<br />
screen.<br />
CHANNEL DISPLAY<br />
METER<br />
The CHANNEL DISPLAY screen will be used as the home<br />
screen.<br />
The METER screen will be used as the home screen.<br />
The home screen is what<br />
appears when you click the<br />
button of the currently<br />
displayed screen (the button<br />
shown in blue).<br />
24
Using M-<strong>400</strong> <strong>RCS</strong><br />
● Fader Layer<br />
This chooses the fader layer buttons (p. 12).<br />
[CH1-24] [CH25-48] [AUX/DCA]<br />
[CH1-24] [CH25-48] [AUX/MTX]<br />
CH1-24, CH25-48. AUX/DCA buttons<br />
CH1-24, CH25-48, AUX/MTX buttons<br />
● Main Fader<br />
If you select “SENDS ON FADER MASTER”, the MAIN fader module becomes the<br />
send-destination AUX fader, while the SENDS ON FADER mode is on.<br />
● DCA [SEL]<br />
This selects the operation that pressing [SEL] preforms when DCA 1 through 8<br />
has been called up to the fader module section. The selection items are as<br />
indicated below.<br />
OFF<br />
ASSIGN<br />
[SEL] is disabled.<br />
Access the DCA GROUP ASSIGN popup.<br />
25
Using M-<strong>400</strong> <strong>RCS</strong><br />
LCR System settings<br />
1<br />
From the “Setup” menu, choose “LCR Setup...”<br />
fig.ScrLCRSetup.eps<br />
For more information about<br />
the LCR features, refer to the<br />
M-<strong>400</strong> owner's manual<br />
(version 2.00 or later).<br />
The “LCR Setup” dialog box will appear.<br />
2<br />
Use the LCR SYSTEM check box to turn LCR System on/off.<br />
If this check box is selected, LCR System will be on. If it is cleared, LCR System will<br />
be off.<br />
3<br />
If you've selected the LCR SYSTEM check box, use the MAIN C<br />
selection box to select the AUX that will be used as MAIN C.<br />
4<br />
Click “OK.”<br />
A message box will appear, asking you to confirm the operation.<br />
● If the LCR SYSTEM check box is selected<br />
fig.ScrLCRSetup_conf1_e.eps<br />
● If the LCR SYSTEM check box is cleared<br />
fig.ScrLCRSetup_conf2_e.eps<br />
5<br />
Click “OK.”<br />
The item shown in the message box of step 4 will be initialized, and the LCR<br />
system setting will be changed.<br />
26
Using M-<strong>400</strong> <strong>RCS</strong><br />
M-48 settings<br />
You can manage and make settings for the M-48 Live Personal Mixer in the same way<br />
you do from the M-<strong>400</strong> console.<br />
M-<strong>400</strong> <strong>RCS</strong> cannot use the following functionality.<br />
• Accessing and operating the M-48 LOAD/SAVE popup<br />
• Monitoring the source in the M-48 SOURCE LEVEL/PAN popup<br />
• Updating the M-48 system program<br />
For details on the M-48 Live<br />
Personal Mixer, refer to the<br />
“M-48 Owner's Manual.”<br />
Making M-48 settings in offline mode<br />
In offline mode, the M-48 list in the M-48 MANAGER popup will show a unit<br />
named “Virtual.”<br />
fig.ScrM48Virtual.eps<br />
For details on M-48 settings,<br />
refer to the M-<strong>400</strong> owner's<br />
manual (version 2.00 or later).<br />
Settings you make for the “Virtual” unit can be stored in the M-48 library. Settings<br />
from the M-48 library can be applied to a physical M-48 in the following ways.<br />
● A project file saved by M-<strong>400</strong> <strong>RCS</strong> can be loaded into the M-<strong>400</strong><br />
console.<br />
In the SYSTEM screen's LOAD/SAVE popup, select the M-48 LIBRARY check box to<br />
load it.<br />
"Saving a project" (p. 17)<br />
Settings made for the<br />
“Virtual” unit will be<br />
discarded when you switch<br />
to online mode. Before<br />
switching to online mode,<br />
you must save these settings<br />
to the M-48 library and then<br />
save the project.<br />
● Switch M-<strong>400</strong> <strong>RCS</strong> to online mode.<br />
The M-48 library data in M-<strong>400</strong> <strong>RCS</strong> can be recalled to a physical M-48 unit.<br />
"Switching to online mode" (p. 18)<br />
You cannot perform the following operations for the “Virtual” unit.<br />
Even if you switch to online<br />
mode, the M-48 library of M-<br />
<strong>400</strong> <strong>RCS</strong> and the M-<strong>400</strong><br />
console will remain<br />
unaffected.<br />
• Edit the unit name “Virtual”<br />
• Store or recall memories<br />
• Set the MEMORY SAFE function, or make output mute settings<br />
M-48 settings in online mode<br />
The M-48 MANAGER popup will show the M-48 units that are actually connected.<br />
You can edit and manage each M-48 unit using the same operations you do from the<br />
M-<strong>400</strong> console.<br />
For details on M-48 settings,<br />
refer to the M-<strong>400</strong> owner's<br />
manual (version 2.00 or later).<br />
27
Offline mode<br />
Operation in offline mode<br />
fig.OfflineEdit.eps<br />
Load the project file<br />
Save the project file<br />
USB memory<br />
Edit within M-<strong>400</strong><strong>RCS</strong><br />
Save the project file<br />
USB memory<br />
Load the project file<br />
Offline mode lets you edit M-<strong>400</strong> project files when you don’t have an M-<strong>400</strong> console<br />
at hand. A project file you’ve edited using M-<strong>400</strong> <strong>RCS</strong> can be loaded by the M-<strong>400</strong><br />
console.<br />
Work flow in offline mode<br />
1<br />
On the M-<strong>400</strong> console, save a project file to USB memory.<br />
fig.OfflineEditStep1.eps<br />
Save the project file<br />
USB memory<br />
2<br />
Start up M-<strong>400</strong> <strong>RCS</strong>.<br />
fig.Scr<strong>RCS</strong>.eps<br />
A new project will open.<br />
3<br />
In M-<strong>400</strong> <strong>RCS</strong>, open the project file from USB memory.<br />
fig.OfflineEditStep2.eps<br />
Load the project file Project files saved by the M-<br />
<strong>400</strong> console will be located in<br />
the “\RSS\M-<strong>400</strong>\PROJ” folder<br />
USB memory<br />
of the USB memory.<br />
28
Offline mode<br />
4<br />
Edit the project.<br />
If necessary, use the “Reac Config” dialog box to make REAC input/output<br />
configuration settings.<br />
5<br />
Save the project file, either by overwriting the existing file or under<br />
a different name.<br />
fig.OfflineEditStep3.eps<br />
Save the project file<br />
If you’re saving a project file<br />
that you wish to load into the<br />
M-<strong>400</strong> console, save it in the<br />
“\RSS\M-<strong>400</strong>\PROJ” folder of<br />
your USB memory.<br />
USB memory<br />
6<br />
Exit M-<strong>400</strong> <strong>RCS</strong>.<br />
7<br />
On the M-<strong>400</strong> console, load the project file from USB memory.<br />
fig.OfflineEditStep4.eps<br />
Load the project file<br />
USB memory<br />
When a project file saved by M-<strong>400</strong> <strong>RCS</strong> is loaded by the M-<strong>400</strong> console, the<br />
following settings will not be loaded.<br />
• Settings of the SYSTEM screen (INTERNAL SAMPLING FREQ, BRIGHTNESS, FADER<br />
TOUCH SENSE)<br />
• REAC SETUP settings of the REAC CONFIG popup<br />
• Settings of the REMOTE popup<br />
• USER settings<br />
29
Online mode<br />
Operation in online mode<br />
fig.OnlineEdit.eps<br />
Control the M-<strong>400</strong><br />
Operations on the M-<strong>400</strong> are fed back<br />
Online mode lets you remotely control the M-<strong>400</strong> console from M-<strong>400</strong> <strong>RCS</strong>. Level<br />
meter data from the M-<strong>400</strong> console and operations performed on the M-<strong>400</strong> console<br />
are also sent to M-<strong>400</strong> <strong>RCS</strong>.<br />
If you’ve cleared the “Level<br />
Meter” check box in the<br />
preference settings, level<br />
meter data will not be sent<br />
from the M-<strong>400</strong> console.<br />
(Preference settings (p. 24))<br />
Synchronization in online mode<br />
In online mode, the following operations are synchronized between M-<strong>400</strong> <strong>RCS</strong> and<br />
the M-<strong>400</strong> console.<br />
• Mixer parameter operations<br />
• Scene memory recall and store operations<br />
• Scene list editing<br />
• Library recall operations<br />
The following operations are not synchronized.<br />
• Switching between screens<br />
• Storing or renaming user library items<br />
• Selection of scene numbers using the [PREV] [NEXT] buttons, etc.<br />
Work flow in online mode<br />
1<br />
Start up the M-<strong>400</strong> console, and use a USB cable to connect it to your<br />
computer.<br />
fig.USBConnection.eps<br />
USB cable<br />
To USB Port<br />
To the rear panel<br />
USB connector<br />
30
Online mode<br />
2<br />
Start up M-<strong>400</strong> <strong>RCS</strong>.<br />
fig.Scr<strong>RCS</strong>.eps<br />
A new project will open.<br />
3<br />
If necessary, open an existing project file.<br />
4<br />
Click the “ONLINE” button to begin synchronizing the project and<br />
enter online mode.<br />
Switching to online mode (p. 18)<br />
fig.ScrOnline.eps<br />
5<br />
In M-<strong>400</strong> <strong>RCS</strong>, remotely control the M-<strong>400</strong> console.<br />
fig.OnlineEdit.eps<br />
Operations on the M-<strong>400</strong> are fed back<br />
6<br />
Click the “ONLINE” button to choose offline mode.<br />
Control the M-<strong>400</strong><br />
fig.ScrOffline.eps<br />
7<br />
Save the project if desired.<br />
8<br />
Exit M-<strong>400</strong> <strong>RCS</strong>.<br />
31
Appendix<br />
Warning/error messages<br />
Error messages common to the M-<strong>400</strong><br />
Warning/error messages shown in the basic screen area are the same as on the M-<br />
<strong>400</strong> console. For details on warning/error messages, refer to “Warning/error<br />
message list” in the “M-<strong>400</strong> owner’s manual.”<br />
Error messages specific to M-<strong>400</strong> <strong>RCS</strong><br />
Message<br />
Cannot find M-<strong>400</strong> console.<br />
The M-<strong>400</strong> console does not respond.<br />
The M-<strong>400</strong> console refused the<br />
connection.<br />
The USB connection was broken.<br />
Communication error<br />
S-<strong>400</strong>0S configuration error<br />
Explanation<br />
The M-<strong>400</strong> console was not found.<br />
Can’t get an online connection<br />
with the M-<strong>400</strong> console (p. 32)<br />
The console does not respond.<br />
Can’t get an online connection<br />
with the M-<strong>400</strong> console (p. 32)<br />
The console might be busy doing something<br />
else intensive. Try again.<br />
The USB connection or cable has been<br />
changed in some way as to cause a disconnect.<br />
Communication error has occurred.<br />
Can’t get an online connection<br />
with the M-<strong>400</strong> console (p. 32)<br />
The S-<strong>400</strong>0S configuration has some problem.<br />
Changing the S-<strong>400</strong>0S module<br />
configuration (p. 22)<br />
Troubleshooting<br />
● Can’t get an online connection with the M-<strong>400</strong> console<br />
• The USB cable is not connected correctly<br />
Connection to the M-<strong>400</strong> (p. 7)<br />
• The correct settings have not been made on the M-<strong>400</strong> console<br />
Settings on the M-<strong>400</strong> console (p. 7)<br />
• The M-<strong>400</strong> Driver is not installed correctly<br />
<strong>About</strong> the M-<strong>400</strong> Driver (p. 6)<br />
• You’re using an incompatible operating system<br />
Operating requirements (p. 6)<br />
• The data transfer is too fast<br />
(p. 19)<br />
32<br />
2PS