Impression 90 RGB Manual V1.26 EN - GLP Light Produktion GmbH
Impression 90 RGB Manual V1.26 EN - GLP Light Produktion GmbH
Impression 90 RGB Manual V1.26 EN - GLP Light Produktion GmbH

You also want an ePaper? Increase the reach of your titles
YUMPU automatically turns print PDFs into web optimized ePapers that Google loves.
Instruction <strong>Manual</strong><br />
R-G-B<br />
from software version 1.72/30<br />
(Instruction version 1.26)<br />
e-mail: service@glp.de<br />
Internet: http://www.glp.de
R-G-B<br />
Notes:<br />
<strong>GLP</strong> German <strong>Light</strong> Products <strong>GmbH</strong> (Instruction version 1.26) / from software version 1.72/30) 2
R-G-B<br />
Table of content<br />
1 Description of Device.............................................................................................. 4<br />
1.1 Safety Instructions ............................................................................................ 5<br />
2 Preparation and Installation ................................................................................... 6<br />
2.1 Mounting ........................................................................................................... 6<br />
2.1.1 Mounting on the floor (upright)............................................................. 7<br />
2.1.1 Mounting in hanging position (head down) .......................................... 8<br />
2.1.1 Mounting in a sideway position ............................................................ 8<br />
2.2 Securing the Device .......................................................................................... 9<br />
2.3 Connections ...................................................................................................... 9<br />
2.3.1 Power Supply....................................................................................... 9<br />
2.3.2 DMX ................................................................................................... 10<br />
3 The Menu Field ...................................................................................................... 10<br />
4 DMX Channel Selection (DMX Protocol) ................................................................. 13<br />
5 Maintaining and Cleaning the IMPRESSION ....................................................... 18<br />
5.1 Safety regulations ........................................................................................... 18<br />
5.2 Maintenance Intervals (rule-of-thumb) ............................................................ 18<br />
6 Technical Specifications ...................................................................................... 19<br />
7 Index ....................................................................................................................... 20<br />
<strong>GLP</strong> German <strong>Light</strong> Products <strong>GmbH</strong> (Instruction version 1.26) / from software version 1.72/30) 3
R-G-B<br />
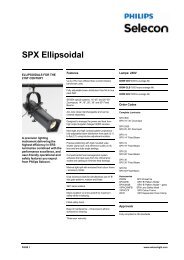
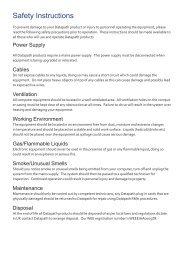
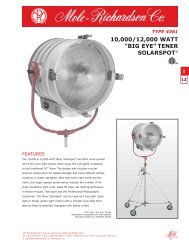
1 Description of Device<br />
1. Moving head (actively and<br />
passively cooled)<br />
2. Arm with various cooling<br />
vents<br />
3. LCD-Display/Menu (data<br />
entry)<br />
4. Base with various<br />
connectors and Camlock<br />
mounting system<br />
1<br />
2<br />
3<br />
4<br />
ba se sid e 1<br />
5<br />
6<br />
b a se sid e 2<br />
5. Power On/Off<br />
6. DMX- Output (3 pole)<br />
7. DMX- Input (3 pole)<br />
8. Micro-fuse 5x20mm, T4A<br />
9. Mains supply (Powercon)<br />
10. 2x Safety eyes<br />
FUSE T4A<br />
10<br />
7 8 9 10<br />
<strong>GLP</strong> German <strong>Light</strong> Products <strong>GmbH</strong> (Instruction version 1.26) / from software version 1.72/30) 4
R-G-B<br />
1.1 Safety Instructions<br />
The IMPRESSION is an advanced technology product. To<br />
guarantee smooth operation, it is necessary to follow the<br />
following instructions.<br />
The manufacturer of this device will not take responsibility of<br />
damages through any disregard of the information in this user<br />
manual. Warranty claims will also be cancelled in the event of<br />
the system casing being opened.<br />
1. Make sure that before powering up the fixture, the fans and air inlets are<br />
clean and not blocked by anything.<br />
2. Before powering up the fixture, ensure that the moving head part of the<br />
fixture can rotate unhindered through its full range of movement.<br />
3. A safety distance of at least 0.5 m to any easily flammable material (e.g.<br />
decoration material) must be adhered to.<br />
4. Attention! Don’t touch the device during operation. Parts of the fixture can<br />
become hot and can cause injuries and / or damages.<br />
5. The system doesn’t contain any user serviceable parts. Opening the fixture<br />
will void the manufacturers warranty.<br />
6. Danger of burning. Wait at least 15 minutes after disconnecting the AC<br />
power before changing the optical carrier on the fixture. Pay attention to<br />
possible hot parts of the system.<br />
7. Never look directly into the beam of light or one of the LEDs. Never use<br />
optical apertures with a distance less than 0.5 m to observe the beam of<br />
light. LED Class 2M. Not following these precautions can result in serious<br />
injury to your eyes and in particular, your retina.<br />
Attention: LED Class 2M can cause injuries of your eyes even<br />
without optical instruments in front of them or within a distance<br />
of less than 0.5m and short exposure time.<br />
Avoid direct radiation to your eyes!<br />
8. To ensure proper operation, you must also follow the installation guide<br />
described in chapter 2 of this manual. Operating the IMPRESSION without<br />
suitable mounting devices can increase the risk of an accident.<br />
9. The IMPRESSION features a unique small and lightweight design with no<br />
specific carrying handles. Care needs to be shown when handling the<br />
fixture to ensure that no unnecessary damage should occur. Fragile areas<br />
include the LCD display and cover on one side arm and the front bezel.<br />
<strong>GLP</strong> German <strong>Light</strong> Products <strong>GmbH</strong> (Instruction version 1.26) / from software version 1.72/30) 5
R-G-B<br />
Pressure in these areas could result in damages which will not be covered<br />
by the standard warranty.<br />
10. Repair-, maintenance- and installation work should only be performed by<br />
qualified or <strong>GLP</strong> certified staff. You need to pay attention to the common<br />
rules of technology that are not explicit mentioned in this manual.<br />
11. Use only original spare parts. Any structural modification on the system will<br />
terminate all warranty claims.<br />
12. Please keep this instruction manual for future reference.<br />
2 Preparation and Installation<br />
2.1 Mounting<br />
The IMPRESSION is fully operational whether it hangs or is mounted to a wall.<br />
It can also be operated while standing on the floor. Keep a safety distance of<br />
0.5 m from any easily inflammable materials (decoration etc.).<br />
Pay attention to the regulations of: BGV C1 (former VBG 70)<br />
and DIN VDE 0711-217.<br />
The installation shall be done by qualified personal only.<br />
<strong>GLP</strong> German <strong>Light</strong> Products <strong>GmbH</strong> (Instruction version 1.26) / from software version 1.72/30) 6
R-G-B<br />
For the various mounting positions of the IMPRESSION (standing on the floor,<br />
sideways or hanging) different accessories kits are available. Using any<br />
required kits, along with the standard mounting connectors on the base of the<br />
fixture, will ensure a safe and firm installation.<br />
1x M10<br />
(length max.16mm)<br />
front side of the fixture<br />
2x Camlock<br />
quick release<br />
fasteners<br />
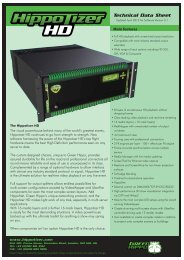
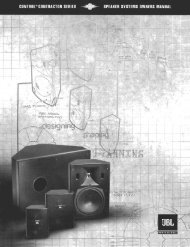
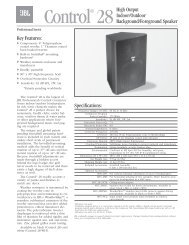
2.1.1 Mounting on the floor (upright)<br />
To operate the IMPRESSION in an upright position, please use the<br />
dedicated floor-stand which ships with all original fixtures. The floor<br />
stand is mounted to the base of the fixture using the two Camlock<br />
quarter turn fasteners. Line up and engage the camlock connectors from<br />
the floor stand into the base of the fixture and turn the two fasteners <strong>90</strong>°<br />
to lock them. Do the opposite to release them again. On both sides you'll<br />
find eyelets to pull though a fixing strap. This allows additional bracing of<br />
the floor-stand during the upright operation.<br />
<strong>GLP</strong> German <strong>Light</strong> Products <strong>GmbH</strong> (Instruction version 1.26) / from software version 1.72/30) 7
R-G-B<br />
2x Ca m loc k<br />
2x eyelets<br />
2.1.1 Mounting in hanging position (head down)<br />
To operate the IMPRESSION in a hanging position, a half-coupler or<br />
similar clamp can be mounted directly to the bottom of the base using<br />
the M10x16 mm threaded socket.<br />
M10x16<br />
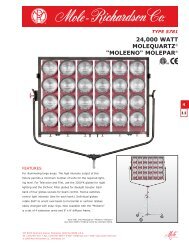
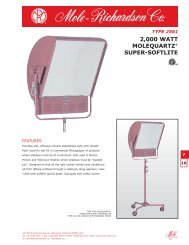
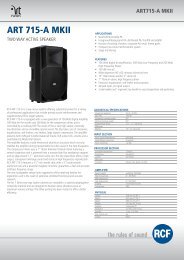
2.1.1 Mounting in a sideway position<br />
To operate the IMPRESSION in a sideways position, please use an<br />
additional mounting bar, available from <strong>GLP</strong> or one of their agents.. This<br />
mounting bar is fixed via the two camlock quick-release connectors. Two<br />
half-couplers or clamps are then used to hang the mounting bar. This<br />
technique is necessary to cope with the additional torque in this<br />
mounting position. Never use the "Mounting in hanging position"<br />
technique described above to secure the fixture in a sideway position, as<br />
the fixtures base can become damaged, and a secure installation cannot<br />
be assured.<br />
<strong>GLP</strong> German <strong>Light</strong> Products <strong>GmbH</strong> (Instruction version 1.26) / from software version 1.72/30) 8
R-G-B<br />
2x <strong>90</strong>°<br />
Half-coupler (clamp) 1 Half-coupler (clamp) 2<br />
without mounting bar<br />
2.2 Securing the Device<br />
Regardless of the mounting method of the IMPRESSION you'll have to use a<br />
secondary safety wire. This safety wire can be attached to the fixture by<br />
threading it through one of the two holes provided on the base of the fixture.<br />
Ensure that the safety wire is securely fastened through the fixture and the<br />
fixtures mounting support. Install a safety wire that can hold at least 10 times<br />
the weight of the fixture.<br />
2.3 Connections<br />
2.3.1 Power Supply<br />
~100-240 Volt AC, 50-60 Hz, earth contact type plug via Powercon<br />
Connected load 350 VA (W) 4 AT (micro-fuse 5x20mm)<br />
Please see printing on the case for the right electronic supply!<br />
Disconnect from the mains supply for changing the fuse and use<br />
only the above described micro-fuse type.<br />
<strong>GLP</strong> German <strong>Light</strong> Products <strong>GmbH</strong> (Instruction version 1.26) / from software version 1.72/30) 9
R-G-B<br />
2.3.2 DMX<br />
USITT DMX-512 Standard input/output in 3 pole connectors.<br />
3 pole: Pin 1 = [Ground] / Pin 2 = [-] / Pin 3 = [+]<br />
The DMX- Addressing starts at the DMX- Address [001].<br />
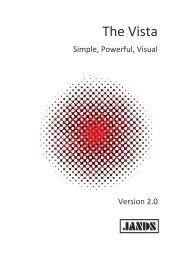
3 The Menu Field<br />
You’ll find the control board on the side of the arm. It allows you to<br />
make all necessary adjustments of the IMPRESSION. With the<br />
Mode-key you get into the main menu. Afterwards you can navigate<br />
through the menu with the Up/Down-keys. Push the Enter-key to get<br />
to the next menu level or to confirm your settings. Select ON/ OFF<br />
function settings with the Up/Down-keys. Confirm and save with the<br />
Enter-key (the display shows OK). Push the Mode-key to cancel the<br />
entry and go back to the main menu. Mod e Down<br />
Enter Up<br />
MODE - <strong>EN</strong>TER <br />
Level1 Level 2 Level 3 Level 4 Remark<br />
DMX Start<br />
Address 001<br />
Define the DMX start address<br />
Special <strong>Manual</strong> DMX <strong>Manual</strong> control of all system functions<br />
DOWN - UP <br />
Pan<br />
Speed<br />
Movements<br />
Pan/Tilt<br />
Movements<br />
Special<br />
White<br />
Temperature<br />
Dimmer<br />
Shutter<br />
Blue<br />
Green<br />
<strong>Manual</strong> control for Pan (X-movement)<br />
Speed adjustment for Pan/Tilt movements see<br />
also item below<br />
<strong>Manual</strong> control for Pan/Tilt movement<br />
Activate the White- or Full-Power Mode; see also<br />
DMX table<br />
<strong>Manual</strong> control for color temperature<br />
<strong>Manual</strong> control for dimmer<br />
<strong>Manual</strong> control for shutter<br />
<strong>Manual</strong> control for blue<br />
<strong>Manual</strong> control for green<br />
Red<br />
Color Wheel<br />
<strong>Manual</strong> control for red<br />
<strong>Manual</strong> control for the color wheel mimic<br />
Display<br />
Contrast<br />
Default Set<br />
Set Dimmer<br />
Frequency<br />
LED Dimmer<br />
Version<br />
Tilt<br />
<strong>Manual</strong> control for Tilt (Y-movement)<br />
Adjustment for the Display contrast<br />
Resetting all functions to original values<br />
Changes PMW frequency between 600Hz and<br />
1200Hz<br />
Reads out the current LED dimmer (software) version<br />
<strong>GLP</strong> German <strong>Light</strong> Products <strong>GmbH</strong> (Instruction version 1.26) / from software version 1.72/30) 10
R-G-B<br />
<strong>Impression</strong><br />
Version<br />
Adjust<br />
Key code<br />
xxxx<br />
Pan Offset<br />
Reads out the current CPU software version<br />
Use the code for entering the calibration menu (for<br />
authorized persons only)<br />
Calibration for Pan-Offset<br />
Tilt Offset<br />
Calibration for Tilt-Offset<br />
Clear<br />
EEPROM<br />
Erase EEPROM memory<br />
Diagnose<br />
Diagnose functions<br />
DOWN - UP <br />
Temperature<br />
Arm<br />
Temperature<br />
Head<br />
PAN/TILT<br />
Motor Power<br />
PAN/TILT<br />
Silent Mode<br />
DMX Hold<br />
Position<br />
Feedback<br />
White<br />
Adjust<br />
Red<br />
Pos Feed<br />
Pan Delta<br />
Anz Ti0-<br />
Int-Err<br />
PFC<br />
Voltage<br />
Pos Feed<br />
Tilt Delta<br />
Internal data and function diagnose<br />
Internal data and function diagnose<br />
Show the present PFC voltage<br />
Internal data and function diagnose<br />
Indicates the arm temperature<br />
Indicates the head temperature<br />
Switches power for Pan/Tilt ON or OFF<br />
(disconnected from power)<br />
Reduces maximum speed for Pan/Tilt<br />
Defines whether the last DMX signal is stored or the<br />
lamp is switched OFF in case of signal interruption<br />
Automatically position feedback (correction) for<br />
Pan/Tilt movement<br />
Adjustments for a uniform white color (white<br />
balance); only in white-mode<br />
Input for red adjustments<br />
Blue<br />
Input for blue adjustments<br />
Green<br />
Input for green adjustments<br />
Set DMX<br />
Image<br />
DMX input<br />
Monitor<br />
Stores the Scene currently sent to the unit<br />
Indicates the presently received DMX signal per DMX<br />
channel<br />
Pan<br />
Instantaneous value for Pan<br />
Speed<br />
Movements<br />
Pan/Tilt<br />
Movements<br />
Speed adjustment for Pan/Tilt movements see<br />
item below<br />
Instantaneous value for Pan/Tilt movements<br />
Special<br />
Instantaneous value for Special<br />
White<br />
Temperature<br />
Adjustment of the color temperature for WHITE<br />
Dimmer<br />
Instantaneous value for Dimmer<br />
Shutter<br />
Instantaneous value for Shutter<br />
Blue<br />
Instantaneous value for Blue<br />
Green<br />
Instantaneous value for Green<br />
<strong>GLP</strong> German <strong>Light</strong> Products <strong>GmbH</strong> (Instruction version 1.26) / from software version 1.72/30) 11
R-G-B<br />
Red<br />
Color Wheel<br />
Tilt<br />
Instantaneous value for Red<br />
Instantaneous value for Color Mixing unit<br />
Instantaneous value for Tilt movement<br />
Self test<br />
Live time<br />
Display<br />
Performs an automatic self-test<br />
Indicates the overall operation time of the system<br />
Adjust the display<br />
DOWN - UP <br />
Select DMX<br />
Mode<br />
White Mode<br />
Reverse Pan<br />
Blackout<br />
Compressed<br />
ON/OFF: Display OFF<br />
Please select the desired DMX Mode<br />
Fixture works in "Compressed" mode see also<br />
sectiion 4<br />
Normal Fixture works in "Normal" mode see also section 4<br />
High-<br />
Resolution<br />
Fixture works in "High Resolution" mode see also<br />
section 4<br />
Selects the activation of Adjustments for whitebalance,<br />
on or off.<br />
Selects Inverse Pan, on or off<br />
Reverse Tilt<br />
Reset<br />
SelectsInverse Tilt on or off<br />
RESET and new calibration for all functions<br />
<strong>GLP</strong> German <strong>Light</strong> Products <strong>GmbH</strong> (Instruction version 1.26) / from software version 1.72/30) 12
R-G-B<br />
4 DMX Channel Selection (DMX Protocol)<br />
Normal-Mode 14 DMX channels<br />
Channel Function Time and Value DMX HEX %<br />
1) PANcoarse<br />
0 .. 660° 2 - 4 s 0..255 00..FF 0..100<br />
2) PAN-fine High- Pos ... High- Pos + 2,6° (16 Bit) 0..255 00. .FF 0..100<br />
3) Tiltcoarse<br />
0 .. 300° 1 - 2 s 0..255 00..FF 0..100<br />
4) Tilt-fine High- Pos … High- Pos + 1,2° (16 Bit) 0..255 00..F F 0..100<br />
5) Color Colors adjustable via <strong>RGB</strong> 0..7 00..07 0..2,5<br />
(fixed) Color 01 - Red 1) 8..15 08..0F 3..5,5<br />
Color 02 - Amber 1) 16..23 10..17 6..8,5<br />
Color 03 - Warm Yellow 1) 24..31 18..1F 9..12,5<br />
Color 04 - Yellow 1) 32..39 20..27 13..15,5<br />
Color 05 - Green 1) 40..47 28..2F 16..18,5<br />
Color 06 - Turquoise 1) 48..55 30..37 19..21,5<br />
Color 07 - Cyan 1) 56..63 38..3F 22..24,5<br />
Color 08 - Blue 1) 64..71 40..47 25..27,5<br />
Color 09 - Lavender 1) 72..79 48..4F 28..30,5<br />
Color 10 - Mauve 1) 80..87 50..57 31..34,5<br />
Color 11 - Magenta 1) 88..95 58..5F 35..37,5<br />
Color 12 - Pink 1) 96..103 60..67 38..40,5<br />
White - CTO<br />
Color temperature 104..111 68..6F 41..43,5<br />
3200K<br />
White<br />
Color temperature 112..119 70..77 44..46,5<br />
5600K<br />
White - CTB<br />
Color temperature 120..127 78..7F 47..49,5<br />
7200K<br />
Rainbow Effect Stop 2) 128 80 50<br />
Rainbow Effect 3) slow - fast 129..223 81..DF 51..88<br />
Rainbow Effect, random colors slow - fast 224.255 E=..FF 89..100<br />
6) Red Color mixing system - Red 0 - 100% 0..255 00..FF 0..100<br />
7) Green Color mixing system - Green 0 - 100% 0..255 00..FF 0..100<br />
8) Blue Color mixing system - Blue 0 - 100% 0..255 00..FF 0..100<br />
9) Shutter Shutter closed 0..15 00..0F 0..5,5<br />
Random Pulse effect slow - fast 16..47 10..2F 6..18,5<br />
Up-dimming then Shutter closing slow - fast 48..79 30..4F 19..31<br />
(random patterns)<br />
Shutter open then down-dimming slow - fast 80..111 50..6F 32..43<br />
(random patterns)<br />
Up-dimming then down-dimming slow - fast 112..143 70..8F 44..56<br />
(random patterns)<br />
Strobe effect pause 5s to 1s 144..199 A0..C7 57..77<br />
Strobe effect, slow - fast 1 Hz .. 10 Hz 200..239 C8..EF 78..94<br />
Shutter open 240..255 F0..FF 95..100<br />
10) Dimmer Dimmer 0% - 100% 0..255 0..FF 0..100<br />
11) Color No color temperature correction 0..6 0..06 0..2<br />
temperature Continuous color temperature Applicable only for 7..255 07..FF 3..100<br />
correction between 3200k - 7200k White color 5)<br />
12) Special Max. Power-Mode 4) Max. light output without 0..15 0..0F 0..5,5<br />
white balance<br />
White-Mode 4) White balance used 16..31 10..1F 6..12,5<br />
Fan min. as long as temp. < <strong>90</strong>°C 224..229 E0..E5 88..89,5<br />
<strong>GLP</strong> German <strong>Light</strong> Products <strong>GmbH</strong> (Instruction version 1.26) / from software version 1.72/30) 13
R-G-B<br />
Channel Function Time and Value DMX HEX %<br />
RESET (Normal Mode) 250..255 FA..FF 98..100<br />
13) Move- No movement 0 00 0<br />
ment Movement Size Phase<br />
PAN 1 0° 01..01 01..01 0,5<br />
1 <strong>90</strong>° 02..03 02..03 1,0<br />
1 180° 04..05 04..05 1,7<br />
1 270° 06..07 06..07 2,5<br />
PAN 2 0° 08..09 08..09 3,3<br />
2 <strong>90</strong>° 10..11 0A..0B 4,1<br />
2 180° 12..13 0C..0D 4,9<br />
2 270° 14..15 0E..0F 5,7<br />
PAN 3 0° 16..17 11..11 6,5<br />
3 <strong>90</strong>° 18..19 12..13 7,3<br />
3 180° 20..21 14..15 8,0<br />
3 270° 22..23 16..17 8,8<br />
PAN 4 0° 24..25 18..19 9,6<br />
4 <strong>90</strong>° 26..27 1A..1B 10,4<br />
4 180° 28..29 1C..1D 11,2<br />
4 270° 30..31 1E..1F 12<br />
TILT size / phase see also PAN 32..63 20..3F 13..25<br />
PAN / TILT size / phase see also PAN 64..95 40..5F 26..37<br />
PAN / TILT (inverse) size / phase see also PAN 96..127 60..7F 38..50<br />
Circle size / phase see also PAN 128..159 80..9F 51..62<br />
Circle (inverse) size / phase see also PAN 160..191 A0..BF 63..75<br />
Lying eight size / phase see also PAN 192..223 C0..DF 76..87<br />
Random movement size see also PAN 224..255 E0..FF 88..100<br />
14) Speed Pan/Tilt relative movement 0..1 00..01 0..0,5<br />
Pan/Tilt<br />
Pan/Tilt slow – fast<br />
Use this channel 14) also for the speed<br />
of the movements (channel 13).<br />
4) Max. Power-Mode vs. White-Mode<br />
Pan Min. 660° = 200s<br />
Pan Max. 660° = 2 - 4s<br />
Tilt Min. 300° = 110s<br />
Tilt Max. 300° = 1 - 2s<br />
2..255 02..FF 1..100<br />
The IMPRESSION can regard the white-balance adjustments for each individual color setting.<br />
Whether the White-Mode is used with <strong>RGB</strong> can be selected in the Normal DMX-Mode during<br />
operation with the Special DMX channel. If the Special channel is set to a value between DMX 0..15,<br />
the White-Mode is not used and the <strong>RGB</strong> goes for the maximum light output. If the Special channel is<br />
set to a value between DMX 16..31, the white balance is used for the <strong>RGB</strong> output.<br />
Since there is no Special DMX channel in the Compress DMX-Mode, the possibility exists to likewise<br />
select these settings also in the display menu. Is the White-Mode set to “ON”, the white-balance is<br />
activated. If the White-Mode is set to “OFF”, the <strong>RGB</strong> goes for the maximum light output (Max. Power-<br />
Mode).<br />
5) The continuous color temperature correction is applicable only for the White color i.e. if this function<br />
is selected (DMX ≥ 001) the <strong>Impression</strong> will change the color to white immediately and will then be<br />
adjustable in the color temperature in a range between 3200K and 7200K. Hence a color correction for<br />
others than white is not intended.<br />
<strong>GLP</strong> German <strong>Light</strong> Products <strong>GmbH</strong> (Instruction version 1.26) / from software version 1.72/30) 14
Compress-Mode 10 DMX channels<br />
R-G-B<br />
Channel Function Time and Value DMX HEX %<br />
1) PANcoarse<br />
0 .. 660° 2 - 4 s 0..255 00..FF 0..100<br />
2) PAN-fine High- Pos ... High- Pos + 2,6° (16 Bit) 0..255 00. .FF 0..100<br />
3) Tiltcoarse<br />
0 .. 300° 1 - 2 s 0..255 00..FF 0..100<br />
4) Tilt-fine High- Pos … High- Pos + 1,2° (16 Bit) 0..255 00..F F 0..100<br />
5) Color Colors adjustable via <strong>RGB</strong> 0..7 00..07 0..2,5<br />
(fixed) Color 01 - Red 1) 8..15 08..0F 3..5,5<br />
Color 02 - Amber 1) 16..23 10..17 6..8,5<br />
Color 03 - Warm Yellow 1) 24..31 18..1F 9..12,5<br />
Color 04 - Yellow 1) 32..39 20..27 13..15,5<br />
Color 05 - Green 1) 40..47 28..2F 16..18,5<br />
Color 06 - Turquoise 1) 48..55 30..37 19..21,5<br />
Color 07 - Cyan 1) 56..63 38..3F 22..24,5<br />
Color 08 - Blue 1) 64..71 40..47 25..27,5<br />
Color 09 - Lavender 1) 72..79 48..4F 28..30,5<br />
Color 10 - Mauve 1) 80..87 50..57 31..34,5<br />
Color 11 - Magenta 1) 88..95 58..5F 35..37,5<br />
Color 12 - Pink 1) 96..103 60..67 38..40,5<br />
White - CTO<br />
Color temperature 104..111 68..6F 41..43,5<br />
3200K<br />
White<br />
Color temperature 112..119 70..77 44..46,5<br />
5600K<br />
White - CTB<br />
Color temperature 120..127 78..7F 47..49,5<br />
7200K<br />
Rainbow Effect Stop 2) 128 80 50<br />
Rainbow Effect 3) slow - fast 129..223 81..DF 51..88<br />
Rainbow Effect, random colors slow - fast 224.255 E0..FF 89..100<br />
6) Red Color mixing system - Red 0 - 100% 0..255 00..FF 0..100<br />
7) Green Color mixing system - Green 0 - 100% 0..255 00..FF 0..100<br />
8) Blue Color mixing system - Blue 0 - 100% 0..255 00..FF 0..100<br />
9) Shutter Shutter closed 0..15 00..0F 0..5,5<br />
Random Pulse effect slow - fast 16..47 10..2F 6..18,5<br />
Up-dimming then Shutter closing slow - fast 48..79 30..4F 19..31,5<br />
(random patterns)<br />
Shutter open then down-dimming slow - fast 80..111 50..6F 32..43<br />
(random patterns)<br />
Up-dimming then down-dimming slow - fast 112..143 70..8F 44..56<br />
(random patterns)<br />
Strobe effect pause 5s to 1s 144..199 A0..C7 57..77<br />
Strobe effect, slow - fast 1 Hz .. 10 Hz 200..239 C8..EF 78..94<br />
Shutter open 240...249 F0..F9 95..97,5<br />
RESET Min. 3 Sec. 250 FA 98<br />
Shutter open 251..255 FB..FF 99..100<br />
10) Dimmer Dimmer (0% - 100%) 0..255 0..FF 0..100<br />
<strong>GLP</strong> German <strong>Light</strong> Products <strong>GmbH</strong> (Instruction version 1.26) / from software version 1.72/30) 15
R-G-B<br />
High Resolution (Extended) -Mode 13 DMX Channels<br />
Channel Function Time and Value DMX HEX %<br />
1) PANcoarse<br />
0 .. 660° 2 - 4 s 0..255 00..FF 0..100<br />
2) PAN-fine High- Pos ... High- Pos + 2,6° (16 Bit) 0..255 00. .FF 0..100<br />
3) Tiltcoarse<br />
0 .. 300° 1 - 2 s 0..255 00..FF 0..100<br />
4) Tilt-fine High- Pos … High- Pos + 1,2° (16 Bit) 0..255 00..F F 0..100<br />
5) Redcoarse<br />
Color mixing system – Red 0 - 100% 0..255 00..FF 0..100<br />
6) Red-fine Color mixing system – Red-Low 0..255 00..FF 0..100<br />
7) Greencoarse<br />
Color mixing system – Green 0 - 100% 0..255 00..FF 0..100<br />
8) Greenfine<br />
Color mixing system – Green-Low 0..255 00..FF 0..100<br />
9) Bluecoarse<br />
Color mixing system – Blue 0 - 100% 0..255 00..FF 0..100<br />
10) Blue-fine Color mixing system – Blue-Low 0..255 00..FF 0..100<br />
11) Shutter Shutter closed 0..15 00..0F 0..5,5<br />
Random Pulse effect slow - fast 16..47 10..2F 6..18,5<br />
Up-dimming then Shutter closing slow - fast 48..79 30..4F 19..31,5<br />
(random patterns)<br />
Shutter open then down-dimming slow - fast 80..111 50..6F 32..43<br />
(random patterns)<br />
Up-dimming then down-dimming slow - fast 112..143 70..8F 44..56<br />
(random patterns)<br />
Strobe effect pause 5s to 1s 144..199 A0..C7 57..77<br />
Strobe effect, slow - fast 1 Hz .. 10 Hz 200..239 C8..EF 78..94<br />
Shutter open 240...249 F0..F9 95..97,5<br />
RESET Min. 3 Sec. 250 FA 98<br />
Shutter open 251..255 FB..FF 99..100<br />
12) Dimmercoarse<br />
Dimmer 0% - 100% 0..255 0..FF 0..100<br />
13) Dimmerfine<br />
Dimmer - Low 0..255 0..FF 0..100<br />
1) The predefined colors can be used as start colors for the Rainbow effect. First select a desired start<br />
color, then<br />
activate the rainbow effect. All IMPRESSIONS will then begin from that color and<br />
execute the rainbow effect synchronously. Different IMPRESSIONS can have different start colors<br />
but will still execute the rainbow effect synchronously. If you choose a color different from the ones<br />
marked with 1) in the tables above the rainbow start-color will be red.<br />
2) Rainbow-effect Stop will pause this function. After resuming the rainbow-effect will be continued with<br />
the current color.<br />
3) The Rainbow-effect will run synchronously only if it is started from one of the predefined colors (see<br />
also 1) before).<br />
<strong>GLP</strong> German <strong>Light</strong> Products <strong>GmbH</strong> (Instruction version 1.26) / from software version 1.72/30) 16
R-G-B<br />
Locking and unlocking the Control Panel<br />
You can lock and unlock the control panel by pressing the menu keys MODE & <strong>EN</strong>TER & UP at the<br />
same time.<br />
Additional shortcut features when switching on the fixture<br />
a) 1200Hz Mode (Hold down the UP- button during power ON)<br />
After switching on, the fixture the LEDs will be operated with a Pulse Width Modulation<br />
(PWM) of 1200Hz.<br />
In addition, all standard settings will be loaded (DMX start address [001], Normal Mode).<br />
b) 600Hz Mode (Hold down the DOWN- button during power ON)<br />
After switching on, the fixture the LEDs will be operated with a Pulse Width Modulation<br />
(PWM) of 600Hz.<br />
In addition, all standard settings will be loaded (DMX start address [001], Normal Mode).<br />
c) Standard Mode (Hold down the <strong>EN</strong>TER- button during power ON)<br />
After switching on the fixture, the DMX start address will be set to [001]. All other settings<br />
will remain unchanged.<br />
Additional Display Indications<br />
As a default you'll find the following additional information in the first row of the LCD display:<br />
XX/X/XX<br />
06 = 600Hz / 12 = 1200Hz<br />
N = Normal Mode / C = Compressed Mode / H = High Res. Mode<br />
N = Tilt normal / I = Tilt inverted<br />
N = Pan normal / I = Pan inverted<br />
<strong>GLP</strong> German <strong>Light</strong> Products <strong>GmbH</strong> (Instruction version 1.26) / from software version 1.72/30) 17
R-G-B<br />
5 Maintaining and Cleaning the IMPRESSION<br />
The IMPRESSION is a low maintenance fixture. It is only necessary to clean the air<br />
inlets and outlets as well as the optical LED lenses from time to time. For safe<br />
operation it is absolutely essential that the fixture is kept clean and that dust, dirt and<br />
smoke-fluid residues must not build up on, or within, the fixture. If they do, the<br />
fixture's light output will be significantly reduced, and damages to the fixture may<br />
occur. Regular cleaning will not only ensure the maximum light output, but will also<br />
allow the fixture to operate reliably throughout its entire life.<br />
A soft lint-free cloth moistened with any good glass cleaning fluid is recommended.<br />
Under no circumstances should alcohol or solvents be used to clean<br />
the fixture or its lenses!<br />
5.1 Safety regulations<br />
• Disconnect the fixture from the mains power before commencing any<br />
maintenance work!<br />
• Wait minimum 15 minutes after removing the power to allow the fixture to<br />
cool down.<br />
5.2 Maintenance Intervals (rule-of-thumb)<br />
The maintenance schedule of any given fixture depends on the installation<br />
environment. Hence no specific guidelines can be given. The cleaning intervals<br />
given below are suggestions, based on practical experience. We suggest that<br />
you start with these and develop your own maintenance schedule as you see<br />
the fixtures performance in your specific environment.<br />
Maintenance Task Interval How<br />
Cleaning of LED lenses and<br />
optical system<br />
weekly<br />
soft brush /lint-free cloth<br />
Cleaning of fans and air channels monthly vacuum cleaner, airbrush, etc.<br />
Attention:<br />
• Never let optical parts come into contact with oil or fat.<br />
• Before running the fixture wait until all parts are touch dry.<br />
• Never touch lenses with bare fingers.<br />
<strong>GLP</strong> German <strong>Light</strong> Products <strong>GmbH</strong> (Instruction version 1.26) / from software version 1.72/30) 18
6 Technical Specifications<br />
Power supply<br />
Power consumption<br />
Power Input<br />
Fuse protection<br />
Operational Parameters<br />
Max. Ambient<br />
Temperature<br />
Mounting Position<br />
R-G-B<br />
350 VA (Watt)<br />
~100-240 V AC, 50-60 Hz (auto sensing input)<br />
Micro-fuse 5x20 mm, T 4A<br />
45°C / 113°F (integrated overheating switch)<br />
Any (see chapter mounting)<br />
<strong>Light</strong>ing System - Additive Color mixing<br />
LED Type<br />
<strong>90</strong>x Luxeon K2 High-power- LEDs<br />
Lifetime<br />
50.000 h<br />
30 LEDs per color, wavelength optimized for maximum presentable color space<br />
Optical System<br />
High efficient Collimator cluster<br />
Exchangeable optical carrier with 10° light distrib ution angle (25° optional)<br />
Scattering light aperture<br />
Shutter / Dimmer (8 Bit)<br />
Strobe- Effect with variable speed between 1 - 10 flashes per second, Random-Strobe, Pulse-<br />
Effects<br />
Continuous Dimmer 0 - 100%<br />
DMX Control<br />
Standard USITT DMX-512, 3 pole XLR; [+] = Pin 3 [-] = Pin 2 [Ground] = Pin 1.<br />
Die DMX- Addressing starts at the DMX channel [001].<br />
Pan / Tilt (8/16 Bit)<br />
Pan- movement<br />
Tilt- movement<br />
Weights and Measures<br />
Width of the base<br />
Length of the base<br />
height (head vertical)<br />
Weight (net)<br />
660° in min. 2 - 4 seconds (Position Feedback)<br />
300° in min. 1 - 2 seconds (Position Feedback)<br />
340 mm / 13.4 inches<br />
145 mm / 5.7 inches<br />
370 mm / 14.6 inches<br />
8.0 kg / 17.6 lbs.<br />
<strong>GLP</strong> German <strong>Light</strong> Products <strong>GmbH</strong> (Instruction version 1.26) / from software version 1.72/30) 19
R-G-B<br />
7 Index<br />
B<br />
BGV C1............................................................ 6<br />
C<br />
Circumference ............................................... 18<br />
Cleaning......................................................... 18<br />
Compress-Mode .................................... 15, 16<br />
D<br />
Description of Device ....................................... 4<br />
DIN VDE 0711-217 .......................................... 6<br />
DMX ............................................................... 10<br />
DMX Protocol ................................................ 13<br />
E<br />
e-mail ............................................................... 1<br />
Enter-key ....................................................... 10<br />
Eyelets ............................................................. 7<br />
H<br />
Half-couplers (clamps) ..................................... 8<br />
I<br />
Instruction Version ........................................... 1<br />
Internet............................................................. 1<br />
L<br />
LED Class 2M ................................................. 5<br />
M<br />
Maintenance .................................................. 18<br />
Max. Power-Mode ........................................ 14<br />
Menu Field ..................................................... 10<br />
Micro-fuse ........................................................ 9<br />
Mode-key....................................................... 10<br />
Mounting......................................................... 6<br />
Mounting in hanging Position .......................... 8<br />
Mounting in sidewise Position ......................... 8<br />
Mounting on the Floor ..................................... 7<br />
N<br />
Normal-Mode ............................................... 13<br />
O<br />
Optical parts ................................................ 18<br />
P<br />
Pan- Movement ............................................. 19<br />
Power Supply ................................................ 9<br />
Powercon ........................................................ 4<br />
S<br />
Safety distance ............................................... 6<br />
Safety Instructions .......................................... 5<br />
Secure the Device ......................................... 9<br />
Software Version ............................................. 1<br />
T<br />
Technical Specifications ............................ 19<br />
Tilt- Movement .............................................. 19<br />
U<br />
Up/Down-keys .............................................. 10<br />
V<br />
VBG 70 ........................................................... 6<br />
W<br />
Warranty claims .............................................. 6<br />
Weights and Measures ................................. 19<br />
White-Mode .................................................. 14<br />
<strong>GLP</strong> German <strong>Light</strong> Products <strong>GmbH</strong> (Instruction version 1.26) / from software version 1.72/30) 20
R-G-B<br />
<strong>GLP</strong> German <strong>Light</strong> Products <strong>GmbH</strong> (Instruction version 1.26) / from software version 1.72/30) 21