PRE-01 User's Manual - Audiomatica Srl
PRE-01 User's Manual - Audiomatica Srl
PRE-01 User's Manual - Audiomatica Srl

Create successful ePaper yourself
Turn your PDF publications into a flip-book with our unique Google optimized e-Paper software.
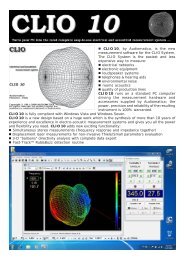
CLIO<br />
ELECTRICAL & ACOUSTICAL TESTS<br />
MICROPHONE<br />
<strong>PRE</strong>AMPLIFIER<br />
<strong>PRE</strong><strong>01</strong><br />
OPERATING MANUAL<br />
PRODUCT DESCRIPTION<br />
The microphone preamplifier <strong>PRE</strong>-<strong>01</strong> has been designed to match <strong>Audiomatica</strong>’s microphones MIC-<br />
<strong>01</strong> and MIC-02. It is particularly useful when the microphone has to be operated far from the<br />
analyzer or when weighted measurements are needed. <strong>PRE</strong>-<strong>01</strong> powers the microphone connected<br />
to its input with an 8.2V phantom supply and adds a selectable weighting filter (A or B or C); also<br />
available there is a 20 dB gain stage. The unit is operated with two standard 9V batteries or with an<br />
external DC power supply.<br />
TECHNICAL SPECIFICATIONS<br />
FREQUENCY RESPONSE: 7Hz÷110kHz (-3dB)<br />
WEIGHTING FILTERS: A, B, C (IEC 651 - TYPE I)<br />
PHANTOM POWER SUPPLY: 8.2V (5600 Ohm)<br />
GAIN :<br />
0 & 20dB (INTERNAL SETTINGS)<br />
INPUT IMPEDANCE:<br />
5600 Ohm<br />
OUTPUT IMPEDANCE:<br />
100 Ohm<br />
MAXIMUM OUTPUT VOLTAGE (@1kHz): 25 Vpp<br />
THD (@1kHz): 0.<strong>01</strong>%<br />
INPUT NOISE (@20dB gain): 7uV LIN, 5.3uV A<br />
DRIVE CAPABILITY:<br />
±7mA<br />
BATTERIES DURATION: >24h (alkaline cells)<br />
SIZE:<br />
12.5x19x5cm<br />
WEIGHT:<br />
900g<br />
USE OF THE <strong>PRE</strong>AMPLIFIER<br />
The MIC-<strong>01</strong> or MIC-02 microphone cable has to be connected to the preamplifier input while the<br />
preamplifier output has to be connected to the analyzer input. The unit is switched on with the<br />
POWER switch, while the TEST push-button controls the state of the unit; when pressing it, if the<br />
led light is on then the unit operates correctly, otherwise not: either the batteries are low or the<br />
external power supply is not connected. The FILTER switch inserts the weigthing filter. To choose<br />
the desired weighting filter type and to set the amplifier gain you have to modify the internal<br />
settings as described later.<br />
NOTE: if the 20 dB gain stage is inserted the overall sensitivity (microphone + pre) is 10<br />
times higher. For example if your microphone has a sensitivity of 17.1 mV/Pa and you<br />
preamplify it of 20 dB then you get a sensitivity of 171 mV/Pa.<br />
<strong>PRE</strong><strong>01</strong><br />
AUDIOMATICA<br />
ON<br />
ON<br />
OFF<br />
OFF<br />
INPUT OUTPUT FILTER TEST POWER<br />
<strong>PRE</strong>-<strong>01</strong> front panel.
BATTERY OPERATED MICROPHONE POWER<br />
SUPPLY & <strong>PRE</strong>AMPLIFIER<br />
SERIAL No<br />
____________<br />
DC IN (12÷16V)<br />
+<br />
MADE IN ITALY<br />
AUDIOMATICA SRL<br />
<strong>PRE</strong>-<strong>01</strong> rear panel.<br />
USE OF AN EXTERNAL POWER SUPPLY<br />
As it may be seen from the above figure the unit can be powered by an external DC power supply<br />
in the range 12÷16V capable of delivering a minimum of 100 mA. The silk-screen also reports<br />
connector wiring with the positive at the tip contact.<br />
INTERNAL SETTINGS<br />
To be able to modify the unit’s internal settings and to replace the batteries you have to open the<br />
unit itself; to do this first turn power off and then carefully unscrew the four screws at the top of the<br />
case. You will gain access to the preamplifier PCB where the dip switches 1-4 and the batteries are<br />
located. Please have Fig.1 as your reference.<br />
TO REPLACE BATTERIES<br />
Substitute the two 9V cells (BAT1 and BAT2) with two equivalent among the many available in the<br />
market (PP3, 6AM6, 6LR6, MN1604 etc.). You may also use rechargeable ones. Take great care to<br />
the polarity when inserting them into the sockets.<br />
TO SELECT A WEIGTHING FILTER<br />
Use dip switches 1-3, selecting one at a time, as follow:<br />
- ‘A weighting’ filter !dip switch 1 ON (2&3 OFF)<br />
- ‘B weighting’ filter !dip switch 2 ON (1&3 OFF)<br />
- ‘C weighting’ filter !dip switch 3 ON (1&2 OFF)<br />
Factory setting: ‘A weighting’ filter.<br />
TO CHANGE AMPLIFIER GAIN<br />
Use dip switch 4 as follow:<br />
- +20 dB gain ! dip switch 4 ON<br />
- 0 dB gain ! dip switch 4 OFF<br />
Factory setting: +20 dB gain.<br />
DIP SWITCHES 1-4<br />
+ -<br />
+ -<br />
BATTERIES POLARITY<br />
Fig.1 Internal settings.<br />
For More Information ....<br />
AUDIOMATICA<br />
VIA MANFREDI 12 - 5<strong>01</strong>36 FIRENZE -ITALY<br />
TEL : +39-0556599036- FAX : +39-0556503772<br />
E-MAIL: info@audiomatica.com<br />
INTERNET: www.audiomatica.com<br />
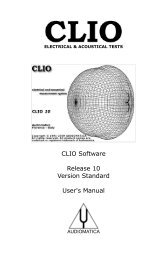
CLIO<br />
ELECTRICAL & ACOUSTICAL TESTS