Download Project PDF - Spotlight
Download Project PDF - Spotlight
Download Project PDF - Spotlight

You also want an ePaper? Increase the reach of your titles
YUMPU automatically turns print PDFs into web optimized ePapers that Google loves.
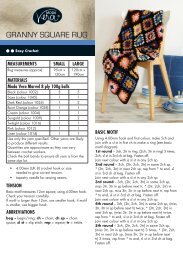
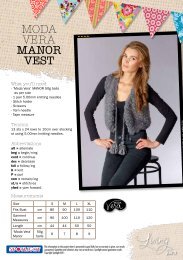
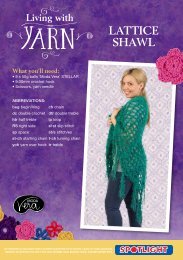
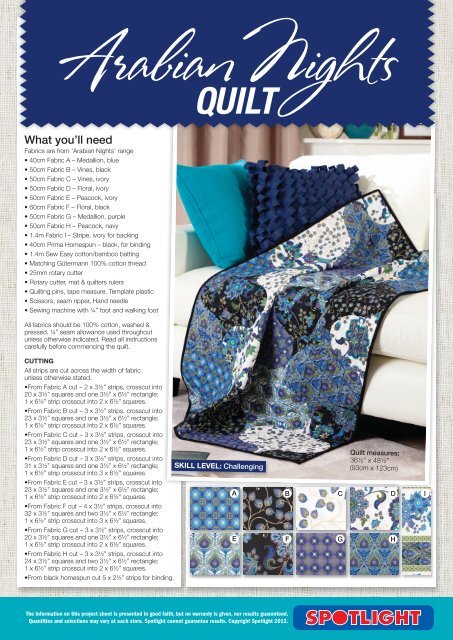
Arabian Nights<br />
QUILT<br />
What you’ll need<br />
Fabrics are from ‘Arabian Nights’ range<br />
• 40cm Fabric A – Medallion, blue<br />
• 50cm Fabric B – Vines, black<br />
• 50cm Fabric C – Vines, ivory<br />
• 50cm Fabric D – Floral, ivory<br />
• 50cm Fabric E – Peacock, ivory<br />
• 60cm Fabric F – Floral, black<br />
• 50cm Fabric G – Medallion, purple<br />
• 50cm Fabric H – Peacock, navy<br />
• 1.4m Fabric I – Stripe, ivory for backing<br />
• 40cm Prima Homespun – black, for binding<br />
• 1.4m Sew Easy cotton/bamboo batting<br />
• Matching Gütermann 100% cotton thread<br />
• 25mm rotary cutter<br />
• Rotary cutter, mat & quilters rulers<br />
• Quilting pins, tape measure, Template plastic<br />
• Scissors, seam ripper, Hand needle<br />
• Sewing machine with ¼” foot and walking foot<br />
All fabrics should be 100% cotton, washed &<br />
pressed. ¼” seam allowance used throughout<br />
unless otherwise indicated. Read all instructions<br />
carefully before commencing the quilt.<br />
CUTTING<br />
All strips are cut across the width of fabric<br />
unless otherwise stated.<br />
• From Fabric A cut – 2 x 3½” strips, crosscut into<br />
20 x 3½” squares and one 3½” x 6½” rectangle;<br />
1 x 6½” strip crosscut into 2 x 6½” squares.<br />
• From Fabric B cut – 3 x 3½” strips, crosscut into<br />
23 x 3½” squares and one 3½” x 6½” rectangle;<br />
1 x 6½” strip crosscut into 2 x 6½” squares.<br />
• From Fabric C cut – 3 x 3½” strips, crosscut into<br />
23 x 3½” squares and one 3½” x 6½” rectangle;<br />
1 x 6½” strip crosscut into 2 x 6½” squares.<br />
• From Fabric D cut – 3 x 3½” strips, crosscut into<br />
31 x 3½” squares and one 3½” x 6½” rectangle;<br />
1 x 6½” strip crosscut into 3 x 6½” squares.<br />
• From Fabric E cut – 3 x 3½” strips, crosscut into<br />
23 x 3½” squares and one 3½” x 6½” rectangle;<br />
1 x 6½” strip crosscut into 2 x 6½” squares.<br />
• From Fabric F cut – 4 x 3½” strips, crosscut into<br />
32 x 3½” squares and two 3½” x 6½” rectangle;<br />
1 x 6½” strip crosscut into 3 x 6½” squares.<br />
• From Fabric G cut – 3 x 3½” strips, crosscut into<br />
20 x 3½” squares and one 3½” x 6½” rectangle;<br />
1 x 6½” strip crosscut into 2 x 6½” squares.<br />
• From Fabric H cut – 3 x 3½” strips, crosscut into<br />
24 x 3½” squares and two 3½” x 6½” rectangle;<br />
1 x 6½” strip crosscut into 2 x 6½” squares.<br />
• From black homespun cut 5 x 2½” strips for binding.<br />
SKILL LEVEL: Challenging<br />
A<br />
E<br />
B C<br />
D I<br />
F<br />
G<br />
Quilt measures:<br />
36½” x 48½”<br />
(93cm x 123cm)<br />
H<br />
The information on this project sheet is presented in good faith, but no warranty is given, nor results guaranteed.<br />
Quantities and selections may vary at each store. <strong>Spotlight</strong> cannot guarantee results. Copyright <strong>Spotlight</strong> 2012.
Arabian<br />
Nights<br />
QUILT<br />
Back<br />
QUILT TOP<br />
1. Trace templates A and B onto template plastic, cut out and<br />
mark. Note – To use templates, position template in one corner<br />
of 3½” square and cut around the curve using the 25mm rotary<br />
cutter. Template A – keep the quarter circle. Template B – keep<br />
the background and discard the quarter circle.<br />
2. Using template A and 3½” squares cut the following quarter<br />
circles – 10 x Fabric A, 11 x Fabric B, 11 x Fabric C,<br />
15 x Fabric D, 11 x Fabric E, 16 x Fabric F, 10 x Fabric G,<br />
12 x Fabric H.<br />
3. Using template B and 3½” squares cut the following<br />
background pieces – 10 x Fabric A, 11 x Fabric B,<br />
11 x Fabric C, 15 x Fabric D, 11 x Fabric E, 16 x Fabric F,<br />
10 x Fabric G, 12 x Fabric H.<br />
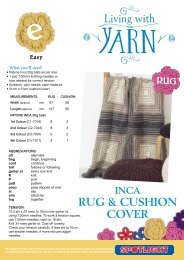
4. Lay out the quilt top – quarter circles, background pieces,<br />
remaining 3½” squares, 3½” x 6½” rectangles and 6½” squares<br />
refer to diagram 1 for colour and diagram 2 for block<br />
placement.<br />
5. To sew quarter circles to background pieces together mark<br />
centre of curve on each piece by folding in half and creasing.<br />
Place background piece on top, right sides facing, and pin<br />
together at the centre point with pin at right angles to the seam.<br />
6. With pieces aligned stitch to the pin at the centre of curve using<br />
fi ngertips or wooden skewer to help keep curved edges<br />
aligned. With needle down, lift presser foot and adjust top<br />
fabric away from you, align edges and sew, stopping 1” from<br />
end to adjust top fabric making sure ends are aligned.<br />
Tip: Hold one piece of fabric with the right hand and the other with<br />
the left so you can move the two pieces back and forth as you<br />
sew. Keeping your eye on the small area where you are actually<br />
sewing as you move down the strips sewing them together.<br />
7. There is no need to clip curve just press seam. Sew all quarter<br />
circles to background pieces and replace in layout.<br />
8. Sew blocks together in each row 1-9. Then sew rows together.<br />
9. Layer backing (Fabric I - Stripe, Ivory), batting and quilt top,<br />
baste together. Stipple quilt or quilt as desired.<br />
10. Join the 5 x 2½” binding strips to make one long strip. Press in<br />
half lengthwise and bind mitering corners. Attach a label or sign<br />
and date your quilt.<br />
A<br />
Row 1<br />
Row 2<br />
Row 3<br />
Row 4<br />
Row 5<br />
Row 6<br />
Row 7<br />
Row 8<br />
Row 9<br />
B<br />
Diagram 1<br />
E F G B<br />
A B C<br />
G<br />
A<br />
C<br />
D<br />
F<br />
D<br />
H<br />
AUSTRALIA spotlight.com.au or call 1300 305 405<br />
6½" square<br />
NEW ZEALAND spotlight.co.nz or call 0800 276 222<br />
SINGAPORE spotlight.com.sg or call 6733 9808<br />
D<br />
C<br />
G<br />
B<br />
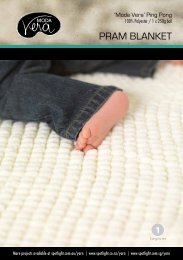
Diagram 2<br />
3½" square<br />
3½" x 6½" rectangle<br />
6½" square<br />
3½” 3½" square<br />
3½” x 6½” rectangle 6½” square<br />
3½" x 6½" rectangle<br />
Trace these<br />
templates at scale<br />
to make your quilt!<br />
G<br />
E<br />
F<br />
E<br />
F<br />
D<br />
E<br />
H<br />
B<br />
A<br />
F<br />
D<br />
H<br />
C<br />
3½" square<br />
3½" x 6½" rectangle<br />
6½" square