Featuring fabrics from Mardi Gras by Jinny Beyer - Logans ...
Featuring fabrics from Mardi Gras by Jinny Beyer - Logans ...
Featuring fabrics from Mardi Gras by Jinny Beyer - Logans ...

Create successful ePaper yourself
Turn your PDF publications into a flip-book with our unique Google optimized e-Paper software.
Designed <strong>by</strong> <strong>Jinny</strong> <strong>Beyer</strong><br />
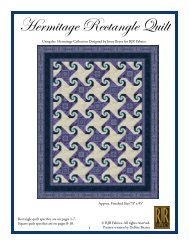
Blue colorway 66 3 /4" x 78 3 /4"<br />
<strong>Featuring</strong> <strong>fabrics</strong> <strong>from</strong><br />
<strong>Mardi</strong> <strong>Gras</strong> <strong>by</strong> <strong>Jinny</strong> <strong>Beyer</strong><br />
Red colorway 66 3 /4" x 78 3 /4"
<strong>Mardi</strong> <strong>Gras</strong><br />
Designed <strong>by</strong> <strong>Jinny</strong> <strong>Beyer</strong><br />
Instructions <strong>by</strong> Margrit Hall<br />
Finished Quilt Size: 66 3 /4" x 78 3 /4"<br />
Finished Block Size: 12"<br />
All seams are 1 /4" – All strips are cut the width of the fabric, except as instructed otherwise – carefully trim all selvages.<br />
No. Fabric Swatch Style Cutting Directions Yardage<br />
Cut 5 strips 4 5 /8" wide. Cut 80<br />
A A<br />
1 5867-02 Template A's. Make Template A <strong>from</strong> 1 yd<br />
A A<br />
semi-transparent template plastic.<br />
2 5866-04<br />
Cut 7 strips 4" wide.<br />
Cut into 160 rectangles x 4".<br />
4"<br />
11/2"<br />
7/8 yd<br />
3 5868-04<br />
Cut 4 strips 3 1 /4" wide. Cut into 80 rectangles 1 1 /2" x 3 1 /4".<br />
Cut 4 strips 4" wide. Cut into 80 rectangles 1 1 /2" x 4".<br />
7/8 yd<br />
*4 5866-41 Cut 8 strips 4 1 /2" wide. Cut into 160 rectangles 1 3 /4" x 4 1 /2". 1 1 /8 yds<br />
5 5867-04 Cut 7 strips 4 1 /2" wide. Cut into 160 rectangles 1 1 /2" x 4 1 /2". 1 yd<br />
6 5869-04 Cut 7 strips 4 1 /2" wide. Cut into 160 rectangles 1 1 /2" x 4 1 /2". 1 yd<br />
7 5866-01 Cut 7 strips 4" wide. Cut into 160 rectangles 1 1 /2" x 4". 7/8 yd<br />
Cut 4 strips, lengthwise, 2 1 /2" <strong>by</strong> length of fabric for the 2nd<br />
* 8 5869-01<br />
border. From the remaining fabric, cut 8 strips 4" wide <strong>by</strong> width<br />
of fabric (fabric is approximately 32" wide). Cut into 160<br />
rectangles 1 1 /2" x 4".<br />
2 1 /4 yds<br />
9 5863-01 See Cutting Border Print directions. 6 1 /2 yds<br />
10 5747-06 Binding 3/4 yd<br />
11 Any Coordinating Fabric for Backing 4 7 /8 yds<br />
* Yardage and cutting for the Red colorway differs <strong>from</strong> the chart above in Fabrics 4 & 8 because of the 2nd border. (Refer to Fabric Requirement & Cutting<br />
chart for Red colorway on following page.) For block construction, Fabric numbers are the same for the two colorways.<br />
Cutting Border Print<br />
Make sure to leave a 1 /4" seam allowance beyond the<br />
outside edge of each border strip.<br />
4. Using Templates B and C, cut 80 of Template B, and 80<br />
of Template C <strong>from</strong> the remaining wide strips of the border<br />
print fabric.<br />
1. Make Templates C and D <strong>from</strong> semi-transparent template<br />
plastic. Draw the 1 /4" seam allowance line on the<br />
template and a line down the center of the template.<br />
Cut Center<br />
of Connecting<br />
Strip<br />
2. From the wide strip on the border print fabric, cut 2 strips<br />
6 1 /8" x 84" for the top and bottom of the quilt, and 4 strips<br />
6 1 /8" x 54" for the sides.<br />
3. From the narrow strip on the border print fabric, cut 2<br />
strips 2" x 60" for the top and bottom of the quilt, and 4<br />
strips 2" x 40" for the sides. When cutting strips, cut on the<br />
exact center of the narrow connecting strip.<br />
B<br />
C<br />
Wide Strip<br />
Cut Center<br />
of Connecting<br />
Strip<br />
Narrow Strip
Constructing Block<br />
Place <strong>fabrics</strong> and sew on the front side of the paper piecing<br />
pattern.<br />
1. Using a glue stick or pin, glue or pin a Template A of<br />
Fabric 1, right side up, on Position 1 of the paper piecing<br />
pattern. Place a 11/2" x 4" rectangle of Fabric 2, right sides<br />
together, on top of Fabric 1. Place the edge of the Fabric<br />
2 rectangle against the black line between Position 1 and<br />
2. Sew 1/4" <strong>from</strong> the line. Press the rectangle back to<br />
cover Position 2. Trim even with the black line.<br />
3. To each of the 80<br />
completed paper<br />
pieced sections,<br />
sew a Template B to<br />
the top left corner<br />
and a Template C<br />
to the bottom right<br />
corner. Remove paper.<br />
B<br />
C<br />
4. Sew 4 sections together as illustrated to make a block.<br />
B<br />
B<br />
C C<br />
C C<br />
2. Using the color illustration for fabric color, continue to<br />
sew, press, and trim in the sequence listed on the paper<br />
piecing pattern. When the paper pieced section is<br />
completed, trim the section even with the outer edge of<br />
the black line. Make 80.<br />
Red Colorway<br />
B B<br />
Quilt Assembly<br />
Using color photo, layout blocks to construct the quilt body.<br />
There will be 5 rows of 4 blocks each.<br />
No. Fabric Swatch Style Cutting Directions Yardage<br />
1 5867-02<br />
Cut 5 strips 4 5 /8" wide. Cut 80 template A's. Make Template A<br />
<strong>from</strong> semi-transparent template plastic.<br />
1 yd<br />
2 5868-12 Cut 7 strips 4" wide. Cut into 160 rectangles 1 1 /2" x 4". 7/8 yd<br />
3 5867-03<br />
*4 5866-03<br />
Cut 4 strips 3 1 /4" wide. Cut into 80 rectangles 1 1 /2" x 3 1 /4".<br />
Cut 4 strips 4" wide. Cut into 80 rectangles 1 1 /2" x 4".<br />
Cut 4 strips, lengthwise, 2 1 /2" <strong>by</strong> length of fabric for the 2nd<br />
border. From the remaining fabric, cut 9 strips 4 1 /2" wide <strong>by</strong><br />
width of fabric (fabric is approximately 32" wide). Cut into<br />
160 rectangles 1 3 /4" x 4 1 /2".<br />
7/8 yd<br />
2 1 /4 yds<br />
5 5868-02 Cut 7 strips 4 1 /2" wide. Cut into 160 rectangles 1 1 /2" x 4 1 /2". 1 yd<br />
6 5866-02 Cut 7 strips 4 1 /2" wide. Cut into 160 rectangles 1 1 /2" x 4 1 /2". 1 yd<br />
7 5866-21 Cut 7 strips 4" wide. Cut into 160 rectangles 1 1 /2" x 4". 7/8 yd<br />
*8 5865-02 Cut 7 strips 4" wide. Cut into 160 rectangles 1 1 /2" x 4". 7/8 yd<br />
9 5863-02 See Cutting Border Print directions. 6 1 /2 yds<br />
10 3302-02 Binding 3/4 yd<br />
11 Any Coordinating Fabric for Backing 4 7 /8 yds
<strong>Jinny</strong>'s Method for Framing a Rectangular Quilt with a Border Print<br />
Because <strong>Mardi</strong> <strong>Gras</strong> is rectangular, the side border print strips must be pieced to ensure perfectly matching motifs in the<br />
border corners, as on the featured quilt. Here are <strong>Jinny</strong>'s step-<strong>by</strong>-step instructions for cutting and piecing the strips.<br />
1. Place one 2" x 60" inner border strip across the middle of<br />
the quilt, centering a mirror-image motif <strong>from</strong> the border<br />
print at the exact center of the quilt (Figure 1). Using a<br />
right-angle, 45° triangle to mark miter along one end of<br />
the strip, positioning triangle at edge of quilt as indicated<br />
(see arrow in diagram) to ensure that the seam allowance<br />
is included. Mark, then cut the miter (make sure miters<br />
are exact mirror-images).<br />
2. Carefully pick up the mitered edge of the border strip and<br />
bring it over to the other end of the border strip at the<br />
opposite side of the quilt. Position it at the precise point<br />
where the miter will be, making sure the fabric design<br />
matches. Cut the second miter.<br />
3. Using this first mitered strip as a pattern, place it on the<br />
remaining 60" inner border strip, matching the design<br />
exactly, and cut an identical strip. Reserve these two<br />
strips for the top and bottom inner borders.<br />
Figure 1 – Cut Top & Bottom Inner Border Strips
4. Because this quilt is rectangular, to ensure that the motifs<br />
will match at the corners, it is necessary to sew a seam in<br />
the center of each side border strip as follows. Place one<br />
of the cut top/bottom inner border strips on one of the<br />
border print 2" x 40" strips, matching the fabric design.<br />
Cut one miter to match the miter on the cut strip. Place the<br />
newly cut strip along the length of the quilt through the<br />
center of the quilt with the miter at the edge of the quilt<br />
(Figure 2). Bring the strip to the exact center of the quilt<br />
and cut it off 1 /4" beyond the center.<br />
Cutting line<br />
Sewing line<br />
Figure 2 – Cut Mirror-Image Half Strips for Inner Border Sides
5. Using this cut strip as a guide, cut one more piece<br />
identical to it and two strips that are the exact mirror<br />
images of the first piece. Sew two mirror-imaged strips<br />
together to form the long (side) borders (Figure 3).<br />
6. To prepare to sew the inner border strips to the quilt,<br />
begin <strong>by</strong> pinning the midpoint of one of the strips to the<br />
middle of one of the edges of the quilt. Pin the corners<br />
next. Then find the midpoint of each half and pin.<br />
Continue finding midpoints and pinning. Finally ease in<br />
any fullness, pinning carefully all along the edge. Sew all<br />
four inner border strips to the quilt. Sew the miters last.<br />
7. Sew the middle border strips to all four sides of the quilt<br />
and miter the corners.<br />
8. Repeat steps 1-6 for the outer border.<br />
9. Layer the backing, batting, and quilt top; baste. Quilt,<br />
bind, and finish as desired.<br />
Seam<br />
Figure 3 – Piece Side Strips
Paper Piecing Pattern<br />
(Shown at 100%, DO NOT scale when printing)<br />
12<br />
14<br />
8<br />
4<br />
10<br />
5<br />
6<br />
9<br />
1<br />
2<br />
13<br />
3<br />
7<br />
15<br />
11<br />
0 1" 2" 3"<br />
Use this 3" scale to insure the accuracy of your printout.
Templates<br />
(Shown at 100%, DO NOT scale when printing)<br />
Template C<br />
Template A<br />
Template B<br />
0 1" 2" 3"<br />
Use this 3" scale to insure the accuracy of your printout.