Featuring fabrics from County Clare by Jinny Beyer - RJR Fabrics
Featuring fabrics from County Clare by Jinny Beyer - RJR Fabrics
Featuring fabrics from County Clare by Jinny Beyer - RJR Fabrics

You also want an ePaper? Increase the reach of your titles
YUMPU automatically turns print PDFs into web optimized ePapers that Google loves.
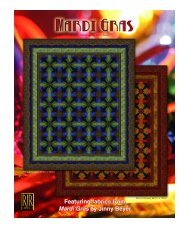
Designed <strong>by</strong> <strong>Jinny</strong> <strong>Beyer</strong><br />
73" x 73" Blue Colorway<br />
73" x 73" Red Colorway<br />
<strong>Featuring</strong> <strong>fabrics</strong> <strong>from</strong> <strong>County</strong> <strong>Clare</strong><br />
<strong>by</strong> <strong>Jinny</strong> <strong>Beyer</strong>
Skill Level: Intermediate - Advanced<br />
<strong>County</strong> <strong>Clare</strong><br />
Designed <strong>by</strong> <strong>Jinny</strong> <strong>Beyer</strong><br />
Finished Quilt: 73" x 73"<br />
Instructions <strong>by</strong> Shannon Murray<br />
Please read the pattern carefully before you begin<br />
All seams are 1 /4"-All strips are cut the width of fabric, except as instructed otherwise-carefully trim all selvages.<br />
An original design <strong>by</strong> <strong>Jinny</strong> <strong>Beyer</strong>, <strong>County</strong> <strong>Clare</strong> is a beautiful quilt design that gives an optical illusion of three-dimensional depth <strong>by</strong> fragmenting colors.<br />
The toile scenes are bordered and complemented <strong>by</strong> their surrounding fragmented diamonds and squares. Four identical x-shaped units make up this<br />
quilt. Each unit is a combination of eight fragmented parallelograms and four fragmented squares. The four x units are joined together with four bordered<br />
square toile scenes set on-point.<br />
To finish the quilt, eight bordered half squares set on-point are set into the outer sections of the x’s of the four original units. The quilt is classically<br />
finished in the traditional <strong>Jinny</strong> <strong>Beyer</strong> manner <strong>by</strong> the addition of a complimentary border.<br />
Fabric Requirements and Cutting Directions<br />
Fabric<br />
Key<br />
Border Prints<br />
Border<br />
Print<br />
Fabric<br />
Swatch<br />
Style<br />
Style<br />
Fabric<br />
Colorway<br />
Colorway Cutting Directions Yardage<br />
Swatch<br />
#1 – Blue #2 – Red<br />
From the wide stripe of the border fabric cut 4 strips 99"<br />
long <strong>by</strong> 6" wide.<br />
From the narrow stripe of the border fabric cut 4 strips<br />
6248-04 6248-03 2 1 /8" x 62".<br />
3 1 /2 Yards<br />
Set aside the remainder of the narrow border print to<br />
use in Cutting D and F, E <strong>from</strong> the Toile Print and an F<br />
<strong>from</strong> Border Print <strong>Fabrics</strong>.<br />
Middle 2266-06 5747-08<br />
Border Palette #66 Palette #140<br />
Cut 4 strips 3 1 /2" wide the length of the fabric.<br />
1 Yard<br />
NOTE: Cut<br />
length-wise.<br />
(2 Yards split<br />
lengthwise down<br />
the middle of the<br />
Fabric.)<br />
Focus Fabric: Refer to Templates D and E for fussy cutting - both machine and hand piecing.<br />
For cutting directions see Cutting D and F <strong>from</strong> Toile<br />
Toile 6254-01 6254-03 1 Yard<br />
Print <strong>Fabrics</strong>.<br />
Unit 1<br />
& 1(r):<br />
For machine piecing, follow strip cutting directions. For hand piecing, cut the number of templates given in italic print. After cutting out<br />
the templates, refer to Template G to trim the sharper points of the parallelogram – this allows for perfect alignment when piecing.<br />
Cut 2 strips – 2 3 /4" the width of the fabric<br />
Fabric #1 6249-04 6249-03 (approximately 42" wide). 1/4 Yard<br />
Cut 8 pieces of Template A and 8 of Template A(r).<br />
Cut 4 strips – 2 3 /4" the width of the fabric<br />
Fabric #2 5745-04 6251-03 (approximately 42" wide). 3/8 Yard<br />
Palette #62<br />
Cut 16 pieces of Template A and 16 of Template A(r).<br />
Cut 6 strips – 2 3 /4" the width of the fabric<br />
Fabric #3 6252-11 6252-03 (approximately 42" wide). 5/8 Yard<br />
Cut 24 pieces of Template A and 24 of Template A(r).
Fabric Requirements and Cutting Directions (continued)<br />
Fabric<br />
Key<br />
Fabric<br />
Swatch<br />
Style<br />
Style<br />
Fabric<br />
Colorway<br />
Colorway Cutting Directions Yardage<br />
Swatch<br />
#1 – Blue #2 – Red<br />
Cut 4 strips – 2 3 /4" the width of the fabric<br />
Fabric #4 6250-01 6249-02 (approximately 42" wide).<br />
Cut 16 pieces of Template A and 16 of Template A(r).<br />
3/8 Yard<br />
Cut 2 strips– 2 3 /4" the width of the fabric<br />
Fabric #5 6251-01 6253-31 (approximately 42" wide).<br />
Cut 8 pieces of Template A and 8 of Template A(r).<br />
1/4 Yard<br />
Unit 2<br />
& 2(r):<br />
For machine piecing, follow strip cutting directions. For hand piecing, cut the number of templates given in italic print. After cutting out<br />
the templates, refer to Template G to trim the sharper points of the parallelogram – this allows for perfect alignment when piecing.<br />
Cut 2 strips – 2 3 /4" the width of the fabric<br />
Fabric #6 2767-03 5745-09 (approximately 42" wide). 1/4 Yard<br />
Palette #127 Palette #146 Cut 8 pieces of Template B and 8 of Template B(r).<br />
Cut 4 strips – 2 3 /4" the width of the fabric<br />
Fabric #7 6249-01 6251-02 (approximately 42" wide). 3/8 Yard<br />
Cut 16 pieces of Template B and 16 of Template B(r).<br />
Cut 6 strips – 2 3 /4" the width of the fabric<br />
Fabric #8 6251-04 6250-02 (approximately 42" wide). 5/8 Yard<br />
Cut 24 pieces of Template B and 24 of Template B(r).<br />
Cut 4 strips – 2 3 /4" the width of the fabric<br />
Fabric #9 6253-01 5747-08 (approximately 42" wide). 3/8 Yard<br />
Palette #140 Cut 16 pieces of Template B and 16 of Template B(r).<br />
Cut 2 strips – 2 3 /4" the width of the fabric<br />
Fabric #10 2266-06 5748-02 (approximately 42" wide). 1/4 Yard<br />
Palette #66 Palette #98 Cut 8 pieces of Template B and 8 of Template B(r).<br />
Unit 3<br />
& 3(r):<br />
For machine piecing, follow strip cutting directions. For hand piecing, cut the squares with directions given in italic<br />
print <strong>from</strong> Template 3 or 3(r).<br />
Fabric #11 4002-09 9701-D4<br />
Palette #79 Palette #113<br />
Fabric # 12 5747-07 3302-08<br />
Palette #80 Palette #114<br />
Fabric #13 6252-04 6251-03<br />
Fabric #14 6250-04 6253-04<br />
Cut 2 – 2 3 /4" strips the width of the fabric<br />
(approximately 42" wide).<br />
Cut 2 – 2 3 /4" strips the width of the fabric.<br />
Sub-cut into 16 squares – 2 3 /4" x 2 3 /4" .<br />
Cut 4 strips – 2 3 /4" the width of the fabric<br />
(approximately 42" wide).<br />
Cut 3 strips – 2 3 /4" the width of the fabric.<br />
Sub-cut into 32 squares – 2 3 /4" x 2 3 /4" .<br />
Cut 6 strips – 2 3 /4" the width of the fabric<br />
(approximately 42" wide).<br />
Cut 4 strips – 2 3 /4" the width of the fabric.<br />
Sub-cut into 48 squares – 2 3 /4" x 2 3 /4" .<br />
Cut 4 strips – 2 3 /4" the width of the fabric<br />
(approximately 42” wide).<br />
Cut 3 strips – 2 3 /4" the width of the fabric.<br />
Sub-cut into 32 squares – 2 3 /4" x 2 3 /4" .<br />
1/4 Yard<br />
3 /8 Yard<br />
5/8 Yard<br />
3/8 Yard
Fabric Requirements and Cutting Directions (continued)<br />
Fabric<br />
Key<br />
Fabric #15<br />
Fabric<br />
Swatch<br />
Style<br />
Style<br />
Fabric<br />
Colorway<br />
Colorway Cutting Directions Yardage<br />
Swatch<br />
#1 – Blue #2 – Red<br />
Cut 2 strips – 2 3 /4" the width of the fabric<br />
5747-06 9812-10 (approximately 42" wide). 1/4 Yard<br />
Palette #68 Palette #8 Cut 2 strips – 2 3 /4" the width of the fabric.<br />
Sub-cut into 16 squares – 2 3 /4" x 2 3 /4" .<br />
Binding 6251-04 6251-03 3/4 Yard<br />
Backing<br />
Any Coordinating Backing Fabric<br />
Note: Buy additional fabric if fabric has a repeat<br />
in order to align the repeat properly before seaming.<br />
4 1 /2 Yards<br />
Optional notions and resources: <strong>Jinny</strong> <strong>Beyer</strong>’s Perfect Piecer $13.95, Quiltmaking <strong>by</strong> Hand <strong>by</strong> <strong>Jinny</strong> <strong>Beyer</strong> $29.95 available at www.jinnybeyer.com<br />
Capturing the Three-Dimensional Design<br />
To Capture the three-dimensional design it is important to follow the fabric<br />
placement .Refer to the quilt pictured and Figure #6 for exact placement.<br />
Units 1 & 1(r), 2 & 2(r), and 3 & 3(r) are identical in color. The difference<br />
between these individual units is the way the seams are pressed and the<br />
orientation of the strips in the fragmented block; i.e., left to right or right to<br />
left.<br />
When piecing this quilt the bias of the quilt fabric will be sewn on, it is<br />
important to avoid stretching the fabric during the piecing process. To<br />
avoid stretching the fabric when machine piecing use a walking foot. If a<br />
walking foot is unavailable, block the fabric, or, have the bias fabric on the<br />
bottom of the two <strong>fabrics</strong> (against the feed dogs) to minimize stretching<br />
the fabric.<br />
Constructing the Strip Sets<br />
1. From the 2 3 /4" strips cut <strong>from</strong><br />
<strong>fabrics</strong> 1-15, construct three<br />
individual strip sets for each<br />
Unit. See Figure #1.<br />
PIECING NOTE:<br />
The arrows show the direction<br />
to press the seams when<br />
constructing the strip sets.<br />
Unit 1:<br />
Fabric 1<br />
Fabric 2<br />
Fabric 3<br />
Unit 1(r):<br />
Fabric 1<br />
Fabric 2<br />
Fabric 3<br />
Unit 2:<br />
Fabric 6<br />
Fabric 7<br />
Fabric 8<br />
Unit 2(r):<br />
Fabric 6<br />
Fabric 7<br />
Fabric 8<br />
Unit 3:<br />
Fabric 11<br />
Fabric 12<br />
Fabric 13<br />
Unit 3(r):<br />
Fabric 11<br />
Fabric 12<br />
Fabric 13<br />
Fabric 2<br />
Fabric 3<br />
Fabric 4<br />
Fabric 2<br />
Fabric 3<br />
Fabric 4<br />
Fabric 7<br />
Fabric 8<br />
Fabric 9<br />
Fabric 7<br />
Fabric 8<br />
Fabric 9<br />
Fabric 12<br />
Fabric 13<br />
Fabric 14<br />
Fabric 12<br />
Fabric 13<br />
Fabric 14<br />
Figure #1<br />
Fabric 3<br />
Fabric 4<br />
Fabric 5<br />
Fabric 3<br />
3<br />
Fabric 4<br />
Fabric 5<br />
Fabric 8<br />
Fabric 9<br />
Fabric 10<br />
Fabric 8<br />
Fabric 9<br />
Fabric 10<br />
Fabric 13<br />
Fabric 14<br />
Fabric 15<br />
Fabric 13<br />
Fabric 14<br />
Fabric 15<br />
Making the Fragmented 45° Diamonds<br />
1. To make Units 1, 1(r), 2 and 2(r), cut each strip set into 45° diagonals<br />
at 3" increments. Cut 8 diagonals <strong>from</strong> each strip set. For Units 1 & 2,<br />
cut the diagonal to the right. For Units 1(r) & 2(r), cut the diagonal to<br />
the left. See below before cutting, ensure the strip set is in the proper<br />
order – lighter fabric on top of set and darker fabric on the bottom.<br />
Units 1 & 2:<br />
L<br />
Units 1(r) & 2(r):<br />
D D<br />
3" Wide<br />
to the right to the left<br />
3" Wide<br />
L<br />
NOTE:<br />
Cut all three<br />
strip sets for<br />
each unit as<br />
shown.<br />
2. After cutting the strip sets into individual strips, use Template G for the<br />
point trimmer and trim the two 45° angles. This allows for easier<br />
alignment when piecing the strip set together.<br />
Construct the 45° diamonds as shown in Figure #2.<br />
1<br />
5<br />
4<br />
Unit 1<br />
2<br />
2<br />
4<br />
3<br />
3<br />
3<br />
3<br />
3<br />
3<br />
2<br />
4<br />
2<br />
4<br />
Unit 1(r)<br />
1<br />
5<br />
Unit 2<br />
7<br />
Unit 2(r)<br />
Figure #2<br />
(For hand piecing, make eight units for each parallelogram shown in<br />
Figure #2. When pressing the seams follow the direction of the arrows in<br />
Figure # 2 for both hand and machine piecing.)<br />
8<br />
8<br />
9<br />
7<br />
7<br />
9<br />
6<br />
10<br />
8<br />
6<br />
10<br />
8 7<br />
Making the Fragmented 9-Patch Squares<br />
To make Units 3 and 3(r),<br />
Units 3 & 3(r):<br />
cut each strip set into<br />
2 3 /4" increments. Cut 8<br />
<strong>from</strong> each strip set.<br />
2 3 /4" Wide<br />
9<br />
9<br />
8<br />
8<br />
NOTE:<br />
Cut all three<br />
strip sets for<br />
each unit as<br />
shown.
Construct the 9-patch blocks as shown in Figure #3:<br />
11<br />
12<br />
13<br />
12<br />
13<br />
14<br />
13<br />
14<br />
15<br />
PIECING NOTE:<br />
Mark the seam allowance on the parallelograms and the squares with<br />
the 45°, 135° and the 90° angles on the Perfect Piecer. Do not sew<br />
through the seam allowance where the Y intersection meets within the<br />
construction of the Unit. For more information on constructing<br />
Y-seams, refer to pp.112–113 in Quiltmaking <strong>by</strong> Hand <strong>by</strong> <strong>Jinny</strong> <strong>Beyer</strong>.<br />
13<br />
14<br />
15<br />
12<br />
13<br />
14<br />
11<br />
12<br />
13<br />
Unit 3<br />
Unit 3(r)<br />
Figure #3:<br />
(For hand piecing, make eight units for each square shown in Figure #3.<br />
When pressing the seams follow the direction of the arrows in Figure # 3<br />
for both hand and machine piecing.<br />
Combining the Fragmented Units<br />
(Directions for hand piecing are the same.)<br />
Unit 3<br />
Unit 3(r)<br />
1. Combine the<br />
fragmented 15 14 13<br />
15 14 13<br />
5<br />
8<br />
parallelograms 14 13 12<br />
14 13 12<br />
4 4<br />
9 7<br />
of Unit 1 and 13 12 11<br />
13 12 11<br />
Unit 2(r) with<br />
3 3 3<br />
10 8 6<br />
8 9 10<br />
Unit 3 in a<br />
2 2<br />
5 4 3<br />
9 7<br />
Y-Seam as<br />
7 8 9<br />
4 3 2<br />
1<br />
8<br />
shown in Figure#4. 6 7 8<br />
3 2 1<br />
Make 8 – this becomes<br />
Unit #4. Do the same when Figure #4:<br />
Figure #5:<br />
combining unit 1(r) and Unit 2 with Unit 3(r) as shown in Figure #5.<br />
Make 8 – this becomes Unit #5.<br />
Cutting D, E <strong>from</strong> Toile Print Fabric and an F <strong>from</strong><br />
Border Print Fabric<br />
(Directions for hand piecing are the same.)<br />
1. Using Template D on point, center one of themes <strong>from</strong> the toile and fussy<br />
cut 4 squares 6 ¾” x 6 ¾”. Set aside to use in Constructing the Blocks.<br />
2. Using Template E on point, fussy cut 8 half squares (2 left, 2 right, 2 top &<br />
2 bottom half squares). Use the quilt pictured as a guide for exact<br />
placement for each piece.<br />
NOTE:<br />
l, r, t and b refer to the position on the quilt for Template E. Two E pieces<br />
will be at the left side, two will be on the right, two will be on the top, and<br />
two will be on the bottom of the quilt.<br />
3. Cut 32 pieces using Template F <strong>from</strong> the remaining narrow border print<br />
fabric. These pieces will border the toile prints cut <strong>from</strong> templates D &<br />
E. Mark the exact vertical center of plastic Template F and center on one<br />
of the two mirrored images in the narrow border stripe.<br />
NOTE:<br />
All F pieces must be centered on a mirror-imaged portion of the border<br />
print and cut identically in order for the mitered corners to align<br />
properly.<br />
4. Place the longest side of the template horizontally along a straight<br />
horizontal line in the narrow border - just outside the sewing line. This<br />
straight line makes a frame around the quilt block when pieced together.<br />
With the template plastic centered on the fabric, trace distinct patterns<br />
<strong>from</strong> the fabric onto the template. Make sure to alternate Template F as<br />
shown in Figure #7 in order to cut all 32 narrow border pieces<br />
<strong>from</strong> the remainder of the border print yardage. Cut 32 identical F<br />
pieces.<br />
2. Combine two Unit 4 pieces and two Unit 5 pieces as shown in<br />
Figure #6 to form an X-shaped section. Make 4–this becomes Unit # 6.<br />
4<br />
5<br />
Figure #7<br />
5<br />
4<br />
Constructing the Blocks<br />
Use the D pieces cut previously to construct the blocks. Piece together four<br />
mirror image F pieces to one D piece in four Y-seams as shown in Figure<br />
#8. Make 4 - this becomes Unit 8. Piece together two F pieces to one E<br />
piece in a Y-seam as shown in Figure #9. Make 8 - this becomes Unit 9.<br />
Figure #6:<br />
PIECING NOTE:<br />
Mark the seam allowance on the parallelograms and the squares with<br />
the 45°, 135° and the 90° angles on the Perfect Piecer. Do not sew<br />
through the seam allowance where the Y intersection will meet with a<br />
bordered toile print. See arrows in Figure 6.<br />
F<br />
F<br />
D<br />
F<br />
F<br />
Figure #8<br />
F<br />
E F<br />
Figure #9
Assembling the Quilt<br />
(Directions for hand piecing are the same.)<br />
1.Combine the four unit 6 pieces, two across and two down as shown in<br />
Figure #10. Do not sew through the seam allowances where the Unit 8<br />
pieces will be inset.<br />
2. Inset the four Unit 8 pieces into the center of the quilt top. Inset the<br />
eight Unit 9 pieces into the outer edges to complete the pieced portion<br />
of the quilt top.<br />
<strong>Jinny</strong>'s Method for Framing a Square Quilt with a<br />
Border Print<br />
9<br />
9<br />
9 9<br />
Figure #10<br />
(Directions for hand piecing are the same.)<br />
9<br />
8<br />
8 8<br />
8<br />
9<br />
9<br />
9<br />
1.Place one narrow (inner) border strip cut <strong>from</strong> the border print fabric<br />
across the middle of the quilt, centering a mirror-imaged motif <strong>from</strong> the<br />
narrow border at the exact center of the quilt. Use a right-angle, 45°<br />
triangle to mark the miter along one end of the strip, positioning triangle<br />
at the edge of the quilt as indicated in Figure #11 (see arrow). Cutting<br />
where the arrow indicates, at the exact edge of the quilt top, allows for<br />
the seam allowance. Mark, then cut the miter.<br />
2. Carefully pick up the mitered edge of the border strip and bring it over<br />
to the other end of the border strip at the opposite side of the quilt,<br />
making sure that the design matches. (If you have centered a motif <strong>from</strong><br />
the border print in the middle of the quilt the designs should match at<br />
the edges.) Cut the second miter.<br />
3. Using the first mitered strip as a pattern, place it on the remaining three<br />
narrow border strips, matching the design exactly. Cut three more<br />
identical strips.<br />
4. Sew the inner borders to the edges of the quilt. Begin <strong>by</strong> pinning the<br />
mid-point of one of the border pieces to the middle of one of the edges<br />
of the quilt. Pin the corners next then ease in any fullness, pinning<br />
carefully all along the edge( the edge of the quilt is usually a little wider<br />
than the center, because of bias edges or seams). Sew all four inner<br />
border strips to the quilt, stopping short of the 1 /4" seam allowance.<br />
Sew the miters last into a Y-seam.<br />
5. Repeat steps 1 through 4 for middle and outer borders.<br />
6. Layer the backing, batting, and quilt top; baste. Quilt bind and finish as<br />
desired.<br />
Figure #11
Templates (Shown at 100%, DO NOT scale when printing)<br />
D<br />
(full<br />
size square on-point)<br />
Cut 4<br />
3 or<br />
3r<br />
Point<br />
Trimmer<br />
Template G<br />
(Flip for Reverse)<br />
0 1" 2" 3"<br />
Use this 3" scale to insure the accuracy of your printout.
top<br />
Half square, on-point: 90° angle points into the interior of the quilt. Long side is<br />
bottom<br />
left<br />
E<br />
right<br />
the outer part of the quilt, abutting the small border<br />
Cut 2 of each<br />
F<br />
Cut<br />
A & B<br />
32<br />
A(r) & B(r)