Tuscan Sun Colorway 1 - RJR Fabrics
Tuscan Sun Colorway 1 - RJR Fabrics
Tuscan Sun Colorway 1 - RJR Fabrics

Create successful ePaper yourself
Turn your PDF publications into a flip-book with our unique Google optimized e-Paper software.
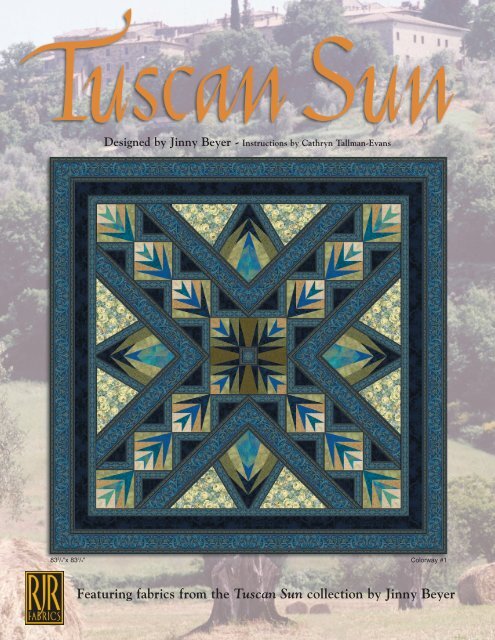
Designed by Jinny Beyer - Instructions by Cathryn Tallman-Evans<br />
83 3 /4"x 83 3 /4" <strong>Colorway</strong> #1<br />
Featuring fabrics from the <strong>Tuscan</strong> <strong>Sun</strong> collection by Jinny Beyer
<strong>Tuscan</strong> <strong>Sun</strong><br />
Finished quilt size 83 3 /4” x 83 3 /4”<br />
All strips are to be cut crosswise on the grain of the fabric (width of the fabric) unless otherwise noted.<br />
Yardage is calculated for 42” wide fabric. Carefully trim off all selvages. Please read the pattern carefully before you begin.<br />
Before beginning, please refer to Fabric Requirements chart on back cover.<br />
To Cut the Border Print Fabric:<br />
Cut all border print strips lengthwise. The border print consists of five large motif strips and<br />
six small motif strips. All border print strips must be cut with the motif carefully centered in<br />
the strip. Cut off 3 yards of border print fabric to<br />
use for the outer borders. From this yardage,<br />
cut five 5 1 /2" x 108" strips with the large motif<br />
centered in each strip and six 2 3 /8" x 108" strips<br />
with the small motif centered in each strip. For<br />
the outer borders, set aside four each of the<br />
large motif and small motif strips. The two<br />
remaining small motif strips will be used below.<br />
From the fifth large motif strip, cut four identical<br />
Template A triangles for the quilt’s large center<br />
square. Place the template on the fabric as<br />
Template A Placement<br />
illustrated at right.<br />
Cut off 2 1 /2 yards of border print fabric. From this yardage, cut six 2 3 /8" x 90" strips<br />
with the small motif centered in each strip. Using Template C, cut four identical pieces<br />
from the small motif border print strips as shown below. Flip the template and cut<br />
another four identical pieces for Template C Reverse.<br />
Template C Placement<br />
Using Template D, cut forty-eight identical pieces from the smaller border print strips as<br />
shown below. Mark points X and Y on the wrong side of each Template D piece.<br />
Template D Placement<br />
From the remaining 3 yards of border print fabric, cut five 5 3 /4" x 108" strips with the<br />
large motif centered in each strip. These strips will be used later to frame the obelisk<br />
block units.<br />
To Make the Paper Pieced Block Components:<br />
Paper piece the star point rectangles, palm frond block components and obelisk block<br />
components following the number sequence on each foundation. Using Foundation 1,<br />
the star point rectangles are made using the Fabric 2 rectangles for piece 1 and the<br />
2 1 /2" x 7" Fabric 6 rectangles for pieces 2 and 3. Make four star point retangle units.<br />
There are four different colorations for the palm frond blocks. Refer to the diagram<br />
Palm Frond Block Fabric Placement<br />
provided above for fabric placement. (The number in each unit represents the Fabric #<br />
indicated in the Fabric Requirements chart.) Make four each of Foundations 2 and 3 for each<br />
coloration. Using Foundations 4 and 5 make the obelisk block units. Use the 3 1 /4" x 8 3 /4" Fabric<br />
10 rectangles for piece 1. Use the 2" x 6 1 /4" Fabric 8 rectangles for piece 2. Use the 3" x 9 1 /2"<br />
Fabric 4 rectangles for piece 3. Use the 2 1 /2" x 7" Fabric 7 rectangles for piece 4. Use the<br />
3" x 11" Fabric 3 rectangles for piece 5. Use the 2 1 /2" x 10 1 /2" Fabric 6 rectangles for piece 6.<br />
To Make the Large Center Square:<br />
Using the smaller palm frond block units, pin a Foundation 2 unit to a Foundation 3 unit, and<br />
sew them together on the long center line, carefully matching all the points. Press the seam<br />
open. Repeat three times. Sew two Template A triangles together on one short side. Repeat.<br />
Sew these two triangle units together to make a square. Sew a small palm frond block to<br />
each long side of a Foundation 1 unit. Repeat. Sew a Foundation 1 unit to each side of the<br />
square made from the Template A triangles. Using the quilt pictured on the cover as a guide,<br />
sew these three units together to make the large center square.<br />
To Make the Obelisk Block Units:<br />
Pin a Foundation 4 unit to a Foundation 5 unit, and sew them together on the long center<br />
line, carefully matching all the points. Press the seam open. Repeat three times. Using the<br />
quilt pictured on the cover as a guide, sew a Template C border print piece to the right side<br />
of an obelisk block, and a reverse Template C piece to the left side of the same block to<br />
make one obelisk block unit. Repeat three times. Sew a Template B triangle to the left side<br />
of an obelisk block unit and a Template B Reverse triangle to the right side of an obelisk<br />
block unit. Repeat three times.<br />
Mark<br />
Here<br />
From the 5 3 /4" strips of border print, cut eight<br />
pieces for the obelisk block unit frames, using the<br />
following procedure. For the right-hand frame, lay<br />
the border print strip as shown at right. With<br />
pencil, lightly mark the center point as shown at<br />
right. Lay a ruler with the 45-degree marking along<br />
the edge of the fabric and the 1 /4" line running<br />
through the dot. Cut. On the wrong side of the<br />
smaller palm<br />
frond block
TEMPLATE D<br />
PALM<br />
FROND<br />
BLOCK<br />
TEMPLATE C<br />
DARK<br />
TRIANGLES<br />
TEMPLATE B<br />
SMALLER<br />
PALM<br />
FROND<br />
BLOCK<br />
TEMPLATE C<br />
OBELISK<br />
BLOCK<br />
FOUNDATION 1
4”<br />
Foundation 1 Foundation 1<br />
6”<br />
8”<br />
2<br />
3<br />
To Make the Paper Foundations:<br />
The center square, obelisk blocks and palm frond<br />
blocks are all made by paper piecing. Make four<br />
Foundation 1 units by enlarging the pattern provided<br />
200% and printing two per page on 8 1 /2” x 11” paper.<br />
Make sixteen each of Foundations 2 and 3 by enlarging<br />
the pattern provided 200% and printing one per page<br />
on 8 1 /2” x 14” paper. Make four each of Foundations 4<br />
and 5 by enlarging the pattern provided 200% and<br />
printing one per page on 11” x 17” paper. To prepare<br />
the foundations for use, trim all the foundations on the<br />
outermost lines. Trim four each of Foundations 2 and<br />
3 - 1 /4” beyond the bottom of the triangle marked “5”.<br />
These foundations will be used for the smaller palm<br />
frond blocks in the quilt’s large center square.<br />
8”<br />
7<br />
6<br />
5<br />
4<br />
1<br />
Foundation 3<br />
8”<br />
For more tips on paper piecing, visit the <strong>RJR</strong> website at<br />
www.rjrfabrics.com.<br />
8”<br />
Foundation 2
8 7 /8”<br />
11 3 /4”<br />
16 3 /8”<br />
16 3 /8”<br />
11 3 /4”<br />
8 7 /8”<br />
Obelisk<br />
Foundation 4<br />
Obelisk<br />
Foundation 5
B<br />
D<br />
8”<br />
4 1 /4”<br />
1 7 /8”<br />
To Make the Templates:<br />
Using see through template plastic, make<br />
templates for shapes A, C, and D.<br />
Template A is shown at 100%. Templates<br />
C and D must be enlarged 200%. Make a<br />
small hole at points X and Y on Template<br />
D. Enlarge the pattern given for Template<br />
B 200% on 11” x 17” paper, glue the<br />
paper to the template plastic and cut out<br />
on the outermost line.<br />
1 7 /8”<br />
C<br />
10 3 /8”<br />
4”<br />
A<br />
11 7 /8”<br />
2”<br />
2 1 /4”
fabric, use the Template D template to mark a<br />
dot 1 /4" from the edge of the upper corner. From<br />
the lower corner, measure 36”, and cut. Repeat<br />
this procedure three times. For the left-hand<br />
frame, turn the border print so that the motif is<br />
oriented as shown at right and repeat the entire<br />
procedure for cutting the right-hand frame.<br />
Repeat three times for a total of four units. Using<br />
the cover quilt as a guide, sew one border print<br />
piece to each short side of an obelisk block unit.<br />
Sew just to the marked dots; do NOT sew through the seam allowances. Finally, sew the<br />
mitered seam joining the two pieces of border print to each other, being careful to match the<br />
design motifs. Repeat three times. Again, referring to the quilt pictured on the cover, trim<br />
the ends of the border print frames even with the bottom edge of the obelisk block units.<br />
To Make the Dark<br />
Triangle Units:<br />
Sew a Template D border print piece to each<br />
short side of a 7 1 /4" Fabric 6 triangle. Sew<br />
just to the dots already marked on the<br />
Template D pieces. Do NOT sew through the<br />
seam allowance. Sew the mitered seam<br />
joining the two pieces of border print to each<br />
other, being careful to match the design<br />
motifs. Repeat twenty-three times for a total<br />
of twenty-four units.<br />
Sew a dark triangle unit to a Foundation 2<br />
palm frond block unit as shown at right.<br />
Repeat eleven times. Sew a dark triangle unit<br />
to a Foundation 3 palm frond block unit as<br />
shown below. Repeat eleven times. Use the<br />
quilt palm frond block placement diagram on<br />
previous page as a guide for the remaining<br />
steps. Sew three Foundation 2 units together.<br />
Sew this unit to the right-hand side of an<br />
obelisk block unit. Repeat this procedure three<br />
times. Sew three Foundation 3 units together.<br />
Sew this unit to the left-hand side of an obelisk<br />
block unit. Repeat this procedure three times.<br />
7<br />
6<br />
5<br />
4<br />
3<br />
1<br />
2<br />
To Make the Borders:<br />
Use Illustration 1 as a guide for centering the design motifs for all the border print strips<br />
used for the first and third borders.<br />
First Border:<br />
Divide each 2 3 /8" strip of border print into<br />
two mirror-image sections by folding each<br />
strip in half. Press on fold.<br />
Second Border:<br />
Trim the selvages from the eight 3 1 /2" Fabric<br />
6 strips. Sew two of the strips together<br />
end-to-end to make one long 3 1 /2" strip. Cut<br />
to measure 82" long. Fold each strip in half<br />
and press on fold. Repeat three times.<br />
Third Border:<br />
Divide each 5 1 /2" strip of border print into<br />
two mirror-image sections by folding each<br />
strip in half. Press on fold.<br />
Open the folds and sew three borders<br />
together, matching fold lines. Repeat three<br />
times.<br />
To Attach the Borders:<br />
Fold the quilt in half and measure. It should<br />
measure 32 1 /4". If your measurement is<br />
different, use your measurements for the<br />
following steps.<br />
Fold a border unit in half on the fold line. The<br />
design motifs should be precisely matched.<br />
Measure over 32 1 /4" from the center fold<br />
and place a dot at the point and 1 /4" up from<br />
the edge of the border as shown in<br />
Illustration 2. Lay a ruler with the 45-degree<br />
marking along the top of the border and the<br />
edge of the ruler through the center of the<br />
dot as shown in Illustration 3. Cut. Repeat for<br />
each border unit. Match the center of the<br />
border to the center of your quilt. Pin the<br />
border to the quilt as shown at right. Sew the<br />
border to the quilt from dot to dot, being<br />
careful not to sew through the seam<br />
allowance.<br />
Fold<br />
Illustration 1<br />
32 1 /4"<br />
Illustration 2<br />
Illustration 3<br />
Sew<br />
To Assemble the Quilt Top:<br />
Sew an obelisk block unit to one side of the quilt’s large center square. Sew from<br />
the center of one palm frond block to the center of another. Do NOT sew through the<br />
seam allowance. Repeat three times to join all the obelisk block units to the large<br />
center square. Finally, sew the mitered seams joining the two halves of the palm frond<br />
blocks together, carefully matching all points. Remove all the paper foundations from<br />
the back of the quilt top.<br />
Finally, sew miters, being careful to match<br />
all design motifs on the border print<br />
fabric. Again, do NOT sew through the<br />
seam allowance. See the quilt pictured on<br />
the cover for an illustration of the<br />
completed borders.
Fabric Requirements<br />
<strong>Colorway</strong> 1<br />
1 5059-1 See special section on cutting the border print fabric.<br />
<strong>Colorway</strong> 2<br />
Visit the <strong>RJR</strong> website<br />
www.rjrfabrics.com for the<br />
cutting directions for this quilt<br />
in the second colorway.<br />
Fabric # Style # Cutting Directions Swatch Yardage<br />
8 1 /2 yards<br />
2 4735-2 Cut (1) 4 1 /2" strip. From this strip, cut (4) 4 1 /2" x 6 1 /2" rectangles.<br />
(NP# 14)<br />
1<br />
/4 yard<br />
3 1702-2 Cut (2) 2 1 /2" strips. From each strip, cut (4) 2 1 /2" x 7 1 /2" rectangles. Cut (3) 3" strips.<br />
(NP# 13) From each of two strips, cut (3) 3" x 11" rectangles. From the last strip, cut (2) 3" x 11"<br />
rectangles.<br />
1<br />
/2 yard<br />
4 5061-1 Cut (7) 2 1 /2" strips. From one strip, cut (8) 2 1 /2" x 5 1 /4" rectangles. From each of the<br />
remaining six strips, cut (4) 2 1 /2" x 9" rectangles. Cut (2) 3" strips. From each strip,<br />
cut (4) 3" x 9 1 /2" rectangles.<br />
3<br />
/4 yard<br />
5 5063-2 Cut (4) 2 1 /2" strips. From each strip, cut (5) 2 1 /2" x 7 1 /2" rectangles. Cut (1) 2 7 /8" strip.<br />
From this strip, cut (4) 2 7 /8" x 2 7 /8" squares. Cut each square once from corner to corner<br />
on the diagonal to make a total of eight triangles. To save fabric, trim the remainder of this<br />
strip to 2 1 /2". From this strip, cut (4) 2 1 /2" x 7 1 /2" rectangles.<br />
6 9812-8<br />
(NP# 87)<br />
Cut (2) 7 1 /4" strips. From each strip, cut (3) 7 1 /4" x 7 1 /4" squares. Cut each square<br />
from corner to corner on both diagonals to make a total of 24 triangles. Cut (4) 2 1 /2" strips.<br />
From each of two strips, cut (4) 2 1 /2" x 10 1 /2" rectangles. From each of the remaining<br />
two strips, cut (4) 2 1 /2" x 7" rectangles. Cut (8) 3 1 /2" strips. Set aside for the middle<br />
border. Cut (9) 2 1 /4 " strips. Set aside for the binding.<br />
7 5062-1 Cut (5) 2 1 /2" strips. From each of two strips, cut (4) 2 1 /2" x 8 1 /2" rectangles<br />
and (1) 2 1 /2" x 6 1 /2" rectangle. From the third strip, cut (6) 2 1 /2" x 6 1 /2"<br />
rectangles. From each of the remaining two strips, cut (4) 2 1 /2" x 7" rectangles.<br />
1<br />
/2 yard<br />
2 1 /8 yards<br />
1<br />
/2 yard<br />
8 9412-12<br />
(NP# 123)<br />
Cut (3) 2 1 /2" strips. From each of two strips, cut (4) 2 1 /2" x 8 1 /2" rectangles and<br />
(1) 2 1 /2" x 6 1 /2" rectangle. From the third strip, cut (6) 2 1 /2" x 6 1 /2" rectangles.<br />
Cut (3) 2" strips. From each of two strips, cut (4) 2" x 6 1 /4" rectangles. From the third strip,<br />
cut (8) 2" x 4 3 /4" rectangles.<br />
9 5062-22 Cut (1) 2" strip. From this strip, cut (8) 2" x 4 3 /4" rectangles. Cut (3) 2 1 /2" strips.<br />
From each of two strips, cut (4) 2 1 /2" x 8 1 /2" rectangles and (1) 2 1 /2" x 6 1 /2" rectangle.<br />
From the third strip, cut (6) 2 1 /2" x 6 1 /2" rectangles.<br />
1<br />
/2 yard<br />
3<br />
/8 yard<br />
10 5061-11 Cut (1) 2" strip. From this strip, cut (8) 2" x 4 3 /4" rectangles. Cut (2) 2 1 /2" strips.<br />
From each strip, cut (4) 2 1 /2" x 6 1 /2" rectangles. Cut (2) 3 1 /4" strips. From each strip,<br />
cut (4) 3 1 /4" x 8 3 /4" rectangles.<br />
1<br />
/2 yard<br />
11 9812-9 Cut (1) 2" strip. From this strip, cut (8) 2" x 4 3 /4" rectangles.<br />
(NP# 128)<br />
12 9414-6 Cut (3) 2 1 /2" strips. From each strip, cut (8) 2 1 /2" x 5 1 /4" rectangles.<br />
(NP# 111)<br />
13 5063-3 Cut (1) 2 7 /8" strip. From this strip, cut (12) 2 7 /8" x 2 7 /8" squares. Cut each square once<br />
from corner to corner on the diagonal to make a total of 24 triangles.<br />
14 5057-1 Cut (2) 15" strips. Fold strips wrong sides together and trace two Template B triangles on<br />
each strip. Cut the triangles on the marked lines cutting through both layers of fabric. Each<br />
marked triangle will yield one Template B and one Template B Reverse.<br />
15 5057-1 Quilt Backing<br />
1<br />
/4 yard<br />
3<br />
/8 yard<br />
3<br />
/8 yard<br />
1 yard<br />
6 yards<br />
© <strong>RJR</strong> <strong>Fabrics</strong> 2004