BTD52L Thermodynamic Steam Trap - Spirax Sarco
BTD52L Thermodynamic Steam Trap - Spirax Sarco
BTD52L Thermodynamic Steam Trap - Spirax Sarco

Create successful ePaper yourself
Turn your PDF publications into a flip-book with our unique Google optimized e-Paper software.
1810050/4<br />
IM-P181-03<br />
ST Issue 4<br />
<strong>BTD52L</strong><br />
<strong>Thermodynamic</strong> <strong>Steam</strong> <strong>Trap</strong><br />
Installation and Maintenance Instructions<br />
1 General<br />
safety information<br />
2 General<br />
product information<br />
3 Installation<br />
4 Commissioning<br />
5 Operation<br />
6 Maintenance<br />
7 Spare parts<br />
Printed IM-P181-03 in the ST UK Issue 4 © Copyright 20021
1 General safety information<br />
Safe operation of these units can only be guaranteed if they are properly installed,<br />
commissioned and maintained by a qualified person (see Secton 11 of the attached<br />
Supplementary Safety Information) in compliance with the operating instructions.<br />
General installation and safety instructions for pipeline and plant construction, as well<br />
as the proper use of tools and safety equipment must also be complied with.<br />
Isolation<br />
Consider whether closing isolating valves will put any other part of the system or<br />
personnel at risk. Dangers might include: isolation of vents and protective devices or<br />
alarms. Ensure isolation valves are turned off in a gradual way to avoid system shocks.<br />
Pressure<br />
Before attempting any maintenance consider what is or may have been in the pipeline.<br />
Ensure that any pressure is isolated and safely vented to atmospheric pressure before<br />
attempting to maintain the product, this is easily achieved by fitting <strong>Spirax</strong> <strong>Sarco</strong><br />
depressurisation valves type DV (see separate literature for details). Do not assume<br />
that the system is depressurised even when a pressure gauge indicates zero.<br />
Temperature<br />
Allow time for temperature to normalise after isolation to avoid the danger of burns and<br />
consider whether protective clothing (including safety glasses) if required.<br />
Disposal<br />
These products are recyclable. No ecological hazard is anticipated with the disposal<br />
of these products providing due care is taken.<br />
2<br />
IM-P181-03 ST Issue 4
2 General product information<br />
2.1 General description<br />
The <strong>BTD52L</strong> is manufactured from 316L stainless steel specifically for mains drainage<br />
applications in clean steam systems.<br />
Optional extras<br />
An insulating cover is available at extra cost to prevent the trap being unduly influenced by<br />
excessive heat loss when subjected to low ambient temperature, wind and rain etc.<br />
Note: For additional information see Technical Information Sheet TI-P181-01.<br />
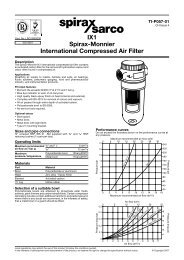
2.2 Sizes and pipe connections<br />
¼", 3 /8", ½" screwed BSP or NPT.<br />
½" O/D x 16 swg (0.065") wall thickness tube end.<br />
DN 11850 (Series 1) tube ends<br />
12 mm O/D x 1.0 mm wall thickness (DN10)<br />
18 mm O/D x 1.0 mm wall thickness (DN15)<br />
ISO 1127 (Series 1) tube ends<br />
17.2 mm O/D x 1.6 mm wall thickness (DN10)<br />
21.3 mm O/D x 1.6 mm wall thickness (DN15)<br />
½" Sanitary clamp compatible connections (DN15)<br />
Fig. 2<br />
½" Tube ends<br />
Fig. 1<br />
Screwed<br />
Fig. 3<br />
Sanitary clamp ends<br />
IM-P181-03 ST Issue 4 3
2.3 Limiting conditions<br />
Body design conditions<br />
PN16<br />
PMA - Maximum allowable pressure 16 bar g (232 psi g)<br />
TMA - Maximum allowable temperature 450°C (842°F)<br />
PMO - Maximum operating pressure 10 bar g (145 psi g)<br />
TMO - Maximum operating temperature 450°C (842°F)<br />
Designed for a maximum cold hydraulic test pressure of: 24 bar g (348 psi g)<br />
Note: Minimum pressure for satisfactory operation is 0.25 bar g (3.6 psi g).<br />
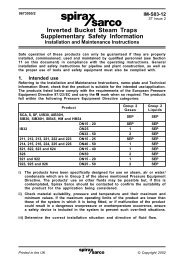
2.4 Operating range<br />
Temperature °C<br />
450<br />
400<br />
300<br />
200<br />
100<br />
0<br />
0<br />
<strong>Steam</strong><br />
saturation<br />
curve<br />
2 4 6 8 10* 12 14 16<br />
Pressure bar g<br />
The product must not be used in this region.<br />
* PMO Maximum operating pressure recommended for steam service.<br />
PMOB Maximum operating back pressure is 80% of the upsteam pressure.<br />
4<br />
IM-P181-03 ST Issue 4
3 Installation<br />
Note: Before actioning any installation observe the 'Safety information' in Section 1.<br />
Referring to the Installation and Maintenance Instructions, name-plate and Technical Information<br />
Sheet, check that the product is suitable for the intended installation.<br />
3.1 Check materials, pressure and temperature and their maximum values. If the maximum<br />
operating limit of the product is lower than that of the system in which it is being fitted,<br />
ensure that a safety device is included in the system to prevent overpressurisation.<br />
3.2 Determine the correct installation situation and the direction of fluid flow.<br />
3.3 Remove protective covers from all connections.<br />
3.4 Always ensure the correct tools, safety procedures and protective equipment are used<br />
at all times.<br />
3.5 The trap should be installed in the horizontal plane, preferably preceded by a small drop<br />
leg. For freeze proof installation, or where horizontal fitting is not possible. The <strong>BTD52L</strong><br />
may be installed vertically, but the service life may be affected.<br />
3.6 Suitable isolation valves must be installed to allow for safe maintenance and trap<br />
replacement.<br />
3.7 Where the trap discharges into a closed return system, a non-return valve should be<br />
fitted downstream to prevent return flow. Remove all packaging and protective covers<br />
and ensure all connections ports are clear from obstruction.<br />
3.8 Always open isolation valves slowly until normal operating conditions are achieved - this<br />
will avoid system shocks. Check for leaks and correct installation.<br />
Note: If the trap is to discharge to atmosphere ensure it is to a safe place. The discharging fluid<br />
may be at a temperature of 100°C (212°F)<br />
4 Commissioning<br />
After installation or maintenance ensure that the system is fully functional. Carry out tests on<br />
any alarms or protective devices.<br />
5 Operation<br />
The thermodynamic steam trap will discharge condensate with a blast type action at a few<br />
degrees below steam saturation temperature, due care must be given to the site of the<br />
discharge.<br />
IM-P181-03 ST Issue 4 5
6 Maintenance<br />
Note: Before actioning any maintenance programme observe<br />
the 'Safety information' in Section 1.<br />
6.1 General maintenance<br />
Before undertaking any maintenance on the trap it must be isolated from both the supply line and<br />
return line and any pressure allowed to safely normalise to the atmosphere. The trap should then<br />
be allowed to cool. When reassembling, ensure that all joint faces are clean.<br />
6.2 How to service:<br />
- Note; refer to Figure 4, page 7, for part number location.<br />
- Remove the insulating cover (4) if fitted.<br />
- Unscrew the cap (2) using a spanner. Do not use Stillsons or a wrench of similar type which<br />
may cause distortion of the cap.<br />
- If the disc (3) and body seating surfaces (1) are only slightly worn they can be refaced by<br />
lapping individually on a flat surface such as the surface plate. A figure of eight motion and<br />
a little grinding compound such as Carborundum Co's Compound I.F. gives the best results.<br />
If the wear is too great to be rectified by simple lapping, the seating faces on the body must<br />
be ground flat and then lapped and the disc replaced with a new one. The total amount of metal<br />
removed in this way should not exceed 0.25 mm (0.01").<br />
- When reassembling the disc (3) is normally placed in position with the grooved side in contact<br />
with the body seating face.<br />
- Screw on the cap (2); no gasket is required but a fine smear of Molybdenum Disulphide grease<br />
should be applied to the threads. Tighten the cap (2) to the recommended tightening torque<br />
(see Table 1).<br />
Warning: When torquing or untorquing the cap (2), some support should be given to the body<br />
of the trap to prevent over stressing and/or distortion of the end connections and system<br />
pipework.<br />
Table 1 Recommended tightening torques<br />
Warning: When torquing or untorquing the cap (2), some support should be given to the body of<br />
the trap to prevent over stressing and/or distortion of the end connections and system pipework.<br />
or<br />
Item Part N m (Ibf ft)<br />
mm<br />
2 Cap 36 A/F 115 - 130 (85 - 96)<br />
6<br />
IM-P181-03 ST Issue 4
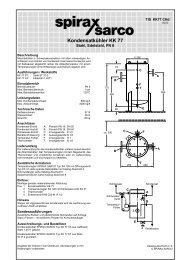
7 Spare parts<br />
The spare parts available are shown in heavy outline. Parts drawn in broken line are not<br />
supplied as spares.<br />
Available spares<br />
Disc 3<br />
Insulating cover 4<br />
How to order spares<br />
Always order spares by using the description given in the column headed 'Available spares' and<br />
state the size and type of trap.<br />
Example: 1 - Disc for the <strong>Spirax</strong> <strong>Sarco</strong> ½" BSP <strong>Spirax</strong> <strong>Sarco</strong> <strong>BTD52L</strong> thermodynamic steam trap.<br />
4<br />
2<br />
(not an available spare)<br />
3<br />
1<br />
(not an available spare)<br />
Fig. 4<br />
IM-P181-03 ST Issue 4 7
8<br />
IM-P181-03 ST Issue 4