Instructions for use - Speidel Tank
Instructions for use - Speidel Tank
Instructions for use - Speidel Tank

Create successful ePaper yourself
Turn your PDF publications into a flip-book with our unique Google optimized e-Paper software.
<strong>Instructions</strong> <strong>for</strong> <strong>use</strong><br />
Hydropress 20,40,90,180L<br />
Dear customer,<br />
You have just purchased a new appliance manufactured by us, and we thank you <strong>for</strong> your confidence. Quality and functionality are the top priority<br />
<strong>for</strong> all our products.<br />
Application:<br />
To guarantee you reliable service and operation right from the start, we have prepared these instructions <strong>for</strong> <strong>use</strong>. If you follow them carefully, your<br />
Hydropress will always operate to your complete satisfaction, and serve you well <strong>for</strong> many years to come.<br />
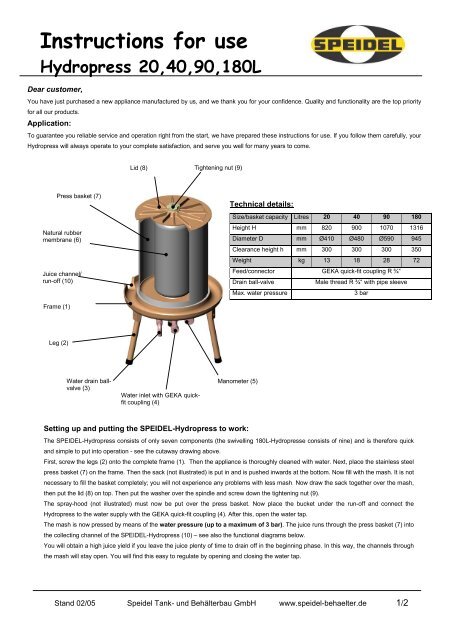
Lid (8) Tightening nut (9)<br />
Press basket (7)<br />
Natural rubber<br />
membrane (6)<br />
Juice channel/<br />
run-off (10)<br />
Technical details:<br />
Size/basket capacity Litres 20 40 90 180<br />
Height H mm 820 900 1070 1316<br />
Diameter D mm Ø410 Ø480 Ø590 945<br />
Clearance height h mm 300 300 300 350<br />
Weight kg 13 18 28 72<br />
Feed/connector GEKA quick-fit coupling R ¾“<br />
Drain ball-valve<br />
Male thread R ¾“ with pipe sleeve<br />
Max. water pressure<br />
3 bar<br />
Frame (1)<br />
Leg (2)<br />
Water drain ballvalve<br />
(3)<br />
Water inlet with GEKA quickfit<br />
coupling (4)<br />
Manometer (5)<br />
Setting up and putting the SPEIDEL-Hydropress to work:<br />
The SPEIDEL-Hydropress consists of only seven components (the swivelling 180L-Hydropresse consists of nine) and is there<strong>for</strong>e quick<br />
and simple to put into operation - see the cutaway drawing above.<br />
First, screw the legs (2) onto the complete frame (1). Then the appliance is thoroughly cleaned with water. Next, place the stainless steel<br />
press basket (7) on the frame. Then the sack (not illustrated) is put in and is pushed inwards at the bottom. Now fill with the mash. It is not<br />
necessary to fill the basket completely; you will not experience any problems with less mash. Now draw the sack together over the mash,<br />
then put the lid (8) on top. Then put the washer over the spindle and screw down the tightening nut (9).<br />
The spray-hood (not illustrated) must now be put over the press basket. Now place the bucket under the run-off and connect the<br />
Hydropress to the water supply with the GEKA quick-fit coupling (4). After this, open the water tap.<br />
The mash is now pressed by means of the water pressure (up to a maximum of 3 bar). The juice runs through the press basket (7) into<br />
the collecting channel of the SPEIDEL-Hydropress (10) – see also the functional diagrams below.<br />
You will obtain a high juice yield if you leave the juice plenty of time to drain off in the beginning phase. In this way, the channels through<br />
the mash will stay open. You will find this easy to regulate by opening and closing the water tap.<br />
Stand 02/05 <strong>Speidel</strong> <strong>Tank</strong>- und Behälterbau GmbH www.speidel-behaelter.de 1/2
SAFETY PRECAUTIONS:<br />
<br />
<br />
<br />
IMPORTANT: FOR SAFETY REASONS, PRESS THE AIR-RELEASE PLUNGER UNTIL WATER RUNS OUT; THE PLUNGER THEN<br />
AUTOMATICALLY RETURNS TO ITS ORIGINAL POSITION.<br />
THE HYDROPRESSE MAY ONLY BE OPERATED BY WATER PRESSURE; IN NO CIRCUMSTANCES WITH COMPRESSED AIR!<br />
PROTECT THE RUBBER MEMBRANE BOTH FROM SHARP OBJECTS AND FROM DIRECT SUNLIGHT!<br />
Safety valve:<br />
The safety valve is set to operate at 3 bar water pressure; when the pressure exceeds this mark, the safety valve operates and water<br />
escapes. The water pressure can always be read off at the manometer (5) and regulated at the water tap by closing it when pressure is<br />
excessive and opening it again slightly once pressure has reduced acceptably. The manometer gives you an immediate picture at any time<br />
of the working condition of your Hydropress.<br />
A regulator valve (pressure reducer) is in any event an advantage - this is usually already installed in the mains network. The regulator valve<br />
should be set at 3 bar water pressure.<br />
Öpen the drain valve (3) to empty the rubber membrane (6).<br />
While doing this, again press the air release valve to allow air into the membrane.<br />
When no more water flows out, the Hydropress is no longer pressurised and the tightening nut (9) can be undone. Remove the washer and<br />
the lid (8).<br />
Once the juice is fully drained, the spray-hood is removed and the sack with the pulp-cake lifted out and emptied (Hydropress 20, 40, 90L).<br />
For this stage, the Hydropress 180L can be swivelled to one side after opening the latch-handle. The Hydropress 180L is swivelled back to<br />
be refilled (Hydropress 180L not illustrated).<br />
A tip <strong>for</strong> getting a better yield when pressing grapes and berries:<br />
Collect the pressed mash from several pressings, break up the pulp-cake well and press out <strong>for</strong> a second time. By doing this, the positions<br />
of the berries and grapes is altered and juice which was trapped can now escape.<br />
The SPEIDEL-Hydropress needs no maintenance. After <strong>use</strong>, simply clean thoroughly with water.<br />
Stand 02/05 <strong>Speidel</strong> <strong>Tank</strong>- und Behälterbau GmbH www.speidel-behaelter.de 2/2