ug_mpmgr
ug_mpmgr
ug_mpmgr

You also want an ePaper? Increase the reach of your titles
YUMPU automatically turns print PDFs into web optimized ePapers that Google loves.
COGNOS (R) 8 BUSINESS INTELLIGENCE<br />
MAP MANAGER<br />
INSTALLATION AND USER<br />
GUIDE<br />
Map Manager Installation and User Guide<br />
01-08-2005<br />
Map Manager<br />
8.1<br />
INSTALLATION AND USER GUIDE<br />
Cognos(R) 8 Business Intelligence Readme<br />
Map Manager Installation and User Guide<br />
THE NEXT LEVEL OF PERFORMANCE TM
Product Information<br />
This document applies to Cognos (R) 8 Version 8.1 and may also apply to subsequent releases. To check for newer versions of this document,<br />
visit the Cognos support Web site (http://support.cognos.com).<br />
Copyright<br />
Copyright (C) 2005 Cognos Incorporated.<br />
Portions of Cognos(R) software products are protected by one or more of the following U.S. Patents: 6,609,123 B1; 6,611,838 B1; 6,662,188<br />
B1; 6,728,697 B2; 6,741,982 B2; 6,763,520 B1; 6,768,995 B2; 6,782,378 B2; 6,847,973 B2; 6,907,428 B2; 6,853,375 B2.<br />
Cognos and the Cognos logo are trademarks of Cognos Incorporated in the United States and/or other countries. All other names are<br />
trademarks or registered trademarks of their respective companies.<br />
While every attempt has been made to ensure that the information in this document is accurate and complete, some typographical errors or<br />
technical inaccuracies may exist. Cognos does not accept responsibility for any kind of loss resulting from the use of information contained in<br />
this document.<br />
This document shows the publication date. The information contained in this document is subject to change without notice. Any<br />
improvements or changes to either the product or the document will be documented in subsequent editions.<br />
U.S. Government Restricted Rights. The software and accompanying materials are provided with Restricted Rights. Use, duplication, or<br />
disclosure by the Government is subject to the restrictions in subparagraph (C)(1)(ii) of the Rights in Technical Data and Computer Software<br />
clause at DFARS 252.227-7013, or subparagraphs (C) (1) and (2) of the Commercial Computer Software - Restricted Rights at<br />
48CFR52.227-19, as applicable. The Contractor is Cognos Corporation, 15 Wayside Road, Burlington, MA 01803.<br />
This software/documentation contains proprietary information of Cognos Incorporated. All rights are reserved. Reverse engineering of this<br />
software is prohibited. No part of this software/documentation may be copied, photocopied, reproduced, stored in a retrieval system,<br />
transmitted in any form or by any means, or translated into another language without the prior written consent of Cognos Incorporated.
Table of Contents<br />
Introduction 5<br />
Chapter 1: Installing Map Manager 7<br />
Install Map Manager 7<br />
Uninstall Map Manager 8<br />
Chapter 2: Map Manager 9<br />
Report Studio and Map Charts 10<br />
Start Map Manager 11<br />
Open a Map File 11<br />
Save a Map File 11<br />
Save a Map File Using a Different Name or Location 12<br />
Change the Position of a Map File in the Report Studio Map Selection Dialog 12<br />
Import a Map from a Third-party Source 12<br />
Preparing Maps for Reuse in Reports 13<br />
Change the Map Image 14<br />
Add a Description to a Map 14<br />
Add an Alias to the Dictionary for a Map Feature 14<br />
Adding Language (Locale) Support 15<br />
Chapter 3: Acquiring New Maps 17<br />
Chapter 4: Troubleshooting 19<br />
Problems Importing Files 19<br />
Error Importing Translated Text File 19<br />
Glossary 21<br />
Index 23<br />
Installation and User Guide 3
4 Map Manager
Introduction<br />
This document describes how to install Map Manager and also describes how to<br />
• import maps from third-party sources to use in Report Studio<br />
• define alternate names or abbreviatons for map features<br />
• provide multilingual support for maps<br />
Map Manager is a Windows-only utility that manages maps and is intended for use only with<br />
Report Studio.<br />
To use this guide, you should be familiar with basic Windows adminstration skills and reporting<br />
concepts.<br />
For more information about using this product, visit the Cognos support Web site<br />
(http://support.cognos.com). For information about education and training, click the Training link<br />
from this site.<br />
The following documents contain related information, and may be referred to in this document.<br />
Note that the studios described in these linked documents may vary depending on your licensing<br />
permissions. To change your licensing permissions, see your administrator.<br />
Document<br />
Cognos 8 Installation and Configuration<br />
Guide<br />
Report Studio User Guide<br />
Framework Manager User Guide<br />
Description<br />
Installing, upgrading, configuring, and testing<br />
Cognos 8, changing application servers, and<br />
setting up samples<br />
Authoring reports that analyze corporate data<br />
according to specific needs<br />
Creating and publishing models using<br />
Framework Manager<br />
This document is available as online help and an online book.<br />
From within the online help, you can click the following link to open a printable version of this<br />
document (PDF).<br />
Our documentation includes user guides, tutorial guides, reference books, and other materials to<br />
meet the needs of our varied audience.<br />
Online Help<br />
All information is available in online help. Online help is available from the help button in a Web<br />
browser, or the Help menu and help button in Windows products. You can also download the<br />
online help from the Cognos support Web site (http://support.cognos.com).<br />
Books for Printing<br />
The information in each online help system is available in online book format (PDF). However,<br />
the information from a given help system may be divided into more than one online book. Use<br />
online books when you want to print a document or when you want to search the whole<br />
document.<br />
You can print selected pages, a section, or the whole book. Cognos grants you a non-exclusive,<br />
non-transferable license to use, copy, and reproduce the copyright materials, in printed or<br />
electronic format, solely for the purpose of providing internal training on, operating, and<br />
maintaining the Cognos software.<br />
Online books are available from the introduction to the online help for each component.<br />
Installation and User Guide 5
Introduction<br />
All online books are available on the Cognos documentation CD.<br />
You can also read the product readme files and the installation guides directly from Cognos<br />
product CDs.<br />
6 Map Manager
Chapter 1: Installing Map Manager<br />
You install Map Manager on a Windows computer. You can install it on the same computer as a<br />
Cognos 8 product or component, such as Framework Manager, or on a different computer.<br />
Install Map Manager<br />
Install Map Manager if you want to<br />
• convert maps from third-party sources for use in Report Studio<br />
• assign alternate names for map features<br />
• assign alternate languages for map features<br />
Before you install, ensure that you have administrator privileges for the Windows computer you<br />
are installing on. If you are not an administrator, ask your system administrator to add you to the<br />
Administrator group on your computer.<br />
System Requirements<br />
Before you install Map Manager, ensure that your computer meets the software and hardware<br />
requirements. The hardware requirements depend on your business intelligence environment. You<br />
may require additional resources, such as disk space.<br />
The following table lists the minimum hardware and software requirements to run Map Manager.<br />
Requirement<br />
Operating system<br />
Disk space<br />
Specification<br />
Windows<br />
Minimum: 50 MB of free space on the drive that contains the<br />
temporary directory used by Cognos 8<br />
Supported Environments<br />
You can view an up-to-date list of environments supported by Cognos products, such as operating<br />
systems, patches, browsers, Web servers, directory servers, and database servers, on the Cognos<br />
support Web site (http://support.cognos.com). It is important to apply all required operating<br />
system patches and to use only the versions of third-party software that are supported by a<br />
Cognos product. Otherwise, your product may not work properly.<br />
Steps<br />
1. We recommend that you first close all applications that are currently running so that the<br />
installation program can copy all the required files to your computer.<br />
2. Insert the Framework Manager for Windows CD and then open the installation menu.<br />
The Welcome page of the installation wizard should appear.<br />
3. If no Welcome page appears, in the win32 directory on the CD, double-click the issetup.exe<br />
file.<br />
4. Select the language to use for the installation.<br />
The language you choose determines the language of the text that appears on the pages of the<br />
installation wizard.<br />
5. On the Installation Location page, select the directory.<br />
If you are installing Map Manager on a computer that already has Cognos 8 products, you<br />
must install Map Manager in the same directory.<br />
Installation and User Guide 7
Chapter 1: Installing Map Manager<br />
6. On the Component Selection page, expand Cognos 8 Business Intelligence Modeling and then<br />
click Map Manager.<br />
7. Follow the directions in the installation wizard to copy the required files to your computer.<br />
8. In the Finish page of the installation wizard, if you want to see late-breaking information<br />
about Map Manager, click View the Readme.<br />
9. Click Finish.<br />
The installation wizard creates two log files in the c8_location\instlog directory. The install<br />
log file records the activities that the installation wizard performs while transferring files. The<br />
summary-error log file records the components you install, disk space information, your<br />
selections in the transfer dialogs, and any errors the installation wizard encounters while<br />
transferring components. The log file names include the product name, version, build number,<br />
and time stamp.<br />
You can now use the Windows Start menu to start Map Manager.<br />
Uninstall Map Manager<br />
If you no longer require Map Manager, you can uninstall it using the uninstall program. It is<br />
important to use uninstall programs to completely remove all files and modifications to system<br />
files.<br />
The uninstallation wizard also uninstalls Framework Manager if it is installed in the same<br />
location.<br />
Before you uninstall, ensure that you back up any data that you may need in the future.<br />
Steps<br />
1. From the Start menu, click Programs, Cognos 8, Uninstall Cognos 8.<br />
The Uninstall wizard appears.<br />
Tip: Cognos 8 is the default name of the Program Folder that is created during the<br />
installation. If you chose another name, go to that folder to find the program.<br />
2. Follow the instructions to uninstall.<br />
3. At the prompt to select the package to uninstall, click Cognos 8 Business Intelligence<br />
Modeling and then click Next.<br />
The Cognos_uninst_log.htm file records the activities that the Uninstall wizard performs<br />
while uninstalling files.<br />
Tip: To find the log file, look in the Temp directory.<br />
Uninstalling does not remove any files that changed since the installation, such as user data files.<br />
Your installation location remains on your computer, and you retain these files until you delete<br />
them using Windows Explorer.<br />
8 Map Manager
Chapter 2: Map Manager<br />
Map Manager is a Windows program that you use to prepare maps for use in reports. You can<br />
add aliases and languages to the sample maps that Cognos provides. You can convert custom<br />
maps from a third-party source to Cognos map format (CMF) and then add aliases and languages.<br />
Map Manager supports third-party maps that use geoset format (GST), from vendors such as<br />
MapInfo, our OEM-preferred provider for map data.<br />
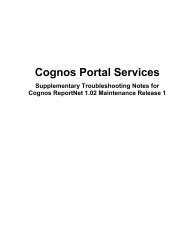
You can perform other actions with map information using a combination of MapInfo and<br />
Cognos products. You can create maps in MapInfo Professional, prepare the maps for use in Map<br />
Manager, define and run a report that uses maps in Report Studio, and then view the report in<br />
Report Viewer.<br />
Custom maps<br />
MapInfo<br />
Professional<br />
Custom<br />
geosets<br />
Translations<br />
Export TXT<br />
Cognos Map<br />
Manager<br />
Import GST<br />
Open CMF<br />
Cognos<br />
sample maps<br />
Import TXT<br />
Save CMF<br />
Maps<br />
directory<br />
Report Studio<br />
Report<br />
definition with<br />
map objects<br />
Run report<br />
Report<br />
Viewer<br />
Within each of the applications, you can perform certain actions as shown in the following table.<br />
Application Actions permitted Actions not permitted<br />
Report Viewer<br />
Drill thro<strong>ug</strong>h<br />
Get tool tips<br />
Zoom<br />
Change layer content<br />
Adjust mismatched data<br />
Installation and User Guide 9
Chapter 2: Map Manager<br />
Application Actions permitted Actions not permitted<br />
Report Studio<br />
Map Manager<br />
MapInfo<br />
Professional<br />
Choose map layers<br />
Apply default map colors<br />
Add aliases within report<br />
Define rules for color based on<br />
datasource queries and filters<br />
Convert third-party maps from<br />
MapInfo format to Cognos format<br />
Change the preview image<br />
Add a description<br />
Define aliases for feature names<br />
Add languages<br />
Create new objects<br />
Create new layers in MapInfo tab<br />
format<br />
Change map content<br />
Change map content<br />
Add languages<br />
Define rules for color based on<br />
data sources<br />
Before you use Map Manager, you should be familiar with basic map terminology and the<br />
reporting requirements for your organization.<br />
Map Manager manages the following types of information in map files:<br />
• Preview images<br />
Shows thumbnail images of the map. You can preview the general appearance of the map.<br />
Preview images do not contain data.<br />
• Layers<br />
Shows thematic groupings of features. For example, it may include regions such as provinces,<br />
territories or states, or categories such as major and minor cities.<br />
• Features<br />
Specifies the points or named elements on a map. Text labels identify points on the map.<br />
• Base language<br />
Identifies the default language for labels. Used when the user’s preferred language does not<br />
exist in the map file. In Report Studio, this is the language for labels at run time if the user<br />
locale is not a supported language in the map file.<br />
• Dictionary<br />
Lists the feature names and any aliases for each available language.<br />
Report Studio and Map Charts<br />
Reports in Report Studio use maps to represent data that can be displayed spatially. For example,<br />
a map can show things such as geographical area, floor plans in a building, seats in an airplane, or<br />
parts of the human body.<br />
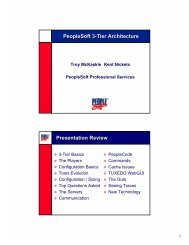
A map in Cognos 8 consists of a collection of layers. Each layer contains different information<br />
that is determined either from the map file or from your data source. A layer is like a transparency<br />
that is placed on top of the base map. Each layer adds more information to the map. For example,<br />
a map of the world may contain one layer with information related to countries and another layer<br />
with information related to cities.<br />
10 Map Manager
Chapter 2: Map Manager<br />
Point Layer<br />
Region Layer<br />
Display Layer<br />
At run time, Report Studio queries the data source to retrieve the data to show in the map chart.<br />
Map layers and points (map features) on the map chart use the numeric values of the data to<br />
display the appropriate color. If the text for the labels that appears on the map differs between the<br />
map file and the data source, you must set up aliases in the map file before you run the query. This<br />
ensures that that the appropriate colors are shown. Report authors can choose to set up the aliases<br />
at run time for one-time reporting needs.<br />
At run time, the map label text appears in the language of the user’s locale setting. For example,<br />
users who have a German user locale see the map labels in German, while users who have a<br />
French user locale see the map labels in French. If the map file does not contain the language of<br />
the user’s locale, then the labels appear in the base language that is specified in the map file. You<br />
can change the base language.<br />
Start Map Manager<br />
Open a Map File<br />
Save a Map File<br />
Start Map Manager when you want to import maps from third-party sources or manage existing<br />
Cognos map files.<br />
To start Map Manager,<br />
• from the Start menu, click Programs, Cognos 8, Map Manager.<br />
You can now open a map file or import a map file from a third-party source.<br />
Open an existing Cognos map file (.cmf) to view the map or to add aliases, a description, or<br />
languages.<br />
You must use the import wizard (p. 12) to open map files from a third-party source.<br />
Steps<br />
1. From the File menu, click Open.<br />
2. In the Look in list, click the drive, folder, or Internet location that contains the Cognos map<br />
file (.cmf) that you want to open.<br />
3. In the folder list, locate and open the folder that contains the map file.<br />
Tip: Sample map files are located in the c8_location/maps directory.<br />
4. Click the file, and then click Open.<br />
Tips<br />
• If you want to use the map as the basis of a new map, save it using a different name.<br />
• You can also resize the application window.<br />
Save a map file to preserve any changes.<br />
What you save in Map Manager is the Cognos Map file (.cmf), which is a specific set of data for<br />
the layers in a map, including the image definiton and the locale or language-based feature names<br />
and aliases.<br />
Use the Save As command to save different versions of the map file.<br />
For the map to be accessible to Report Studio, you must save it in the c8_location/maps directory.<br />
Installation and User Guide 11
Chapter 2: Map Manager<br />
To save a file,<br />
• from the File menu, click Save.<br />
When a new map file is saved to the c8_location/maps directory, it appears at the end of the list of<br />
maps in the Report Studio map selection dialog. You can move the new map to another position<br />
in the map selection dialog.<br />
Save a Map File Using a Different Name or Location<br />
You can save a map file using a different name or location if you want to use it as the basis for<br />
another map file or to save different versions of the map file.<br />
Steps<br />
1. On the File menu, click Save As.<br />
2. In the Save in list, click the drive, folder, or Internet location that contains the image file that<br />
you want to open.<br />
3. In the File name box, enter a new name for the file.<br />
4. Click Save.<br />
Change the Position of a Map File in the Report Studio Map Selection Dialog<br />
By default, new maps are added to the bottom of the map selection dialog in Report Studio. You<br />
can move the new map to an existing map group or create another map group for it.<br />
Steps<br />
1. In the c8_location\webcontent\pat directory, open MapGroups.xml in an XML editor.<br />
2. To add the new map to an existing group, add a entry to the group.<br />
For example, to add a new map for Ontario to the Americas group, find the node for<br />
"IDS_MAP_GROUP_LABEL_AMERICAS" and type the entry<br />
<br />
The position of the entry is important. Maps appear in the order in which they are listed in the<br />
file.<br />
3. To add the new map file to a a new map group, do the following:<br />
• Add a new node in the position you want it to appear.<br />
For example, to add a Provinces group to the Canada map in the Americas group, find<br />
the node for "canada.cmf", add a line after it, and then type<br />
Chapter 2: Map Manager<br />
• The MapInfo tab files must be referenced by *.gst files.<br />
• Map objects (regions and points) must have an identifier and the identifier must be in the first<br />
column of the associated MapInfo table.<br />
• If aliases are defined for the identifiers, they must be in any column except the first column.<br />
Steps<br />
1. From the File menu, click Import.<br />
The Map Import Wizard opens.<br />
2. Click Next.<br />
3. On the Specify a map file wizard page, choose the location of the MapInfo files, identify the<br />
language that the map was authored in, and then click Next.<br />
Map Manager reads and then loads the data.<br />
4. On the Select aliases wizard page, do the following:<br />
• Expand the column headings.<br />
• Click the check box for each column, if any, that contains aliases for the features in the<br />
first column.<br />
For example, the feature column may refer to Canadian provinces using abbreviations,<br />
such as Ont., and another column may use the full name, such as Ontario. These two<br />
columns refer to the same map feature. The full-name column is an alias for the<br />
abbreviations (feature) column and should be checked.<br />
• In the Layer box, select the next layer, expand the column headings, and select any alias<br />
columns that apply.<br />
• Repeat for all layers.<br />
• Click Finish.<br />
After you import the custom map, you can set it up to ensure it is available for multiple reports.<br />
Preparing Maps for Reuse in Reports<br />
Map Manager helps report authors or modellers reuse the same map charts across departmental,<br />
corporate, and national boundaries. By managing the map files from which the map charts are<br />
based, report authors can resuse the content to ensure its consistency and usability. In addition, in<br />
the long-term improvements include increased quality, reduced time and costs for development<br />
and maintenance.<br />
Use Map Manager to add language support so that users can view feature names on map charts in<br />
their preferred language. Use Map Manager to add aliases so that feature names can be correlated<br />
to names in corporate databases.<br />
Users can reuse custom maps or the sample Cognos map files in their reports. However, before<br />
you can use custom map charts in Report Studio, you must convert them to Cognos map files by<br />
importing them into Map Manager (p. 12).<br />
After you open a map file, you can:<br />
❑ change the map image<br />
❑ add a description to the map<br />
❑ add an alias to the dictionary for a map feature<br />
❑ add language (locale) support<br />
Change the Map Image<br />
Preview a thumbnail of the map image that will appear in a report to see how it will look.<br />
Depending on your reporting requirements, you may want to change the thumbnail image of the<br />
current map. For example, you may want to use a map that was created with third-party software<br />
and saved as an image file.<br />
Installation and User Guide 13
Chapter 2: Map Manager<br />
When you import a map from a third-party source, Map Manager creates a thumbnail image that<br />
is a stripped-down version of the map. The default color of the image is determined by the first<br />
MapInfo object to be read from the layer. You may want to add color or a name to the thumbnail<br />
image or you may want to use an existing thumbnail image.<br />
The requirements for a thumbnail image are that they must be<br />
• in PNG, JPG, or GIF format<br />
• between 154 by 110 pixels<br />
You can also reset the map image to use the default.<br />
Steps<br />
1. In the Image window, click the browse button.<br />
2. In the Look in list, click the drive, folder, or Internet location of the new image file.<br />
The image file must be PNG, JPG or GIF format.<br />
3. Find the image and click it.<br />
4. Click Open.<br />
The new image appears in Map Manager.<br />
5. From the File menu, click Save.<br />
Reset the Map Preview Image to the Default<br />
Change the preview image back to the default image if the default image better suits your<br />
reporting needs.<br />
To reset the preview image to the default,<br />
• in the image window, click the restore button.<br />
Add a Description to a Map<br />
When a map is used in Report Studio, it contains a copyright. You can add a description of the<br />
map to the copyright information using Map Manager.<br />
You cannot change the copyright information.<br />
Steps<br />
1. In the Description window, click in the Description box.<br />
2. Type the description.<br />
3. From the File menu, click Save.<br />
The description appears in the Copyright box and in Report Studio when the map is used.<br />
Add an Alias to the Dictionary for a Map Feature<br />
You specify aliases to match data values in your data source to feature names in the map.<br />
For example, a report uses a data source that uses the name Korea, whereas the map files uses two<br />
names: Korea, Republic of, and Korea. Before you can accurately show information, such as<br />
revenue for Korea, Republic of, you must create an alias to match that country to Korea in the<br />
data source.<br />
Another example is if addresses in your data source use a number of abbreviations for city names.<br />
You must create an alias for each abbreviation.<br />
Report authors can override or add to these multilingual labels in Report Studio for one-time<br />
reporting needs. For example, if multiple regions contain a city that has the same name, you may<br />
choose to show only the city in one region by setting up an alias.<br />
Steps<br />
1. In the Dictionary Entry window, click the Language drop-down list and then click the<br />
language of the dictionary.<br />
14 Map Manager
Chapter 2: Map Manager<br />
The map layers and features associated with this language are now available for defining<br />
aliases.<br />
2. In the Layer box, select the appropriate layer.<br />
The features in this layer are listed in the Feature box.<br />
3. If you want additional information to help identify the features in the layer, select the<br />
appropriate layer from the Refine layer box.<br />
Additional information about the feature appears in the Feature box in the Refine column.<br />
4. In the Feature box, select the name of the feature for which you want to add an alias.<br />
5. In the Alias box, type the alias and then click the add entry button.<br />
The alias is added to the dictionary.<br />
Find a Map Feature<br />
You can quickly search for every occurrence of a word or letter sequence in feature names. For<br />
example, you can search for a list of cities in the United States with the name Springfield.<br />
Steps<br />
1. In the Dictionary Entry window, click the Language drop-down list and then click the<br />
language.<br />
2. In the Layer box, select the layer.<br />
3. If required, in the Refine layer box, select the appropriate layer to see additional information<br />
to help identify the feature.<br />
4. In the Find box, type the text that you want to search for.<br />
The Feature box shows the results of the search.<br />
Adding Language (Locale) Support<br />
Export the Translation File<br />
For multilingual support, you can translate the labels for the names of map features to different<br />
languages. For example, in Report Studio, if you have multilingual versions of a report, you can<br />
ensure that the map charts are available in the same language as the report.<br />
You perform the following two steps in Map Manager to translate the names of map features to<br />
another language:<br />
❑ Export the language file<br />
❑ Import the language file<br />
The first step in providing multilingual versions of the map labels is to select the languages and<br />
make the feature names available for translation. You do this by exporting feature names for all or<br />
some selected layers to files that can be used by translators or prepared for translators.<br />
Steps<br />
1. From the Language menu, select Export Translation File.<br />
The Export Translation File dialog box appears. The Languages currently in the map box<br />
shows the current list of languages. You must export at least one of these languages as the<br />
basis for translating the map labels into other languages. As a result, one of the languages in<br />
the map file appears in the Languages to be exported box.<br />
2. If there is more than one language in the Languages to be exported box, select any that you do<br />
not want and then click the remove button.<br />
Tip: Press Ctrl+click to select multiple languages.<br />
3. In the Languages to be added box, select the languages you want the text translated to and<br />
then click the add button.<br />
4. In the Languages to be exported box, move the languages to the sequence you want using the<br />
up and down arrows.<br />
In the export translation file, the languages appear as column headings in the order shown.<br />
Installation and User Guide 15
Chapter 2: Map Manager<br />
Import the Translation File<br />
5. Select whether you want to translate all or some layers.<br />
• If you want to translate the names of the map features in all layers, click All.<br />
• If you only want to translate the names of the map features in some layers, click Selected<br />
and then in the Layer box, clear the check boxes for the layers you don’t want to<br />
translate.<br />
6. Click Export.<br />
7. In the Save in list, click the drive, folder, or Internet location that contains the image file that<br />
you want to open.<br />
8. In the File name box, enter a new name for the file.<br />
9. Click the Save as type drop-down list, and then click the file format that you want to save the<br />
file in.<br />
If you select TXT, the columns are separated by tabs. If you select CSV, the columns are<br />
separated by commas.<br />
10. Click Save.<br />
The feature names are saved in a TXT or CSV file and are ready for translation. We recommend<br />
that a TXT file be imported to a Microsoft Excel spreadsheet for the translation. This will prevent<br />
errors in tabulation between columns. When the translation is complete, the information can be<br />
exported back to a TXT file.<br />
Important: Ensure that you read and write information from Excel using UTF-8 encoding.<br />
You import the translation file back into Map Manager after translators have translated the<br />
content of the export file.<br />
The second step in providing multilingual version of the map labels is to make the translated<br />
features names available to users. You do this by importing both the original and translated<br />
languages into Map Manager.<br />
To successfully import the translated feature names, the TXT file must meet the following<br />
requirements:<br />
• Feature names must be in the same sequence as they were when you exported the file.<br />
• The file must contain the same number of feature names.<br />
• For a TXT file, ensure that there are no extra tabs.<br />
• For a CSV file, ensure that there are no extra commas.<br />
• The map file that was used to export the language translation file must be open.<br />
Steps<br />
1. From the Language menu, select Import Translation File.<br />
2. In the Look in list, click the drive, folder, or Internet location that contains the Cognos map<br />
file (.cmf) that you want to open.<br />
3. In the folder list, locate and open the folder that contains the file to import.<br />
4. Click the file and then click Open.<br />
The Import Translation File dialog box opens. The language that the translators used for the<br />
translation is listed in the Key language in the translation file box.<br />
5. From the Other languages in the translation file box, click the language that you want to<br />
import and then click the add button.<br />
6. Click OK.<br />
If you click the Language drop-down list in the Description window or in the Dictionary<br />
window, it now includes the imported language.<br />
16 Map Manager
Chapter 3: Acquiring New Maps<br />
Cognos supplies a set of standard maps as part of the Cognos 8 product that can be used directly<br />
with Report Studio as well as Map Manager. You can download additional maps from the Cognos<br />
support Web site (http://support.cognos.com).<br />
The majority of the supplied maps are derived from Cognos' preferred OEM provider for location<br />
intelligence, MapInfo Corporation. MapInfo is the leading global provider of location intelligence<br />
solutions, driving insightful decisions and deriving greater value for organizations around the<br />
world.<br />
If you already have proprietary geographic data, you can also create your own custom .GST files<br />
and then import these into Map Manager. To create custom .GST files, you must use an<br />
application that produces MapInfo files, such as MapInfo Professional.<br />
You can contact MapInfo at www.mapinfo.com/cognos.<br />
The Cognos Support website also lists other vendors than can provide custom map data.<br />
Installation and User Guide 17
Chapter 3: Acquiring New Maps<br />
18 Map Manager
Chapter 4: Troubleshooting<br />
Use this troubleshooting reference information and solutions as a resource to help you solve<br />
specific problems you may encounter when installing or using Cognos Map Manager.<br />
Problems are characterized by their symptoms. Each symptom can be traced to one or more causes<br />
by using specific troubleshooting tools and techniques. After being identified, each problem can be<br />
fixed by implementing a series of actions.<br />
When you are troubleshooting, log files can help you. Another valuable troubleshooting tool is the<br />
Knowledge Base, which is available on the Cognos support site (http://support.cognos.com). The<br />
Knowledge Base is a database of problems and solutions for all Cognos products.<br />
When you cannot resolve a problem, the final resource is your Cognos technical support<br />
representative. To analyze a problem, your technical support representative requires information<br />
about the situation and the symptoms that you are experiencing. To help isolate the problem,<br />
collect the necessary data before you contact your representative.<br />
Problems Importing Files<br />
You may encounter problems when you try to import a map file or text file.<br />
Error Importing Translated Text File<br />
When you import a TXT or CSV file that has been translated, you receive an error message similar<br />
to the following:<br />
"Unable to import because MapX is not installed or has been removed."<br />
"Unable to save the file."<br />
"An error occurred while importing the map file."<br />
"Unable to import. The translation file contains no useful content."<br />
The problem may be caused by one of the following:<br />
• The map file that is open is not the map from which you created the export translation file.<br />
• Features were added or deleted in the file.<br />
• Columns (extra tabs or commas) were added to the file.<br />
• The data was sorted and is now in a different sequence than when it was first exported.<br />
To resolve the problem, first ensure that the correct map file is open. If it is, then resend the<br />
original exported file for translation and specify that the contents must not be sorted, deleted,<br />
added to, or modified except to add translated features. If required, export the translation features<br />
and languages again.<br />
Installation and User Guide 19
Chapter 4: Troubleshooting<br />
20 Map Manager
Glossary<br />
alias<br />
In map information technology, a secondary name for a map feature. Aliases are used to create a<br />
reference between custom map feature names and feature names in databases.<br />
base language<br />
In map information technology, the default language for labels. Used when the user’s preferred<br />
language does not exist in the map file. In Report Studio, this is the language for labels at run time<br />
if the user locale is not a supported language in the map file.<br />
data source<br />
A relational database, dimensional cube, file, or other physical data store that can be accessed<br />
tho<strong>ug</strong>h Cognos 8.<br />
feature<br />
In map information technology, the name of a region or point that represents data spatially.<br />
layer<br />
In map information technology, a thematic grouping of features. For example, a layer may include<br />
regions such as provinces, territories or states, or categories such as major and minor cities.<br />
locale<br />
A code that is used to set the language or dialect used for browsers, report text, and so on; and the<br />
regional preferences, such as formats for time, date, money, money expressions, and time of day.<br />
For Cognos products, you can specify a locale for the product interface (product locale) and for<br />
the data in the report (content locale).<br />
prompt<br />
A report element that asks for parameter values before the report is run.<br />
user<br />
A person accessing a Cognos 8 application. Authenticated user definitions and information, such<br />
as first and last names, passwords, IDs, locales, and email addresses, are maintained in third-party<br />
authentication sources.<br />
Other user information, such as the location of personal folders or preferred formats for viewing<br />
reports, is stored in Cognos 8.<br />
Installation and User Guide 21
Glossary<br />
22 Map Manager
Index<br />
A<br />
adding a map description, 14<br />
adding locales, 15<br />
adding third-party maps, 12<br />
aliases<br />
adding to the dictionary, 14<br />
B<br />
base language, 9<br />
C<br />
copyright, 2<br />
copyright for maps, 14<br />
CSV files<br />
requirements, 16<br />
D<br />
data sources<br />
definition, 21<br />
default map preview images, 14<br />
description<br />
adding to a map, 14<br />
dictionary, 9<br />
adding aliases for map features, 14<br />
disk space<br />
requirements, 7<br />
document<br />
version, 2<br />
E<br />
errors<br />
importing translation files, 19<br />
exporting translation files, 15<br />
F<br />
features, 9<br />
finding map features, 15<br />
G<br />
getting new maps, 17<br />
I<br />
importing files<br />
problems, 19<br />
importing maps from a third-party source, 12<br />
importing translation files, 16<br />
installing<br />
Map Manager, 7<br />
L<br />
languages<br />
adding, 15<br />
Layers, 9<br />
locales<br />
adding, 15<br />
definition, 21<br />
log files, Cognos Knowledge Base, 19<br />
M<br />
map charts<br />
in Report Studio, 10<br />
map features<br />
adding aliases to the dictionary, 14<br />
finding, 15<br />
map files<br />
moving in Report Studio selection dialog, 12<br />
opening, 11<br />
saving, 11<br />
map image<br />
previewing, 14<br />
Map Manager<br />
description, 5, 9<br />
maps<br />
adding a description, 14<br />
copyright information, 14<br />
importing, 12<br />
preparing to use in reports, 13<br />
resetting, 14<br />
saving, 11<br />
moving a map file in the Report Studio selection dialog, 12<br />
N<br />
new maps<br />
where to get, 17<br />
O<br />
opening a map file, 11<br />
other guides, 5<br />
P<br />
Preview Images, 9<br />
previewing maps, 14<br />
problems, 19<br />
prompts<br />
definition, 21<br />
Installation and User Guide 23
Index<br />
R<br />
Report Studio<br />
map description, 14<br />
map selection dialog, 12<br />
using map charts, 10<br />
reports<br />
preparing maps, 13<br />
requirements, 7<br />
for TXT and CSV files, 16<br />
resetting map images, 14<br />
S<br />
saving a map file, 11<br />
searching map features, 15<br />
source of new maps, 17<br />
starting Map Manager, 11<br />
T<br />
text files<br />
exporting, 15<br />
importing, 16<br />
third-party maps<br />
importing, 12<br />
thumbnail view, 14<br />
translation files<br />
exporting, 15<br />
importing, 16<br />
problems importing, 19<br />
troubleshooting, 19<br />
TXT files<br />
requirements, 16<br />
U<br />
uninstalling<br />
Map Manager, 8<br />
users<br />
definition, 21<br />
using the guide, 5<br />
V<br />
version<br />
document, 2<br />
W<br />
Windows<br />
requirements, 7<br />
24 Map Manager