You also want an ePaper? Increase the reach of your titles
YUMPU automatically turns print PDFs into web optimized ePapers that Google loves.
4<br />
4<br />
4<br />
5<br />
0<br />
Installation and Setup<br />
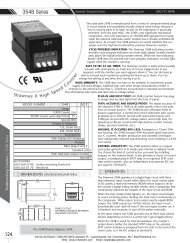
<strong>API</strong> 4059 DIN<br />
8 No Connection<br />
7 No Connection<br />
6 No Connection<br />
5 No Connection<br />
4 No Connection<br />
3 Power AC or (–)<br />
2 No Connection<br />
1 Power AC or (+)<br />
8 7 6 5 4 3 2 1<br />
Excitation Input Output<br />
SW “A” SW “C” SW “D”<br />
Excitation<br />
Fine Adj.<br />
Output<br />
LED<br />
Test Adj.<br />
Test<br />
Offset<br />
Switch<br />
SW “B”<br />
Zero<br />
Span<br />
Input<br />
LED<br />
SW “E”<br />
V I<br />
Excitation Input Output<br />
E<br />
D<br />
C<br />
B<br />
A<br />
9<br />
F<br />
0<br />
8<br />
1<br />
7<br />
2<br />
6<br />
SW “A” SW “C” SW “D”<br />
Excitation<br />
Fine Adj.<br />
Output<br />
LED<br />
Test Adj.<br />
Test<br />
Offset<br />
Switch<br />
0<br />
E<br />
D<br />
C<br />
B<br />
A<br />
9<br />
F<br />
8<br />
1<br />
7<br />
2<br />
SW “B”<br />
3<br />
5<br />
3<br />
5<br />
6<br />
E<br />
D<br />
C<br />
B<br />
A<br />
9<br />
F<br />
0<br />
8<br />
Span<br />
Zero<br />
1<br />
7<br />
2<br />
3<br />
5<br />
6<br />
Input<br />
LED<br />
6<br />
4<br />
3<br />
7<br />
8<br />
2<br />
9<br />
1<br />
SW “E”<br />
V I<br />
O<br />
U<br />
T<br />
P<br />
U<br />
T<br />
R<br />
A<br />
N<br />
G<br />
E<br />
S<br />
9 10 11 12 13 14 15 16<br />
Input Signal (–) 9<br />
Input Signal (+) 10<br />
Sense Lead 11<br />
Excitation (+) 12<br />
Excitation (–) 13<br />
No Connection 14<br />
Output Signal (–) 15<br />
Output Signal (+) 16<br />
Quick<br />
Setup<br />
<strong>API</strong> 4059 DIN Setup and Calibration<br />
1. First examine your transducer to determine what excitation voltage to use<br />
and select that voltage using switch A. The excitation fine adjust may be used<br />
to precisely trim this voltage, if desired.<br />
2. For a five- or six-lead bridge with a “sense” lead, use this lead to allow the<br />
Api 4059 DIN to compensate for leadwire resistance effects. For four-wire<br />
bridges, it is best to connect the sense terminal on the 4059 DIN to the (+)<br />
excitation terminal. It is not necessary to do this, but the final trim adjustment<br />
should be done after all bridge connections are made.<br />
3. Determine how much full-scale output in millivolts the load cell will produce<br />
at full load.<br />
4. Look in the setup table on the side of the unit for the setup code for your<br />
desired input/output ranges and set switches B, C, and D according to the<br />
table.<br />
5. Switch E must be set to select voltage or current output, as required.<br />
6. After all switches are set, the Zero and Span controls must be set to precisely<br />
adjust the module output. This can be done easily with a suitable calibration<br />
device or simulator, or in actual use with dummy loads or weights.<br />
7. The Test Cal control should be set with the Test button pressed to obtain the<br />
desired Test level.<br />
1. Set switch A for desired excitation voltage.<br />
2. Set switches B, C, D for desired input & output ranges per table.<br />
3. Set switch E for voltage (V) or current (I) output as required.<br />
4. Set Zero and Span controls.<br />
5. Set output test level by holding Test Switch and adjusting Test Adj. potentiometer.<br />
INPUT RANGES<br />
0-5 0-10 0-20 0-25 0-30 0-40 0-50 0-100 0-200 0-250 0-300 0-400<br />
Rotary mV mV mV mV mV mV mV mV mV mV mV mV<br />
±10 mV ±20 mV<br />
Switches<br />
BCD BCD BCD BCD BCD BCD BCD BCD BCD BCD BCD BCD BCD BCD<br />
0-1 V 020 0A0 030 060 0E0 0B0 000 080 010 040 0C0 090 330 3B0<br />
0-2 V 028 0A8 038 068 0E8 0B8 008 088 018 048 0C8 098 338 3B8<br />
0-4 V 021 0A1 031 061 0E1 0B1 001 081 011 041 0C1 091 331 3B1<br />
1-5 V 026 0A6 036 066 0E6 0B6 006 086 016 046 0C6 096 336 3B6<br />
0-5 V 029 0A9 039 069 0E9 0B9 009 089 019 049 0C9 099 339 3B9<br />
0-8 V 022 0A2 032 062 0E2 0B2 002 082 012 042 0C2 092 332 3B2<br />
2-10 V 027 0A7 037 067 0E7 0B7 007 087 017 047 0C7 097 337 3B7<br />
0-10 V 023 0A3 033 063 0E3 0B3 003 083 013 043 0C3 093 333 3B3<br />
±5 V 024 0A4 034 064 0E4 0B4 004 084 014 044 0C4 094 334 3B4<br />
±10 V 025 0A5 035 065 0E5 0B5 005 085 015 045 0C5 095 335 3B5<br />
0-2 mA 070 0A0 030 060 0E0 0B0 000 080 010 040 0C0 090 330 3B0<br />
2-10 mA 026 0A6 036 066 0E6 0B6 006 086 016 046 0C6 096 336 3B6<br />
0-10 mA 029 0A9 039 069 0E9 0B9 009 089 019 049 0C9 099 339 3B9<br />
0-16 mA 022 0A2 032 062 0E2 0B2 002 082 012 042 0C2 092 332 3B2<br />
4-20 mA 027 0A7 037 067 0E7 0B7 007 087 017 047 0C7 097 337 3B7<br />
0-20 mA 023 0A3 033 063 0E3 0B3 003 083 013 043 0C3 093 333 3B3<br />
Using Offset Switch B<br />
The Api 4059 DIN offset switch B allows canceling or taring of non-zero deadweights<br />
or other sensor offsets. Often the desired zero, or low end, of the transmitter<br />
output may not coincide with zero output from the sensor. For example, a<br />
user may want a 0 to 10 VDC output from the transmitter when a 10 lb load is<br />
on the platform. In this case, the 10 lb deadweight results in a non-zero output<br />
from the sensor when a zero output is required.<br />
Certain low-output sensors (e.g., less than 1 mV/V) may have zero offsets large<br />
enough that the Zero control may not produce the desired zero output. The<br />
switch B setting may be changed from the table values to realign the zero output<br />
by following steps 8-10.<br />
8. Switch B is the only switch needed to correct zero offsets. Switch B does not<br />
interact with any other switch. Its only purpose is to adjust or cancel effects<br />
of the low end of the input range not corresponding nominally to 0 mV.<br />
Setting this switch to “0” results in no offset.<br />
9. To RAISE the output zero, rotate switch B clockwise from “1” thru “7”, until the<br />
Zero control can be set for your application. This elevation of the output is<br />
useful for bipolar input ranges such as ±10 mV.<br />
10. To LOWER the output zero, rotate switch B clockwise from “9” thru “F”, until<br />
the Zero control can be set for your application. This suppression of the<br />
output is useful for elevated input ranges such as 10-20 mV.<br />
Strain Gauge<br />
BSOLUTE ROCESS NSTRUMENTS, Inc.<br />
© Absolute Process Instruments, Inc. 09/06 LoopTracker–Reg TM Absolute Process Instruments, Inc.<br />
Sold by <strong>AA</strong> <strong>Electric</strong> 1-800-237-8274 Lakeland, FL • Lawrenceville, GA • Greensboro, NC • East Rutherford, NJ www.A-Aelectric.com