You also want an ePaper? Increase the reach of your titles
YUMPU automatically turns print PDFs into web optimized ePapers that Google loves.
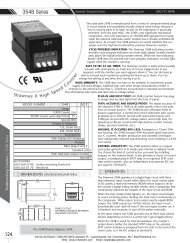
AC Input<br />
ELECTRICAL CONNECTIONS<br />
WARNING! All wiring must be performed by qualified personnel only.<br />
This module requires an industry-standard 11-pin socket. Order <strong>API</strong> 011 or finger-safe<br />
<strong>API</strong> 011 FS socket separately. Socket voltage rating must be observed!<br />
Power Input Terminals – The white label on the side of the <strong>API</strong> module will indicate<br />
the power requirements. AC power is connected to terminals 1 and 3. For<br />
DC powered modules, polarity MUST be observed. Positive (+) is wired to terminal<br />
1 and negative (–) is wired to terminal 3.<br />
Signal Input – Terminals 4 and 5 are used for the AC input.<br />
Current<br />
Transformer<br />
V – or – Shunt Load – or –<br />
– or –<br />
120 to 240<br />
VAC typ.<br />
Contact<br />
Set 1<br />
Relay Output Terminals – Terminals 6, 7, 8 and 9, 10, 11 provide the appropriate<br />
connections for the desired relay operations. (NO = Normally Open, NC =<br />
Normally Closed, C = Common). NOTE: Although the <strong>API</strong> 1600 G has a pair of<br />
relays, these relays will energize and de-energize in unison. The <strong>API</strong> 1620 G will<br />
accommodate independent relay operations.<br />
SETUP<br />
The input range and alarm types are pre-configured at the factory as specified<br />
on your order. No input calibration is necessary. Contact factory for custom<br />
ranges or modifications.<br />
Setpoint Control – This multi-turn potentiometer (one for each setpoint on the<br />
<strong>API</strong> 1620 G) allows the operator to adjust the level at which the alarm is activated.<br />
This control is adjustable from 0 to 100% of the input range.<br />
Deadband Control – The <strong>API</strong> 1600 G deadband potentiometer allows the<br />
alarm trip and reset window to be adjusted symmetrically about the setpoint<br />
from 1 to 100% of the span.<br />
The deadband is fixed at 1% of span on the <strong>API</strong> 1620 G. The <strong>API</strong> 1620 GA with<br />
adjustable deadband option allows deadbands to be adjusted symmetrically<br />
about each setpoint from 1 to 100% of the span.<br />
Adjustable deadband allows the operator to fine tune the point at which the<br />
alarm trips (alarm condition) and resets (non alarm condition). The deadband is<br />
typically used to prevent chattering of the relays or false trips when the process<br />
signal is unstable or changes rapidly.<br />
<strong>API</strong> 1620 G Alarm Configuration – The alarm configuration of the <strong>API</strong> 1620 G<br />
is pre-configured at the factory per your order, but if a change is necessary,<br />
internal jumpers can be used to modify the alarm type as follows.<br />
1. Unplug the module from the socket.<br />
2. Remove the 4 screws from the module bottom and remove the plastic case.<br />
3. Unplug the circuit board with the test button from the base.<br />
4. Note location of jumper block at top left of circuit board next to test button.<br />
5. Place jumpers as indicated for desired alarm operation. The standard HI/LO<br />
setting is with one jumper across the two top pins or with no jumper at all.<br />
Never place a jumper across the two bottom pins!<br />
6. Replace board, cover, and screws.<br />
Setpoint 1 = HI<br />
Setpoint 2 = LO<br />
(Standard)<br />
<strong>API</strong> 1600 G<br />
<strong>API</strong> 1620 G<br />
NO<br />
C<br />
NC<br />
4<br />
3<br />
2<br />
5<br />
1<br />
6<br />
11<br />
7<br />
10<br />
Socket top view<br />
8<br />
9<br />
Setpoint 1 = LO<br />
Setpoint 2 = HI<br />
Setpoint 1 = HI<br />
Setpoint 2 = HI<br />
AC or DC (–)<br />
Power Input<br />
AC or DC (+)<br />
NC<br />
C<br />
NO<br />
Contact<br />
Set 2<br />
Setpoint 1 = LO<br />
Setpoint 2 = LO<br />
<strong>API</strong> 1620 G <strong>API</strong> 1620 G <strong>API</strong> 1620 G <strong>API</strong> 1620 G<br />
TEST BUTTON<br />
The functional test pushbutton toggles the alarm status independent of the input<br />
when depressed. It verifies the alarm and system operation and also provides<br />
the additional function of unlatching the alarm on the <strong>API</strong> 1600 GHT with the<br />
latching alarm option.<br />
OPERATION<br />
GREEN LoopTracker ® Input LED – Provides a visual indication that a signal is<br />
being sensed by the input circuitry of the module. It also indicates the input signal<br />
strength by changing in intensity as the process changes from minimum to<br />
maximum to provide a quick visual picture of your process loop at all times. If<br />
the LED fails to illuminate, or fails to change in intensity as the process changes,<br />
this may indicate a problem with module power or signal input wiring. This features<br />
greatly aid in saving time during initial start-up or troubleshooting.<br />
Bi-Color Alarm LED – Provides a visual indication of the alarm status. In all<br />
configurations, a GREEN LED indicates a non-alarm condition and a RED LED<br />
indicates an alarm condition.<br />
Alarm Relays – In the normal mode of operation (failsafe), the relay coil is energized<br />
in a non-alarm condition and de-energized in an alarm condition. This will<br />
create an alarm condition if the module loses power. For a normal acting, nonlatching<br />
configuration, the alarm will activate when the input signal exceeds the<br />
setpoint (HI alarm) or falls below the setpoint (LO alarm), then will automatically<br />
reset when the alarm condition no longer exists.<br />
If reverse acting mode is selected (non-failsafe), the relay coil is de-energized in<br />
a non-alarm condition and energized in an alarm condition. The alarm will activate<br />
when the input signal exceeds the setpoint (HI alarm) or falls below the setpoint<br />
(LO alarm), then will automatically reset when the alarm condition no<br />
longer exists.<br />
<strong>API</strong> 1600 G HT Latching Alarm – For units with the HT latching alarm option,<br />
the Test Switch is also used to reset the alarm relays. The alarm relay contacts<br />
will remain in the alarmed condition until the input signal falls below the high<br />
alarm setpoint (or above low alarm setpoint, depending on configuration) and<br />
the Test/Reset pushbutton has been pressed or power to the unit has been<br />
switched off.<br />
<strong>API</strong> 1600 G HP Latching Alarm – For units with the HP latching alarm option,<br />
the alarm relay contacts will remain in the alarmed condition until the input signal<br />
falls below the high alarm setpoint (or above low alarm setpoint, depending<br />
on configuration) and the power to the unit has been switched off.<br />
No Alarm<br />
No Alarms<br />
Installation and Setup<br />
GREEN<br />
Contact Set 1<br />
6: NO<br />
7: Common<br />
8: NC<br />
GREEN<br />
Contact Set 2<br />
9: NO<br />
10: Common<br />
11: NC<br />
GREEN<br />
Contact Set 1<br />
6: NO<br />
7: Common<br />
8: NC<br />
HI Alarm<br />
Power Off<br />
RED<br />
OFF<br />
Contact Set 1<br />
6: NO<br />
7: Common<br />
8: NC<br />
Contact Set 2<br />
Contact Set 2<br />
9: NO<br />
9: NO<br />
10: Common<br />
10: Common<br />
11: NC<br />
11: NC<br />
<strong>API</strong> 1600 G with Normal Action HI Alarm<br />
HI Alarm<br />
RED<br />
Contact Set 1<br />
6: NO<br />
7: Common<br />
8: NC<br />
GREEN<br />
Contact Set 2<br />
9: NO<br />
10: Common<br />
11: NC<br />
LO Alarm<br />
GREEN<br />
Contact Set 1<br />
6: NO<br />
7: Common<br />
8: NC<br />
RED<br />
Contact Set 2<br />
9: NO<br />
10: Common<br />
11: NC<br />
<strong>API</strong> 1620 G Alarm States with Normal Action HI/LO Alarms<br />
124<br />
<strong>API</strong> maintains a constant effort to upgrade and improve its products. Specifications<br />
are subject to change without notice. Consult factory for your specific requirements.<br />
Sold by <strong>AA</strong> <strong>Electric</strong> 1-800-237-8274 Lakeland, FL • Lawrenceville, GA • Greensboro, NC • East Rutherford, NJ www.A-Aelectric.com