Sonim Xperience One (XP1) - Sonim Technologies
Sonim Xperience One (XP1) - Sonim Technologies Sonim Xperience One (XP1) - Sonim Technologies
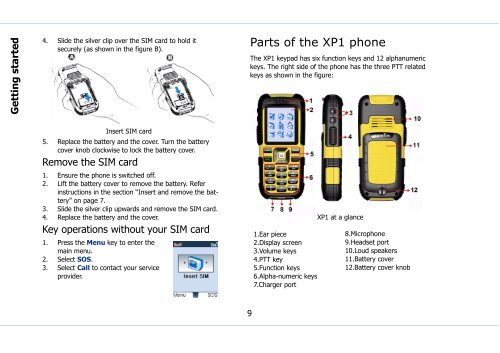
Getting started 4. Slide the silver clip over the SIM card to hold it securely (as shown in the figure B). Parts of the XP1 phone The XP1 keypad has six function keys and 12 alphanumeric keys. The right side of the phone has the three PTT related keys as shown in the figure: Insert SIM card 5. Replace the battery and the cover. Turn the battery cover knob clockwise to lock the battery cover. Remove the SIM card 1. Ensure the phone is switched off. 2. Lift the battery cover to remove the battery. Refer instructions in the section “Insert and remove the battery” on page 7. 3. Slide the silver clip upwards and remove the SIM card. 4. Replace the battery and the cover. Key operations without your SIM card 1. Press the Menu key to enter the main menu. 2. Select SOS. 3. Select Call to contact your service provider. 1.Ear piece 2.Display screen 3.Volume keys 4.PTT key 5.Function keys 6.Alpha-numeric keys 7.Charger port XP1 at a glance 8.Microphone 9.Headset port 10.Loud speakers 11.Battery cover 12.Battery cover knob 9
XP1 keypad The various keypad keys and their corresponding functions are described in the following figure. Function keys 1.Navigation arrow keys (Up/Down/Left/Right) 2.Right Selection Key (RSK) 3.Menu key 4.Power On/Off/End call 5.Call accept/Send 6.Left Selection Key (LSK) Numeric keys 7.Press and hold for voicemail 8.Press and hold to turn on/ off the loudspeaker 9.Press and hold to lock/ unlock the keypad 10.Press and hold to turn on/off silent mode. 11.Press and hold to display + (before dialling an international Keypad functions number) use these keys efficiently. For more information on text input modes refer section “Text input mode” on page 52. Standby mode Certain information is displayed when the phone is in standby mode, for example, the name of the service provider, date and time, battery charge status, PTT and GPRS connectivity. Other indicators may be displayed (if the feature is activated), like the alarm, call forward etc. The device with a fully-charged battery can remain in the standby mode for a duration of 200 hours without PTT service and for 70 hours if the PTT service is activated. 1.PTT and GPRS connectivity 2.Signal strength indicator 3.Display icons 4.Battery charge indicator 5.Service provider 6.Local time 7.RSK command 8.LSK command Getting started The alpha-numeric keys comprise numbers from one to zero, alphabets from A-Z, plus [*] and [#] keys. By pressing the designated key you can input numbers or characters. Choose the appropriate text input option to enable you to Standby screen display 10
- Page 1 and 2: Sonim Xperience TM One (XP1) User
- Page 3 and 4: Contents Contents..................
- Page 5 and 6: Make PTT calls.....................
- Page 7 and 8: Press and hold menu options Select
- Page 9 and 10: Battery care A rechargeable battery
- Page 11 and 12: The localized (SAR) of the portable
- Page 13: 3. If the battery is being charged
- Page 17 and 18: Keypad functions The following tabl
- Page 19 and 20: Keypad key Operation •Press and h
- Page 21 and 22: Registering with the PTT service. 1
- Page 23 and 24: Type Preference Function Turn on Dn
- Page 25 and 26: 3. On the Phone book list select th
- Page 27 and 28: 3. When you accept the call, the to
- Page 29 and 30: Your XP1 phone This model is a bar
- Page 31 and 32: Display indicators Settings Name Un
- Page 33 and 34: Available networks Add existing Add
- Page 35 and 36: 4. Select Yes to save a copy of the
- Page 37 and 38: Store the IP service number You can
- Page 39 and 40: 2. Choose a list and select OK to v
- Page 41 and 42: When Call forward is enabled, the i
- Page 43 and 44: White list calls This list contains
- Page 45 and 46: Push-to-Talk The Sonim Xperience On
- Page 47 and 48: OK. The list of contacts in your Ph
- Page 49 and 50: Add members via the PTT contact lis
- Page 51 and 52: Delete a chat group 1. To remove a
- Page 53 and 54: Make PTT calls A user can make a on
- Page 55 and 56: 4. If you want to add more contacts
- Page 57 and 58: Messages SMS is a convenient and in
- Page 59 and 60: Select Exit to return to the text p
- Page 61 and 62: New cell broadcast messages are dir
- Page 63 and 64: Edit organizer entries 1. Select Me
Getting started<br />
4. Slide the silver clip over the SIM card to hold it<br />
securely (as shown in the figure B).<br />
Parts of the <strong>XP1</strong> phone<br />
The <strong>XP1</strong> keypad has six function keys and 12 alphanumeric<br />
keys. The right side of the phone has the three PTT related<br />
keys as shown in the figure:<br />
Insert SIM card<br />
5. Replace the battery and the cover. Turn the battery<br />
cover knob clockwise to lock the battery cover.<br />
Remove the SIM card<br />
1. Ensure the phone is switched off.<br />
2. Lift the battery cover to remove the battery. Refer<br />
instructions in the section “Insert and remove the battery”<br />
on page 7.<br />
3. Slide the silver clip upwards and remove the SIM card.<br />
4. Replace the battery and the cover.<br />
Key operations without your SIM card<br />
1. Press the Menu key to enter the<br />
main menu.<br />
2. Select SOS.<br />
3. Select Call to contact your service<br />
provider.<br />
1.Ear piece<br />
2.Display screen<br />
3.Volume keys<br />
4.PTT key<br />
5.Function keys<br />
6.Alpha-numeric keys<br />
7.Charger port<br />
<strong>XP1</strong> at a glance<br />
8.Microphone<br />
9.Headset port<br />
10.Loud speakers<br />
11.Battery cover<br />
12.Battery cover knob<br />
9


