ATEM Switchers Manual - Holdan.eu
ATEM Switchers Manual - Holdan.eu
ATEM Switchers Manual - Holdan.eu

Create successful ePaper yourself
Turn your PDF publications into a flip-book with our unique Google optimized e-Paper software.
56<br />
Using the <strong>ATEM</strong> 2 M/E Broadcast Panel<br />
Button Mapping<br />
Selected Button Selected Input<br />
Button 1 Input 1<br />
Camera 1<br />
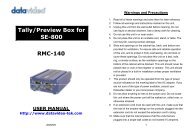
<strong>ATEM</strong> Broadcast Panel button mapping<br />
Button Mapping<br />
<strong>ATEM</strong> software and hardware control panels support button mapping so you can assign your most<br />
important sources, especially cameras, to the most accessible buttons in the program and preview rows.<br />
Occasional sources can be assigned to less prominent buttons. Button mapping is set independently for<br />
each control panel so button mapping set on a software control panel will not affect the button mapping<br />
set on a hardware control panel.<br />
<strong>ATEM</strong> Broadcast Panel Button Mapping and Button Brightness Level<br />
Button Mapping on <strong>ATEM</strong> Broadcast Panels is easy. On the <strong>ATEM</strong> Broadcast Panel, go to the System<br />
Control block and press PANEL SETUP followed by BUTTON MAP. Once in the button map menu, you<br />
will notice the System Control window shows a Button number and an Input number. Turn the knob under<br />
Selected Button to select the desired button which you want to associate with an input. You can do the<br />
same thing by selecting the desired button in the Select row. The buttons in the Select row correspond to<br />
the buttons directly below them in the Preview and Program rows. Next, turn the knob under Selected Input<br />
to set an input for the selected button. Choose another button you wish to map and repeat until all the<br />
buttons are mapped with desired inputs.<br />
If you want to change the brightness of the buttons, press the BUTTON LEVEL button and rotate the knob<br />
under Brightness until the desired brightness level is seen.<br />
Once you have configured all the button settings, press the SAVE button to save the new button map and<br />
brightness level, or REVERT to discard changes.<br />
Controlling Two <strong>ATEM</strong> <strong>Switchers</strong><br />
The <strong>ATEM</strong> 2 M/E Broadcast Panel can be used to control up to two switchers simultaneously when used<br />
with any of the following combinations of switchers:<br />
• 2 x <strong>ATEM</strong> 1 M/E Production Switcher<br />
• 2 x <strong>ATEM</strong> Television Studio<br />
• <strong>ATEM</strong> 1 M/E Production Switcher and 1 x <strong>ATEM</strong> Television Studio<br />
The M/E 1 block is the main control block and has a few more settings that can be useful for an <strong>ATEM</strong> 1 M/E<br />
Production Switcher, so you may want to assign an <strong>ATEM</strong> 1 M/E Production Switcher to the lower block of<br />
your <strong>ATEM</strong> 2 M/E Broadcast Panel. If both of your switchers are of the same model, it doesn't matter which<br />
one you assign to the M/E 1 and M/E 2 blocks