ATEM Switchers Manual - Holdan.eu
ATEM Switchers Manual - Holdan.eu
ATEM Switchers Manual - Holdan.eu

Create successful ePaper yourself
Turn your PDF publications into a flip-book with our unique Google optimized e-Paper software.
37<br />
Using <strong>ATEM</strong> Software Control<br />
Audio Source Selection<br />
Below each audio level meter, you will find the ON and AFV checkboxes that select which audio sources are<br />
sent to the program output of the switcher.<br />
ON<br />
AFV<br />
SOLO<br />
Selecting the direct mix to ON allows an audio input to be permanently mixed into the program<br />
output, even when the associated video source is not on air. The red tally light will always be lit<br />
because the audio is always on air. Selecting this option automatically disables AFV.<br />
Audio-follow-video (AFV) allows audio to crossfade when inputs change. The audio will only be<br />
sent to the program output when the input is on air, lighting the red tally light above. Selecting<br />
this option automatically disables the direct mix ON setting.<br />
SOLO lets you listen to a solo audio source by muting all other audio output on the audio<br />
breakout cable. Selecting solo does not affect the program output audio. You can monitor the<br />
solo audio source regardless of whether or not it is on air and so the solo setting has no effect<br />
on the red tally light. Solo can be used when "monitor audio" is selected in the settings tab.<br />
Master Audio Level Output<br />
The master fader on the right side of the audio mixer is used to set the gain on the audio level on the SDI<br />
and HDMI program outputs and has its own audio level meter.<br />
The audio meter for Cam1 is shown in gray to indicate that its<br />
audio will not be used as neither of its ON or AFV checkboxes are<br />
enabled. Cam2 has AFV selected but its audio is not currently<br />
being used as the camera is not on air as is indicated by its unlit<br />
tally light. Cam4 and Cam7 have their direct mix set to ON so<br />
their mixed audio is always used, and their tally lights remain lit,<br />
even if another camera is currently on air. The audio level meters<br />
for Cam3, Cam5, Cam6 and Cam8 show that no audio is present<br />
on these cameras.<br />
The monitor fader and checkboxes set independent audio levels<br />
and allow solo monitoring on the audio breakout cable output.<br />
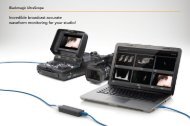
Audio Mixer Monitor<br />
The monitor fader and checkboxes appear below the master fader and are made available by selecting the<br />
audio breakout setting to "monitor audio" in the settings tab. They set independent audio levels and allow<br />
solo monitoring on the audio breakout cable output.<br />
ON<br />
DIM<br />
MUTE<br />
Select ON to enable audio monitoring on the audio breakout cable output.<br />
Select DIM to temporarily reduce the monitor audio level without having to adjust the fader.<br />
Select ON to return to your preferred listening level.<br />
Select MUTE to disable all audio on the audio breakout cable output.<br />
Using the Media Manager and Media Pool<br />
The media tab is used to transfer stills and clips from your computer into the switcher's Media Pool. On the<br />
left is a browse screen that you can use to navigate to the location of still image and image sequence files<br />
on your computer. On the right, the Media Pool shows what is currently loaded into the switcher's memory.<br />
Navigating the Browse Window<br />
The browse window is a simplified file browser that lets you navigate your computer to look for graphics<br />
files. The drop down list at the top shows the current folder. You can use the drop down to navigate back<br />
one level or multiple levels at once.