Arthroscopic Hip Labral Repair Using the BIORAPTOR⢠Knotless ...
Arthroscopic Hip Labral Repair Using the BIORAPTOR⢠Knotless ...
Arthroscopic Hip Labral Repair Using the BIORAPTOR⢠Knotless ...

Create successful ePaper yourself
Turn your PDF publications into a flip-book with our unique Google optimized e-Paper software.
<strong>Arthroscopic</strong> <strong>Hip</strong><br />
<strong>Labral</strong> <strong>Repair</strong> <strong>Using</strong><br />
<strong>the</strong> BIORAPTOR<br />
<strong>Knotless</strong> Suture<br />
Anchor<br />
<strong>Hip</strong> Series Technique Guide as described by:<br />
Srino Bharam, MD
<strong>Arthroscopic</strong> <strong>Hip</strong> <strong>Labral</strong> <strong>Repair</strong><br />
<strong>Using</strong> <strong>the</strong> Smith & Nephew<br />
BIORAPTOR <strong>Knotless</strong> Suture Anchor<br />
Introduction<br />
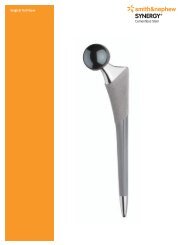
The Smith & Nephew BIORAPTOR <strong>Knotless</strong> Suture Anchor for labral repairs is<br />
intended to provide secure fixation of <strong>the</strong> labrum to <strong>the</strong> acetabular rim. The<br />
anchor’s unique design allows capture of suture limbs that are passed through<br />
<strong>the</strong> labrum and secured within <strong>the</strong> anchor by an inner plug. Suture tension is<br />
set after implantation and is independent of anchor depth. This technique offers<br />
<strong>the</strong> surgeon complete control over <strong>the</strong> amount of suture tension, as well as <strong>the</strong><br />
desired tissue shift, without knot tying or a knot stack in <strong>the</strong> joint.<br />
As described by:<br />
Srino Bharam, MD<br />
Sports Medicine/<strong>Hip</strong> Service<br />
Lenox Hill Hospital<br />
New York, NY<br />
Clinical Assistant Professor<br />
NYU School of Medicine<br />
New York, NY<br />
Torque limiter<br />
Suture cleats<br />
Suture threader<br />
Inserter handle<br />
<strong>Knotless</strong> suture anchor<br />
BIORAPTOR <strong>Knotless</strong> Suture Anchor <strong>Arthroscopic</strong> <strong>Hip</strong> <strong>Labral</strong> <strong>Repair</strong><br />
3
Patient Preparation<br />
1. Position <strong>the</strong> patient in ei<strong>the</strong>r <strong>the</strong> supine or lateral position on a fracture table or a hip<br />
distractor table.<br />
2. Use a padded, extra-wide bolster to protect <strong>the</strong> perineum.<br />
3. Place both feet in well-padded boots.<br />
4. Position <strong>the</strong> non-operative leg in slight abduction and neutral rotation.<br />
5. Place <strong>the</strong> operative leg in slight flexion and internal rotation with neutral abduction.<br />
6. Apply gentle inline traction to <strong>the</strong> operative hip, with countertraction to <strong>the</strong> non-operative leg.<br />
7. <strong>Using</strong> fluoroscopy, confirm joint distraction of approximately 10 mm.<br />
Portal Placement<br />
1. Establish <strong>the</strong> anterolateral portal first, locating it 1 cm anterior and 1 cm superior to <strong>the</strong> tip of <strong>the</strong><br />
greater trochanter.<br />
2. Insert a 17-gauge arthroscopic needle under fluoroscopic guidance through <strong>the</strong> capsule, avoiding<br />
labral and femoral head cartilage.<br />
3. Inject 20–30 cc of normal saline into <strong>the</strong> needle to confirm pressurized back-flow and intra-articular<br />
placement.<br />
4. Insert a nitinol wire through <strong>the</strong> needle.<br />
5. Place a cannula trochar assembly over <strong>the</strong> nitinol wire.<br />
6. Perform a diagnostic arthroscopic examination using a 70° arthroscope to assess <strong>the</strong> location, size<br />
and morphology of <strong>the</strong> labral tear and associated chondral and impingement lesions.<br />
7. Establish <strong>the</strong> anterior portal approximately 1 cm lateral to <strong>the</strong> ASIS (anterior superior iliac spine) and<br />
in line with <strong>the</strong> anterolateral portal.<br />
8. Place <strong>the</strong> needle under direct arthroscopic visualization.<br />
9. Insert a nitinol wire and place a 5.0 mm cannula and trochar assembly over <strong>the</strong> wire to establish<br />
a second portal.<br />
Alternatively, a mid-anterior portal can be used to optimize suture anchor placement. This portal<br />
should be placed at a 45° angle and 4–6 cm distal (may vary slightly with patient size) from <strong>the</strong><br />
anterolateral portal.<br />
<strong>Labral</strong> <strong>Repair</strong> Preparation<br />
1. Prepare <strong>the</strong> acetabular rim for labral repair. A capsulotomy may be performed with a banana blade<br />
to improve instrument maneuverability and access to <strong>the</strong> acetabular rim.<br />
2. Perform capsular elevation off <strong>the</strong> acetabular rim using arthroscopic shavers and/or flexible<br />
radiofrequency probes.<br />
3. For associated pincer-type impingement (anterior acetabular overcoverage), perform acetabular rim<br />
trimming with a high speed burr to remove <strong>the</strong> excessive acetabular overhang. <strong>Labral</strong> detachment<br />
may be completed with a banana blade to facilitate rim resection.<br />
4. If <strong>the</strong>re is associated pincer-type impingement, trim <strong>the</strong> rim using <strong>the</strong> high speed burr to remove<br />
<strong>the</strong> excessive acetabular overhang. Complete labral detachment performed with a banana blade<br />
may be needed to facilitate rim resection.<br />
4<br />
BIORAPTOR <strong>Knotless</strong> Suture Anchor <strong>Arthroscopic</strong> <strong>Hip</strong> <strong>Labral</strong> <strong>Repair</strong>
Technique<br />
STEP 1<br />
1. <strong>Using</strong> a suture passing device such as an ARTHRO-<br />
PIERCE or ARTHRO-ROUND XL Suture Passer, pass<br />
one end of a 40" strand of suture around or through <strong>the</strong><br />
labrum. This step may be done through a disposable<br />
cannula or percutaneously.<br />
STEP 3<br />
STEPS 4 & 5<br />
STEP 2<br />
2. <strong>Using</strong> <strong>the</strong> same device, retrieve <strong>the</strong> two ends of <strong>the</strong><br />
suture and bring <strong>the</strong>m outside of <strong>the</strong> joint. Clamp both<br />
limbs of <strong>the</strong> suture tails to prevent suture slippage.<br />
3. <strong>Using</strong> <strong>the</strong> proper drill guide and obturator, place <strong>the</strong> distal<br />
tip of <strong>the</strong> guide onto <strong>the</strong> bone at <strong>the</strong> desired implantation<br />
site. It is suggested to place <strong>the</strong> guide 1–2 mm onto <strong>the</strong><br />
rim of <strong>the</strong> acetabulum to aid visualization. Remove <strong>the</strong><br />
obturator.<br />
STEP 6<br />
4. While firmly holding <strong>the</strong> guide in place, use <strong>the</strong><br />
appropriate drill bit to prepare <strong>the</strong> insertion site:<br />
a. The depth stop on <strong>the</strong> drill bit will bottom out on<br />
<strong>the</strong> proximal end of <strong>the</strong> guide when <strong>the</strong> proper hole<br />
depth is reached.<br />
b. The wide viewing window on <strong>the</strong> guide can be used<br />
to gauge proper hole depth by advancing <strong>the</strong> drill bit<br />
until <strong>the</strong> black band on <strong>the</strong> drill is aligned with <strong>the</strong><br />
center of <strong>the</strong> wide viewing window.<br />
5. While holding <strong>the</strong> guide steady, remove <strong>the</strong> drill bit from<br />
<strong>the</strong> insertion site by backing <strong>the</strong> drill bit axially out of <strong>the</strong><br />
hole.<br />
Note: Bone quality determines which size drill bit to use.<br />
Use a 3.0 mm drill bit for predrilling hard bone. In all<br />
cases, surgeon judgment should prevail.<br />
6. Remove <strong>the</strong> hemostat clamp from <strong>the</strong> suture tails. <strong>Using</strong><br />
standard sterile technique, remove <strong>the</strong> BIORAPTOR<br />
<strong>Knotless</strong> Suture Anchor from its packaging. While<br />
holding <strong>the</strong> anchor handle, push <strong>the</strong> suture threader<br />
tab forward to release <strong>the</strong> suture threader loop. Thread<br />
<strong>the</strong> free ends of <strong>the</strong> suture through <strong>the</strong> suture-threading<br />
loop. Remove <strong>the</strong> suture threader tab from <strong>the</strong> shaft<br />
of <strong>the</strong> insertion device, and pull to feed <strong>the</strong> sutures<br />
through <strong>the</strong> anchor eyelet.<br />
BIORAPTOR <strong>Knotless</strong> Suture Anchor <strong>Arthroscopic</strong> <strong>Hip</strong> <strong>Labral</strong> <strong>Repair</strong><br />
5
Technique (continued)<br />
STEP 7<br />
7. Advance <strong>the</strong> loaded suture anchor into <strong>the</strong> operative<br />
cannula. Leaving some slack in <strong>the</strong> suture, advance <strong>the</strong><br />
anchor to <strong>the</strong> prepared bone site. Do not attempt to<br />
tension <strong>the</strong> suture at this time.<br />
STEP 8<br />
8. Orient <strong>the</strong> anchor such that <strong>the</strong> free limb sutures<br />
entering <strong>the</strong> anchor are facing <strong>the</strong> tissue. Ensure<br />
that <strong>the</strong> sutures are not twisted around <strong>the</strong> anchor.<br />
Note: Ensure<br />
that <strong>the</strong> anchor<br />
is aligned with<br />
<strong>the</strong> drilled hole to<br />
achieve proper<br />
implantation.<br />
9. Establish and maintain axial alignment of <strong>the</strong> suture<br />
anchor with <strong>the</strong> prepared insertion site. Place <strong>the</strong> tip<br />
of <strong>the</strong> anchor into <strong>the</strong> prepared hole. Use a mallet to<br />
tap <strong>the</strong> inserter handle until <strong>the</strong> laser mark is flush<br />
with <strong>the</strong> cortical bone. This places <strong>the</strong> suture anchor<br />
approximately 2–3 mm below <strong>the</strong> bone surface.<br />
10. Unhook both ends of <strong>the</strong> retention suture from <strong>the</strong><br />
inserter cleats and pull one end to remove <strong>the</strong> suture<br />
from <strong>the</strong> handle. Discard <strong>the</strong> retention suture.<br />
STEP 11a<br />
STEP 9<br />
STEP 10<br />
Note: The retention<br />
suture must be<br />
removed prior to<br />
applying tension.<br />
STEP 11b<br />
11a. Apply tension to <strong>the</strong> suture and lock <strong>the</strong> suture.<br />
Maintain slight downward pressure on <strong>the</strong> inserter<br />
handle while manually pulling <strong>the</strong> free suture limb(s)<br />
and remove <strong>the</strong> free ends of <strong>the</strong> suture(s) from <strong>the</strong><br />
inserter handle. Manually pull <strong>the</strong> suture(s), individually<br />
or toge<strong>the</strong>r, to apply <strong>the</strong> desired tension.<br />
11b. If desired, secure <strong>the</strong> free ends of <strong>the</strong> suture using<br />
<strong>the</strong> cleats located on <strong>the</strong> inserter handle. While<br />
maintaining slight downward pressure on <strong>the</strong> inserter,<br />
locate <strong>the</strong> torque limiter on <strong>the</strong> proximal end of <strong>the</strong><br />
inserter handle and rotate it clockwise approximately<br />
eight turns until several clicks are heard.<br />
6<br />
BIORAPTOR <strong>Knotless</strong> Suture Anchor <strong>Arthroscopic</strong> <strong>Hip</strong> <strong>Labral</strong> <strong>Repair</strong>
Technique (continued)<br />
STEPS 12 & 13<br />
STEP 14<br />
12. Slowly disengage <strong>the</strong> suture anchor from <strong>the</strong> inserter<br />
by pulling straight back or tapping <strong>the</strong> distal end with<br />
a mallet. Do not wiggle <strong>the</strong> handle to disengage <strong>the</strong><br />
anchor.<br />
13. Discard <strong>the</strong> insertion device and cut <strong>the</strong> excess suture.<br />
14. Repeat with additional anchors until <strong>the</strong> desired final<br />
repair is completed.<br />
Technique Pearls<br />
1. After suture passing, prepare <strong>the</strong> drill hole in a location that will optimize<br />
<strong>the</strong> desired tissue shift.<br />
2. To aid suture tensioning, secure one end of <strong>the</strong> suture into <strong>the</strong> inserter<br />
cleats. Pull <strong>the</strong> o<strong>the</strong>r end to tension <strong>the</strong> suture. Alternate securing suture<br />
ends and tensioning <strong>the</strong> suture until <strong>the</strong> desired tension is achieved.<br />
3. Do not wiggle <strong>the</strong> inserter handle during removal. Pull it straight back or<br />
tap it out with a mallet. The inner driver runs down <strong>the</strong> entire length of <strong>the</strong><br />
anchor, and wiggling <strong>the</strong> handle could compromise anchor security.<br />
4. Prior to removing <strong>the</strong> inserter, rotate <strong>the</strong> knob counterclockwise until a click<br />
is heard. This will help ease <strong>the</strong> release of <strong>the</strong> inserter from <strong>the</strong> anchor.<br />
5. Use a guide wire to maintain prepared hole location and alignment during<br />
<strong>the</strong> anchor insertion process. Remove <strong>the</strong> guide wire before placing <strong>the</strong><br />
anchor into <strong>the</strong> hole.<br />
BIORAPTOR <strong>Knotless</strong> Suture Anchor <strong>Arthroscopic</strong> <strong>Hip</strong> <strong>Labral</strong> <strong>Repair</strong><br />
7
Additional Instruction<br />
Prior to performing this technique, consult <strong>the</strong> Instructions for Use documentation provided with<br />
individual components – including indications, contraindications, warnings, cautions, and instructions.<br />
Ordering Information<br />
Some of <strong>the</strong> more common instruments for hip repair are listed below. Call +1 800 343 5717 in <strong>the</strong> U.S.<br />
or contact your authorized Smith & Nephew representative to order any of <strong>the</strong> following components.<br />
REF Number Product<br />
72202397 BIORAPTOR <strong>Knotless</strong> Suture Anchor, hip<br />
72202399 BIORAPTOR <strong>Knotless</strong> Inline Drill Guide, spike tip<br />
72202400 BIORAPTOR <strong>Knotless</strong> Inline Drill Guide, crown tip<br />
72202793 BIORAPTOR <strong>Knotless</strong> Inline Obturator, cannulated<br />
72202792 BIORAPTOR <strong>Knotless</strong> Inline Obturator, blunt<br />
72201395 BIORAPTOR <strong>Knotless</strong> Drill Bit, 3.0 mm<br />
7209350 Arthroscopy Needle, 17-gauge, 6"<br />
Caution: U.S. Federal law restricts this device to sale by or on <strong>the</strong> order of a physician.<br />
Courtesy of Smith & Nephew, Inc., Endoscopy Division<br />
Trademarks of Smith & Nephew, registered U.S. Patent & Trademark Office.<br />
Endoscopy<br />
Smith & Nephew, Inc.<br />
Andover, MA 01810<br />
USA<br />
www.smith-nephew.com<br />
+1 978 749 1000<br />
+1 978 749 1108 Fax<br />
+1 800 343 5717 U.S. Customer Service<br />
©2010 Smith & Nephew, Inc.<br />
All rights reserved.<br />
04/2010 10600666 Rev. A