Manual - Charles Industries, Ltd.
Manual - Charles Industries, Ltd.
Manual - Charles Industries, Ltd.

You also want an ePaper? Increase the reach of your titles
YUMPU automatically turns print PDFs into web optimized ePapers that Google loves.
Issue 1 Print 4<br />
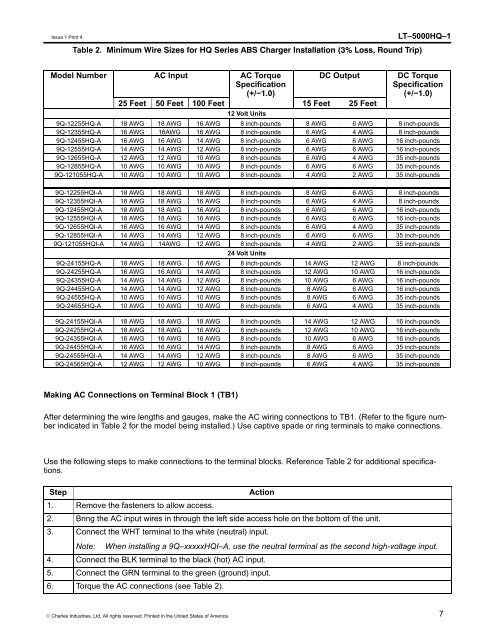
Table 2. Minimum Wire Sizes for HQ Series ABS Charger Installation (3% Loss, Round Trip)<br />
LT–5000HQ–1<br />
Model Number AC Input AC Torque<br />
Specification<br />
(+/−1.0)<br />
DC Output<br />
25 Feet 50 Feet 100 Feet 15 Feet 25 Feet<br />
12 Volt Units<br />
DC Torque<br />
Specification<br />
(+/−1.0)<br />
9Q-12255HQ-A 18 AWG 18 AWG 16 AWG 8 inch-pounds 8 AWG 6 AWG 8 inch-pounds<br />
9Q-12355HQ-A 16 AWG 16AWG 16 AWG 8 inch-pounds 6 AWG 4 AWG 8 inch-pounds<br />
9Q-12455HQ-A 16 AWG 16 AWG 14 AWG 8 inch-pounds 6 AWG 6 AWG 16 inch-pounds<br />
9Q-12555HQ-A 14 AWG 14 AWG 12 AWG 8 inch-pounds 6 AWG 6 AWG 16 inch-pounds<br />
9Q-12655HQ-A 12 AWG 12 AWG 10 AWG 8 inch-pounds 6 AWG 4 AWG 35 inch-pounds<br />
9Q-12855HQ-A 10 AWG 10 AWG 10 AWG 8 inch-pounds 6 AWG 6 AWG 35 inch-pounds<br />
9Q-121055HQ-A 10 AWG 10 AWG 10 AWG 8 inch-pounds 4 AWG 2 AWG 35 inch-pounds<br />
9Q-12255HQI-A 18 AWG 18 AWG 18 AWG 8 inch-pounds 8 AWG 6 AWG 8 inch-pounds<br />
9Q-12355HQI-A 18 AWG 18 AWG 16 AWG 8 inch-pounds 6 AWG 4 AWG 8 inch-pounds<br />
9Q-12455HQI-A 18 AWG 18 AWG 16 AWG 8 inch-pounds 6 AWG 6 AWG 16 inch-pounds<br />
9Q-12555HQI-A 18 AWG 18 AWG 16 AWG 8 inch-pounds 6 AWG 6 AWG 16 inch-pounds<br />
9Q-12655HQI-A 16 AWG 16 AWG 14 AWG 8 inch-pounds 6 AWG 4 AWG 35 inch-pounds<br />
9Q-12855HQI-A 14 AWG 14 AWG 12 AWG 8 inch-pounds 6 AWG 6 AWG 35 inch-pounds<br />
9Q-121055HQI-A 14 AWG 14AWG 12 AWG 8 inch-pounds 4 AWG 2 AWG 35 inch-pounds<br />
24 Volt Units<br />
9Q-24155HQ-A 18 AWG 18 AWG 16 AWG 8 inch-pounds 14 AWG 12 AWG 8 inch-pounds<br />
9Q-24255HQ-A 16 AWG 16 AWG 14 AWG 8 inch-pounds 12 AWG 10 AWG 16 inch-pounds<br />
9Q-24355HQ-A 14 AWG 14 AWG 12 AWG 8 inch-pounds 10 AWG 6 AWG 16 inch-pounds<br />
9Q-24455HQ-A 14 AWG 14 AWG 12 AWG 8 inch-pounds 8 AWG 6 AWG 16 inch-pounds<br />
9Q-24555HQ-A 10 AWG 10 AWG 10 AWG 8 inch-pounds 8 AWG 6 AWG 35 inch-pounds<br />
9Q-24655HQ-A 10 AWG 10 AWG 10 AWG 8 inch-pounds 6 AWG 4 AWG 35 inch-pounds<br />
9Q-24155HQI-A 18 AWG 18 AWG 18 AWG 8 inch-pounds 14 AWG 12 AWG 16 inch-pounds<br />
9Q-24255HQI-A 18 AWG 18 AWG 16 AWG 8 inch-pounds 12 AWG 10 AWG 16 inch-pounds<br />
9Q-24355HQI-A 16 AWG 16 AWG 16 AWG 8 inch-pounds 10 AWG 6 AWG 16 inch-pounds<br />
9Q-24455HQI-A 16 AWG 16 AWG 14 AWG 8 inch-pounds 8 AWG 6 AWG 35 inch-pounds<br />
9Q-24555HQI-A 14 AWG 14 AWG 12 AWG 8 inch-pounds 8 AWG 6 AWG 35 inch-pounds<br />
9Q-24565HQI-A 12 AWG 12 AWG 10 AWG 8 inch-pounds 6 AWG 4 AWG 35 inch-pounds<br />
Making AC Connections on Terminal Block 1 (TB1)<br />
After determining the wire lengths and gauges, make the AC wiring connections to TB1. (Refer to the figure number<br />
indicated in Table 2 for the model being installed.) Use captive spade or ring terminals to make connections.<br />
Use the following steps to make connections to the terminal blocks. Reference Table 2 for additional specifications.<br />
Step<br />
Action<br />
1. Remove the fasteners to allow access.<br />
2. Bring the AC input wires in through the left side access hole on the bottom of the unit.<br />
3. Connect the WHT terminal to the white (neutral) input.<br />
Note: When installing a 9Q–xxxxxHQI–A, use the neutral terminal as the second high-voltage input.<br />
4. Connect the BLK terminal to the black (hot) AC input.<br />
5. Connect the GRN terminal to the green (ground) input.<br />
6. Torque the AC connections (see Table 2).<br />
<strong>Charles</strong> <strong>Industries</strong>, <strong>Ltd</strong>. All rights reserved. Printed in the United States of America.<br />
7