

Sloan and Regal Optima Urinal Flushometer Installation Instruction
Sloan and Regal Optima Urinal Flushometer Installation Instruction
Sloan and Regal Optima Urinal Flushometer Installation Instruction

You also want an ePaper? Increase the reach of your titles
YUMPU automatically turns print PDFs into web optimized ePapers that Google loves.
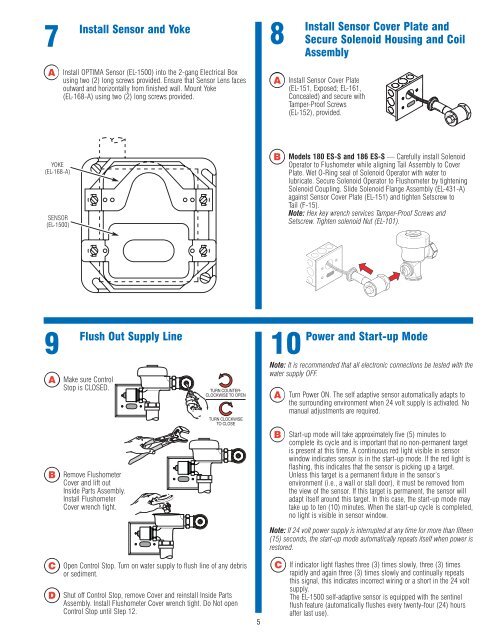
7<br />
Install<br />
Sensor <strong>and</strong> Yoke<br />
8<br />
Install<br />
Sensor Cover Plate <strong>and</strong><br />
Secure Solenoid Housing <strong>and</strong> Coil<br />
Assembly<br />
A<br />
Install OPTIMA Sensor (EL-1500) into the 2-gang Electrical Box<br />
using two (2) long screws provided. Ensure that Sensor Lens faces<br />
outward <strong>and</strong> horizontally from finished wall. Mount Yoke<br />
(EL-168-A) using two (2) long screws provided.<br />
A<br />
Install Sensor Cover Plate<br />
(EL-151, Exposed; EL-161,<br />
Concealed) <strong>and</strong> secure with<br />
Tamper-Proof Screws<br />
(EL-152), provided.<br />
YOKE<br />
(EL-168-A)<br />
SENSOR<br />
(EL-1500)<br />
B<br />
Models 180 ES-S <strong>and</strong> 186 ES-S — Carefully install Solenoid<br />
Operator to <strong>Flushometer</strong> while aligning Tail Assembly to Cover<br />
Plate. Wet O-Ring seal of Solenoid Operator with water to<br />
lubricate. Secure Solenoid Operator to <strong>Flushometer</strong> by tightening<br />
Solenoid Coupling. Slide Solenoid Flange Assembly (EL-431-A)<br />
against Sensor Cover Plate (EL-151) <strong>and</strong> tighten Setscrew to<br />
Tail (F-15).<br />
Note: Hex key wrench services Tamper-Proof Screws <strong>and</strong><br />
Setscrew. Tighten solenoid Nut (EL-101).<br />
9<br />
Flush<br />
A<br />
Out Supply Line<br />
Make sure Control<br />
Stop is CLOSED.<br />
10<br />
A<br />
Power <strong>and</strong> Start-up Mode<br />
Note: It is recommended that all electronic connections be tested with the<br />
water supply OFF.<br />
Turn Power ON. The self adaptive sensor automatically adapts to<br />
the surrounding environment when 24 volt supply is activated. No<br />
manual adjustments are required.<br />
B<br />
Remove <strong>Flushometer</strong><br />
Cover <strong>and</strong> lift out<br />
Inside Parts Assembly.<br />
Install <strong>Flushometer</strong><br />
Cover wrench tight.<br />
B<br />
Start-up mode will take approximately five (5) minutes to<br />
complete its cycle <strong>and</strong> is important that no non-permanent target<br />
is present at this time. A continuous red light visible in sensor<br />
window indicates sensor is in the start-up mode. If the red light is<br />
flashing, this indicates that the sensor is picking up a target.<br />
Unless this target is a permanent fixture in the sensor’s<br />
environment (i.e., a wall or stall door), it must be removed from<br />
the view of the sensor. If this target is permanent, the sensor will<br />
adapt itself around this target. In this case, the start-up mode may<br />
take up to ten (10) minutes. When the start-up cycle is completed,<br />
no light is visible in sensor window.<br />
Note: If 24 volt power supply is interrupted at any time for more than fifteen<br />
(15) seconds, the start-up mode automatically repeats itself when power is<br />
restored.<br />
C<br />
D<br />
Open Control Stop. Turn on water supply to flush line of any debris<br />
or sediment.<br />
Shut off Control Stop, remove Cover <strong>and</strong> reinstall Inside Parts<br />
Assembly. Install <strong>Flushometer</strong> Cover wrench tight. Do Not open<br />
Control Stop until Step 12.<br />
5<br />
C<br />
If indicator light flashes three (3) times slowly, three (3) times<br />
rapidly <strong>and</strong> again three (3) times slowly <strong>and</strong> continually repeats<br />
this signal, this indicates incorrect wiring or a short in the 24 volt<br />
supply.<br />
The EL-1500 self-adaptive sensor is equipped with the sentinel<br />
flush feature (automatically flushes every twenty-four (24) hours<br />
after last use).


