AL-2021/2041 Operation-Manual GB - Sharp
AL-2021/2041 Operation-Manual GB - Sharp
AL-2021/2041 Operation-Manual GB - Sharp

You also want an ePaper? Increase the reach of your titles
YUMPU automatically turns print PDFs into web optimized ePapers that Google loves.
MODEL<br />
<strong>AL</strong>-<strong>2021</strong><br />
<strong>AL</strong>-<strong>2041</strong><br />
DIGIT<strong>AL</strong> MULTIFUNCTION<strong>AL</strong><br />
SYSTEM<br />
OPERATION GUIDE<br />
<strong>AL</strong>-<strong>2021</strong><br />
Page<br />
CONTENTS..........................2<br />
INTRODUCTION ..................3<br />
LOADING PAPER ................9<br />
INST<strong>AL</strong>LING THE<br />
SOFTWARE .......................14<br />
COPIER FUNCTIONS........25<br />
PRINTER FUNCTIONS......37<br />
SCANNER FUNCTIONS....52<br />
SPECI<strong>AL</strong> FUNCTIONS ......64<br />
MAINTENANCE .................69<br />
TROUBLESHOOTING THE<br />
UNIT ...................................74<br />
<strong>AL</strong>-<strong>2041</strong>
CONTENTS<br />
1 INTRODUCTION<br />
CONVENTIONS USED IN THIS<br />
MANU<strong>AL</strong> .......................................... 3<br />
PART NAMES .................................. 4<br />
OPERATION PANEL........................ 5<br />
INDICATORS ON THE OPERATION<br />
PANEL.............................................. 6<br />
POWER ON ..................................... 7<br />
2 LOADING PAPER<br />
PAPER ............................................. 9<br />
LOADING THE PAPER TRAY........ 10<br />
BYPASS FEED (including special<br />
paper)............................................. 12<br />
3 INST<strong>AL</strong>LING THE SOFTWARE<br />
SOFTWARE................................... 14<br />
HARDWARE AND SOFTWARE<br />
REQUIREMENTS .......................... 15<br />
INST<strong>AL</strong>LING THE SOFTWARE ..... 16<br />
CONFIGURING THE PRINTER<br />
DRIVER ......................................... 22<br />
SETTING UP BUTTON MANAGER.. 23<br />
4 COPIER FUNCTIONS<br />
COPY FLOW.................................. 25<br />
ORIGIN<strong>AL</strong> PLACEMENT ............... 26<br />
SET THE COPY QUANTITY.......... 28<br />
EXPOSURE ADJUSTMENT/PHOTO<br />
COPYING ...................................... 28<br />
REDUCTION/ENLARGEMENT/<br />
ZOOM ............................................ 30<br />
SELECTING THE TRAY ................ 30<br />
TWO SIDED COPYING (<strong>AL</strong>-<strong>2041</strong><br />
only) ............................................... 31<br />
SORT COPY .................................. 33<br />
ID CARD COPY ............................. 36<br />
5 PRINTER FUNCTIONS<br />
BASIC PRINTING .......................... 37<br />
PRINTER DRIVER SETTING<br />
SCREEN ........................................ 40<br />
SETTING ADVANCED PRINT<br />
FUNCTIONS .................................. 41<br />
SAVING FREQUENTLY USED<br />
PRINT SETTINGS ........................ 49<br />
OUTLINE OF THE PRINT STATUS<br />
WINDOW ....................................... 50<br />
PRINTER DRIVER FEATURES..... 51<br />
6 SCANNER FUNCTIONS<br />
SCANNING OVERVIEW ................52<br />
SCANNING USING THE KEYS ON<br />
THE MACHINE...............................53<br />
SCANNING FROM YOUR<br />
COMPUTER...................................57<br />
7 SPECI<strong>AL</strong> FUNCTIONS<br />
DESCRIPTION OF SPECI<strong>AL</strong><br />
FUNCTIONS ................................. 64<br />
TONER SAVE MODE.....................65<br />
USER PROGRAMS .......................66<br />
DISPLAYING TOT<strong>AL</strong> NUMBER OF<br />
COPIES..........................................67<br />
CHECKING THE TONER LEVEL ..68<br />
8 MAINTENANCE<br />
TD CARTRIDGE REPLACEMENT... 69<br />
DRUM CARTRIDGE<br />
REPLACEMENT ............................70<br />
CLEANING THE UNIT ...................71<br />
MOVING AND STORING THE UNIT .. 73<br />
9 TROUBLESHOOTING THE UNIT<br />
MACHINE/COPYING PROBLEMS .. 74<br />
PRINTING AND SCANNING<br />
PROBLEMS ...................................76<br />
PROBLEMS DURING SETUP OF<br />
THE SOFTWARE...........................80<br />
STATUS INDICATORS ...................82<br />
MISFEED REMOV<strong>AL</strong> .....................83<br />
IF A PAPER MISFEED OCCURS IN<br />
THE MAIN UNIT WHILE USING THE<br />
SPF (<strong>AL</strong>-<strong>2041</strong>) ................................. 88<br />
1<br />
2<br />
3<br />
4<br />
5<br />
6<br />
7<br />
8<br />
9<br />
2
1<br />
This chapter provides basic information for using the unit.<br />
INTRODUCTION<br />
CONVENTIONS USED IN THIS MANU<strong>AL</strong><br />
• This manual explains the operation of the <strong>AL</strong>-<strong>2021</strong> and <strong>AL</strong>-<strong>2041</strong> models. In cases<br />
where the operation is the same, the <strong>AL</strong>-<strong>2041</strong> is used.<br />
• The illustrations in this manual generally show the <strong>AL</strong>-<strong>2041</strong>.<br />
• Wherever "<strong>AL</strong>-xxxx" appears in this manual, please substitute your model name<br />
for "xxxx".<br />
• Illustrations of driver screens and other computer screens show the screens that<br />
appear in Windows Vista. Some of the names that appear in these illustrations<br />
may differ slightly from the screens that appear in other operating systems.<br />
• This manual refers to the Single Pass Feeder as the "SPF".<br />
• In this manual, the following icons are used to provide the user with information<br />
pertinent to the use of the unit.<br />
1<br />
Warns the user that injury may result if the contents of the warning<br />
are not properly followed.<br />
Cautions the user that damage to the unit or one of its components<br />
may result if the contents of the caution are not properly followed.<br />
Notes provide information relevant to the unit regarding<br />
specifications, functions, performance, operation and such, that<br />
may be useful to the user.<br />
Indicates a letter displayed in the display.<br />
3
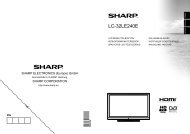
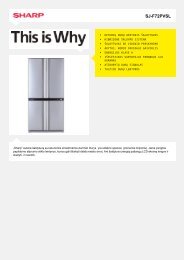
PART NAMES<br />
SPF (<strong>AL</strong>-<strong>2041</strong>)<br />
Exit area<br />
Original guides<br />
Document<br />
feeder cover<br />
Peep hole<br />
Document feeder tray<br />
Original cover<br />
(<strong>AL</strong>-<strong>2021</strong>)<br />
Interface<br />
USB<br />
connector<br />
1<br />
1<br />
10<br />
11<br />
12<br />
13<br />
14<br />
2<br />
3<br />
4<br />
5<br />
7<br />
8<br />
9<br />
Drum cartridge<br />
6<br />
TD cartridge<br />
7<br />
15<br />
4<br />
16<br />
17<br />
1<br />
2<br />
3<br />
4<br />
5<br />
6<br />
7<br />
8<br />
9<br />
SPF scanning area (<strong>AL</strong>-<strong>2041</strong>)<br />
Document glass<br />
<strong>Operation</strong> panel<br />
Front cover<br />
Paper tray<br />
Multi-bypass tray<br />
Side cover<br />
Side cover open button<br />
Bypass tray paper guides<br />
10 Paper output tray<br />
11 Paper output tray extension<br />
12 Power switch<br />
13 Handle<br />
14 Power cord socket<br />
15 Fusing unit release lever<br />
16 Transfer charger<br />
17 Charger cleaner<br />
4
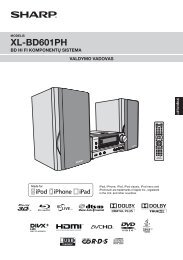
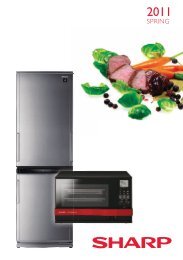
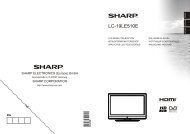
OPERATION PANEL<br />
1<br />
1<br />
2<br />
3<br />
4<br />
5<br />
6<br />
7<br />
Two-sided copy key* 1 /Sort key and<br />
indicators<br />
Use to select sort<br />
mode.<br />
Two-sided copies from<br />
one-sided originals.<br />
Turn on Long Edge or<br />
Turn on Short Edge<br />
can be selected.<br />
Exposure mode selector key and<br />
indicators<br />
Use to sequentially select the exposure<br />
modes: AUTO, MANU<strong>AL</strong> or PHOTO.<br />
Selected mode is shown by a lit<br />
indicator. (p.28)<br />
Light and dark keys and indicators<br />
Use to adjust the MANU<strong>AL</strong> or PHOTO<br />
exposure level. Selected exposure level<br />
is shown by a lit indicator. (p.28) Use to<br />
start and terminate user program<br />
setting. (p.66)<br />
Alarm indicators<br />
Drum replacement required<br />
indicator (p.70)<br />
Misfeed indicator (p.83)<br />
TD cartridge replacement<br />
required indicator (p.69)<br />
SPF indicator* 2 (p.27)<br />
SPF misfeed indicator* 2 (p.87)<br />
Copy ratio selector key* 3 and<br />
indicators<br />
Use to sequentially select preset<br />
reduction/enlargement copy ratios.<br />
Selected copy ratio is shown by a lit<br />
indicator. (p.30)<br />
8<br />
9<br />
10<br />
11<br />
12<br />
13<br />
14<br />
15<br />
Copy ratio display (%) key/<br />
READ-END key<br />
• Use to verify a zoom setting without<br />
changing the zoom ratio. (p.30)<br />
• Use to check the number of originals<br />
that must be returned to the document<br />
feeder tray if a misfeed occurs in the<br />
machine when the SPF is used. (p.88)<br />
• Use to terminate reading originals in<br />
sort mode. (p.33)<br />
Display<br />
Displays the specified copy quantity,<br />
zoom copy ratio, user program code<br />
and error code.<br />
SCAN key and indicator<br />
(p.6, p.53)<br />
ID CARD key and indicator<br />
Use to copy ID card. For description,<br />
see "ID CARD COPY" (p.36).<br />
Start key and indicator<br />
• Copying is possible when the<br />
indicator is on.<br />
• Press to start copying<br />
• Use to set a user program. (p.66)<br />
Power save indicator<br />
Lights up when the unit is in a power<br />
save mode. (p.64, p.66)<br />
Tray select key<br />
Use to select a paper feed station<br />
(paper tray or multi-bypass tray). (p.30)<br />
Paper feed location indicators<br />
Light up to show the selected paper<br />
feed station.<br />
*1 <strong>AL</strong>-<strong>2041</strong> only<br />
*2 <strong>AL</strong>-<strong>2041</strong> only<br />
*3 The indicators of the operation panel<br />
may differ depending on the country<br />
and region.<br />
5
16<br />
17<br />
ZOOM keys and indicator<br />
Use to select any reduction or<br />
enlargement copy ratio from 25% to<br />
400% in 1% increments. (When the<br />
SPF is being used, the zoom copy ratio<br />
range is 50% to 200%.) (p.30)<br />
Copy quantity keys<br />
• Use to select the desired copy<br />
quantity (1 to 99). (p.28)<br />
• Use to make user program entries.<br />
(p.66)<br />
18<br />
Clear key<br />
• Press to clear the display, or press<br />
during a copy run to terminate<br />
copying. (p.28)<br />
• Press and hold down during standby<br />
to display the total number of copies<br />
made to date. (p.67)<br />
1<br />
INDICATORS ON THE OPERATION PANEL<br />
The start ( ) indicator indicates the state of the printer or scanner.<br />
SCAN indicator<br />
Start indicator<br />
Power save indicator<br />
Start indicator<br />
On: Indicates the unit is ready for copying or scanning is being performed.<br />
Blinking: The indicator blinks in the following situations:<br />
• When a print job is interrupted.<br />
• When reserving a copy job.<br />
• When toner is being replenished during a copy or print job.<br />
Off: The indicator is off in the following situations:<br />
• During copying or scanning.<br />
• The unit is in the auto power shut-off mode.<br />
• When a misfeed or error has occurred.<br />
• During print online.<br />
Power save indicator<br />
On: Indicates the unit is in a power save mode.<br />
Blinking: Indicates that the unit is initializing (when the side cover is opened and<br />
closed or the power turned off and on).<br />
SCAN indicator<br />
On: The SCAN ( ) key has been pressed and the unit is in scanner mode.<br />
Blinking: A scan job is being executed from the computer, or scan data is stored<br />
in the unit's memory.<br />
Off: The unit is in the copy mode.<br />
6
POWER ON<br />
Turn the power switch on the left side of the unit to the "ON" position. The start ( )<br />
indicator will light up and other indicators which show the initial settings of the<br />
operation panel will also light up to indicate the ready condition. For the initial<br />
settings, see "Initial settings of operation panel" (p.8).<br />
• The unit will enter a power save mode once the set time has elapsed<br />
without any unit operation. The settings of the power save modes can<br />
be modified. See "USER PROGRAMS" (p.66).<br />
• The unit will return to the initial settings a preset amount of time after<br />
the end of a job. The preset amount of time (auto clear time) can be<br />
changed. See "USER PROGRAMS" (p.66).<br />
1<br />
About the scan head<br />
The scan head lamp remains on constantly when the unit is in the ready condition<br />
(when the start ( ) indicator is illuminated).<br />
The unit adjusts the scan head lamp periodically to maintain copying quality. At this<br />
time, the scan head moves automatically. This is normal and does not indicate unit<br />
trouble.<br />
7
Initial settings of operation panel<br />
When the unit power is on, the operation panel will revert to the initial settings when<br />
the time set with the "Auto clear time" setting (p.66) elapses after a job is finished, or<br />
when the clear key is pressed twice.<br />
The initial settings of the operation panel are shown below.<br />
1<br />
"0" is displayed in the display.<br />
When copying has begun in this state, the settings in the following table are used.<br />
Copy quantity<br />
1 copy<br />
Exposure adjustment<br />
AUTO<br />
Zoom 100%<br />
Tray<br />
Paper tray<br />
Two-sided copy (<strong>AL</strong>-<strong>2041</strong> only)<br />
The "Two-sided copy" indicator does<br />
not illuminate. (One-sided copy is<br />
selected.)<br />
Power off methods<br />
If not used for a certain period of time, the unit will automatically enter auto power<br />
shut-off mode (p.64) in order to minimize power consumption. In cases where the<br />
machine will not be used for a long time, turn off the power switch and remove the<br />
power cord from the outlet.<br />
8
2<br />
Follow the steps below to load paper into the tray.<br />
LOADING PAPER<br />
PAPER<br />
For best results, use only paper recommended by SHARP.<br />
Type of paper<br />
feeding<br />
Paper tray Standard paper A4<br />
A5<br />
B5<br />
Letter<br />
Legal<br />
Invoice<br />
Type of media Size Weight<br />
56 g/m 2 to<br />
80 g/m 2<br />
2<br />
Multi-bypass<br />
tray<br />
Standard paper and<br />
thick paper<br />
A4<br />
A5<br />
A6<br />
B5<br />
Letter<br />
Legal<br />
Invoice<br />
56 g/m 2 to<br />
128 g/m 2 * 2<br />
Special<br />
media<br />
Transparency<br />
film<br />
Envelope* 1<br />
A4<br />
Letter<br />
International DL<br />
International C5<br />
Commercial 10<br />
Monarch<br />
*1 Do not use non-standard envelopes, and envelopes that have metal clasps,<br />
plastic snappers, string closures, windows, linings, self-adhesive, patches or<br />
synthetic materials. Do not use envelopes that are filled with air or envelopes that<br />
have labels or stamps attached. These will cause physical damage to the unit.<br />
*2 For paper weighing from 105 g/m 2 to 128 g/m 2 , A4 is the maximum size that can be<br />
fed through the multi-bypass tray.<br />
• Special papers such as transparency film, labels and envelopes must be fed one<br />
sheet at a time through the multi-bypass tray.<br />
9
LOADING THE PAPER TRAY<br />
1<br />
Raise the handle of the paper tray<br />
and pull the paper tray out until it<br />
stops.<br />
2<br />
Adjust the paper guides on the paper tray to the copy paper<br />
width and length. Squeeze the lever of paper guide A and slide<br />
the guide to match with the width of the paper. Move paper<br />
guide B to the appropriate slot as marked on the tray.<br />
2<br />
Paper<br />
guide B<br />
Paper<br />
guide A<br />
3<br />
Fan the paper and insert it into the tray. Make sure the edges go<br />
under the corner hooks.<br />
Do not load paper above the maximum height line (<br />
the line will cause a paper misfeed.<br />
). Exceeding<br />
10
4<br />
Gently push the paper tray back into the unit.<br />
• Be sure that paper is free of rips, dust, wrinkles, and curled or bent<br />
edges.<br />
• Make sure all the paper in the stack is the same size and type.<br />
• When loading paper, ensure there is no space between the paper and<br />
the guide, and check if the guide is not set too narrow causing the<br />
paper to bend. Loading paper in these ways will result in document<br />
skew or a paper jam.<br />
• When not using the unit for an extended period, remove all paper from<br />
the paper tray and store it in a dry place. If paper is left in the unit for<br />
an extended period, the paper will absorb moisture from the air,<br />
resulting in paper jams.<br />
• When adding new paper to the paper tray, remove the old paper<br />
already contained in the tray. Placing new paper on top of the paper<br />
already contained in the tray may result in feeding two sheets at one<br />
time.<br />
• If output paper curls, it may help to turn the paper over when loading it<br />
in the tray.<br />
2<br />
11
BYPASS FEED (including special paper)<br />
The multi-bypass tray can be used to feed standard paper, transparency film, labels,<br />
envelopes, and other special purpose paper. Paper measuring from A6 to A4 and in<br />
the weight range of 56 g/m 2 to 128 g/m 2 can be used in this tray. (For paper weighing<br />
from 105 g/m 2 to 128 g/m 2 , A4 is the maximum size.)<br />
The multi-bypass tray<br />
1<br />
• The multi-bypass tray can hold maximum of 50 sheets of paper.<br />
(Capacity will vary depending on the type of paper loaded.)<br />
• The original image must be smaller than the paper or media for<br />
copying. If the original image is bigger than the paper or media, this<br />
may cause smudges on the edges of the copies.<br />
Open the multi-bypass tray and extend the tray.<br />
2<br />
To close the multi-bypass tray, perform step 1 and then step<br />
2 in the illustration and push the round projections at the right<br />
of the tray until they click.<br />
2<br />
1<br />
12
2<br />
Set the paper guides to the paper width. Insert the paper (print<br />
face down) all the way into the multi-bypass tray.<br />
Print face<br />
• Paper must be fed narrow side into the feed slot.<br />
• Special papers such as transparency film, labels, and envelopes<br />
must be fed one sheet at a time through the multi-bypass tray.<br />
• When copying onto transparency film, remove each copy<br />
promptly. Do not let copies stack up.<br />
2<br />
3<br />
Press the tray select ( ) key to select the multi-bypass tray.<br />
Note for loading envelopes<br />
• Envelopes must be fed narrow side into the feed slot at a time.<br />
• Do not use non-standard envelopes, and envelopes that have metal clasps, plastic<br />
snappers, string closures, windows, linings, self-adhesive, patches or synthetic<br />
materials. Do not use envelopes that are filled with air or envelopes that have<br />
labels or stamps attached.<br />
• Envelopes of which the surface is not flat because of embossing may cause the<br />
copies/prints to become smudged.<br />
• Under high humidity and temperature conditions the glue flaps on some envelopes<br />
may become sticky and be sealed when copied/printed.<br />
• Use only envelopes which are flat and crisply folded. Curled or poorly formed<br />
envelopes may be poorly printed or may cause misfeeds.<br />
• Be sure to select either Com10, DL, C5 or Monarch on the paper size setting of the<br />
printer driver. (For detailed information on printer driver, refer to "PRINTER<br />
DRIVER FEATURES" (p.51).)<br />
• It is recommended that you perform a test print before performing the actual copy/<br />
print job.<br />
Note for loading thick paper<br />
Confirm that user program 29 is set to "2 (High)" when using thick paper. (See<br />
page 66 and 67.)<br />
13
3 INST<strong>AL</strong>LING THE SOFTWARE<br />
This chapter explains how to install and configure the software that is required for the<br />
printer and scanner functions of the machine.<br />
SOFTWARE<br />
The Software CD-ROM that accompanies the machine contains the following<br />
software:<br />
MFP driver<br />
Printer driver<br />
The printer driver enables you to use the printer function of the machine.<br />
The printer driver includes the Print Status Window. This is a utility that monitors<br />
the machine and informs you of the printing status, the name of the document<br />
currently being printed, and error messages.<br />
Scanner driver<br />
The scanner driver allows you to use the scanning function of the machine with<br />
TWAIN-compliant and WIA-compliant applications.<br />
<strong>Sharp</strong>desk<br />
<strong>Sharp</strong>desk is an integrated software environment that makes it easy to manage<br />
documents and image files, and launch applications.<br />
* <strong>Sharp</strong>desk cannot be used in Windows 2000.<br />
Button Manager<br />
Button Manager allows you to use the scanner menus on the machine to scan a<br />
document.<br />
3<br />
14
HARDWARE AND SOFTWARE REQUIREMENTS<br />
Check the following hardware and software requirements in order to install the<br />
software.<br />
Computer type<br />
Operating system* 3<br />
Other hardware<br />
requirements<br />
IBM PC/AT or compatible computer equipped with a<br />
USB2.0* 1 /1.1* 2<br />
Windows 2000 Professional* 4 , Windows XP,<br />
Windows Vista, Windows 7<br />
An environment on which any of the operating systems<br />
listed above can fully operate<br />
*1 The machine's USB 2.0 port will transfer data at the speed specified by the USB 2.0<br />
(Hi-Speed) standard only if the Microsoft USB 2.0 driver is preinstalled in the<br />
computer, or if the USB 2.0 driver for Windows 2000 Professional/XP/Vista that<br />
Microsoft provides through "Windows Update" is installed.<br />
*2 Compatible with models preinstalled with Windows 2000 Professional, Windows<br />
XP Professional, Windows XP Home Edition, Windows Vista, or Windows 7, and<br />
which are equipped standard with a USB interface.<br />
*3 • The machine does not support printing from a Macintosh environment.<br />
• Administrator's rights are required to install the software using the installer.<br />
*4 <strong>Sharp</strong>desk cannot be installed.<br />
3<br />
15
INST<strong>AL</strong>LING THE SOFTWARE<br />
1<br />
The USB cable must not be connected to the machine. Make<br />
sure that the cable is not connected before proceeding.<br />
If the cable is connected, a Plug and Play window will appear. If this<br />
happens, click the "Cancel" button to close the window and disconnect the<br />
cable.<br />
The cable will be connected in step 13.<br />
2<br />
3<br />
4<br />
5<br />
6<br />
7<br />
Insert the Software CD-ROM into your computer's CD-ROM<br />
drive.<br />
Click the "Start" button, click "Computer", and then<br />
double-click the CD-ROM icon ( ).<br />
• In Windows XP, click the "start" button, click "My Computer", and then<br />
double-click the CD-ROM icon.<br />
• In Windows 2000, double-click "My Computer", and then double-click the<br />
CD-ROM icon.<br />
Double-click the "Setup" icon ( ).<br />
• In Windows 7, if a message screen appears asking you for confirmation,<br />
click "Yes".<br />
• In Windows Vista, if a message screen appears asking you for<br />
confirmation, click "Allow".<br />
The "SOFTWARE LICENSE" window will appear. Make sure<br />
that you understand the contents of the software license, and<br />
then click the "Yes" button.<br />
You can show the "SOFTWARE LICENSE" in a different language by<br />
selecting the desired language from the language menu. To install the<br />
software in the selected language, continue the installation with that<br />
language selected.<br />
Read the "Readme First" in the "Welcome" window and then<br />
click the "Next" button.<br />
To install all of the software, click the "Standard" button and go<br />
to step 12.<br />
To install particular packages, click the "Custom" button and<br />
go to next step.<br />
3<br />
16
8<br />
Click the "MFP Driver" button.<br />
Click the "Display Readme" button to<br />
show information on packages that are<br />
selected.<br />
9<br />
Select "Connected to this<br />
computer" and click the "Next"<br />
button.<br />
Follow the on-screen instructions.<br />
3<br />
• If you are using Windows Vista/7 and a security warning window<br />
appears, be sure to click "Install this driver software anyway".<br />
• If you are running Windows 2000/XP and a warning message appears<br />
regarding the Windows logo test or digital signature, be sure to click<br />
"Continue Anyway" or "Yes".<br />
10<br />
You will return to the window of step 8. If you wish to install<br />
Button Manager or <strong>Sharp</strong>desk, click the "Utility Software"<br />
button.<br />
If you do not wish to install the Utility Software, click the "Close" button and<br />
go to step 12.<br />
After the installation, a message prompting you to restart your computer<br />
may appear. In this case, click the "Yes" button to restart your computer.<br />
17
Installing the Utility Software<br />
11<br />
Click the "Button Manager" or the<br />
"<strong>Sharp</strong>desk" button.<br />
Click the "Display Readme" button to<br />
show information on packages that are<br />
selected.<br />
Follow the on-screen instructions.<br />
* In Windows 2000, The "<strong>Sharp</strong>desk"<br />
button does not appear.<br />
12<br />
When installing is finished, click the "Close" button.<br />
• If you are using Windows Vista/7 and a security warning window<br />
appears, be sure to click "Install this driver software anyway".<br />
• If you are running Windows 2000/XP and a warning message appears<br />
regarding the Windows logo test or digital signature, be sure to click<br />
"Continue Anyway" or "Yes".<br />
A message will appear instructing you to connect the machine to your<br />
computer. Click the "OK" button.<br />
After the installation, a message prompting you to restart your computer<br />
may appear. In this case, click the "Yes" button to restart your computer.<br />
3<br />
13<br />
Connect the machine to your computer with a USB cable.<br />
1<br />
2<br />
3<br />
Make sure that the machine is powered on.<br />
Connect the cable to the USB<br />
connector (B type) on the machine.<br />
The USB interface on the machine<br />
complies with the USB 2.0 (Hi-Speed)<br />
standard. Please purchase a shielded<br />
USB cable.<br />
Connect the other end of the cable to<br />
the USB connector (A type) on your<br />
computer.<br />
The machine is found and a Plug and Play window appears.<br />
If your computer is not compatible with USB 2.0 (Hi-Speed), the "USB<br />
2.0 mode switching" setting in the machine's user program must be set<br />
to "Full-Speed". For more information, see "USER PROGRAMS" (p.66).<br />
18
14<br />
Follow the instructions in the plug and play window to install<br />
the driver.<br />
When the "Found New Hardware Wizard" appears, select "Install the<br />
software automatically (Recommended)", click the "Next" button, and follow<br />
the on-screen instructions.<br />
• If you are using Windows Vista/7 and a security warning window<br />
appears, be sure to click "Install this driver software anyway".<br />
• If you are running Windows 2000/XP and a warning message appears<br />
regarding the Windows logo test or digital signature, be sure to click<br />
"Continue Anyway" or "Yes".<br />
This completes the installation of the software.<br />
• If you installed Button Manager, set up Button Manager as explained in "SETTING<br />
UP BUTTON MANAGER" (p.23).<br />
• If you installed <strong>Sharp</strong>desk, the <strong>Sharp</strong>desk setup screen will appear. Follow the<br />
instructions in the screen to set up <strong>Sharp</strong>desk.<br />
3<br />
19
Using the machine as a shared printer<br />
If the machine will be used as a shared printer on a network, follow these steps to<br />
install the printer driver in the client computer.<br />
To configure the appropriate settings in the print server, see the<br />
operation manual or help file of your operating system.<br />
1<br />
2<br />
Perform steps 2 through 6 in "INST<strong>AL</strong>LING THE SOFTWARE"<br />
(p.16).<br />
Click the "Custom" button.<br />
3<br />
3<br />
Click the "MFP Driver" button.<br />
Click the "Display Readme" button to<br />
show information on packages that are<br />
selected.<br />
4<br />
Select "Connected via the<br />
network" and click the "Next"<br />
button.<br />
20
5<br />
Select the printer name (configured as a shared printer).<br />
1<br />
2<br />
Select the printer name (configured as a shared printer on a print<br />
server) from the list.<br />
In Windows 2000/XP, you can also click the "Add Network Port" button<br />
displayed below the list and select the printer to be shared by browsing<br />
the network in the window that appears.<br />
Click the "Next" button.<br />
Follow the on-screen instructions.<br />
If the shared printer does not appear in the list, check the settings on the<br />
print server.<br />
• If you are using Windows Vista/7 and a security warning window<br />
appears, be sure to click "Install this driver software anyway".<br />
• If you are running Windows 2000/XP and a warning message appears<br />
regarding the Windows logo test or digital signature, be sure to click<br />
"Continue Anyway" or "Yes".<br />
3<br />
6<br />
You will return to the window of step 3. Click the "Close"<br />
button.<br />
After the installation, a message prompting you to restart your computer<br />
may appear. In this case, click the "Yes" button to restart your computer.<br />
7<br />
This completes the installation of the software.<br />
21
CONFIGURING THE PRINTER DRIVER<br />
After installing the MFP driver, you must configure the printer driver settings<br />
appropriately for the size of paper loaded in each.<br />
1<br />
2<br />
3<br />
4<br />
5<br />
6<br />
Click the "Start" button, click "Control Panel", and then click<br />
"Printer".<br />
• In Windows 7, click the "start" button and then click "Devices and<br />
Printers".<br />
• In Windows XP, click the "start" button and click "Printers and Faxes".<br />
• In Windows 2000, click the "Start" button, select "Settings", and then click<br />
"Printers".<br />
In Windows XP, if "Printers and Faxes" does not appear in the "start"<br />
menu, select "Control Panel", select "Printers and Other Hardware", and<br />
then select "Printers and Faxes".<br />
Open the printer properties window.<br />
1<br />
2<br />
Right-click the printer driver icon of the machine.<br />
Select "Properties".<br />
In Windows 7, click the "Printer properties" menu.<br />
Click the "Configuration" tab.<br />
Click the "Set Tray Status" button and select the size of paper<br />
that is loaded in each tray.<br />
Select a tray in the "Paper Source" menu, and select the size of paper<br />
loaded in that tray from the "Set Paper Size" menu. Repeat for each tray.<br />
Click the "OK" button in the "Set Tray Status" window.<br />
Click the "OK" button in the printer properties window.<br />
3<br />
22
SETTING UP BUTTON MANAGER<br />
Button Manager is a software program that works with the scanner driver to enable<br />
scanning from the machine.<br />
To scan using the machine, Button Manager must be linked with the scan menu on<br />
the machine. Follow the steps below to link Button Manager to scanner events.<br />
Windows XP/Vista/7<br />
1<br />
2<br />
3<br />
Click the "Start" button, click "Control Panel", click "Hardware<br />
and Sound", and then click "Scanners and Cameras".<br />
• In Windows 7, click the "start" button and then click "Devices and Printers".<br />
• In Windows XP, click the "start" button, select "Control Panel" and click<br />
"Printers and Other Hardware", and then click "Scanners and Cameras".<br />
Click the "SHARP <strong>AL</strong>-xxxx" icon and select "Properties".<br />
• In Windows 7, right-click the "SHARP <strong>AL</strong>-xxxx" icon and select "Scan properties".<br />
• In Windows XP, select "Properties" from the "File" menu.<br />
In the "Properties" screen, click the "Events" tab.<br />
3<br />
4<br />
Select "SC1:" from the "Select an event"<br />
pull-down menu.<br />
5<br />
Select "Start this program" and then select<br />
"<strong>Sharp</strong> Button Manager Y" from the<br />
pull-down menu.<br />
6<br />
7<br />
Repeat Steps 4 and 5 to link Button Manager to "SC2:" through<br />
"SC6:".<br />
Select "SC2:" from the "Select an event" pull-down menu. Select "Start this<br />
program", select "<strong>Sharp</strong> Button Manager Y" from the pull-down menu. Do<br />
the same for each ScanMenu through "SC6:".<br />
Click the "OK" button.<br />
Button Manager is now linked to the scan menu (1 through 6).<br />
The scan settings for each of scan menu 1 through 6 can be changed with<br />
the setting window of Button Manager.<br />
For the factory default settings of the scan menu and the procedures for<br />
configuring Button Manager settings, see "Button Manager settings" (p.55).<br />
23
Windows 2000<br />
1<br />
2<br />
Click the "Start" button, select "Settings", and then click<br />
"Control Panel".<br />
Double-click the "Scanners and Cameras" icon.<br />
3<br />
4<br />
5<br />
Select "SHARP <strong>AL</strong>-xxxx" and click the "Properties" button.<br />
In the "Properties" screen, click the "Events" tab.<br />
Select "SC1:" from the "Scanner events"<br />
pull-down menu.<br />
3<br />
6<br />
Select "<strong>Sharp</strong> Button Manager Y" in "Send<br />
to this application".<br />
If other applications are shown,<br />
deselect the checkboxes for the other<br />
applications and leave only the Button<br />
Manager checkbox selected.<br />
7<br />
8<br />
Click the "Apply" button.<br />
Repeat Steps 5 through 7 to link Button Manager to "SC2:"<br />
through "SC6:".<br />
Select "SC2:" from the "Scanner events" pull-down menu. Select "<strong>Sharp</strong><br />
Button Manager Y" in "Send to this application" and click the "Apply" button.<br />
Do the same for each ScanMenu through "SC6:".<br />
When the settings have been completed, click the "OK" button to close the<br />
screen.<br />
Button Manager is now linked to the scan menu (1 through 6).<br />
The scan settings for each of scan menu 1 through 6 can be changed with<br />
the setting window of Button Manager.<br />
For the factory default settings of the scan menu and the procedures for<br />
configuring Button Manager settings, see "Button Manager settings" (p.55).<br />
24
4 COPIER FUNCTIONS<br />
This chapter explains basic and other copying functions.<br />
The unit is equipped with a one-page memory buffer. This memory allows the unit to<br />
scan an original once only and make up to 99 copies. This feature improves<br />
workflow, reduces operation noise from the copier, and provides higher reliability by<br />
reducing wear and tear on the scanning mechanism.<br />
COPY FLOW<br />
1 Make sure that paper has been loaded in the paper tray (p.10) or<br />
multi-bypass tray (p.12), and check the paper size (p.9).<br />
If paper is not loaded, see page 10.<br />
2 Place the original.<br />
If you are using the document glass, see "Using the document glass" (p.26).<br />
If you are using the SPF, see "Using the SPF (<strong>AL</strong>-<strong>2041</strong>)" (p.27).<br />
When copying onto paper larger than A4 size, pull out the paper output tray<br />
extension.<br />
4<br />
3 Select the copy settings.<br />
• To set the number of copies, see page 28.<br />
• To adjust the resolution and contrast settings, see page 28.<br />
• To enlarge or reduce the copy, see page 30.<br />
• To change the tray used, see page 30.<br />
• To sort multiple original pages into sets, see page 33.<br />
• To copy the front and rear sides of ID card onto a page, see page 36.<br />
<strong>AL</strong>-<strong>2041</strong><br />
• To print on both sides of the paper, see page 31.<br />
4 Start copying.<br />
Press the start (<br />
) key.<br />
25
• If you start a print job while a copy job is in progress, the print job will<br />
begin when the copy job is completed.<br />
• The scanning function cannot be used while a copy job is in progress.<br />
About interrupt copying<br />
If you press the start ( ) key to begin a copy job while a print job using the paper<br />
tray or multi-bypass tray is in progress, the copy job will begin automatically after the<br />
print data in the unit's memory is printed (interrupt copying). When this is done, the<br />
print data remaining in the computer is not sent to the unit. When the copy job ends,<br />
press the clear key twice to change the unit to the online state, or wait until the set<br />
auto clear time (p.66) elapses. The remaining print data will be sent to the unit and<br />
printing will resume.<br />
* Interrupt copying during two-sided printing is not possible until the print job is finished.<br />
(<strong>AL</strong>-<strong>2041</strong> only)<br />
ORIGIN<strong>AL</strong> PLACEMENT<br />
Using the document glass<br />
• The document glass can read up to A4 original.<br />
• Image loss 4 mm can occur at the leading and trailing edges of the<br />
copies. Also image loss 4.5 mm in total can occur along the other<br />
edges of the copies.<br />
• When copying a book or an original which has been folded or a crumpled<br />
original, press down the original cover/SPF lightly. If the original cover/<br />
SPF is not securely closed, the copies may be striped or blurred.<br />
• When using the document glass to scan an original, make sure that an<br />
original is not placed in the SPF.<br />
4<br />
1<br />
2<br />
Open the original cover/SPF, and place the original.<br />
Place an original face down on the document glass. Align it<br />
with the original scale and the centring ( ) mark. Gently close<br />
the original cover/SPF.<br />
After placing the original, be sure to close the original cover/SPF. If left open,<br />
parts outside of the original will be copied black, causing excessive use of<br />
toner. In addition, toner may scatter inside the machine or the drum cartridge<br />
may suffer damage.<br />
Original scale<br />
mark<br />
26
Setting a large original (<strong>AL</strong>-<strong>2021</strong>)<br />
The original cover can be removed to allow copying of bulky objects.<br />
1<br />
Simply lift the original cover straight<br />
up.<br />
2<br />
To reattach the original cover, reverse the above procedure.<br />
Using the SPF (<strong>AL</strong>-<strong>2041</strong>)<br />
The SPF is designed to hold up to 50 originals measuring from A5 to A4 and weighting<br />
from 56 g/m 2 to 90 g/m 2<br />
• Before feeding originals in the document feeder tray, be sure to<br />
remove any staples or paper clips from them.<br />
• Before placing curled or wavy originals into the document feeder tray,<br />
be sure to flatten them. If not, original misfeeds may result.<br />
• If the original is placed correctly in the SPF, the SPF indicator will light<br />
up. If the original is not placed correctly, the SPF indicator will not<br />
light. If the SPF is not closed correctly, the indicator will blink.<br />
• Badly damaged originals may misfeed in the SPF. It is recommended<br />
that such originals be copied from the document glass.<br />
• Special originals such as transparency film should not be fed through<br />
the SPF, but should be placed directly on the document glass.<br />
• Image loss (max. 4 mm) can occur at the leading and trailing edges of<br />
the copies. Also image loss (max. 4.5 mm in total) can occur along the<br />
other edges of the copies. It can be 6 mm (15/64") (max.) at the<br />
trailing edge of the second copy of two-sided copying.<br />
• To stop continuous copying using the SPF, press the clear key.<br />
• Copying using one-sided to one-sided mode:<br />
Ensure that no indicator is lit among the Two-sided copy indicators<br />
(<strong>AL</strong>-<strong>2041</strong> only).<br />
4<br />
1<br />
2<br />
Make sure that no original is left on the document glass.<br />
Adjust the original guides to the<br />
size of originals.<br />
3<br />
Set the originals face up in the<br />
document feeder tray.<br />
Use the peep hole (see the illustration at<br />
right) to check the position of the original.<br />
There is an original top edge mark ▲ in the<br />
peep hole. Align the top edge of the<br />
original with this mark.<br />
27<br />
Original face up<br />
Peep hole
SET THE COPY QUANTITY<br />
Set the number of copies using the two copy quantity ( , ) keys when copying<br />
from the document glass or copying from SPF.<br />
• Press the clear key to clear an entry if a mistake is made.<br />
• A single copy can be made with the initial setting, i.e., when "0" is<br />
displayed.<br />
• Press the right copy quantity key to set the unit digit<br />
from 0 to 9. This key will not change the tens digit.<br />
• Press the left copy quantity key to set the tens digit<br />
from 1 to 9.<br />
Tens digit<br />
Unit digit<br />
EXPOSURE ADJUSTMENT/PHOTO COPYING<br />
Exposure adjustment<br />
Copy density adjustment is not required for most originals in the automatic exposure<br />
mode. To adjust the copy density manually or to copy photographs, the exposure<br />
level can be adjusted in five steps manually.<br />
4<br />
The copy resolution used for AUTO and MANU<strong>AL</strong> (<br />
changed. (p.66)<br />
) mode can be<br />
1<br />
Press the exposure mode selector key to<br />
select the MANU<strong>AL</strong> ( ) mode or<br />
PHOTO ( ) mode.<br />
2<br />
Use the light ( ) and dark ( ) keys to<br />
adjust the exposure level. If exposure level<br />
2 is selected, the two left-handmost<br />
indicators for that level will light up<br />
simultaneously. Also, if level 4 is selected,<br />
the two right-handmost indicators for that<br />
level will light up simultaneously.<br />
28
Automatic exposure adjustment<br />
This automatic exposure level will remain in effect until you change it<br />
again by this procedure.<br />
The automatic exposure level can be adjusted to suit your copying needs. This level is<br />
set for copying from the document glass and copying from the SPF respectively.<br />
1<br />
2<br />
3<br />
4<br />
5<br />
When adjusting the automatic exposure level for copying from<br />
the SPF, place an original in the document feeder tray and<br />
make sure that the SPF indicator lights up. When adjusting the<br />
level for copying from the document glass, make sure that no<br />
original is left in the document feeder tray.<br />
Press the exposure mode selector key to<br />
select the PHOTO ( ) mode.<br />
Press and hold down the exposure mode<br />
selector key for approximately 5 seconds.<br />
The PHOTO ( ) indicator will go out and<br />
the AUTO indicator will begin to blink. One<br />
or two light and dark indicators<br />
corresponding to the automatic exposure<br />
level which has been selected will light up.<br />
Press the light ( ) or dark ( ) key to<br />
lighten or darken the automatic exposure<br />
level as desired. If exposure level 2 is<br />
selected, the two left-handmost indicators<br />
for that level will light up simultaneously.<br />
Also, if level 4 is selected, the two righthandmost<br />
indicators for that level will<br />
light up simultaneously.<br />
Press the exposure selector key. The AUTO indicator will stop<br />
blinking and light up steadily.<br />
4<br />
29
REDUCTION/ENLARGEMENT/ZOOM<br />
Three preset reduction ratios and two enlargement ratios can be selected. The zoom<br />
function enables copy ratio selection from 25% to 400% in 1% increments. (When<br />
the SPF is being used, the zoom copy ratio range is 50% to 200%.)<br />
1<br />
2<br />
3<br />
Set the original and check the paper size.<br />
Use the copy ratio selector key and/or ZOOM ( , ) keys to<br />
select the desired copy ratio.<br />
• To verify a zoom setting without changing the zoom ratio,<br />
press and hold down the copy ratio display (%) key. When the<br />
key is released, the display will return to the copy quantity<br />
display.<br />
• To reset the ratio to 100%, press the copy ratio selector key<br />
repeatedly until the 100% indicator lights up.<br />
Set the reduction/enlargement ratio.<br />
To decrease or increase the zoom ratio rapidly, press and hold<br />
down the ZOOM ( ) or ( ) key. However the value will<br />
stop at the preset reduction or enlargement ratios. To move<br />
beyond these ratios, release the key and then press and hold it<br />
down again.<br />
4<br />
To select a preset copy ratio:<br />
Preset reduction and enlargement ratios are:<br />
50%, 70%, 86%, 141%, and 200%.<br />
To select a zoom ratio:<br />
When a ZOOM ( or ) key is pressed, the<br />
ZOOM indicator will light up and the zoom ratio will<br />
be displayed in the display.<br />
SELECTING THE TRAY<br />
Press the tray select ( ) key.<br />
Each time you press the tray select ( ) key, the location<br />
indicated by the paper feed location indicator changes in<br />
the following order: paper tray, multi-bypass tray.<br />
30
TWO SIDED COPYING (<strong>AL</strong>-<strong>2041</strong> only)<br />
Two-sided copies of one-sided originals only are possible. Automatic two-sided<br />
copying can also be performed without using the SPF. When copying from one-sided<br />
originals to two-sided copies, copying orientation can be selected between Turn on<br />
Long Edge and Turn on Short Edge.<br />
• When making two-sided copies from the original table, the paper size<br />
must be A4, letter.<br />
When making two-sided copies from the SPF, A4, B5, A5, letter, legal,<br />
and invoice sizes can be used. Non-standard size paper cannot be<br />
used.<br />
• When making two-sided copies, the multi-bypass tray cannot be used.<br />
• When using two-sided invoice size originals from the SPF, be sure to<br />
place them in the landscape orientation. Otherwise, an original<br />
misfeed will occur.<br />
A A<br />
A<br />
A<br />
A A<br />
A<br />
A<br />
4<br />
Turn on Long Edge<br />
Turn on Short Edge<br />
31
Making two-sided copies<br />
1<br />
2<br />
Place the original(s) on the document glass or in the SPF. (see<br />
"ORIGIN<strong>AL</strong> PLACEMENT" (p.26).<br />
Select two-sided copy mode.<br />
When copying in a one-sided to two-sided mode:<br />
Use the Two-sided copy key to select the desired one-sided to two-sided<br />
copying mode (Turn on Long Edge or Turn on Short Edge). See the<br />
illustrations on page 31.<br />
3<br />
Select the copy settings. See "SET THE COPY QUANTITY"<br />
(p.28), "EXPOSURE ADJUSTMENT/PHOTO COPYING" (p.28),<br />
and "REDUCTION/ENLARGEMENT/ZOOM" (p.30).<br />
Using the document glass<br />
1 Press the start ( ) key.<br />
The original is scanned into the unit's memory and the number of the<br />
copy quantity blinks in the display.<br />
2 Place the original that you wish to copy onto the rear side of the<br />
paper, and press the start ( ) key again.<br />
Copying begins.<br />
Using the SPF (<strong>AL</strong>-<strong>2041</strong>)<br />
Press the start ( ) key. Copying begins in the selected two-sided copy mode.<br />
4<br />
32
SORT COPY<br />
Copies of multiple original pages can be sorted into sets.<br />
Using the document glass<br />
1<br />
The number of pages that can be scanned varies depending on the<br />
original type (photo, text, etc.) and the amount of memory allocated to<br />
the printer. The amount of memory allocated to the printer can be<br />
changed with "Memory for printer" in the user programs. (p.66)<br />
Place the first original. (p.26)<br />
2<br />
Select the Two-sided copy/Sort key to select the sort mode.<br />
(<strong>AL</strong>-<strong>2041</strong>)<br />
(<strong>AL</strong>-<strong>2021</strong>)<br />
4<br />
3<br />
4<br />
5<br />
Set the number of copies and other settings, and then press the<br />
start ( ) key.<br />
The Sort indicator blinks, and the original is scanned into memory.<br />
When the start indicator lights, replace the original with the<br />
next original, and then press the start ( ) key.<br />
Repeat step 4 until all originals have been scanned into memory.<br />
When all originals have been scanned, and then press the<br />
READ-END key.<br />
The copies are delivered to the paper output tray.<br />
To clear the data in memory, press the clear key.<br />
33
Using the SPF (<strong>AL</strong>-<strong>2041</strong>)<br />
1<br />
Place the originals. (p.27)<br />
Sort mode is normally the default output mode, and thus the SPF and Sort<br />
indicators light up.<br />
• If "Sort auto select" has been set to "2: OFF" in the user programs,<br />
follow the steps below to select sort mode.<br />
• "Sort auto select" can also be used to change the default output mode<br />
(p.66).<br />
2<br />
Press the Two-sided copy/Sort key to select the sort mode.<br />
(<strong>AL</strong>-<strong>2041</strong>)<br />
3<br />
Set the number of copies and other settings, and then press the<br />
start ( ) key.<br />
The copies are delivered to the paper output tray.<br />
• To cancel the Sort copy job, press the clear key.<br />
• To cancel Sort mode, press the Sort/Two-sided copy key repeatedly<br />
until the Sort indicator is off.<br />
4<br />
34
If the memory becomes full<br />
• If the memory becomes full while scanning the originals, "FUL" will appear in the<br />
display, and the machine will stop copying.<br />
• To copy the originals that have been scanned up to that point, press the start ( )<br />
key.<br />
• To clear the data that has been scanned into memory, press the clear key.<br />
4<br />
35
ID CARD COPY<br />
You can copy the front and reverse sides of ID card onto a page through this<br />
function. The ID card print image is shown as follows.<br />
Originals<br />
Copies<br />
Front<br />
Back<br />
• ID card copy feature cannot be used in combination with two-sided<br />
copy and sort functions.<br />
• The following paper sizes can be used: A5R, A4, B5, 16K. (A5R can<br />
only be used in bypass tray.)<br />
• The image may cut off even if using standard paper size.<br />
• In ID card copy mode, scan area and scan number (1 page) cannot be<br />
changed. Scan area is:<br />
X: 54 + 5 mm (margin),<br />
Y: 86 + 10 mm (top margin 5 mm and bottom margin 5 mm).<br />
• Only making a single copy is available (Number of copies cannot be<br />
set.).<br />
4<br />
1<br />
2<br />
3<br />
Press the ID CARD key.<br />
• The ID CARD indicator will light up. The<br />
exposure is set to "text", the exposure level is set<br />
to "3", and the number is set to "1" automatically.<br />
• The multi-bypass tray is automatically selected<br />
when ID card copy feature is selected. The tray<br />
can be changed manually with the tray select key.<br />
Place the ID card on the document glass,<br />
align with the ID card mark, and press the<br />
start ( ) key.<br />
When scan is finished, ID CARD indicator will blink<br />
and one side of the ID card is scanned into<br />
memory. (In this case, print will start if pressing<br />
READ-END key.)<br />
ID CARD mark<br />
Turn and replace the ID card on the document glass, and press<br />
the start ( ) key.<br />
When scan finished, Copy will begin.<br />
To cancel ID card copy, press the clear key and make sure the ID CARD<br />
indicator is off.<br />
36
5 PRINTER FUNCTIONS<br />
This chapter explains how to use the printer functions.<br />
The procedure for loading paper is the same as for loading copy paper. See<br />
"LOADING PAPER" (p.9).<br />
• If copying is being performed when printing is started, copying will<br />
continue. After copying is complete, printing will be executed when the<br />
clear key is pressed twice or approximately 60 seconds (auto clear<br />
time)* elapse.<br />
* The auto clear time varies with a user program setting. See "USER<br />
PROGRAMS" (p.66).<br />
• Preheat mode and auto power shut-off mode will be cancelled when<br />
printing is started.<br />
• If the paper size specified from the software application is larger than<br />
the paper size in the printer, part of the image that is not transferred to<br />
the paper may remain on the surface of the drum. In this case, the<br />
rear side of the paper may become dirty. If this occurs, change to the<br />
correct size paper and print two or three pages to clean the image.<br />
BASIC PRINTING<br />
The following example explains how to print a document from WordPad.<br />
Before printing, make sure that the correct size of paper for your document has been<br />
loaded in the machine.<br />
1 Start WordPad and open the document that you wish to print.<br />
5<br />
2<br />
Select "Print" from the application's "File"<br />
menu.<br />
If you are using Windows 7, click the button.<br />
The menu used to execute printing<br />
may vary depending on the software<br />
application.<br />
37
3<br />
Make sure that "SHARP <strong>AL</strong>-xxxx" is selected as the printer.<br />
If you need to change any print<br />
settings, click the "Preferences"<br />
button to open the printer driver<br />
setup screen.<br />
Windows 2000 does not have the "Preferences" button in this dialog box.<br />
Select settings as needed on each of the tabs in the setup screen and click<br />
the "OK" button.<br />
"PRINTER DRIVER SETTING SCREEN" (p.40)<br />
"SETTING ADVANCED PRINT FUNCTIONS" (p.41)<br />
The button that is used to open the printer driver properties window<br />
(usually "Properties" or "Printing Preferences") may vary depending on<br />
the software application.<br />
4<br />
Click the "Print" button.<br />
Printing begins. When printing begins, the Print Status Window<br />
automatically opens.<br />
"OUTLINE OF THE PRINT STATUS WINDOW" (p.50)<br />
The print job will be delivered to the output tray.<br />
5<br />
Pausing a print job<br />
To pause a print job during printing, press the clear key on the operation panel to<br />
switch the machine off-line.<br />
• To cancel the print job, press the clear key once and then press it again within 5<br />
seconds.<br />
• If 5 seconds elapses after the first time the clear key is pressed, printing will<br />
automatically resume.<br />
38
Opening the printer driver from the "Start" button<br />
You can open the printer driver and change the printer driver settings from the<br />
Windows "Start" button. Settings adjusted in this way will be the initial settings when<br />
you print from an application. (If you change the settings from the printer driver setup<br />
screen at the time of printing, the settings will revert to the initial settings when you<br />
quit the application.)<br />
1<br />
Click the "Start" button and select "Control Panel" and then<br />
select "Printer".<br />
• In Windows 7, click the "start" button and then click "Devices and<br />
Printers".<br />
• In Windows XP, click the "start" button, and then click "Printers and<br />
Faxes".<br />
• In Windows 2000, click the "Start" button and point to "Settings", and then<br />
select "Printers".<br />
In Windows XP, if "Printers and Faxes" does not appear in the "start"<br />
menu, select "Control Panel", select "Printers and Other Hardware", and<br />
then select "Printers and Faxes".<br />
2<br />
3<br />
4<br />
Click the "SHARP <strong>AL</strong>-xxxx" printer driver icon.<br />
In Windows 7, right-click the icon of the printer driver of the machine.<br />
Select "Properties" from the "Organize" menu.<br />
• In Windows 7, click the "Printer properties" menu.<br />
• In Windows XP/2000, select "Properties" from the "File" menu.<br />
Click the "Printing Preferences" button in the "General" tab.<br />
• In Windows 7, click the "Preferences" button on the "General" tab.<br />
• The printer driver setup screen will appear.<br />
"PRINTER DRIVER SETTING SCREEN" (p.40)<br />
5<br />
39
PRINTER DRIVER SETTING SCREEN<br />
Some restrictions exist on the combinations of settings that can be selected in the<br />
printer driver setup screen. When a restriction is in effect, an information icon ( )<br />
will appear next to the setting. Click the icon to view an explanation of the restriction.<br />
1<br />
2<br />
3<br />
4<br />
5<br />
6<br />
5<br />
7 8 9 10<br />
The settings and the image of the machine will vary depending on the<br />
model.<br />
1<br />
2<br />
3<br />
4<br />
5<br />
Tab<br />
The settings are grouped on tabs.<br />
Click on a tab to bring it to the front.<br />
Checkbox<br />
Click on a checkbox to activate or<br />
deactivate a function.<br />
Print setting image<br />
This shows the effect of the selected<br />
print settings.<br />
Drop-down list<br />
Allows you to make a selection from a<br />
list of choices.<br />
Image of paper trays<br />
The tray selected in "Paper Selection"<br />
in the "Paper" tab appears in blue. You<br />
can also click on a tray to select it.<br />
40<br />
6<br />
7<br />
8<br />
9<br />
10<br />
Check button<br />
Allows you to select one item from a<br />
list of options.<br />
"OK" button<br />
Click this button to save your settings<br />
and exit the dialog box.<br />
"Cancel" button<br />
Click this button to exit the dialog box<br />
without making any changes to the<br />
settings.<br />
"Apply" button<br />
Click to save your settings without<br />
closing the dialog box.<br />
"Help" button<br />
Click this button to display the help file<br />
for the printer driver.
SETTING ADVANCED PRINT FUNCTIONS<br />
This section explains major advanced print functions.<br />
The explanations assume that the paper size and other basic settings have already<br />
been selected. For the basic procedure for printing and the steps for opening the<br />
printer driver, see "BASIC PRINTING" (p.37).<br />
Printing multiple pages on one page (N-Up Printing)<br />
This function can be used to reduce the print image and print multiple pages on a<br />
single sheet of paper.<br />
This is convenient when you want to print multiple images such as photos on a single<br />
sheet of paper, and when you want to conserve paper.<br />
The following print results will be obtained, depending on the order selected.<br />
N-Up<br />
(Pages per<br />
sheet)<br />
Left To Right<br />
Print results<br />
Right To Left<br />
Top To Bottom<br />
(when the print<br />
orientation is landscape)<br />
2-Up<br />
(2 pages<br />
per sheet)<br />
N-Up<br />
(Pages per<br />
sheet)<br />
Right, and Down Down, and Right Left, and Down Down, and Left<br />
5<br />
4-Up<br />
(4 pages<br />
per sheet)<br />
6-Up<br />
(6 pages<br />
per sheet)<br />
41
1<br />
2<br />
Click the "Main" tab in the printer driver setup screen.<br />
Select the number of pages per sheet.<br />
If you wish to print borderlines, check the<br />
"Border" box.<br />
3<br />
Select the order of the pages.<br />
Fitting the printed image to the paper (Fit To Paper Size)<br />
The printer driver can adjust the size of the printed image to match the size of the<br />
paper loaded in the machine.<br />
Follow the steps shown below to use this function. The explanation below assumes<br />
that you intend to print an A4 or Letter size document on B5 or Invoice size paper.<br />
1<br />
Click the "Paper" tab in the printer driver setup screen.<br />
5<br />
2<br />
Select the original size (A4 or Letter) of<br />
the print image in "Paper Size".<br />
3<br />
Check the "Fit To Paper Size" button.<br />
42
4<br />
Select the actual size of paper to be used for printing (B5 or<br />
Invoice).<br />
The size of the printed Paper Size: A4 or Letter<br />
image will be<br />
Fit To Paper Size: B5 or Invoice<br />
automatically adjusted<br />
to match the paper<br />
loaded in the machine.<br />
A4 or Letter size<br />
document<br />
(Paper Size)<br />
B5 or Invoice size<br />
paper<br />
(Fit To Paper Size)<br />
Rotating the print image 180 degrees (Rotate 180 degrees)<br />
The feature rotates the image 180 degrees so that it can be printed correctly on<br />
paper that can only be loaded in one orientation (such as envelopes).<br />
ABCD<br />
ABCD<br />
5<br />
1<br />
2<br />
Click the "Main" tab in the printer driver setup screen.<br />
Check the "Rotate 180 degrees" box.<br />
43
Enlarging/reducing the print image (Zoom)<br />
This function is used to enlarge or reduce the image to a selected percentage. This<br />
allows you to enlarge a small image or add margins to the paper by slightly reducing<br />
an image.<br />
The "Zoom" setting is not available when "N-Up Printing" is selected.<br />
1<br />
2<br />
Click the "Paper" tab in the printer driver setup screen.<br />
Select "Zoom" and click the "Settings" button.<br />
The actual paper size to be used for printing can<br />
be selected from the pop-up menu.<br />
5<br />
3<br />
Select the zoom ratio.<br />
Directly enter a number or click the button<br />
to change the ratio in increments of 1%.<br />
44
Printing faint text and lines in black<br />
(Text To Black/Vector To Black)<br />
When printing a colour image, colour text and lines that are faint can be printed in<br />
black. (Raster data such as bitmap images cannot be adjusted.) This allows you to<br />
bring out colour text and lines that are faint and difficult to see.<br />
ABCD<br />
ABCD<br />
1<br />
2<br />
Click the "Advanced" tab in the printer driver setup screen.<br />
Check the "Text To Black" box and/or the "Vector To Black"<br />
box.<br />
• "Text To Black" can be selected to print all text<br />
other than white text in black.<br />
• "Vector To Black" can be selected to print all<br />
vector graphics other than white lines and areas<br />
in black.<br />
5<br />
45
Adjusting the brightness and contrast of the image<br />
(Image Adjustment)<br />
The brightness and contrast can be adjusted in the print settings when printing a<br />
photo or other image. These settings can be used for simple corrections when you<br />
do not have image editing software installed on your computer.<br />
1<br />
Click the "Advanced" tab in the printer driver setup screen.<br />
2<br />
Click the "Image Adjustment" button.<br />
3<br />
Adjust the image settings.<br />
To adjust a setting, drag the slide<br />
bar or click the or<br />
button.<br />
5<br />
46
Adding a watermark to printed pages (Watermark)<br />
Faint shadow-like text can be added to the background of the printed image as a<br />
watermark. The size, density, and angle of the watermark text can be adjusted. The<br />
text can be selected from a pre-stored list, or entered to create an original<br />
watermark.<br />
1<br />
2<br />
Click the "Watermarks" tab in the printer driver setup screen.<br />
Select the watermark settings.<br />
Select a stored watermark from the<br />
pull-down menu. You can click the<br />
"Edit" button to edit the font and select<br />
other detailed settings.<br />
If you wish to create a new watermark, enter the text of the watermark in<br />
the "Text" box and click the "Add" button.<br />
5<br />
47
Two-sided printing (<strong>AL</strong>-<strong>2041</strong> only)<br />
The machine can print on both sides of the paper. This function is useful for many<br />
purposes, and is particularly convenient when you want to create a simple pamphlet.<br />
Two-sided printing also helps conserve paper.<br />
When using two-sided printing, select a source other than "Bypass Tray"<br />
for the "Paper Source" in the "Paper" tab.<br />
Paper<br />
orientation<br />
Printing result<br />
2-Sided (Book)<br />
2-Sided (Tablet)<br />
Vertical<br />
Horizontal<br />
2-Sided (Book)<br />
2-Sided (Tablet)<br />
5<br />
The pages are printed so that<br />
they can be bound at the side.<br />
The pages are printed so that<br />
they can be bound at the top.<br />
1<br />
2<br />
Click the "Main" tab in the printer driver setup screen.<br />
Select "2-Sided(Book)" or<br />
"2-Sided(Tablet)".<br />
48
SAVING FREQUENTLY USED PRINT SETTINGS<br />
Settings configured on each of the tabs at the time of printing can be saved as user<br />
settings. Saving frequently used settings or complex colour settings under an<br />
assigned name makes it easy to select those settings the next time you need to use<br />
them.<br />
Saving settings at the time of printing (User Settings)<br />
Settings can be saved from any tab of the printer driver properties window. Settings<br />
configured on each tab are listed at the time of saving, allowing you to check the<br />
settings as you save them.<br />
For the steps for opening the printer driver, see "BASIC PRINTING" (p.37).<br />
1<br />
Configure print settings on each tab and click the "Save"<br />
button on any tab.<br />
2<br />
After checking the displayed settings, enter a name for the<br />
settings (maximum of 20 characters).<br />
5<br />
• Up to 30 sets of user settings can be saved.<br />
• A watermark that you created cannot be saved in user settings.<br />
3<br />
Click the "OK" button.<br />
Using saved settings<br />
Select the user settings that you wish to use on any tab.<br />
Deleting saved settings<br />
Select the user settings that you want to delete in "Using saved settings" (above),<br />
and click the "Delete" button.<br />
49
OUTLINE OF THE PRINT STATUS WINDOW<br />
When printing begins, the Print Status Window automatically opens.<br />
The Print Status Window is a utility that monitors the machine and shows the name<br />
of the document being printed and any error messages that occur.<br />
1<br />
2<br />
3<br />
4<br />
5<br />
6<br />
7<br />
5<br />
1<br />
2<br />
Status window<br />
Provides information on the current<br />
status of the printer.<br />
Status icon<br />
The status icons appear to alert you to<br />
printer errors. Nothing appears when<br />
printing is taking place normally.<br />
The icons are explained below. Follow<br />
the instructions in the status window to<br />
solve the problem.<br />
Icon<br />
Print Status<br />
An error has occurred<br />
that requires immediate<br />
attention.<br />
An error has occurred<br />
that requires attention<br />
soon.<br />
3<br />
4<br />
5<br />
6<br />
7<br />
Tab<br />
Click a tab to bring it to the front. The<br />
"Options" tab allows you to select<br />
display options for the Print Status<br />
Window.<br />
Document Name<br />
Shows the name of the document<br />
currently being printed.<br />
"Cancel Job" button<br />
Printing can be cancelled by clicking<br />
this button before the machine<br />
receives the job.<br />
"Help" button<br />
Click this button to display the help file<br />
for the Print Status Window.<br />
"Close" button<br />
Click this button to close the Print<br />
Status Window.<br />
50
PRINTER DRIVER FEATURES<br />
Main<br />
Paper<br />
Advanced<br />
Tab Setting Selections Initial setting<br />
Copies 1 to 999 1<br />
Collate On/Off On<br />
N-Up Printing 1-Up/2-Up/4-Up/6-Up 1-Up<br />
Order<br />
1-Up: None<br />
2-Up: Left To Right/Right To Left/Top To<br />
Bottom<br />
4-Up/6-Up: Right, and Down/Down, and<br />
Right/Left, and Down/Down,<br />
and Left<br />
None<br />
Border On/Off Off<br />
Document Style* 1 1-Sided/2-Sided (Book)/2-Sided (Tablet) 1-Sided<br />
Image Orientation Portrait/Landscape/Rotate 180 degrees Portrait<br />
Paper Size A3 [Fit To Page]* 2 , A4, A5, A6, B4 [Fit To A4* 3<br />
Page]* 2 , B5, Ledger [Fit To Page]* 2 , Letter,<br />
Legal, Executive, Invoice, Foolscap, Folio,<br />
COM10, Monarch, DL, C5, 8K [Fit To<br />
Page]* 2 , 16K, Custom Paper<br />
Zoom settings Normal/Fit To Paper Size/Zoom Normal<br />
Paper Source Tray 1, Bypass Tray Tray 1<br />
[Custom]<br />
Width 98.3 to 215.9 (mm.)/3.87 to 8.50 (in.) 98.3 (mm.)* 3<br />
Length 148.0 to 355.6 (mm.)/5.83 to 14.00 (in.) 148.0 (mm.)* 3<br />
Size millimeters/inches millimeters* 3<br />
Text To Black On/Off Off<br />
Vector To Black On/Off Off<br />
[Image Adjustment]<br />
Brightness 0 to 100 50<br />
Contrast 0 to 100 50<br />
Watermark (None)/TOP SECRET/CONFIDENTI<strong>AL</strong>/ (None)<br />
DRAFT/ORIGIN<strong>AL</strong>/COPY<br />
Text - -<br />
Watermarks<br />
Size 6 to 300 100<br />
Angle -90 to +90 +45<br />
On First Page Only On/Off<br />
Off<br />
Configuration ROPM On/Off On<br />
Main, Paper,<br />
Advanced,<br />
Watermarks<br />
[User Settings]<br />
Setting Name Up to 30 names, 20 characters each -<br />
*1 <strong>AL</strong>-<strong>2041</strong> only<br />
*2 Will be reduced to A4 (letter) size or the specified size before printing.<br />
*3 This initial setting may vary depending on your operating user programs.<br />
For information on each setting, see Help in the printer driver setup screen.<br />
5<br />
51
6<br />
This chapter explains how to use the scanner functions.<br />
SCANNER FUNCTIONS<br />
SCANNING OVERVIEW<br />
The flow chart shown below provides an overview of scanning.<br />
Scanning from the<br />
machine* 1<br />
Scanning from a<br />
TWAIN* 2 -compliant or<br />
WIA* 3 -compliant<br />
application<br />
Scanning from the<br />
"Scanner and Camera<br />
Wizard" (Windows XP)<br />
Place the original in the scanning position<br />
For more information, refer to "SCANNING USING THE KEYS ON THE MACHINE" (p.53).<br />
Change the machine to<br />
scanner mode and<br />
select the scan menu.<br />
(SC1: to SC6:)<br />
Start up a Twaincompliant<br />
or WIAcompliant<br />
application,<br />
and select the<br />
machine's scanner<br />
driver.<br />
Start up the "Scanner<br />
and Camera Wizard"<br />
from "Control Panel" in<br />
your computer.<br />
Set the scan preferences<br />
(only if the preferences<br />
are set to appear)<br />
Scanning<br />
"SCANNING USING THE<br />
KEYS ON THE<br />
MACHINE" (p.53)<br />
Scanning<br />
"Scanning from a TWAINcompliant<br />
application"<br />
(p.57)<br />
"Scanning from a WIAcompliant<br />
application<br />
(Windows XP/Vista/7)"<br />
(p.61)<br />
Set the scan preferences<br />
Scanning<br />
"Scanning from the<br />
"Scanner and Camera<br />
Wizard" (Windows XP)"<br />
(p.62)<br />
6<br />
*1 To scan using the machine's operation panel, you must first install Button<br />
Manager and establish the appropriate settings in the Control Panel. For details,<br />
see "SETTING UP BUTTON MANAGER" (p.23).<br />
*2 TWAIN is an international interface standard for scanners and other image<br />
acquisition devices. By installing a TWAIN driver on your computer, you can scan<br />
and work with images using a variety of TWAIN-compliant applications.<br />
*3 WIA (Windows Imaging Acquisition) is a Windows function that allows a scanner,<br />
digital camera or other imaging device to communicate with an image processing<br />
application. The WIA driver for this machine can only be used in Windows XP/<br />
Vista/7.<br />
52
SCANNING USING THE KEYS ON THE MACHINE<br />
When scanning is performed by this method, the application that has been set in<br />
Button Manager will automatically start and the scanned image will be pasted into<br />
the application. For the steps to allocate applications using the Button Manager or<br />
other settings, see "Button Manager settings" (p.55).<br />
Scanning from the operation panel of the machine<br />
1<br />
• Scanning is not possible during a copy job.<br />
• If the SCAN ( ) key is pressed during a print job, the scan job will<br />
be stored.<br />
• When scanning an original that has been placed in the SPF, only one<br />
original can be placed unless you are using <strong>Sharp</strong>desk.<br />
Press the SCAN ( ) key.<br />
The unit enters scan mode.<br />
2<br />
3<br />
Place the original you wish to scan on the document glass/SPF.<br />
For the procedure for placing the original, see "ORIGIN<strong>AL</strong> PLACEMENT"<br />
(p.26).<br />
Press the right copy quantity<br />
key to display the number of<br />
the application that you wish to<br />
use for scanning.<br />
The application numbers are initially<br />
as follows.<br />
6<br />
Application<br />
number<br />
Application launched<br />
SC1<br />
SC2<br />
SC3<br />
SC4<br />
SC5<br />
SC6<br />
<strong>Sharp</strong>desk<br />
Email<br />
FAX<br />
OCR<br />
Microsoft Word<br />
Filing<br />
To check the settings, see "Button Manager settings" (p.55) and then open<br />
the settings window of the Button Manager.<br />
53
4<br />
Press the start ( ) key.<br />
Scanning will start and the scanned data will be transferred to the<br />
application.<br />
• If the following screen appears, select<br />
Button Manager and click "OK". Button<br />
Manager starts and the application<br />
associated with Button Manager starts. If<br />
you want only Button Manager to start in<br />
this case, set up Button Manager for use in<br />
Windows as explained in "SETTING UP<br />
BUTTON MANAGER" (p.23).<br />
• If step 4 is performed with the "Show<br />
TWAIN setting screen when scanning"<br />
checkbox selected in the Scan Button Destination Setting Dialog Box<br />
(p.56), the TWAIN settings screen (p.59) will automatically appear.<br />
Check the settings, and then press the start ( ) key again or click<br />
the "Scan" button in the TWAIN setting screen to start scanning. The<br />
scanned data will be transferred to the application.<br />
6<br />
54
Button Manager settings<br />
Once installed, Button Manager normally runs in the background in the Windows<br />
operating system. If you need to change Button Manager settings, follow the steps below.<br />
For details on Button Manager settings, see Button Manager Help.<br />
"Outline of Button Manager" (p.56)<br />
1<br />
Right-click the Button Manager icon ( ) on the task bar, and<br />
select "Settings" from the pop-up menu.<br />
The setting screen of Button Manager will open.<br />
If the Button Manager icon does not appear on the task bar, click the<br />
"Start" button, select "All Programs" ("Programs" in Windows 2000),<br />
select "<strong>Sharp</strong> Button Manager Y", and then click "Button Manager" to<br />
start Button Manager.<br />
2<br />
Click the tab of the scan menu that you want to set up.<br />
3<br />
Select the start-up application in the "Application Selection"<br />
area.<br />
When the "Show TWAIN setting screen when scanning" checkbox is<br />
selected, the scan setting screen appears when scanning is executed to<br />
let you adjust the scanning conditions.<br />
Button Manager scan menu (factory default)<br />
Display/Button Manager menu Application that starts<br />
SC1:<br />
<strong>Sharp</strong>desk<br />
SC2:<br />
Email<br />
SC3:<br />
FAX<br />
SC4:<br />
OCR<br />
SC5:<br />
Microsoft Word<br />
SC6:<br />
Filing<br />
6<br />
The start-up application must be installed before using.<br />
4<br />
5<br />
Set up the "Colour Mode", "Edge" and other scan settings in<br />
the "Scan Setup" area.<br />
Click the "OK" button.<br />
This completes the settings.<br />
55
Outline of Button Manager<br />
Button Manager is a software utility that allows you to use the scanner function at the<br />
machine. Button Manager allows you to configure six sets of scanning settings as a<br />
scan menu on the machine.<br />
To view Help for a setting, click the button in the upper right-hand corner of the<br />
window and then click the setting.<br />
To begin scanning using the machine's operation panel, settings must be established<br />
in the Control Panel after Button Manager is installed. For information on installing<br />
Button Manager and establishing the Control Panel settings, see "SETTING UP<br />
BUTTON MANAGER" (p.23). For information on scanning using the machine's<br />
operation panel, see "SCANNING USING THE KEYS ON THE MACHINE" (p.53).<br />
You can use Button Manager to select and change the functions of the six scan<br />
menus. Refer to "Button Manager settings" (p.55).<br />
1<br />
2<br />
3<br />
4<br />
5 6 7 8<br />
6<br />
1<br />
2<br />
3<br />
4<br />
Tab<br />
Click to set scan menu options. Each tab<br />
contains scan settings for the scan menu.<br />
"Application Selection" area<br />
Select the start-up application here.<br />
"Show TWAIN setting screen when<br />
scanning" Checkbox<br />
You can select whether or not the<br />
TWAIN screen is shown. When the<br />
checkbox is selected, the TWAIN screen<br />
appears when scanning is executed to<br />
let you adjust the scanning conditions.<br />
"Scan Setup" area<br />
Set the scan conditions.<br />
5<br />
6<br />
7<br />
8<br />
"OK" button<br />
Click to save your settings and exit the<br />
dialog box.<br />
"Cancel" button<br />
Click this button to exit the dialog box<br />
without making any changes to the<br />
settings.<br />
"Apply" button<br />
Click to save your settings without<br />
closing the dialog box.<br />
"Help" button<br />
Click this button to display the help file<br />
for Button Manager.<br />
Some applications may limit<br />
your choice of settings.<br />
"Menu Name" is not used on this machine.<br />
56
SCANNING FROM YOUR COMPUTER<br />
The machine supports the TWAIN standard, making it possible to scan from TWAINcompliant<br />
applications. The machine also supports WIA (Windows Image<br />
Acquisition), making it possible to scan from WIA-compliant applications and the<br />
"Scanner and Camera Wizard" in Windows XP. For information on TWAIN and WIA<br />
settings, see the help file for the scanner driver or Windows Help.<br />
Scanning is not possible during a copy job.<br />
Scanning from a TWAIN-compliant application<br />
The SHARP scanner driver is compatible with the TWAIN standard, allowing it to be<br />
used with a variety of TWAIN-compliant applications.<br />
1<br />
2<br />
Place the original(s) that you wish to scan on the document<br />
glass/SPF.<br />
For the procedure for placing the original, see "ORIGIN<strong>AL</strong> PLACEMENT"<br />
(p.26).<br />
After starting TWAIN-compliant application, click the "File"<br />
menu and select a menu to scan.<br />
3<br />
The method for accessing the menu to select the scanner depends upon<br />
the application. For more information, refer to the manual or the help file<br />
of your application.<br />
Select "SHARP MFP TWAIN Y", and click the "Select" button.<br />
• If you are using Windows XP/Vista/7, you can also select "WIA-<br />
SHARP <strong>AL</strong>-xxxx" to scan using the WIA driver.<br />
"Scanning from a WIA-compliant application (Windows XP/Vista/7)"<br />
(p.61)<br />
• Depending on your system, "SHARP MFP TWAIN Y 1.0 (32-32)" and<br />
"WIA-SHARP <strong>AL</strong>-xxxx 1.0 (32-32)" may appear in the above "Select<br />
Source" screen.<br />
6<br />
4<br />
Select the menu to acquire an image from the application's<br />
"File" menu.<br />
The scanner driver setup screen will appear.<br />
"Scanner driver settings" (p.59)<br />
57
5<br />
In the "Scanning Source" menu, select the location where you<br />
placed the original in Step 1.<br />
If you placed a one-sided original<br />
in the SPF, select "SPF".<br />
6<br />
7<br />
8<br />
Click the "Preview" button.<br />
The preview image will appear.<br />
• If the angle of the image is not correct, reset the original, and click the<br />
"Preview" button again.<br />
• If the preview image is not oriented correctly, click the "Rotate" button<br />
in the preview screen. This rotates the preview image 90 degrees<br />
clockwise, allowing you to correct the orientation without resetting the<br />
original. "Preview screen" (p.60)<br />
• If you set multiple pages in the SPF, the machine previews only the<br />
top page of the originals, and then sends it to the original exit area.<br />
Return the previewed original to the SPF before starting the scanning<br />
job.<br />
Specify the scanning area and set the scan preferences.<br />
For information on specifying the scan area and setting the scan<br />
preferences, see scanner driver Help.<br />
"Preview screen" (p.60)<br />
Scanning a large area at high resolution results in a large quantity of<br />
data and a prolonged scanning time. It is recommended that you set<br />
appropriate scanning preferences for the type of original being scanned,<br />
i.e., Monitor, Photo, FAX, or OCR.<br />
When you are ready to begin scanning, click the "Scanning"<br />
button.<br />
To cancel a scanning job after clicking the "Scanning" button, press the<br />
[Esc] key on your keyboard.<br />
6<br />
58
Scanner driver settings<br />
The scanner driver setup screen consists of the "Set-up screen", which lets you select<br />
scan settings, and the "Preview screen", which shows the scanned image. For details<br />
on the scan settings, click the "Help" button in the preview screen to display Help.<br />
Set-up screen<br />
1<br />
2<br />
3<br />
4<br />
5<br />
6<br />
1<br />
2<br />
3<br />
"Scanning Source" menu<br />
Select the location where the original is<br />
placed. Selections are "Platen"<br />
(document glass) or "SPF".<br />
"Scanning from a TWAIN-compliant<br />
application" (p.57)<br />
"Scanning Mode" menu<br />
Select "Standard" or "Professional" for<br />
the scanning mode. For details on the<br />
settings, click the "Help" button in the<br />
preview screen to display Help.<br />
"Zoom Preview" Checkbox<br />
When this is selected, the selected part<br />
of the preview image will be enlarged<br />
when the "Preview" button is clicked. To<br />
return to the regular view, remove the<br />
checkmark.<br />
"Zoom Preview" can be used<br />
when "Platen" is selected in<br />
the "Scanning Source" menu.<br />
4 "Preview" button<br />
Previews the document.<br />
If "Preview" is cancelled by<br />
immediately pressing the [Esc]<br />
key on your keyboard, or the<br />
clear key on the machine,<br />
nothing will appear in the<br />
preview screen.<br />
5<br />
6<br />
"Scanning" button<br />
Click to scan an original using the<br />
selected settings. Before clicking the<br />
"Scanning" button, make sure the<br />
settings are correct.<br />
To cancel a scanning job after<br />
clicking the "Scanning" button,<br />
press the [Esc] key on your<br />
keyboard, or the clear key on<br />
the machine.<br />
"Close" button<br />
Click to close the scanner driver setup<br />
screen.<br />
6<br />
59
Preview screen<br />
1<br />
2<br />
3<br />
4<br />
5<br />
1<br />
2<br />
3<br />
Preview screen<br />
Click the "Preview" button in the Set-up<br />
screen to display the scanned image. You<br />
can specify the scanning area by<br />
dragging the mouse inside the window.<br />
The inside of the frame that is created<br />
when you drag the mouse will be the<br />
scanning area. To cancel a specified<br />
scanning area and clear the frame, click<br />
anywhere outside the frame.<br />
"Rotate" button<br />
Click to rotate the preview image 90<br />
degrees clockwise. This allows the<br />
orientation to be corrected without<br />
resetting the original. Upon scanning, the<br />
image file is created in the orientation<br />
shown in the preview screen.<br />
"Image Size" button<br />
Click to open a dialog box that allows you<br />
to specify the scanning area by entering<br />
numbers. Pixels, mm, or inches can be<br />
selected for the units of the numbers. By<br />
initially specifying a scanning area,<br />
numbers can be entered to change that<br />
area relative to the top left corner as a<br />
fixed origin.<br />
4<br />
5<br />
"Auto Scan Area Judgement" button<br />
Click when the preview screen is<br />
displayed to automatically set the<br />
scanning area to the entire preview<br />
image.<br />
Click the "Auto Scan<br />
Area Judgement"<br />
button to<br />
automatically set the<br />
scanning area to the<br />
entire preview image.<br />
Preview image<br />
Preview screen<br />
"Help" button<br />
Click to display the help file for the<br />
scanner driver.<br />
6<br />
60
Scanning from a WIA-compliant application<br />
(Windows XP/Vista/7)<br />
If you are using Windows XP/Vista/7, you can use the WIA driver to scan from WIAcompliant<br />
applications.<br />
1<br />
2<br />
Place the original that you wish to scan on the document glass/<br />
SPF.<br />
For the procedure for placing the original, see "ORIGIN<strong>AL</strong> PLACEMENT"<br />
(p.26).<br />
After starting WIA-compliant application, click the "File" menu<br />
and select a menu to scan.<br />
The method for accessing the menu to select the scanner depends upon<br />
the application. For more information, refer to the manual or the help file<br />
of your application.<br />
3<br />
Select the paper source and picture type, and click the<br />
"Preview" button.<br />
The preview image will appear.<br />
If you placed the original on the document<br />
glass, select "Flatbed" for the "Paper<br />
source".<br />
If you placed the original in the SPF, select<br />
"Document Feeder" for the "Paper source"<br />
and specify the original size in "Page size".<br />
• If you select "Document Feeder" for the "Paper source" and click the<br />
"Preview" button, the top original in the SPF is previewed. The<br />
previewed original is sent to the original exit area, so you will need to<br />
return it to the SPF before starting the scanning job.<br />
• In Windows XP, you can view Help for a setting. Click the button in<br />
the upper right-hand corner of the window and then click the setting.<br />
6<br />
4<br />
Click the "Scan" button.<br />
Scanning begins and the image is acquired into Paint.<br />
Use "Save" in your application to specify a file name and folder for the<br />
scanned image, and save the image.<br />
To cancel a scanning job after clicking the "Scan" button, click the "Cancel"<br />
button.<br />
61
Scanning from the "Scanner and Camera Wizard"<br />
(Windows XP)<br />
The procedure for scanning with the "Scanner and Camera Wizard" in Windows XP<br />
is explained here. The "Scanner and Camera Wizard" lets you scan an image<br />
without using a WIA-compliant application.<br />
1<br />
Place the original that you wish to scan on the document glass/<br />
SPF.<br />
For the procedure for placing the original, see "ORIGIN<strong>AL</strong> PLACEMENT"<br />
(p.26).<br />
2<br />
3<br />
4<br />
5<br />
Click the "start" button, click "Control<br />
Panel", click "Printers and Other<br />
Hardware", and then click "Scanners<br />
and Cameras".<br />
Click the "SHARP <strong>AL</strong>-xxxx" icon and<br />
then click "Get pictures" in "Imaging<br />
Tasks".<br />
The "Scanner and Camera Wizard" will appear.<br />
Click the "Next" button.<br />
Select the "Picture type" and "Paper<br />
source", and click the "Next" button.<br />
• If you placed the original on the document<br />
glass, select "Flatbed" for the "Paper source".<br />
• If you placed the original in the SPF, select<br />
"Document Feeder" for the "Paper source"<br />
and specify the original size in "Page size".<br />
• You can click the "Preview" button to display<br />
the preview image.<br />
• If you select "Document Feeder" for the "Paper source" and click the<br />
"Preview" button, the top original in the SPF is previewed. The<br />
previewed original is sent to the original exit area, so you will need to<br />
return it to the SPF before starting the scanning job.<br />
• To adjust the resolution, picture type, brightness and contrast settings,<br />
click the "Custom settings" button.<br />
Specify a group name, format and folder<br />
for saving the image, and then click the<br />
"Next" button.<br />
JPG, BMP, TIF or PNG can be selected for the<br />
format. To begin scanning, click the "Next"<br />
button.<br />
6<br />
62
6<br />
7<br />
When scanning ends, the following<br />
screen will appear. Select the next task<br />
that you wish to perform, and then click<br />
the "Next" button.<br />
If you are ready to end the session, click<br />
"Nothing. I'm finished working with these<br />
pictures".<br />
Click the "Finish" button.<br />
The "Scanner and Camera Wizard" closes and the scanned image is saved<br />
in the specified folder.<br />
6<br />
63
7 SPECI<strong>AL</strong> FUNCTIONS<br />
This chapter describes the special functions of this unit. Use these functions as<br />
needed.<br />
DESCRIPTION OF SPECI<strong>AL</strong> FUNCTIONS<br />
Toner save mode<br />
Reduces toner consumption by approximately 10%.<br />
Power save modes<br />
The unit has two power save modes of operation: preheat mode and auto power<br />
shut-off mode.<br />
Preheat mode<br />
When the unit enters the preheat mode, the power save ( ) indicator will light up<br />
and other indicators will remain on or off as before. In this condition, the fuser in<br />
the unit is maintained at a lower heat level, thereby saving power. To copy from<br />
the preheat mode, make desired copier selections and press the start ( ) key<br />
using the normal copying procedure.<br />
Auto power shut-off mode<br />
When the unit enters the auto power shut-off mode, the power save ( ) indicator<br />
will light up and other indicators will go out. The auto power shut-off mode saves<br />
more power than the preheat mode but requires a longer time before starting<br />
copying. To copy from the auto power shut-off mode, press the start ( ) key.<br />
Then make desired copier selections and press the start ( ) key using the<br />
normal copying procedure.<br />
Auto clear<br />
The unit returns to the initial settings a preset amount of time after the end of job.<br />
This preset amount of time (auto clear time) can be changed.<br />
Resolution of AUTO & MANU<strong>AL</strong> mode<br />
You can set the copy resolution used for AUTO and MANU<strong>AL</strong> ( ) exposure<br />
mode.<br />
Prevention of OC copies when the original cover/SPF is up function<br />
When enabled, this function may help prevent wasteful use of toner that occurs<br />
when the original cover/SPF is not completely closed.<br />
If the start ( ) key is pressed when the original cover/SPF is not completely closed,<br />
" " will appear in the display and copying may not take place. If copying does not<br />
take place, copying can be performed by pressing the start ( ) key again, however,<br />
the scan size set in "Copy effective paper width setting function" (program numbers<br />
25, 26) will be used.<br />
If the original cover/SPF is completely closed after " " appears, copying will take<br />
place at the normal size.<br />
7<br />
64
TONER SAVE MODE<br />
1<br />
Press the exposure mode selector key<br />
to select the MANU<strong>AL</strong> ( ) mode.<br />
2<br />
3<br />
4<br />
Press and hold down the exposure mode<br />
selector key for approximately 5 seconds.<br />
The MANU<strong>AL</strong> ( ) indicator will go out<br />
and the PHOTO ( ) indicator will begin<br />
to blink. The light and dark indicator<br />
marked "5" will light up, indicating the<br />
standard toner mode is active.<br />
To enter the toner save mode, press the<br />
light ( ) key. The light and dark<br />
indicator marked "1" will light up,<br />
indicating the toner save mode is<br />
selected.<br />
Press the exposure mode selector key. The PHOTO ( ) indicator<br />
will stop blinking and light up steadily. The light and dark indicator<br />
marked "3" will light up. The toner save mode is now active.<br />
To return to the standard mode, repeat the procedure but use the dark<br />
( ) key to select exposure level "5" in step 3.<br />
7<br />
65
USER PROGRAMS<br />
The user programs allow the parameters of certain functions to be set, changed, or<br />
cancelled as desired.<br />
Setting the user programs<br />
1<br />
2<br />
3<br />
4<br />
Press and hold down the light ( ) key for more than 5<br />
seconds until all the alarm indicators ( , , ) blink and<br />
" " appears in the display.<br />
Use the left copy quantity ( ) key to select a user program<br />
number (For the user program numbers, see the following table.).<br />
The selected number will blink in the left side of the display.<br />
Press the start ( ) key. The entered program number will be<br />
steadily lit and the currently selected parameter number for the<br />
program will blink on the right side of the display.<br />
Select the desired parameter using the right copy quantity ( ) key.<br />
The entered parameter number will blink on the right of the display.<br />
Program<br />
No.<br />
Mode<br />
1 Auto clear time<br />
2 Preheat mode<br />
3<br />
4<br />
6<br />
10<br />
Auto power shut- off<br />
mode<br />
Auto power shut- off<br />
timer<br />
SPF automatic<br />
original discharge<br />
time (<strong>AL</strong>-<strong>2041</strong>)<br />
Resolution of AUTO<br />
& MANU<strong>AL</strong> mode<br />
Parameters<br />
1 10 sec., 2 30 sec., *3 60 sec.,<br />
4 90 sec., 5 120 sec., 6 OFF<br />
*1 30 sec., 2 60 sec., 3 5 min.,<br />
4 30 min., 5 60 min., 6 120 min.,<br />
7 240 min.<br />
*1 ON, 2 OFF<br />
*1 5 min., 2 30 min., 3 60 min.,<br />
4 120 min., 5 240 min.<br />
1 5 min., *2 30 min.,<br />
3 60 min., 4 120 min.,<br />
5 240 min., 6 OFF<br />
*1 300dpi, 2 600dpi<br />
1 30%, 2 40%, *3 50%,<br />
13 Memory for printer<br />
4 60%, 5 70%<br />
21 Reset factory 1 YES, *2 NO<br />
22<br />
24<br />
Sort auto select<br />
(<strong>AL</strong>-<strong>2041</strong>)<br />
Prevention of OC<br />
copies when the<br />
original cover/SPF<br />
is up function<br />
*1 ON, 2 OFF<br />
*1 ON, 2 OFF<br />
7<br />
66
Program<br />
No.<br />
25<br />
26<br />
28<br />
29<br />
32<br />
Mode<br />
Copy effective paper<br />
width setting function<br />
(Bypass tray)<br />
Copy effective paper<br />
width setting function<br />
(Paper tray)<br />
Selection of copy<br />
start state (Polygon<br />
rotation on/off)<br />
Fusing temperature<br />
setting when the<br />
bypass tray is used<br />
USB 2.0 mode<br />
switching<br />
*1 Large (LETTER/A4 width),<br />
2 Small (INVOICE/B5R width)<br />
*1 Large (LETTER/A4 width),<br />
2 Small (INVOICE/B5R width)<br />
*1 ON, 2 OFF<br />
1 Low, *2 High<br />
Parameters<br />
1 Full-Speed, *2 Hi-Speed<br />
* Factory default settings are indicated with an asterisk (*).<br />
5<br />
Press the start ( ) key. The right-hand number in the display<br />
will be steadily lit and the entered value will be stored.<br />
To change the setting or to set another mode, press the clear<br />
key. The unit will return to step 2.<br />
6<br />
Press the light ( ) key to return to the normal copy mode.<br />
DISPLAYING TOT<strong>AL</strong> NUMBER OF COPIES<br />
Use the following procedure to display the total number of copies.<br />
Press and hold down the clear key for approximately 5 seconds. The<br />
total number of copies will appear in two steps, each with three digits.<br />
Example: Total number of copies is 1,234.<br />
7<br />
67
CHECKING THE TONER LEVEL<br />
The toner level is indicated by a 6-level display. Use it as a guideline for replacing<br />
the toner cartridge.<br />
1<br />
Hold down the light ( ) key until the alarm indicators ( , ,<br />
) blink.<br />
The display will show "- -".<br />
2<br />
Hold down the Copy ratio display (%) key for more than 5<br />
seconds.<br />
The approximate quantity of toner remaining<br />
will be indicated in the display as a percentage.<br />
("100", "75", "50", "25", "10" is displayed.)<br />
When the percentage is less than 10%, "LO"<br />
will be displayed.<br />
3<br />
Press the light ( ) key to return to the normal display.<br />
The alarm indicators ( , , ) go off.<br />
The display returns to the number of copies display.<br />
7<br />
68
8<br />
MAINTENANCE<br />
This chapter describes how to replace the TD cartridge and drum cartridge and how<br />
to clean the unit.<br />
Be sure to use only genuine SHARP parts and supplies.<br />
TD CARTRIDGE REPLACEMENT<br />
The TD cartridge replacement required ( ) indicator will light up when toner is needed.<br />
For more information on purchasing the TD cartridge, see "ABOUT SUPPLIES AND<br />
OPTIONS" in the Start Guide. If copying is continued while the indicator is lit, copies will<br />
gradually become lighter until the unit stops and the indicator begins blinking. Replace<br />
the old TD cartridge by following the procedure below.<br />
• After the unit stops, it may be possible to make a few more copies by taking<br />
the TD cartridge out of the unit, shaking it horizontally, then reinstalling it. If<br />
copying is not possible after this operation, replace the TD cartridge.<br />
• During long copy run of a dark original, the TD cartridge replacement<br />
required ( ) indicator may light up, the start ( ) indicator blink,<br />
and the unit stops, even though toner is left. The unit will feed toner up<br />
to 2 minutes and then the start ( ) indicator will light up. Press the<br />
start ( ) key to restart copying.<br />
1<br />
2<br />
Open the multi-bypass tray, side cover, and front cover, in that<br />
order.<br />
To open the multi-bypass tray, see "The multi-bypass tray" (p.12). To open<br />
the side cover and front cover, see "INST<strong>AL</strong>LING THE TD CARTRIDGE" in<br />
the Start Guide.<br />
Gently pull the TD cartridge out<br />
while pressing the lock release<br />
button.<br />
Lock release button<br />
8<br />
In order to help preserve the global environment, we recycle used TD<br />
cartridges. Please read "COPIER TONER CARTRIDGE RECYCLING<br />
PROGRAM", which is enclosed in the new toner cartridge package.<br />
3<br />
Install a new TD cartridge. To install the new cartridge, see<br />
"INST<strong>AL</strong>LING THE TD CARTRIDGE" in the Start Guide.<br />
69
4<br />
Close the front cover and then the side cover by pressing the<br />
round projections near the side cover open button. The indicator<br />
( ) will go out and the start ( ) indicator will light up.<br />
When closing the covers, be sure to close the front cover securely and<br />
then close the side cover. If the covers are closed in the wrong order,<br />
the covers may be damaged.<br />
DRUM CARTRIDGE REPLACEMENT<br />
The useful life of the drum cartridge is approximately 18,000 copies*. When the internal<br />
counter reaches approximately 17,000 copies, the drum replacement required ( )<br />
indicator will light up indicating that replacement of the drum cartridge will be needed<br />
soon. For more information on purchasing the drum cartridge, see "ABOUT SUPPLIES<br />
AND OPTIONS" in the Start Guide. When the indicator begins to blink, the unit will stop<br />
operating until the cartridge is replaced. Replace the drum cartridge at this time.<br />
*Based on copying onto A4 size paper at 5% toned area.<br />
Do not remove the protective cover on the drum portion (black paper) of<br />
a new drum cartridge before use. The cover protects the drum against<br />
external light.<br />
1<br />
2<br />
Remove the TD cartridge (see step 1 and 2 in "TD CARTRIDGE<br />
REPLACEMENT" (p.69)).<br />
Hold the drum cartridge handle and<br />
gently pull the cartridge out. Dispose<br />
of the old drum cartridge in<br />
accordance with local regulations.<br />
Drum cartridge handle<br />
3<br />
Remove the new drum cartridge from<br />
the protective bag and remove the protective cover from the<br />
cartridge. Then gently install the new drum cartridge.<br />
8<br />
Do not touch the surface of the drum (green portion) of the<br />
cartridge. Doing so may cause smudges on the copies.<br />
70
4<br />
5<br />
Gently install the TD cartridge. To install the TD cartridge, see<br />
step 5 in "INST<strong>AL</strong>LING THE TD CARTRIDGE" in the Start Guide.<br />
Close the front cover and then the side cover by pressing the<br />
round projections near the side cover open button. The drum<br />
replacement required ( ) indicator will go out and the start ( )<br />
indicator will light up.<br />
When closing the covers, be sure to close the front cover securely and<br />
then close the side cover. If the covers are closed in the wrong order,<br />
the covers may be damaged.<br />
CLEANING THE UNIT<br />
Proper care is essential in order to get clean, sharp copies. Be sure to take a few<br />
minutes to regularly clean the unit.<br />
Do not spray flammable cleaner gas. Gas from the spray may come in<br />
contact with the internal electrical components or high-temperature parts<br />
of the fusing unit, creating a risk of fire or electrical shock.<br />
• Before cleaning, be sure to turn the power switch off and remove the<br />
power cord from the outlet.<br />
• Do not use thinner, benzene or other volatile cleaning agents. Doing<br />
so may cause deformation, discoloration, deterioration or malfunction.<br />
Cabinet<br />
Wipe the cabinet with a soft, clean cloth.<br />
Document glass and the rear side of the original cover/SPF<br />
Stains on the document glass, SPF scanning window, cover or SPF roller will also be<br />
copied. Wipe the document glass, SPF scanning window, cover and SPF roller with<br />
a soft, clean cloth. If necessary, dampen the cloth with a glass cleaner.<br />
Document glass/SPF scanning window<br />
Original cover/SPF<br />
SPF roller<br />
8<br />
SPF scanning window<br />
71
Transfer charger<br />
If copies start becoming streaky or blotchy, the transfer charger may be dirty. Clean<br />
the charger using the following procedure.<br />
1<br />
Turn the power switch off. (p.8)<br />
2<br />
3<br />
Ensure that the multi-bypass tray is open and then open the<br />
side cover while pressing the side cover open button.<br />
Take the charger cleaner out by holding the tab. Set the charger<br />
cleaner onto the right end of the transfer charger, gently slide<br />
the cleaner to the left end, and then remove it. Repeat this<br />
operation two or three times.<br />
Slide the charger cleaner from the right end to the left end along<br />
the groove of the transfer charger. If the cleaner is stopped on<br />
the way, smudges on copies may occur.<br />
4<br />
Return the charger cleaner<br />
to its original position.<br />
Close the side cover by<br />
pressing the round<br />
projections near the side<br />
cover open button.<br />
5<br />
Turn the power switch on. (p.7)<br />
8<br />
72
MOVING AND STORING THE UNIT<br />
Moving instructions<br />
When moving the unit, follow the procedure below.<br />
When moving this unit, be sure to remove the TD cartridge in advance.<br />
1<br />
2<br />
3<br />
4<br />
5<br />
6<br />
7<br />
Turn the power switch off and remove the power cord from the<br />
outlet.<br />
Open the side cover and front cover, in that order. Remove the<br />
TD cartridge and close the front cover and side cover, in that<br />
order.<br />
To open and close the side cover and front cover, and to remove the TD<br />
cartridge, see "TD CARTRIDGE REPLACEMENT" (p.69).<br />
Raise the handle of the paper tray and pull the paper tray out<br />
until it stops.<br />
Push the centre of the pressure plate down until it locks in<br />
place and lock the plate using the pressure plate lock which<br />
has been stored in the front of the paper tray.<br />
Push the paper tray back into the unit.<br />
Close the multi-bypass tray and the paper output tray<br />
extension, and attach the packing materials and tape which<br />
were removed during installation of the unit. See "PREPARING<br />
THE UNIT FOR INST<strong>AL</strong>LATION" in the Start Guide.<br />
Pack the unit into the carton.<br />
Proper storage<br />
Store the supplies in a location that is:<br />
• clean and dry,<br />
• at a stable temperature,<br />
• not exposed to direct sunlight<br />
Store paper in the wrapper and lying flat.<br />
• Paper stored out of the wrapper or in packages standing on end may curl or get<br />
damp, resulting in paper misfeeds.<br />
8<br />
73
9 TROUBLESHOOTING THE UNIT<br />
This chapter describes misfeed removal and troubleshooting.<br />
For problems with the printer function or the scanner function, see the Help file for<br />
the printer/scanner driver.<br />
MACHINE/COPYING PROBLEMS<br />
If any problem occurs, check the list below before contacting your authorised service<br />
representative.<br />
Problem Possible cause Solution Page<br />
Unit does not<br />
operate.<br />
Blank copies<br />
Copies are too<br />
dark or too light.<br />
Dust, dirt,<br />
smudges<br />
appear on<br />
copies.<br />
Unit plugged in?<br />
Plug the unit into a grounded<br />
outlet.<br />
Start<br />
Guide<br />
Power switch on? Turn the power switch on. 7<br />
Side cover closed<br />
securely?<br />
Front cover closed?<br />
Is the original placed face<br />
down on the document<br />
glass or face up in the<br />
SPF?<br />
Is original image too dark<br />
or too light?<br />
Is the unit in the<br />
automatic exposure<br />
mode?<br />
Is the unit in the photo<br />
exposure mode?<br />
Document glass or SPF<br />
dirty?<br />
Original smudged or<br />
blotchy?<br />
Gently close the side cover.<br />
Gently close the front cover and<br />
then close the side cover.<br />
Place the original face down on<br />
the document glass or face up in<br />
the SPF.<br />
Adjust the exposure manually.<br />
Start<br />
Guide<br />
Start<br />
Guide<br />
26, 27<br />
28<br />
Adjust the automatic exposure<br />
level. 29<br />
Cancel the photo exposure mode.<br />
Clean regularly.<br />
Use a clean original.<br />
Striped copies Is transfer charger clean? Clean the transfer charger. 72<br />
Paper misfeeds<br />
frequently.<br />
Non-standard paper<br />
used?<br />
Paper curled or damp?<br />
Pieces of paper inside<br />
unit?<br />
Paper guides in the paper<br />
tray not set properly?<br />
Too much paper in the<br />
paper tray or multi-bypass<br />
tray?<br />
Use standard paper. If using<br />
special papers, feed the paper<br />
through the multi-bypass tray.<br />
Store paper flat in the wrapper in a<br />
dry location.<br />
Remove all pieces of misfed<br />
paper.<br />
Set the guides properly depending<br />
on the paper size.<br />
28<br />
71<br />
–<br />
9<br />
–<br />
83<br />
10, 13<br />
Remove excessive paper from the<br />
tray. 10, 12<br />
9<br />
74
Problem Possible cause Solution Page<br />
Images rub off<br />
the copy easily.<br />
Printing is not<br />
uniform<br />
between the<br />
edges of the<br />
paper and the<br />
centre.<br />
Is the paper too heavy?<br />
The fusing temperature is<br />
not appropriate.<br />
Paper damp?<br />
The fusing temperature is<br />
not appropriate.<br />
Use paper within the specified<br />
range.<br />
In the user programs, set "Fusing<br />
temperature setting when the<br />
bypass tray is used" (program 29)<br />
to "2 (High)".<br />
Replace with dry paper. If the unit<br />
is not used for long time, remove<br />
the paper from the paper tray and<br />
store it in its wrapper in a dry<br />
location.<br />
In the user programs, set "Fusing<br />
temperature setting when the<br />
bypass tray is used" (program 29)<br />
to "1 (Low)".<br />
9<br />
67<br />
–<br />
67<br />
9<br />
75
PRINTING AND SCANNING PROBLEMS<br />
In addition to this section, troubleshooting information can also be found in the<br />
README files for each of the software programs. To view a README file, see<br />
"INST<strong>AL</strong>LING THE SOFTWARE" (p.16).<br />
Problem Cause and solution Page<br />
The machine is not correctly connected with your<br />
computer.<br />
→ Check both ends of the USB cable and make sure you<br />
have a solid connection. Try a known good cable.<br />
18<br />
Copy job is performed.<br />
→ Wait until the copy job is complete.<br />
Your machine is not selected correctly in the current<br />
application for the print job.<br />
→ When choosing "Print" from the "File" menu located in<br />
applications, be sure you have selected "SHARP <strong>AL</strong>xxxx"<br />
(where xxxx is the model name of your machine)<br />
printer displayed in the "Print" dialog box.<br />
–<br />
–<br />
The machine does<br />
not print.<br />
The printer driver has not been installed properly.<br />
→ Follow these steps to check and see if the printer driver<br />
is installed.<br />
1 Click the "Start" button, click "Control Panel", and<br />
then click "Printer".<br />
In Windows 7, click the "Start" button and click<br />
"Devices and printers".<br />
In Windows XP, click the "start" button, and then<br />
click "Printer and Faxes".<br />
In Windows 2000, click the "Start" button, select<br />
"Settings" and then click "Printers".<br />
2 If the "SHARP <strong>AL</strong>-xxxx" printer driver icon is shown<br />
but you still cannot print, the printer driver may not<br />
have been installed correctly. In this case, delete<br />
the software and then reinstall it.<br />
81<br />
The tray size settings are not the same on the machine<br />
and in the printer driver.<br />
→ Make sure that the same tray paper size is set on the<br />
machine and in the printer driver. To change the tray's<br />
paper size setting on the machine, see "LOADING THE<br />
PAPER TRAY" or see "CONFIGURING THE PRINTER<br />
DRIVER" to change it in the printer driver.<br />
10, 22<br />
The specified size of paper has not been loaded.<br />
→ Load the specified size of paper in the paper tray.<br />
10<br />
A Notice Page<br />
(NP-001) has been<br />
printed, but the<br />
print data has not<br />
been printed<br />
completely.<br />
A print job containing more data than can be held in<br />
the print memory is sent to the machine.<br />
→ Disable the ROPM function on the "Configuration" tab<br />
of the printer driver setup screen. If you need to use the<br />
ROPM function, divide the pages of the print data into<br />
two or more print jobs.<br />
→ The memory allocated to the printer function can be<br />
changed in the user program "Memory for printer".<br />
66<br />
9<br />
76
Problem Cause and solution Page<br />
Printing is slow.<br />
Simultaneous use of two or more application software<br />
programs.<br />
→ Start printing after quitting all unused application<br />
software programs.<br />
–<br />
The printed image<br />
is light and<br />
uneven.<br />
The paper is loaded so that printing takes place on the<br />
rear side of the paper.<br />
→ Some paper types have a front and rear side. If the<br />
paper is loaded so that printing takes place on the rear<br />
side, toner will not adhere well to the paper and a good<br />
image will not be obtained.<br />
10<br />
You are using paper that is outside the specified size<br />
and weight range.<br />
→ Use copy paper within the specified range.<br />
9<br />
The printed image<br />
is dirty.<br />
Paper curled or damp.<br />
→ Do not use curled or crimped paper. Replace with dry<br />
copy paper. During periods when the machine is not<br />
used for a long time, remove the paper from the tray<br />
and store it in a dark place in a bag to prevent moisture<br />
absorption.<br />
–<br />
You did not set sufficient margins in the paper settings<br />
of your application.<br />
→ The top and bottom of the paper may be dirty if the<br />
margins are set outside of the specified print quality<br />
area.<br />
→ Set the margins in the software application within the<br />
specified print quality area.<br />
–<br />
The paper loaded in the tray is not the same size as<br />
that specified in the printer driver.<br />
→ Check if the "Paper Size" options suit the size of the<br />
paper loaded in the tray.<br />
→ If the "Fit To Paper Size" setting is activated, make sure<br />
that the paper size selected from the drop-down list is<br />
the same as the size of the loaded paper.<br />
–<br />
The printed image<br />
is skewed or it<br />
runs off the paper.<br />
The orientation of document setting is not correct.<br />
→ Click the "Main" tab in the printer driver setup screen,<br />
and verify if the "Image Orientation" option is set to<br />
your requirements.<br />
Paper is not loaded properly.<br />
→ Make sure the paper is properly loaded.<br />
–<br />
10<br />
The printed image<br />
is darker or lighter<br />
than expected.<br />
You did not correctly specify the margins for the<br />
application in use.<br />
→ Check the layout of the document margins and the<br />
paper size settings for the application you are using.<br />
Also check if the print settings are specified correctly to<br />
suit the paper size.<br />
The setting for the print density is not appropriate.<br />
→ You can adjust the print density on the printer driver.<br />
Click the "Advanced" tab in the printer driver setup<br />
screen, and click the "Compatibility" button. Select the<br />
"Print Density Level" from 1 (light) to 5 (dark).<br />
–<br />
–<br />
9<br />
77
Problem Cause and solution Page<br />
Any one of the<br />
alarm indicators<br />
( , , ) is<br />
lit or blinking.<br />
Poor scanning<br />
quality.<br />
See "STATUS INDICATORS" to check the meaning of<br />
the alarm indicator, and take appropriate action.<br />
The document glass or the underside of the document<br />
cover/SPF is dirty.<br />
→ Clean regularly.<br />
Original smudged or blotchy.<br />
→ Use a clean original.<br />
You have not specified a suitable resolution.<br />
→ Make sure that the resolution setting in the scanner<br />
driver is appropriate for the original.<br />
You have not specified a suitable value for the "B/W<br />
Threshold" setting.<br />
→ If you are scanning with a TWAIN-compliant<br />
application, make sure that a suitable value is specified<br />
for the "B/W Threshold" setting. A larger threshold<br />
value makes your output darker, while a small<br />
threshold value makes it lighter. To adjust the threshold<br />
automatically, click the "Auto Threshold" button on the<br />
"Image" tab of the "Professional" screen.<br />
The brightness and contrast settings are not suitable.<br />
→ If you are scanning with a TWAIN-compliant application<br />
and the resulting image has unsuitable brightness or<br />
contrast (for example it is too bright), click the "Auto<br />
Brightness/Contrast Adjustment" button on the<br />
"Colour" tab of the "Professional" screen. Click the<br />
"Brightness/Contrast" button to adjust the brightness<br />
and the contrast while viewing the scanned output<br />
image on the screen. If you are scanning with a WIAcompliant<br />
application or the "Scanner and Camera<br />
Wizard", click "Adjust the quality of the scanned<br />
picture" or the "Custom settings" button, and adjust the<br />
brightness and contrast in the screen that appears.<br />
The original is not placed face up in the SPF or face<br />
down on the document glass.<br />
→ Place the original face up in the SPF or face down on<br />
the document glass.<br />
The original was not placed in the correct position.<br />
→ Place the original correctly.<br />
82<br />
71<br />
–<br />
–<br />
–<br />
–<br />
26, 27<br />
26, 27<br />
9<br />
78
Problem Cause and solution Page<br />
Unable to scan the<br />
image.<br />
Scanner transfer<br />
speed is slow.<br />
If scanning is not possible, shut down your computer,<br />
turn off the machine's power switch, and unplug the<br />
machine's power cord. Next, start your computer,<br />
restore power to the machine, and try scanning again.<br />
If scanning is still not possible, check the following<br />
items.<br />
Your application is not TWAIN/WIA compliant.<br />
→ If your application is not TWAIN/WIA compliant,<br />
scanning will not be possible. Make sure your<br />
application is TWAIN/WIA compliant.<br />
You have not selected the scanner driver of the<br />
machine in your application.<br />
→ Make sure that the machine's scanner driver is<br />
selected in your TWAIN/WIA-compliant application.<br />
You have not specified all scanning preferences<br />
appropriately.<br />
→ Scanning a large area at high resolution results in a<br />
large amount of data and extended scanning times.<br />
The scanning preferences should be set appropriately<br />
for type of original to be scanned, i.e., Text, Text/<br />
Graphics, Photograph.<br />
Your computer does not meet the system requirements<br />
for the USB 2.0 interface (Hi-Speed mode).<br />
→ See "HARDWARE AND SOFTWARE<br />
REQUIREMENTS" to configure your system as<br />
required for USB 2.0, and check if "Hi-Speed" is set.<br />
–<br />
–<br />
–<br />
–<br />
15, 67<br />
9<br />
79
PROBLEMS DURING SETUP OF THE SOFTWARE<br />
If the software does not install correctly, check the following items on your computer.<br />
To remove the software, see "Removing the software" (p.81).<br />
Problem Possible cause Solution Page<br />
Is there sufficient free<br />
space on your hard drive?<br />
The software<br />
cannot be<br />
installed.<br />
The plug and play<br />
screen does not<br />
appear (USB<br />
connection in<br />
Windows).<br />
Can your computer use a<br />
USB connection?<br />
Check remaining drive space.<br />
Delete any unneeded files and<br />
applications to increase free space<br />
on your hard drive.<br />
Check your computer whether or not<br />
a USB interface can be used on the<br />
Device Manager in your computer.<br />
(For information on "Device<br />
Manager", see Help in Windows.)<br />
If USB can be used, your controller<br />
chipset type and root hub will appear<br />
in "Universal Serial Bus controllers" in<br />
"Device Manager". (The items that<br />
appear will vary depending on your<br />
computer.)<br />
–<br />
–<br />
The MFP driver<br />
cannot be<br />
correctly installed<br />
by Plug and Play.<br />
Did you connect the<br />
machine to your computer<br />
before installing the MFP<br />
driver?<br />
If these two items appear, USB<br />
should be useable. If a yellow<br />
exclamation point appears next to<br />
"Universal Serial Bus controllers" or<br />
the two items do not appear, refer to<br />
your computer manual or check with<br />
the manufacturer of your computer to<br />
enable USB and then reinstall the<br />
printer driver.<br />
Check the details below and reinstall<br />
the MFP driver correctly.<br />
If the machine was connected to your<br />
computer with a USB cable when the<br />
MFP driver was installed, check if<br />
information on the unsuccessful<br />
installation remains in "Device<br />
Manager". (For information on "Device<br />
Manager", see Help in Windows.)<br />
If the model name of the machine<br />
appears in "Other devices" in "Device<br />
Manager", delete it, restart your<br />
computer, and install the MFP driver<br />
again.<br />
Other devices<br />
SHARP <strong>AL</strong>-xxxx<br />
–<br />
9<br />
80
MFP driver cannot be installed (Windows 2000/XP)<br />
If the MFP driver cannot be installed in Windows 2000/XP, follow these steps to<br />
check your computer's settings.<br />
1<br />
2<br />
3<br />
Click the "start" button and then click "Control Panel".<br />
In Windows 2000, click the "Start" button, select "Settings", and then click<br />
"Control Panel".<br />
Click "Performance and Maintenance", and then click<br />
"System".<br />
In Windows 2000, double-click the "System" icon.<br />
Click the "Hardware" tab and then click the "Driver Signing"<br />
button.<br />
4<br />
Check "What action do you want<br />
Windows to take?" ("File<br />
signature verification" in<br />
Windows 2000).<br />
If "Block" has been selected, it will not be<br />
possible to install the MFP driver. Select<br />
"Warn" and then install the MFP driver<br />
as explained in "INST<strong>AL</strong>LING THE<br />
SOFTWARE" (p.16).<br />
Removing the software<br />
If you need to remove the software, follow these steps.<br />
1<br />
2<br />
3<br />
Click the "Start" button, and then click "Control Panel".<br />
In Windows 2000, click the "Start" button, select "Settings", and then click<br />
"Control Panel".<br />
Click "Uninstall a program".<br />
• In Windows XP, click "Add or Remove Programs".<br />
• In Windows 2000, double-click the "Add/Remove Programs" icon.<br />
Select "SHARP <strong>AL</strong>-xxxx Series MFP Driver", <strong>Sharp</strong>desk, and<br />
Button Manager from the list, and remove them.<br />
For more information, refer to your operating manual or to the help files for<br />
your operating system.<br />
9<br />
81
STATUS INDICATORS<br />
When the following indicators light up or blink on the operation panel or the following<br />
alphanumeric codes appear in the display, solve the problem immediately referring<br />
to both the table below and the relevant page.<br />
Be sure to use only genuine SHARP parts and supplies.<br />
Indication Cause and remedy Page<br />
Steadily Replacement of drum cartridge will be needed Start<br />
Drum replacement<br />
lit soon. Prepare a new cartridge.<br />
Guide<br />
required indicator<br />
Blinking Drum cartridge must be replaced. Replace it with a new one. 70<br />
TD cartridge Steadily Replacement of TD cartridge will be needed Start<br />
replacement lit soon. Prepare a new cartridge.<br />
Guide<br />
required indicator Blinking TD cartridge must be replaced. Replace it with a new one. 69<br />
Misfeed indicator Blinking<br />
A misfeed has occurred. Remove the misfed paper<br />
referring to the description of "MISFEED REMOV<strong>AL</strong>".<br />
83<br />
Steadily<br />
When the document feeder cover is open.<br />
lit<br />
–<br />
SPF misfeed<br />
indicator<br />
Power save indicator is<br />
steadily lit.<br />
Blinking<br />
The paper tray indicator is<br />
blinking.<br />
"CH" is blinking in the display.<br />
"CH" is steadily lit in the<br />
display.<br />
press the start (<br />
"OP" is blinking in the display.<br />
"P" is blinking in the display.<br />
A letter and a number appear<br />
alternately.<br />
An original misfeed has occurred in the SPF. Remove<br />
the misfed originals referring to the description of<br />
"D: Misfeed in the SPF (<strong>AL</strong>-<strong>2041</strong>)".<br />
The unit is in the preheat mode. Press any key to<br />
cancel the preheat mode.<br />
The unit is in the auto power shut-off mode. Press<br />
the start ( ) key to cancel the auto power shutoff<br />
mode.<br />
The paper tray is not pushed in correctly, or there<br />
is no paper in the tray. Push the tray all the way<br />
in or load paper in the tray.<br />
The TD cartridge is not installed. Check if the<br />
cartridge is installed.<br />
Push the cartridge in until it locks securely in<br />
place.<br />
Side cover is open. Close the side cover securely<br />
by pressing the round projections near the side<br />
cover open button.<br />
This appears if it is detected that the original<br />
cover/SPF is open when copying is started.<br />
Completely close the original cover/SPF, or<br />
) key again.<br />
Depending on the colour and the density of the<br />
original, "OP" blinking may appear even when<br />
the original cover/SPF is closed. In such a case,<br />
press the start key again to make a copy.<br />
The paper tray or multi-bypass tray is empty.<br />
Load paper.<br />
A misfeed has occurred in the paper tray or<br />
multi-bypass tray. Remove the misfed paper.<br />
The unit will not function. Turn the power switch<br />
off, remove the power cord from the outlet, and<br />
contact your authorised service representative.<br />
87<br />
64<br />
64<br />
–<br />
Start<br />
Guide<br />
–<br />
–<br />
10, 12<br />
83<br />
–<br />
9<br />
82
MISFEED REMOV<strong>AL</strong><br />
When the misfeed ( ) indicator blinks or blinks in the display, the unit will<br />
stop because of a misfeed. When the SPF misfeeds an original sheet, the unit will<br />
stop and the SPF misfeed ( ) indicator will blink, while the misfeed ( ) indicator<br />
will remain off. For a misfeed of originals in the SPF, see "D: Misfeed in the SPF (<strong>AL</strong>-<br />
<strong>2041</strong>)" (p.87).<br />
1<br />
Open the multi-bypass tray,<br />
and then open the side<br />
cover.<br />
2<br />
Check the misfeed location. Remove the misfed paper<br />
following the instructions for each location in the illustration<br />
below. If the misfeed ( ) indicator blinks, proceed to "A:<br />
Misfeed in the paper feed area" (p.84).<br />
If the misfed paper is seen from this<br />
side, proceed to "C: Misfeed in the<br />
transport area" (p.86).<br />
If paper is misfed here, proceed to<br />
"B: Misfeed in the fusing area" (p.85).<br />
If paper is misfed here, proceed to<br />
"A: Misfeed in the paper feed area" (p.84).<br />
9<br />
83
A: Misfeed in the paper feed area<br />
1<br />
Gently remove the misfed paper from the paper feed area as<br />
shown in the illustration. When the misfeed ( ) indicator<br />
blinks, and the misfed paper is not seen from the paper feed<br />
area, pull out the paper tray and remove the misfed paper. If the<br />
paper cannot be removed, proceed to "B: Misfeed in the fusing<br />
area".<br />
The fusing unit is hot. Do not touch the fusing unit when<br />
removing misfed paper. Doing so may cause a burn or other<br />
injury.<br />
• Do not touch the surface (green portion) of the drum cartridge<br />
when removing the misfed paper. Doing so may damage the<br />
drum and cause smudges on copies.<br />
• If the paper has been fed through the multi-bypass tray, do<br />
not remove the misfed paper through the multi-bypass tray.<br />
Toner on the paper may stain the paper transport area,<br />
resulting in smudges on copies.<br />
2<br />
Close the side cover by pressing the round projections near<br />
the side cover open button. The misfeed ( ) indicator will go<br />
out and the start ( ) indicator will light up.<br />
9<br />
84
B: Misfeed in the fusing area<br />
1<br />
Lower the fusing unit release<br />
lever.<br />
Fusing unit release lever<br />
2<br />
Gently remove the misfed paper<br />
from under the fusing unit as<br />
shown in the illustration. If the<br />
paper cannot be removed, proceed<br />
to "C: Misfeed in the transport<br />
area".<br />
The fusing unit is hot. Do not<br />
touch the fusing unit when<br />
removing misfed paper. Doing<br />
so may cause a burn or other<br />
injury.<br />
• Do not touch the surface (green portion) of the drum cartridge<br />
when removing the misfed paper. Doing so may cause<br />
smudges on copies.<br />
• Do not remove the misfed paper from above the fusing unit.<br />
Unfixed toner on the paper may stain the paper transport<br />
area, resulting in smudges on copies.<br />
3<br />
Raise the fusing unit release lever and then close the side<br />
cover by pressing the round projections near the side cover<br />
open button. The misfeed ( ) indicator will go out and the start<br />
( ) indicator will light up.<br />
9<br />
85
C: Misfeed in the transport area<br />
1<br />
2<br />
3<br />
Lower the fusing unit release lever.<br />
See "B: Misfeed in the fusing area" (p.85).<br />
Open the front cover.<br />
To open the front cover, see "INST<strong>AL</strong>LING THE TD CARTRIDGE" in the<br />
Start Guide.<br />
Rotate the roller rotating<br />
knob in the direction of the<br />
Roller rotating knob<br />
arrow and gently remove<br />
the misfed paper from the<br />
exit area.<br />
4<br />
Raise the fusing unit release lever, close the front cover and<br />
then close the side cover by pressing the round projections<br />
near the side cover open button. The misfeed ( ) indicator will<br />
go out and the start ( ) indicator will light up.<br />
When closing the covers, be sure to close the front cover securely and<br />
then close the side cover. If the covers are closed in the wrong order,<br />
the covers may be damaged.<br />
9<br />
86
D: Misfeed in the SPF (<strong>AL</strong>-<strong>2041</strong>)<br />
An original misfeed may occur at one of three locations: if the misfed original is seen<br />
from the document feeder tray, (A) in the document feeder tray; if the misfed original is<br />
not seen from the document feeder tray, (B) in the exit area or (C) under the document<br />
feeder cover. Remove the misfed original following the instructions for each location.<br />
After removing the jammed paper, be sure to press the clear key to clear<br />
the misfeed error state.<br />
(A) Open the document feeder cover and pull the misfed original out from the<br />
document feeder tray. Press the SPF jam release lever (see below) while<br />
you remove the original. Close the document feeder cover. Open and close<br />
the SPF to clear the SPF misfeed ( ) indicator. If the misfed original<br />
cannot be easily removed, proceed to (C).<br />
Document feeder cover<br />
SPF jam release lever<br />
(B) Open the SPF and rotate the roller to remove the misfed original from the<br />
exit area. If the misfed original cannot be easily removed, proceed to (C).<br />
Roller<br />
(C) If the original does not move easily into the exit area, remove it in the<br />
direction of the arrow while rotating the knob.<br />
9<br />
87
IF A PAPER MISFEED OCCURS IN THE MAIN UNIT<br />
WHILE USING THE SPF (<strong>AL</strong>-<strong>2041</strong>)<br />
If a paper misfeed occurs in the main unit paper path when making copies with<br />
original(s) through the SPF, the SPF will automatically stop scanning. <strong>Manual</strong>ly<br />
remove the misfed paper(s) in the main unit. You can check the number of originals<br />
that must be returned to the document feeder tray in the display on the operation<br />
panel. Follow the steps below to display the number of originals to be returned.<br />
The following procedure omits removal of the misfeed. Be sure to<br />
remove the misfeed before displaying the number of originals to be<br />
returned. For the misfeed removal procedure, see "MISFEED<br />
REMOV<strong>AL</strong>" (p.83).<br />
1<br />
2<br />
3<br />
When a paper misfeed occurs in the<br />
main unit, the SPF stops and the ZOOM<br />
indicator blinks.<br />
The remaining number of sets will blink in the<br />
display.<br />
Be sure to remove misfed paper(s) at the main<br />
unit paper path first. Then follow the step 2<br />
onwards.<br />
Remove any originals that have not yet<br />
been scanned from the document<br />
feeder tray.<br />
For the original(s) stuck in the SPF, do not<br />
remove manually. This may cause a machine<br />
malfunction. See the step 3.<br />
Press the copy ratio display (%) key.<br />
The originals that were being scanned in the<br />
SPF will be discharged and the number of<br />
original sheets to be returned will blink in the<br />
display.<br />
Place the displayed number of original sheets<br />
back in the document feeder tray together with<br />
the original sheets removed in step 2.<br />
Display of number of original<br />
sheets to be returned<br />
9<br />
If "SPF automatic original discharge time" is enabled in the user<br />
programs, the originals in the SPF will be automatically discharged after<br />
the set time elapses. ("USER PROGRAMS" (p.66))<br />
88
A. Information on Disposal for Users (private households)<br />
1. In the European Union<br />
Attention: If you want to dispose of this<br />
equipment, please do not use the ordinary dust<br />
bin!<br />
Used electrical and electronic equipment must<br />
be treated separately and in accordance with<br />
legislation that requires proper treatment,<br />
recovery and recycling of used electrical and<br />
electronic equipment.<br />
Following the implementation by member states,<br />
private households within the EU states may<br />
return their used electrical and electronic<br />
equipment to designated collection facilities free<br />
of charge*. In some countries* your local retailer<br />
may also take back your old product free of<br />
charge if you purchase a similar new one.<br />
*) Please contact your local authority for further details.<br />
If your used electrical or electronic equipment<br />
Attention: Your product is<br />
marked with this symbol. It<br />
means that used electrical<br />
and electronic products<br />
should not be mixed with<br />
general household waste.<br />
There is a separate<br />
collection system for these<br />
products.<br />
has batteries or accumulators, please dispose of these separately beforehand<br />
according to local requirements.<br />
By disposing of this product correctly you will help ensure that the waste undergoes<br />
the necessary treatment, recovery and recycling and thus prevent potential<br />
negative effects on the environment and human health which could otherwise arise<br />
due to inappropriate waste handling.<br />
2. In other Countries outside the EU<br />
If you wish to discard this product, please contact your local authorities and ask for<br />
the correct method of disposal.<br />
For Switzerland: Used electrical or electronic equipment can be returned free of<br />
charge to the dealer, even if you don’t purchase a new product. Further collection<br />
facilities are listed on the homepage of www.swico.ch or www.sens.ch.<br />
B. Information on Disposal for Business Users.<br />
1. In the European Union<br />
If the product is used for business purposes and you want to discard it:<br />
Please contact your SHARP dealer who will inform you about the take-back of the<br />
product. You might be charged for the costs arising from take-back and recycling.<br />
Small products (and small amounts) might be taken back by your local collection<br />
facilities.<br />
For Spain: Please contact the established collection system or your local authority<br />
for take-back of your used products.<br />
2. In other Countries outside the EU<br />
If you wish to discard of this product, please contact your local authorities and ask for the<br />
correct method of disposal.
SHARP ELECTRONICS (Europe) GmbH<br />
Sonninstraße 3, D-20097 Hamburg
OPERATION GUIDE<br />
EN1 EX1