Create successful ePaper yourself
Turn your PDF publications into a flip-book with our unique Google optimized e-Paper software.
Part Names and Functions<br />
Numbers in Z refer to the main pages in this operation manual where the<br />
topic is explained.<br />
15<br />
1 9<br />
2<br />
3<br />
4<br />
5<br />
6<br />
7<br />
8<br />
16 17 18 19 20<br />
16<br />
10<br />
11<br />
12<br />
13<br />
14<br />
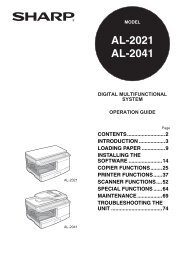
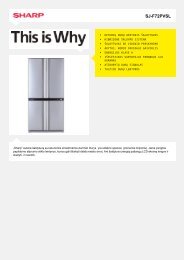
Top View<br />
1 FOCUS buttons 31<br />
For adjusting the focus.<br />
2 H&V LENS SHIFT (P/R/O/Q) buttons 30<br />
For shifting the lens horizontally and<br />
vertically.<br />
3 MENU button 41<br />
For displaying adjustment and setting<br />
screens.<br />
4 Adjustment buttons (P/R/O/Q) 41<br />
For selecting menu items.<br />
5 ENTER button 33<br />
For setting items selected or adjusted on<br />
the menu.<br />
6 STANDBY/ON button 28<br />
For turning the power on and putting the<br />
projector into Standby mode.<br />
7 TEMP. (temperature warning)/STATUS<br />
indicator 64<br />
8 POWER indicator 64<br />
9 ZOOM buttons 31<br />
For adjusting the projected image size.<br />
10 RETURN button 41<br />
For returning to the previous menu screen<br />
during menu operations.<br />
11 INPUT button 33<br />
For switching Input mode.<br />
12 AUTO SYNC button 36<br />
For automatically adjusting images when<br />
connected to a computer.<br />
13 LAMP 1 indicator 64<br />
14 LAMP 2 indicator 64<br />
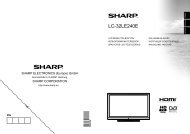
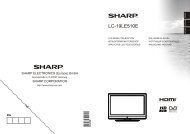
Front View<br />
Introduction<br />
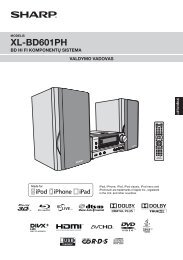
Attaching the lens cap/dustproof cap<br />
Snap on the lens cap/dustproof cap straight.<br />
Removing the lens cap/dustproof cap<br />
Pull the lens cap/dustproof cap directly<br />
outward.<br />
15 Carrying handle<br />
For carrying the projector.<br />
16 Adjustment foot 30<br />
17 Remote control sensor 16<br />
18 LENS RELEASE button 26<br />
19 Dust filter 62<br />
20 Anti-theft screw 27<br />
13