CYB KLED Cyber Suite Install Manual - Securityhelpdesk.com.au
CYB KLED Cyber Suite Install Manual - Securityhelpdesk.com.au
CYB KLED Cyber Suite Install Manual - Securityhelpdesk.com.au

Create successful ePaper yourself
Turn your PDF publications into a flip-book with our unique Google optimized e-Paper software.
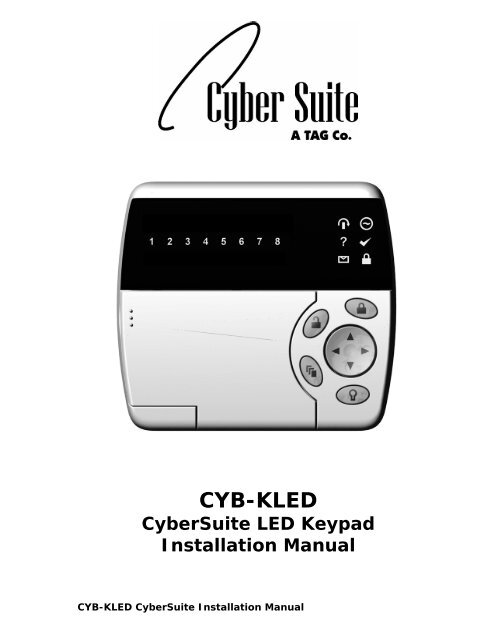
<strong>CYB</strong>-<strong>KLED</strong><br />
<strong>Cyber</strong><strong>Suite</strong> LED Keypad<br />
<strong>Install</strong>ation <strong>Manual</strong><br />
<strong>CYB</strong>-<strong>KLED</strong> <strong>Cyber</strong><strong>Suite</strong> <strong>Install</strong>ation <strong>Manual</strong>
PUBLICATION INFORMATION<br />
First Publication<br />
Draft Document Release Only<br />
Updated fire zone information<br />
Second Publication<br />
Option Menu Navigation Updated<br />
Card Reader Interface Options Added<br />
Third Publication<br />
Slave Keypad Options Added<br />
Slave mode Zone Wiring Diagrams Added<br />
<strong>CYB</strong>-<strong>KLED</strong> <strong>Cyber</strong><strong>Suite</strong> <strong>Install</strong>ation <strong>Manual</strong>
CONTENTS<br />
INTRODUCTION ....................................................1<br />
Hardware Compatibility ..................................................................................... 1<br />
WIRING CONFIGURATION ....................................2<br />
Introduction .................................................................................................... 2<br />
Keypad Wire Loom Colour Coding ....................................................................... 2<br />
Communication Connection ............................................................................... 3<br />
Zone Input Wiring ............................................................................................ 4<br />
Fire Zone Input Wiring ...................................................................................... 5<br />
Slave Keypad Zone Wiring................................................................................. 6<br />
PGM (Programmable Output) ............................................................................. 7<br />
Slave Reader Network....................................................................................... 8<br />
Slave Keypad Network ...................................................................................... 9<br />
Indicator Lights................................................................................................ 10<br />
Binary Number Display ..................................................................................... 10<br />
DEVICE CONFIGURATION ...................................11<br />
Device Configuration Mode Access ...................................................................... 11<br />
Address Selection ([MENU] , [1])........................................................................ 11<br />
Device Options ([MENU] , [2]) ........................................................................... 12<br />
Device Def<strong>au</strong>lt ([MENU] , [3]) ............................................................................ 12<br />
LOCAL INSTALLER LOGIN ...................................12<br />
Introduction .................................................................................................... 13<br />
TIMING (MENU 1)...............................................14<br />
Entry Delay Timer ([MENU] [1], [1]) ................................................................... 14<br />
Exit Delay Timer (Menu 1, 2) ............................................................................. 14<br />
Alarm/Siren (Menu 1, 3) ................................................................................... 15<br />
Reader Pre-Alarm Timer (Menu 1, 4)................................................................... 16<br />
Reader Left Open Timer (Menu 1, 5) ................................................................... 16<br />
OPTIONS (MENU 2) ............................................17<br />
General Options (Menu 2, 1).............................................................................. 17<br />
Arming Options (Menu 2, 2)............................................................................... 19<br />
Reporting Options (Menu 2, 3) ........................................................................... 20<br />
Panic Options (Menu 2, 4) ................................................................................. 22<br />
ZONES (MENU 3) ................................................24<br />
Selecting a Zone .............................................................................................. 24<br />
Zone Type....................................................................................................... 24<br />
Zone Options................................................................................................... 25<br />
CONTACT ............................................................27<br />
Contact........................................................................................................... 27<br />
<strong>CYB</strong>-<strong>KLED</strong> <strong>Cyber</strong><strong>Suite</strong> <strong>Install</strong>ation <strong>Manual</strong>
INTRODUCTION<br />
This document details the wiring configuration of the <strong>Cyber</strong><strong>Suite</strong><br />
condominium control keypad and installer programming functions.<br />
Hardware Compatibility<br />
This manual is written for hardware verison 208-4125-020 or<br />
higher and covers firmware application 1.00. This firmware<br />
<strong>com</strong>municates with a <strong>Cyber</strong><strong>Suite</strong> enabled Protégé System<br />
Controller firmware version 1.06 or above.<br />
1 <strong>CYB</strong>-<strong>KLED</strong> <strong>Cyber</strong><strong>Suite</strong> <strong>Install</strong>ation <strong>Manual</strong>
WIRING CONFIGURATION<br />
Introduction<br />
The wiring structure of the <strong>Cyber</strong><strong>Suite</strong> keypad uses an encrypted<br />
RS485 <strong>com</strong>munication interface. Connections should be made in a<br />
daisy chain configuration, avoiding star and stub connections.<br />
Figure 1 - Condominium Keypad Communication<br />
Keypad Wire Loom Colour Coding<br />
The condominium keypads are supplied with a wire loom attachment<br />
and are connected using a keyed 10 position snap lock connector.<br />
The 10 way wiring loom connection uses the following colour coding.<br />
Figure 2 - Wire Loom Colour Coding and Function<br />
<strong>CYB</strong>-<strong>KLED</strong> <strong>Cyber</strong><strong>Suite</strong> <strong>Install</strong>ation <strong>Manual</strong><br />
2
Communication Connection<br />
Support for up to 250 keypads per condominium controller is<br />
provided, connection to the system controller uses the network<br />
<strong>com</strong>munication RS-485 interface. This interface is an isolated<br />
interface and requires power to be supplied to the N+ and N-<br />
terminals.<br />
Figure 3 - Wire Loom Colour Coding and Function<br />
When using more than one PSU to supply multiple wiring runs<br />
of condominium keypads only connect the +12 output of ONE<br />
power supply unit to the N+ and N- terminals of the<br />
controller. Each PSU unit should have the <strong>com</strong>mon (0V or -)<br />
connected together to ensure a <strong>com</strong>mon 0V.<br />
3 <strong>CYB</strong>-<strong>KLED</strong> <strong>Cyber</strong><strong>Suite</strong> <strong>Install</strong>ation <strong>Manual</strong>
Zone Input Wiring<br />
The <strong>Cyber</strong><strong>Suite</strong> LED Keypad is capable of connecting to 4 zone<br />
inputs, each zone input can then be programmed to perform the<br />
required function in the system.<br />
The following diagrams show each of the zone wiring configuration<br />
settings that are possible. The programmed zone configuration for<br />
the <strong>Cyber</strong><strong>Suite</strong> LED Keypad is made in the option settings. Refer to<br />
the General Options Section on Page 17 for the programming of the<br />
zone configuration.<br />
When using a tamper input on a device the tamper contacts<br />
must be normally closed and wired in series.<br />
All resistors required to wire the zone configurations are<br />
provided with the <strong>Cyber</strong><strong>Suite</strong> LED Keypad in the accessory<br />
bag.<br />
Figure 4 - 2 Zone Input (No Resistors)<br />
Figure 5 - 2 Zone Input (1K and 1K)<br />
<strong>CYB</strong>-<strong>KLED</strong> <strong>Cyber</strong><strong>Suite</strong> <strong>Install</strong>ation <strong>Manual</strong><br />
4
Figure 6 - 4 Zone Input Duplex Mode (1K and 2K4)<br />
Fire Zone Input Wiring<br />
When wiring a zone to be a fire zone input the current programmed<br />
zone options will determine what resistors and configuration is<br />
required, refer to the General Options Section on Page 17 and the<br />
zone configuration diagrams in the Zone Input Wiring Configuration<br />
on Page 4.<br />
Figure 7 - Fire/Smoke Detection Input<br />
When a fire zone is connected to a zone input that is used in<br />
the duplex zone configuration a fire zone f<strong>au</strong>lt will NOT BE<br />
shown when the fire zone has a shorted condition as this is<br />
shown as all zones closed. A Fire Loop trouble will be shown<br />
when the zone is tampered.<br />
Fire zones that are installed in duplex mode operation are not<br />
re<strong>com</strong>mended. Fire zones should ALWAYS be connected using<br />
the EOL resistor method (2R) as this provides both open and<br />
short circuit monitoring.<br />
5 <strong>CYB</strong>-<strong>KLED</strong> <strong>Cyber</strong><strong>Suite</strong> <strong>Install</strong>ation <strong>Manual</strong>
Slave Keypad Zone Wiring<br />
With one or more slave keypads connected, extra zones beyond the<br />
normal 4 are available on the suite system.<br />
There are 2 options for wiring the zones:<br />
- Duplex mode enabled, 8 zones in total available. This setup<br />
is shown in Error! Reference source not found..<br />
- Standard wiring mode, 6 zones in total available. This setup<br />
is shown in Figure 9.<br />
The choice between the two wiring options will be dependent on the<br />
physical configuration of the sensors and wiring in each installation.<br />
See General Options on page 17 for enabling duplex zones.<br />
Figure 8 - Slave Keypad Duplex Zone Wiring<br />
<strong>CYB</strong>-<strong>KLED</strong> <strong>Cyber</strong><strong>Suite</strong> <strong>Install</strong>ation <strong>Manual</strong><br />
6
Figure 9 - Slave Keypad Standard Zone Wiring<br />
PGM (Programmable Output)<br />
The <strong>Cyber</strong><strong>Suite</strong> LED Keypad uses a programmable output (PGM) that<br />
will activate during an alarm condition. This output can be<br />
programmed to either:<br />
- Follow the status of the alarm siren time or the fire alarm setting<br />
- Follow the armed / disarmed status of the keypad.<br />
Connect a relay or other interface device to this open collector output<br />
for activation of ancillary devices. The behaviour of this output can<br />
also be inverted in the programming, see the General Options section<br />
0 for details on PGM programming.<br />
Figure 10 - LED Indicator Output<br />
7 <strong>CYB</strong>-<strong>KLED</strong> <strong>Cyber</strong><strong>Suite</strong> <strong>Install</strong>ation <strong>Manual</strong>
Slave Reader Network<br />
The <strong>Cyber</strong><strong>Suite</strong> LED Keypad is capable of controlling a slave network of<br />
up to 8 proximity card reader devices from the following range:<br />
- PRX-NANO Nano Prox Small Form Factor Proximity Card Reader<br />
- PRX-VARIO Vario Prox Flush Mount Proximity Card Reader<br />
Each slave reader device <strong>com</strong>municates with the keypad via a PRX-SAM<br />
Standalone Module Board. This module also allows control of an<br />
electronic lock device with the onboard relay.<br />
Figure 11 - Slave Reader Network Wiring To SAM<br />
Module<br />
For further information regarding wiring of the Reader device and the<br />
Stand Alone Modules, please refer to the PRX-SAM Stand Alone<br />
Module <strong>Install</strong>ation <strong>Manual</strong>, provided with your SAM board or from<br />
www.integratedcontroltechnology.<strong>com</strong>.<br />
<strong>CYB</strong>-<strong>KLED</strong> <strong>Cyber</strong><strong>Suite</strong> <strong>Install</strong>ation <strong>Manual</strong><br />
8
Slave Keypad Network<br />
The <strong>Cyber</strong><strong>Suite</strong> LED Keypad is capable of controlling a slave network<br />
of up to 4 other <strong>Cyber</strong><strong>Suite</strong> Keypads in Slave Mode (see Device<br />
Options for configuration).<br />
Each slave reader device <strong>com</strong>municates with the keypad via<br />
connection of their primary network lines to the secondary network<br />
lines of the master keypad, as shown below. Note that the Slave<br />
Reader Network Enabled option must be OFF to allow use of the<br />
slave keypad network.<br />
Figure 12 – Slave Keypad Wiring to Master Keypad<br />
9 <strong>CYB</strong>-<strong>KLED</strong> <strong>Cyber</strong><strong>Suite</strong> <strong>Install</strong>ation <strong>Manual</strong>
Indicator Lights<br />
The <strong>Cyber</strong><strong>Suite</strong> LED keypad features three status indicator lights showing<br />
the condition of the <strong>Cyber</strong><strong>Suite</strong> Security System.<br />
Bypass<br />
<strong>Install</strong><br />
Message<br />
Power/Trouble<br />
Ready Indicator<br />
Armed/Alarm<br />
Figure 13 - Indicator Lights<br />
Binary Number Display<br />
The <strong>Cyber</strong><strong>Suite</strong> LED keypad displays programming information such as<br />
timers and addresses using the 8 Zone LED’s. The Zone LED’s will be lit in<br />
binary mode, meaning that you must add the place value of each LED<br />
together to obtain the programmed value. The place values are shown in<br />
the table below:<br />
ZONE LED<br />
VALUE<br />
Zone 1 128<br />
Zone 2 64<br />
Zone 3 32<br />
Zone 4 16<br />
Zone 5 8<br />
Zone 6 4<br />
Zone 7 2<br />
Zone 8 1<br />
Binary Number Display Example<br />
64 + 2 + 1 = 67<br />
<strong>CYB</strong>-<strong>KLED</strong> <strong>Cyber</strong><strong>Suite</strong> <strong>Install</strong>ation <strong>Manual</strong><br />
10
DEVICE CONFIGURATION<br />
Device Configuration Mode Access<br />
Before the <strong>Cyber</strong><strong>Suite</strong> LED Keypad module will <strong>com</strong>municate it must<br />
be assigned an address and programmed with specific options as to<br />
how it will operate. This is achieved by accessing the device<br />
configuration menu.<br />
The device configuration menu can only be accessed in the<br />
FIRST 2 SECONDS when the device powers up. It is not able<br />
to be accessed when the system is operational.<br />
To gain access to the device configuration menu, apply power to the<br />
device, and within the first 2 seconds after the four beep tone is<br />
heard, press the [CLEAR] key, followed by the [ENTER] key.<br />
The INSTALL LED will then be lit to notify that device configuration<br />
mode has been entered. You can then press the key corresponding to<br />
the menu required from the following list.<br />
Address Selection ([MENU] , [1])<br />
The address selection sets the address of the <strong>Cyber</strong><strong>Suite</strong> LED<br />
Keypad, this address must be a unique address on the system from 1<br />
to 250.<br />
Enter the address with the following keypress sequence:<br />
[MENU] , [1] , [ADDRESS 1] , [ADDRESS 2], [ADDRESS 3], [ENTER]<br />
The address will now be displayed on the zone LED’s in binary form once<br />
all 3 digits have been entered.<br />
ALL 3 Digits MUST be entered when programming an address.<br />
This means that for addresses below 100, you must enter [0]<br />
then the 2 digits of the address. For addresses below 10, you<br />
must enter [0] , [0] followed by the address digit.<br />
11 <strong>CYB</strong>-<strong>KLED</strong> <strong>Cyber</strong><strong>Suite</strong> <strong>Install</strong>ation <strong>Manual</strong>
Device Options ([MENU] , [2])<br />
The device options set options that relate to the mode of operation of<br />
the <strong>Cyber</strong><strong>Suite</strong> keypad.<br />
To enter the Device Options Menu, press<br />
[MENU] , [2]<br />
To toggle options press the keys [1] to [8] , and the corresponding<br />
Zone LED will be lit when that option is ENABLED.<br />
Pressing the [ENTER] key will save the options.<br />
Option 1 – Slave Keypad<br />
If this option is used, be sure to address the keypad as<br />
slave 1,2,3 or 4.<br />
Enabled Slave mode is entered on start up<br />
Disabled Master mode is entered on start up<br />
Option 2 to 8 – Reserved<br />
Device Def<strong>au</strong>lt ([MENU] , [3])<br />
To def<strong>au</strong>lt all the Device Options, press<br />
[MENU] , [3]<br />
The ARMED LED will now flash, and you must press [ENTER] to<br />
confirm or [MENU] to cancel.<br />
Exiting Device Configuration Mode<br />
Once Device configuration is <strong>com</strong>plete, press the [CLEAR] key to restart<br />
the keypad.<br />
If you do not press any key for 45 seconds while in Device<br />
Configuration mode, the keypad will <strong>au</strong>tomatically restart.<br />
<strong>CYB</strong>-<strong>KLED</strong> <strong>Cyber</strong><strong>Suite</strong> <strong>Install</strong>ation <strong>Manual</strong><br />
12
LOCAL INSTALLER LOGIN<br />
Introduction<br />
The def<strong>au</strong>lt local installer code is [0000]. To access the local<br />
installation menu, press:<br />
[ENTER] , [0000]<br />
The INSTALL LED will then be lit to notify that <strong>Install</strong>er mode has<br />
been entered.<br />
One Zone LED will be lit to show you which selection from the<br />
current menu you are currently at. You can change your selection<br />
with the [] and [] keys and then press [ENTER] to access that<br />
menu item, or just press the number key corresponding to the<br />
menu item you wish to select.<br />
The following pages will outline the menu selections available, along<br />
with their shortcut keys.<br />
Notes on <strong>Install</strong>er Access<br />
If a module update has been performed on the system controller and<br />
the user code at system controller user location 3 (UN00003) has<br />
been changed. The code that is entered in this setting is now the<br />
local installer code. This code is programmed system wide when an<br />
update is performed.<br />
To disable the <strong>Install</strong>er Code on ALL <strong>Cyber</strong><strong>Suite</strong> keypads<br />
(Re<strong>com</strong>mended) delete the code for User UN00003 by following the<br />
instructions in the <strong>Cyber</strong><strong>Suite</strong> System Reference <strong>Manual</strong> for deleting<br />
a user pin code.<br />
You can not access the installer menu if the <strong>Cyber</strong><strong>Suite</strong> system is<br />
armed. Disarm the <strong>Cyber</strong><strong>Suite</strong> system before attempting to login<br />
with the installer code.<br />
It is re<strong>com</strong>mended that all installer modifications are <strong>com</strong>pleted and<br />
downloaded using the Protege System Management <strong>Suite</strong> (PRT-<br />
SMGT). Ensure a module update <strong>com</strong>mand is executed when<br />
modifications are being made.<br />
13 <strong>CYB</strong>-<strong>KLED</strong> <strong>Cyber</strong><strong>Suite</strong> <strong>Install</strong>ation <strong>Manual</strong>
TIMING (MENU 1)<br />
ALL 3 Digits of the timer value MUST be entered when<br />
programming a timer. This means that for addresses below<br />
100, you must enter [0] then the 2 digits of the address. For<br />
addresses below 10, you must enter [0] , [0] followed by the<br />
address digit.<br />
Entry Delay Timer ([MENU] [1], [1])<br />
The entry delay timer is programmable from 000 to 255 seconds<br />
(Def<strong>au</strong>lt 30 Seconds).<br />
To program the timer value, press<br />
[MENU] , [1] , [1] , [TIM 1], [TIM 2] , [TIM 3] , [ENTER]<br />
Where TIM 1 ~ 3 are the timer value digits, entered using the 0 to 9<br />
number keys.<br />
Programming the entry delay timer to 0 will result in no entry delay<br />
operation for any zone that has been assigned the entry delay zone<br />
type.<br />
Exit Delay Timer ([MENU] , [1] , [2])<br />
The exit timer is programmable from 000 to 255 seconds (Def<strong>au</strong>lt 30<br />
Seconds).<br />
To program the timer value, press<br />
[MENU] , [1] , [2] , [TIM 1], [TIM 2] , [TIM 3] , [ENTER]<br />
Where TIM 1 ~ 3 are the timer value digits, entered using the 0 to 9<br />
number keys.<br />
Programming the exit delay timer to 0 will result in no exit delay, the<br />
system will immediately arm the <strong>Cyber</strong><strong>Suite</strong> System.<br />
<strong>CYB</strong>-<strong>KLED</strong> <strong>Cyber</strong><strong>Suite</strong> <strong>Install</strong>ation <strong>Manual</strong><br />
14
Alarm/Siren ([MENU] , [1] , [3])<br />
The siren/alarm timer is programmed from 000 to 250 minutes<br />
(Def<strong>au</strong>lt 4 minutes).<br />
To program the timer value, press<br />
[MENU] , [1] , [3] , [TIM 1], [TIM 2] , [TIM 3] , [ENTER]<br />
Where TIM 1 ~ 3 are the timer value digits, entered using the 0 to 9<br />
number keys.<br />
15 <strong>CYB</strong>-<strong>KLED</strong> <strong>Cyber</strong><strong>Suite</strong> <strong>Install</strong>ation <strong>Manual</strong>
Reader Pre-Alarm Timer ([MENU] , [1] , [4])<br />
The Reader Pre-Alarm Timer is programmable from 0 to 255 seconds<br />
(Def<strong>au</strong>lt 30 Seconds). This is only used when the Reader Slave<br />
Network is enabled.<br />
To program the timer value, press<br />
[MENU] , [1] , [4] , [TIM 1], [TIM 2] , [TIM 3] , [ENTER]<br />
Where TIM 1 ~ 3 are the timer value digits, entered using the 0 to 9<br />
number keys.<br />
The minimum Pre-Alarm Time is 5 seconds, any number lower than 5<br />
seconds entered will be <strong>au</strong>tomatically increased to 5 seconds to<br />
ensure correct reader operation.<br />
Reader Left Open Timer ([MENU] , [1] , [5])<br />
The Reader Left Open Timer is programmable from 0 to 255 seconds<br />
(Def<strong>au</strong>lt 45 Seconds). This is only used when the Reader Slave<br />
Network is enabled.<br />
To program the timer value, press<br />
[MENU] , [1] , [5] , [TIM 1], [TIM 2] , [TIM 3] , [ENTER]<br />
Where TIM 1 ~ 3 are the timer value digits, entered using the 0 to 9<br />
number keys.<br />
The minimum Left Open Time is 5 seconds, any number lower than 5<br />
seconds entered will be <strong>au</strong>tomatically increased to 5 seconds to<br />
ensure correct reader operation.<br />
<strong>CYB</strong>-<strong>KLED</strong> <strong>Cyber</strong><strong>Suite</strong> <strong>Install</strong>ation <strong>Manual</strong><br />
16
OPTIONS (MENU 2)<br />
General Options ([MENU] , [2] , [1])<br />
The general options set options that relate to the general operation<br />
of the <strong>Cyber</strong><strong>Suite</strong> keypad.<br />
To enter the General Options Menu, press<br />
[MENU] , [2] , [1]<br />
To toggle options press the keys [1] to [8] , and the corresponding<br />
Zone LED will be lit when that option is ENABLED.<br />
Pressing the [ENTER] key will save the options.<br />
Option 1 - Zone Type Option 1<br />
If duplex zone (Option 2) is not enabled then Option 1<br />
will set the zone input configuration (EOL or NO EOL).<br />
EOL requires the use of 2 X 1K resistors to provide,<br />
Short, Alarm, Closed and Tamper Monitoring. NO EOL<br />
provides Alarm and Closed monitoring.<br />
Enabled EOL resistors are used (2R Mode) (2 Zones).<br />
Disabled NO EOL resistors are used (2 Zones).<br />
Option 2 - Duplex Zone Operation<br />
If Option 2 is set Option 1 does not have any function.<br />
When option 2 is set the zones will use a 1K and 2K4<br />
resistor and provide monitoring for 2 zones.<br />
Enabled Duplex Zone Mode (4 Zones).<br />
Disabled Option 1 sets the zone configuration.<br />
Option 3 - Beep On Trouble Condition<br />
Enabled the beeper will emit 4 beeps every 5 minutes<br />
if a trouble condition is present, to silence the trouble<br />
beep, view the trouble condition.<br />
17 <strong>CYB</strong>-<strong>KLED</strong> <strong>Cyber</strong><strong>Suite</strong> <strong>Install</strong>ation <strong>Manual</strong>
Disabled no trouble beep will be generated.<br />
Option 4 - Device Power Up Disarmed<br />
Enabled the system will power up disarmed regardless<br />
of the system status at the time power was lost.<br />
Disabled the system will power up in an exit delay<br />
condition if the power to the <strong>Cyber</strong><strong>Suite</strong> device was<br />
turned off during an exit delay cycle or if the system<br />
was in alarm or armed.<br />
Option 5 – Reader Slave Network<br />
Enabled the Slave Communications Port will be used<br />
to <strong>com</strong>municate with Card Reader Interfaces via a<br />
Standalone Module.<br />
Disabled the Slave Communications Port will not be<br />
used.<br />
Option 6 – PGM Output Follows Alarm Status<br />
Enabled the PGM Output will be enabled with the<br />
alarm siren time activation or fire alarm activation.<br />
Disabled the PGM Output will not change state<br />
regardless of the alarm status.<br />
Option 7 – PGM Output Follows Area Status<br />
Enabled the PGM Output will be enabled when the<br />
<strong>Cyber</strong><strong>Suite</strong> system is armed, and disabled when the<br />
system is disarmed.<br />
Disabled the PGM Output will not change state<br />
regardless of the area status.<br />
Option 8 – PGM Output Inversion<br />
Enabled the PGM Output will follow the operation<br />
programmed by options 6 and 7, but the output will<br />
be opposite to the behaviour described in those<br />
functions.<br />
Disabled the PGM Output will follow the programmed<br />
output behaviour of options 6 and 7.<br />
<strong>CYB</strong>-<strong>KLED</strong> <strong>Cyber</strong><strong>Suite</strong> <strong>Install</strong>ation <strong>Manual</strong><br />
18
Arming Options ([MENU] , [2] , [2])<br />
The arming options set functions that relate to the arming of the<br />
<strong>Cyber</strong><strong>Suite</strong> system.<br />
To enter the Arming Options Menu, press<br />
[MENU] , [2] , [2]<br />
To toggle options press the keys [1] to [8] , and the corresponding<br />
Zone LED will be lit when that option is ENABLED.<br />
Pressing the [ENTER] key will save the options.<br />
Option 1 - Allow Fast Regular Arming<br />
Enabled the system can be FAST ARMED by pressing<br />
and holding the closed padlock key.<br />
Disabled FAST ARMING is disabled.<br />
Option 2 - Allow Fast Stay Arming<br />
Enabled the system can be FAST STAY by pressing<br />
and holding the [STAY] key.<br />
Disabled FAST STAY arming is disabled.<br />
Option 3 - Allow Instant Arming During Stay Exit Delay<br />
Enabled the system will allow the stay key to be<br />
pressed and held during the exit delay of a stay<br />
arming cycle to allow the stay arming to be changed<br />
to an instant stay arm.<br />
Disabled pressing the stay key during the stay exit<br />
delay will have no function.<br />
Option 4 - Allow Fast Force Arming<br />
Enabled the system can be FAST FORCE armed by<br />
pressing and holding the [FORCE] key.<br />
Disabled FAST FORCE arming is disabled.<br />
Option 5, 6, 7 and 8 - Reserved<br />
19 <strong>CYB</strong>-<strong>KLED</strong> <strong>Cyber</strong><strong>Suite</strong> <strong>Install</strong>ation <strong>Manual</strong>
Reporting Options ([MENU] , [2] , [3])<br />
The reporting options are a set of functions that relate to the<br />
reporting of information to the on site monitoring application or<br />
offsite central station. The system can further be configured for each<br />
reportable event to go to monitoring station and the local on site<br />
monitoring.<br />
To enter the Reporting Options Menu, press<br />
[MENU] , [2] , [3]<br />
To toggle options press the keys [1] to [8] , and the corresponding<br />
Zone LED will be lit when that option is ENABLED.<br />
Pressing the [ENTER] key will save the options.<br />
Option 1 - Report Arming and Disarming<br />
Enabled the <strong>Cyber</strong><strong>Suite</strong> keypad will send a message to<br />
the system controller when the system is armed or<br />
disarmed. If this option is disabled the current status<br />
of the <strong>Cyber</strong><strong>Suite</strong> keypad will not be valid. It is<br />
re<strong>com</strong>mended this and the Report Alarm options are<br />
always enabled.<br />
Disabled no message will be sent.<br />
Option 2 - Report Alarms (Fire and Normal)<br />
Enabled the <strong>Cyber</strong><strong>Suite</strong> keypad will send a message<br />
when an alarm occurs on the <strong>Cyber</strong><strong>Suite</strong> system. This<br />
also enables the sending of the alarm silenced and<br />
alarm timed out messages.<br />
Disabled no message will be sent for an alarm event.<br />
Option 3 - Report Zone Bypass<br />
Enabled the system will report when the <strong>Cyber</strong><strong>Suite</strong><br />
system is armed with zones that have been bypassed.<br />
Disabled no message will be sent when the user arms<br />
the system with zone(s) bypassed.<br />
<strong>CYB</strong>-<strong>KLED</strong> <strong>Cyber</strong><strong>Suite</strong> <strong>Install</strong>ation <strong>Manual</strong><br />
20
Option 4 - Report Zone F<strong>au</strong>lt<br />
Enabled the system will report any zone f<strong>au</strong>lt trouble<br />
condition to the system controller. This will not<br />
indicate the zone that has the f<strong>au</strong>lt as this will be<br />
shown on the local keypad and in the trouble view<br />
menu.<br />
Disabled no zone f<strong>au</strong>lt message will be sent.<br />
Option 5 - Report User Menu Access<br />
Enabled the system will report when the master user<br />
has accessed the main menu.<br />
Disabled no message will be sent when the master<br />
access's the main menu.<br />
Option 6 - Report Local <strong>Install</strong>er Access<br />
Enabled the system will report when the local installer<br />
code is used to gain access to the local installation<br />
options.<br />
Disabled no message will be sent when the installer<br />
access's the installer menu.<br />
Option 7 - Report Extended Information<br />
Enabled the system will report extending information<br />
such as the device tamper and fire loop trouble<br />
conditions. These conditions do not generate an alarm<br />
in the system locally but can be used to generate an<br />
event at the local monitoring or remote monitoring<br />
center alerting the operator to a potential problem.<br />
Disabled no message will be sent when the extended<br />
functions are triggered.<br />
Option 8 - Reserved<br />
It is re<strong>com</strong>mended not to enable/disable or modify the settings of<br />
reserved options.<br />
21 <strong>CYB</strong>-<strong>KLED</strong> <strong>Cyber</strong><strong>Suite</strong> <strong>Install</strong>ation <strong>Manual</strong>
Panic Options ([MENU] , [2] , [4])<br />
The panic options set functions that relate to the panic processing of<br />
the <strong>Cyber</strong><strong>Suite</strong> system.<br />
To enter the Panic Options Menu, press<br />
[MENU] , [2] , [4]<br />
To toggle options press the keys [1] to [8] , and the corresponding<br />
Zone LED will be lit when that option is ENABLED.<br />
Pressing the [ENTER] key will save the options.<br />
Option 1 - 1+3 Silent Panic<br />
Enabled the system will send a silent panic alarm to<br />
the front desk when the 1+3 keys are held for a<br />
period of 2 seconds. No message will be displayed on<br />
the screen or alarm generated.<br />
Disabled the 1+3 will not c<strong>au</strong>se any alarm.<br />
Option 2 - 4+6 Medical Alarm<br />
Enabled the system will send a medical panic alarm to<br />
the front desk when the 4+6 keys are held for a<br />
period of 2 seconds. No message will be displayed on<br />
the screen or alarm generated.<br />
Disabled the 4+6 keys will not c<strong>au</strong>se any alarm.<br />
Option 3 - 7+9 Fire Alarm<br />
Enabled the system will generate a local fire alarm on<br />
the <strong>Cyber</strong><strong>Suite</strong> keypad and also alert the central<br />
station and on site monitoring.<br />
Disabled the 7+9 keys will not c<strong>au</strong>se any alarm.<br />
<strong>CYB</strong>-<strong>KLED</strong> <strong>Cyber</strong><strong>Suite</strong> <strong>Install</strong>ation <strong>Manual</strong><br />
22
Option 4 - User 8 Duress Code Enabled<br />
Enabled the system will enable user code 8 to be a<br />
duress code user and on login will send a duress code<br />
to the central station or on site monitoring system.<br />
Disabled user code 8 will operate as a standard user.<br />
Option 5, 6, 7 and 8 - Reserved<br />
Reserved.<br />
Reserved.<br />
Do not modify the reserved options configuration.<br />
23 <strong>CYB</strong>-<strong>KLED</strong> <strong>Cyber</strong><strong>Suite</strong> <strong>Install</strong>ation <strong>Manual</strong>
ZONES ([MENU] , [3])<br />
Selecting a Zone<br />
To enter the Zone number selection menu, press<br />
[MENU] , [3]<br />
To select a zone to modify use the [] and [] keys to scroll through<br />
the available zones, and press the [ENTER] key to move to the next<br />
configuration menu for the selected zone. You may also shortcut to a<br />
particular zone configuration menu by pressing:<br />
[MENU] , [3] , [ZONE NUMBER]<br />
Where ZONE NUMBER is the number button corresponding to the<br />
required zone.<br />
Once you have selected a zone, The Zone Type setup will be<br />
displayed by the LED corresponding to the current Zone Type<br />
being lit.<br />
Zone Type<br />
Once you have selected a Zone, you must select the Zone Type.<br />
To select the Zone Type, use the [] and [] keys to scroll through<br />
the available types, and press the [ENTER] key to move to the next<br />
configuration menu for the selected zone.<br />
You can also press the number button corresponding to the required<br />
zone type to instantly select that zone type and move to the Zone<br />
Options setup for this zone.<br />
You must select a Zone Type from the following list:<br />
Zone Types<br />
1 Disabled Zone is disabled, does not function in the system.<br />
2 Delay Zone will have an entry delay when a user enters.<br />
3 Follow Zone will not c<strong>au</strong>se an alarm if the entry delay has<br />
started otherwise the zone will be an instant zone.<br />
<strong>CYB</strong>-<strong>KLED</strong> <strong>Cyber</strong><strong>Suite</strong> <strong>Install</strong>ation <strong>Manual</strong><br />
24
Use this to set the zone type for a motion detector<br />
that is located in an entrance area.<br />
4 Instant Zone will c<strong>au</strong>se an alarm immediately.<br />
5 24HR Zone will always c<strong>au</strong>se an alarm immediately.<br />
6 Fire Zone is a fire zone and will generate an instant<br />
alarm.<br />
7 Fire Delay Zone is a delayed fire zone and will generate the<br />
fire delay beeping and require the user to follow<br />
the delay fire zone procedures to prevent a full fire<br />
alarm from being activated.<br />
Zone Options<br />
The zone options select functions that relate to the operation of<br />
bypassing, force arming and stay arming.<br />
Once you have selected a Zone Type for your selected zone, you<br />
must select the Zone Options.<br />
To toggle options press the keys [1] to [8] , and the corresponding<br />
Zone LED will be lit when that option is ENABLED.<br />
Pressing the [ENTER] key will save the options.<br />
Option 1 - Bypass Allowed<br />
Enabled the zone can be bypassed. A fire zone can<br />
never be bypassed regardless of the bypass setting.<br />
Disabled zone can not be bypassed.<br />
Option 2 - Stay Zone<br />
Enabled the zone is set as a stay zone. When the<br />
system is armed in stay mode this zone will not<br />
generate an alarm.<br />
Disabled the zone is not a stay zone.<br />
25 <strong>CYB</strong>-<strong>KLED</strong> <strong>Cyber</strong><strong>Suite</strong> <strong>Install</strong>ation <strong>Manual</strong>
Option 3 - Force Zone<br />
Enabled the zone can be force armed when it is not<br />
ready to be armed. A force armed zone will<br />
<strong>au</strong>tomatically be included in the alarm processing<br />
when the zone restores from the not ready condition.<br />
Disabled the zone is not able to be force armed.<br />
Option 4, 5, 6, 7 and 8 - Reserved<br />
Reserved.<br />
Reserved.<br />
It is re<strong>com</strong>mended not to enable/disable or modify the settings of<br />
reserved options.<br />
<strong>CYB</strong>-<strong>KLED</strong> <strong>Cyber</strong><strong>Suite</strong> <strong>Install</strong>ation <strong>Manual</strong><br />
26
CONTACT<br />
Contact<br />
Integrated Control Technology wel<strong>com</strong>es all feedback. Please go to<br />
our website or use the information below.<br />
Integrated Control Technology<br />
P.O. Box 302-340<br />
North Harbour Post Centre<br />
Auckland<br />
New Zealand<br />
Unit C<br />
6 Ascension Place<br />
Mairangi Bay<br />
Auckland<br />
New Zealand<br />
Phone: +64-9-476-7124<br />
Fax: +64-9-476-7128<br />
www.integratedcontroltechnology.<strong>com</strong><br />
27 <strong>CYB</strong>-<strong>KLED</strong> <strong>Cyber</strong><strong>Suite</strong> <strong>Install</strong>ation <strong>Manual</strong>
Unit C, 6 Ascension Place, Mairangi Bay, P.O. Box 302-340<br />
North Harbour, Auckland, New Zealand.<br />
Phone: +64 (9) 476 7124 • Fax: +64 (9) 476 7128<br />
www.integratedcontroltechnology.<strong>com</strong>