Instruction Book (PDF) - Capresso
Instruction Book (PDF) - Capresso
Instruction Book (PDF) - Capresso

You also want an ePaper? Increase the reach of your titles
YUMPU automatically turns print PDFs into web optimized ePapers that Google loves.
Froth Tec IB Eng PS_Layout 1 9/21/12 2:10 PM Page 1<br />
LIMITED WARRANTY<br />
This warranty covers your <strong>Capresso</strong> machine Model # 206. This warranty is in<br />
effect for one year from the date of the first consumer purchase and is limited to<br />
the United States of America. This warranty covers all defects in materials or<br />
workmanship (parts and labor). Jura <strong>Capresso</strong> will repair or replace your machine<br />
within one year from the date of the first consumer purchase. Jura <strong>Capresso</strong> will<br />
pay for the repair or replacement and the freight back to your destination within<br />
the United States.<br />
The warranty does not cover:<br />
• Any machine not distributed by Jura <strong>Capresso</strong> within the United States.<br />
• Any machine not purchased from an Authorized Jura <strong>Capresso</strong> Dealer.<br />
• Commercial use of the machine.<br />
• Damage caused by accident, abuse, negligence, misuse, improper operation<br />
or failure to follow instructions contained in this manual.<br />
• Damage to glass milk pitcher.<br />
• Any service or alteration performed by an unauthorized person, company<br />
or association.<br />
• Any used machines bought at auctions and unauthorized websites.<br />
Other limitations and exclusions:<br />
Any implied warranties including fitness for use and merchantability are limited<br />
in duration to the period of the express warranty set forth above and no person<br />
is authorized to assume for Jura <strong>Capresso</strong> any other liability in connection with<br />
the sale of the machine.<br />
Jura <strong>Capresso</strong> expressly disclaims liability for incidental and consequential<br />
damages caused by the machine. The terms "incidental damages"refers to the<br />
loss of the original purchaser’s time, loss of the use of the machine or other<br />
costs relating to the care and custody of the machine. The term "consequential<br />
damages" refers to the cost of repairing or replacing other property which is<br />
damaged when this machine does not work properly. The remedies provided<br />
under this warranty are exclusive and in lieu of all others. This warranty gives<br />
you specific legal rights, and you may also have other rights which vary from<br />
state to state.<br />
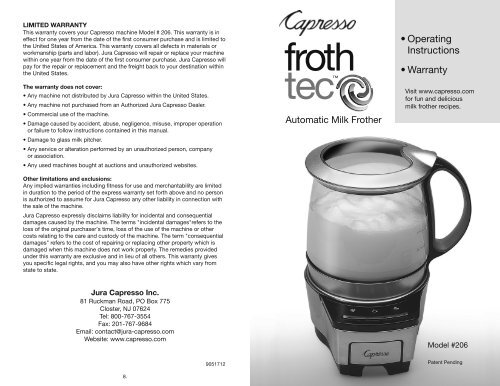
froth<br />
tec<br />
Automatic Milk Frother<br />
• Operating<br />
<strong>Instruction</strong>s<br />
• Warranty<br />
Visit www.capresso.com<br />
for fun and delicious<br />
milk frother recipes.<br />
Jura <strong>Capresso</strong> Inc.<br />
81 Ruckman Road, PO Box 775<br />
Closter, NJ 07624<br />
Tel: 800-767-3554<br />
Fax: 201-767-9684<br />
Email: contact@jura-capresso.com<br />
Website: www.capresso.com<br />
Model #206<br />
8.<br />
9051712<br />
Patent Pending
Froth Tec IB Eng PS_Layout 1 9/21/12 2:10 PM Page 3<br />
Read all instructions before operating the appliance.<br />
IMPORTANT SAFEGUARDS<br />
When using electrical appliances, basic safety precautions should always be<br />
followed, including the following:<br />
• Read all instructions.<br />
• After having the packaging removed, check that the appliance is intact. If in<br />
doubt do not use the appliance and contact your sales agent.<br />
• The parts of the packaging, plastic bags etc. must not be left within the reach of<br />
children as they are potential sources of danger.<br />
• DO NOT touch hot surfaces. Use handles or knobs.<br />
• To protect against fire, electric shock and personal injury do not immerse cord,<br />
plugs, or appliance in water or other liquid.<br />
• Never immerse the base in water or any other liquid for cleaning.<br />
• The appliance is not intended for use by persons (including children) with<br />
reduced physical, sensory or mental capabilities, or lack of experience and<br />
knowledge, unless they have been given supervision or instruction.<br />
• Close supervision is necessary when any appliance is used by or near children.<br />
• Unplug from outlet when not in use and before cleaning. Allow to cool before<br />
putting on or taking off parts, and before cleaning the appliance.<br />
• DO NOT operate any appliance with a damaged cord or plug or if the appliance<br />
has been damaged in any manner. Return the appliance to the nearest shop for<br />
examination or repair or send back to company.<br />
• The use of accessory attachments not recommended by the appliance<br />
manufacturer may result in fire, electric shock or personal injury.<br />
• DO NOT use outdoors.<br />
• DO NOT let cord hang over edge of table or counter, or touch hot surfaces.<br />
• DO NOT place on or near a hot gas or electric burner, or in a heated oven.<br />
• Always attach plug to appliance first, then plug cord into the wall outlet.<br />
• To disconnect, turn the power switch off, then remove plug from wall outlet.<br />
• DO NOT use appliance for other than intended use.<br />
• Use extreme caution when disposing hot steam.<br />
• The milk pitcher is not suited for microwave use.<br />
• Only the supplied milk pitcher can be placed on heating platform of the base.<br />
• DO NOT use a cracked pitcher or a pitcher having a loose or weakened handle.<br />
SAVE THESE INSTRUCTIONS<br />
FOR HOUSEHOLD USE ONLY.<br />
Please note:<br />
• When you remove the milk pitcher from the appliance during operation, the item<br />
will automatically shut off. When replacing the pitcher, you need to push one of<br />
the three buttons to start it again.<br />
• If the heating plate or the bottom of the milk pitcher is still hot, the appliance will<br />
not turn on and will alert you by the 3 LEDs flashing together. In this case, remove<br />
the milk pitcher. Cool it down by running it under cold water. Make sure the<br />
underside bottom is dry and start over.<br />
Which milk?<br />
All kinds of milk can be used with this appliance (Whole, 2%, 1%, skim, even soy<br />
milk). Skim milk will produce the thickest, most dense froth. Soy milk will produce<br />
froth with somewhat larger bubbles.<br />
Hot Chocolate<br />
Use the frothing disk for frothy hot chocolate or the heating disk for smooth hot<br />
chocolate. When using the middle button (Fig. G, warm), the hot chocolate will not<br />
be as hot, ideal for small children. Chocolate syrup and shaved chocolate can be<br />
added directly to the pitcher during operation. Do not add any large items to the<br />
milk pitcher as they can get stuck around the disks and put strain on the motor.<br />
Cold frothing / Auto shut-off<br />
When using the left side button (Fig G, cold), the unit will froth, but not heat. Use<br />
this feature when preparing iced latte or iced cappuccino. Frothing volume will be<br />
less than with heating.<br />
Cleaning<br />
1. Unplug the item and let it cool down.<br />
2. Remove the froth enhancer from the milk pitcher. Remove the frothing disk or<br />
the heating disk from the froth enhancer.<br />
3. The milk pitcher, lid, froth enhancer, frothing disk and heating disk are<br />
dishwasher safe (top-rack).<br />
4. Wipe the heating plate with a moist cloth.<br />
5. Discoloration of the heating plate may occur if milk spills onto the heating plate.<br />
Scrub lightly with baking soda.<br />
6. Discoloration of the bottom of the milk pitcher may occur if cleaning in the<br />
dishwasher and after prolonged time can affect the performance of the unit.<br />
To remove discoloration from bottom of milk pitcher scrub with soap, water<br />
and steel wool until base is back to normal appearance.<br />
Froth / Heating Disk Storage<br />
One disk can be kept inside the milk pitcher while attached to the froth enhancer.<br />
The other disk can be stored in the drawer that slides out of the front of the base<br />
of the appliance.<br />
Additional Milk Pitcher and Disks<br />
You can order an additional milk pitcher or disks from our website<br />
www.capresso.com or call our Customer Service Hotline at 1-800-767-3554.<br />
2.<br />
7.
Froth Tec IB Eng PS_Layout 1 9/21/12 2:10 PM Page 5<br />
Usage<br />
1. Plug in appliance.<br />
2. Remove lid from milk pitcher. (A)<br />
3. Place frothing disk or heating disk onto the pin of the froth enhancer. (B)<br />
4. Place the froth enhancer into the bottom of the milk pitcher (C).<br />
Align the 3 tall tabs of the froth enhancer with the 3 curved panels at the<br />
bottom of the milk pitcher and make sure it snaps in securely (D).<br />
5. Make sure underside of the milk pitcher is dry.<br />
6. Pour fresh cold milk into the milk pitcher. (E)<br />
7. Replace lid and place pitcher on heating platform. (F)<br />
8. Choose your desired temperature setting, cold, warm, or hot. (G)<br />
9. The button illuminates and the frothing/mixing action starts automatically.<br />
10. When the milk has reached the maximum temperature (or time limit for cold<br />
frothing), the appliance will automatically shut off. The indicator light turns off<br />
and the frothing action stops.<br />
CAUTION: When using warm or hot setting, the milk pitcher will be very warm<br />
after use; the bottom of the pitcher is hot. Only place the milk pitcher on a heat<br />
resistant surface.<br />
11. Let the frothed milk sit for a few seconds before pouring to allow the<br />
froth to stiffen.<br />
12. Remove lid and pour the milk into your cup and spoon the froth on top.<br />
13. Always unplug from outlet when not in use and before cleaning. Allow to cool<br />
before putting on or taking off parts, and before cleaning the appliance<br />
CAUTION: Do not place the milk pitcher in the microwave oven or on any other<br />
heating surface.<br />
Making Milk Froth<br />
A B C D<br />
E F G<br />
6.<br />
cold warm hot<br />
SPECIAL CORD SET INSTRUCTIONS<br />
Regarding your Cord Set:<br />
A. A short power-supply cord (or detachable power-supply cord) is provided to<br />
reduce risks resulting from becoming entangled in or tripping over a longer cord.<br />
B. Longer detachable power-supply cords or extension cords are available and<br />
may be used if care is exercised in their use.<br />
C. If an extension cord is used,<br />
a. the marked electrical rating of the extension cord should be at least as<br />
great as the electrical rating of the appliance, and<br />
b. the longer cord shall be arranged so that it will not drape over the counterop<br />
or tabletop where it can be pulled on by children or tripped over.<br />
D. This appliance has a polarized plug (one blade is wider than the other). As a<br />
safety feature, this plug will fit in a polarized outlet only one way. If the plug<br />
does not fit fully in the outlet, reverse the plug. If it still does not fit, contact a<br />
qualified electrician. Do not attempt to defeat this safety feature.<br />
CAUTION:<br />
This appliance is for household use. Any servicing other than cleaning and user<br />
maintenance should be performed by an authorized service representative.<br />
• Do not immerse base in water or try to disassemble.<br />
• To reduce the risk of fire or electric shock, do not remove the base.<br />
No user serviceable parts inside.<br />
• Repair should be done by authorized service personnel only.<br />
• Check voltage to be sure that the voltage indicated on the name plate agrees<br />
with your voltage.<br />
• Keep your hands and the cord away from hot parts of the appliance during operation.<br />
• Never clean with scouring powders or hard implements.<br />
WELCOME AND THANK YOU<br />
Thank you for choosing the <strong>Capresso</strong> froth TEC. This compact and space saving<br />
item froths and heats your milk completely and automatically. It is easy to use, easy<br />
to clean. Use it for hot chocolate, frothed milk and iced cappuccinos. Use the warm<br />
setting to serve hot chocolate at the right temperature for small children. Please read all<br />
of the instructions in this booklet before operating your new machine. Understanding<br />
and complying with these instructions is essential to ensure that the machine is utilized<br />
without risk and to ensure safety during operation and maintenance.<br />
HOW TO REACH JURA CAPRESSO<br />
Should you require further information or if particular problems occur that<br />
are not covered in this manual, please<br />
• CALL our toll free HELP LINE: 1-800-767-3554<br />
Monday -Thursday 8AM to 9PM Eastern Standard Time.<br />
Friday 8AM to 8PM and Saturday 9AM to 5PM Eastern Standard Time.<br />
• FAX us at 1-201-767-9684<br />
• E-MAIL us at contact@jura-capresso.com<br />
• VISIT our website at www.capresso.com<br />
• WRITE to Jura <strong>Capresso</strong> Inc., Customer Service, P.O. Box 775,<br />
Closter, NJ 07624<br />
3.
Froth Tec IB Eng PS_Layout 1 9/21/12 2:10 PM Page 7<br />
Fig. 1<br />
Using the froth TEC <br />
Lid<br />
Frothing Disk<br />
The froth TEC Automatic Milk Frother comes equipped with a glass milk<br />
pitcher with lid, a froth enhancer, one frothing disk, one heating disk and the<br />
base unit. One of the disks is installed onto the froth enhancer inside the milk<br />
pitcher. The other disk is stored in the drawer that slides out of the front of the<br />
base of the appliance.<br />
Froth Enhancer<br />
Froth enhancer (disk holder)<br />
Holds frothing or heating disk<br />
in place and enhances mixing<br />
power.<br />
Glass Milk Pitcher<br />
Fill Markings<br />
HEAT<br />
FROTH<br />
MIN<br />
Heating Disk (smooth) - Snaps into froth enhancer for<br />
heating milk without froth. Can be stored in storage<br />
drawer on front of the base.<br />
Frothing Disk (whisk) - Snaps<br />
into froth enhancer for frothing<br />
milk. Can be stored in storage<br />
drawer on front of the base.<br />
Base<br />
Operating Buttons<br />
(from left to right):<br />
cold, warm, hot<br />
Built-in storage<br />
drawer for disk<br />
Before First Use<br />
Clean the milk pitcher, lid, froth enhancer and the disks under running warm<br />
water. Make sure the underside of the milk pitcher is completely dry before<br />
placing on the base.<br />
CAUTION:<br />
Maximum Capacity - FROTHING: never fill more than 10 oz.<br />
(see FROTH marking on the side of the milk pitcher)<br />
Maximum Capacity - HEATING: never fill more than 16 oz.<br />
(see HEAT marking on the side of the milk pitcher)<br />
Using the Frothing Disk<br />
Never fill more than 10 oz. of milk or chocolate milk into the<br />
milk pitcher ("FROTH" marking); otherwise, hot milk could<br />
spill over the milk pitcher onto the heating platform. This<br />
may damage the interior parts of the machine.<br />
Fig. 1a<br />
Using the Heating Disk:<br />
Never fill more than 16 oz. of milk or chocolate milk into the<br />
milk pitcher ("HEAT" marking).<br />
Froth Enhancer Frothing Disk Heating Disk<br />
4.<br />
5.