Silvia with PID Operation Guide - Seattle Coffee Gear
Silvia with PID Operation Guide - Seattle Coffee Gear
Silvia with PID Operation Guide - Seattle Coffee Gear

You also want an ePaper? Increase the reach of your titles
YUMPU automatically turns print PDFs into web optimized ePapers that Google loves.
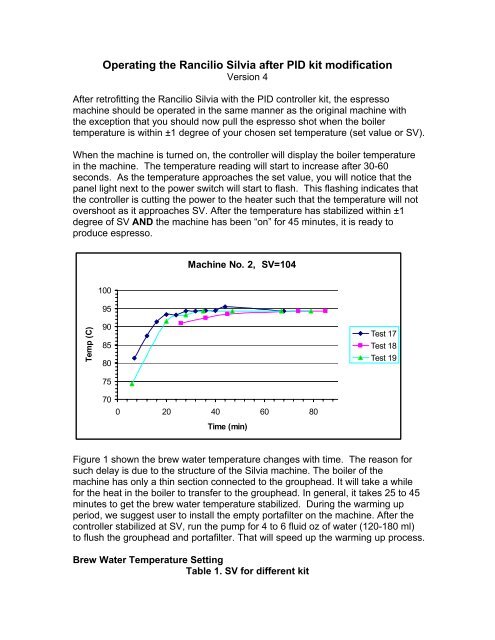
Operating the Rancilio <strong>Silvia</strong> after <strong>PID</strong> kit modification<br />
Version 4<br />
After retrofitting the Rancilio <strong>Silvia</strong> <strong>with</strong> the <strong>PID</strong> controller kit, the espresso<br />
machine should be operated in the same manner as the original machine <strong>with</strong><br />
the exception that you should now pull the espresso shot when the boiler<br />
temperature is <strong>with</strong>in ±1 degree of your chosen set temperature (set value or SV).<br />
When the machine is turned on, the controller will display the boiler temperature<br />
in the machine. The temperature reading will start to increase after 30-60<br />
seconds. As the temperature approaches the set value, you will notice that the<br />
panel light next to the power switch will start to flash. This flashing indicates that<br />
the controller is cutting the power to the heater such that the temperature will not<br />
overshoot as it approaches SV. After the temperature has stabilized <strong>with</strong>in ±1<br />
degree of SV AND the machine has been NonO for 45 minutes, it is ready to<br />
produce espresso.<br />
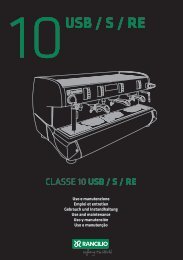
Machine No. 2, SV=104<br />
100<br />
95<br />
Temp (C)<br />
90<br />
85<br />
80<br />
75<br />
Test 17<br />
Test 18<br />
Test 19<br />
70<br />
0 20 40 60 80<br />
Time (min)<br />
Figure 1 shown the brew water temperature changes <strong>with</strong> time. The reason for<br />
such delay is due to the structure of the <strong>Silvia</strong> machine. The boiler of the<br />
machine has only a thin section connected to the grouphead. It will take a while<br />
for the heat in the boiler to transfer to the grouphead. In general, it takes 25 to 45<br />
minutes to get the brew water temperature stabilized. During the warming up<br />
period, we suggest user to install the empty portafilter on the machine. After the<br />
controller stabilized at SV, run the pump for 4 to 6 fluid oz of water (120-180 ml)<br />
to flush the grouphead and portafilter. That will speed up the warming up process.<br />
Brew Water Temperature Setting<br />
Table 1. SV for different kit
Part Number Description SV value in ºC SV value in ºF<br />
KIT-<br />
Rancilio retrofit kit <strong>with</strong> RTD<br />
RSRTD(N) sensor 105 221<br />
Table 1 lists default settings for the SV of the controller.<br />
Temperature relation in Celsius<br />
Brew Water Temperature<br />
99<br />
98<br />
97<br />
96<br />
95<br />
94<br />
93<br />
92<br />
91<br />
90<br />
89<br />
88<br />
96 98 100 102 104 106 108<br />
Controller Set Temperatuer<br />
Temperature relation in Fahrenheit<br />
Brew Water Temperature<br />
210<br />
208<br />
206<br />
204<br />
202<br />
200<br />
198<br />
196<br />
194<br />
192<br />
190<br />
205 210 215 220 225 230<br />
Controller Set Temperatuer<br />
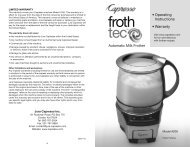
Figure 2 Correlation between <strong>PID</strong> controller set temperature and brew water<br />
temperature detected at grouphead measured by Scace Thermofilter. Top,<br />
display in degrees Celsius. Bottom, Display in degrees Fahrenheit.<br />
Figure 2 shows the correlation between the <strong>PID</strong> controller set temperature and<br />
brew water temperature. The controller in the Auber instruments[ <strong>PID</strong> kits has<br />
been calibrated <strong>with</strong> its sensor to the accuracy of 1 degree C before shipping.<br />
However, due to the machine structure variations, the brew water temperature of
different machine can have 1-2 C difference when controlled by the same <strong>PID</strong><br />
controller kit. For detailed relationship between the <strong>PID</strong> setting temperature and<br />
brew water temperature, please read the file named NTemperature Performance<br />
StudyO in the CD that came <strong>with</strong> the kit.<br />
It should be noted that the setting temperature we recommended is lower than<br />
some people suggested on the internet forums. As SV can be easily changed, it<br />
will up to the user to decide what the best temperature is for their espresso.<br />
Changing Brew Water Temperature Setting<br />
There are two ways in which SV may be changed:<br />
1) Press the or key once and release it. The display will change from<br />
measured temperature (process value, PV) to flash the SV. Then press the <br />
or key to change SV until the desired value is displayed. There is no need to<br />
press the SET key as the display will change back to reading the boiler<br />
temperature automatically after no keys are pressed for 8 seconds.<br />
2) Press the SET key and enter the code 0001. Press SET again. The controller<br />
will display the current setting for SV. Use the, , and > keys to change the<br />
SV to the desired value. Press the SET again. Then use the and keys until<br />
the controller displays NENDO. Press SET to complete the process. While this<br />
setup method is more complicated than the previous method, it is faster and<br />
more reliable when the temperature change is very large. However, this would<br />
not typically be required in an espresso machine installation.<br />
Fine tuning the <strong>PID</strong> Constants<br />
The parameters for the <strong>PID</strong> controller have been optimized for Rancilio <strong>Silvia</strong><br />
<strong>with</strong> extensive testing. For most users, there is no need to fine tune the machine.<br />
For some machines, the temperature might oscillate 2 degrees occasionally. The<br />
recovery time might increase to 3-4 minutes when it is cold. These differences<br />
are not critical to most users because it might take that much time to prepare the<br />
next shot. As the machine warms up, the performance will improve. A warmed up<br />
machine could take less than 40 seconds to recover after pulling a shot. We<br />
found the most noticeable performance differences were between new machines<br />
and some old, poorly maintained machines. This is believed to be due to internal<br />
scale build-up in older machines which slows the response time. If you are<br />
technically adept and willing to read through the controller instruction manual,<br />
below are some hints that may help you fine tune the controller. Should you ever<br />
want to set the controller to its original state, Table 2 lists the default settings that<br />
come <strong>with</strong> the controller.
1) Changing the P constant MAY improve performance. We found for kits using<br />
the RTD sensor the P value should be between 1.8 and 2.5 (the default is 2.0).<br />
In general, a lower P value will speed up the recovery after a shot. However, a<br />
lower P value can also cause the temperature to oscillate. For older machines,<br />
2.5 may provide better results. For kits using the K type thermocouple, the P<br />
value should be between 0.9 and 1.4 (the default is 1.1).<br />
2) For older machines, changing the integral constant, I, from 60 seconds to up<br />
to 75 seconds may improve performance. However if I is set too short the<br />
temperature will oscillate and when I is set too long the recovery speed will be<br />
slower.<br />
Controller Instruction Manual<br />
Table 2. Controller Parameters For <strong>Silvia</strong><br />
KIT-RSRTD(N)<br />
F<br />
KIT-RSRTD(N)<br />
C<br />
Code 0036<br />
P 2 2<br />
I 60 60<br />
d 15 15<br />
Code 0001<br />
SV 221 105<br />
AH1 350 175<br />
AL1 320 160<br />
Code 0089<br />
Corf 1 0<br />
A copy of the instruction manual for the controller is included in the kit. For most<br />
users, there is no need to read it. If you decide to read the manual we want to<br />
point out that this controller is modified after the manual was created. We have<br />
added two control parameters to balance the requirement for cold start speed,<br />
shot recovery speed and long term stability. These parameters are proprietary<br />
and are not accessible by the user. In addition, the dampening factor, SovF, has<br />
been deactivated. Other than that, the remaining control functions are the same.<br />
Change the Display to 0.1 Degree Resolution.<br />
For the kits <strong>with</strong> RTD sensor, it is possible to display the temperature in 0.1<br />
degree (F or C) resolution. The controller will be able to hold the temperature at<br />
± 0.1 degree range. However, <strong>with</strong> 0.1 degree resolution, the machine will take<br />
much longer to reach the set point. Should you decide to use the 0.1 degree<br />
resolution, you will need to use the code 0089 to change the Inty parameter from<br />
PT100 to PT10.0. Then, use code 0001 to reset SV, AH1 and AL1.
Frothing the Milk by Steam.<br />
You should froth the milk in the same way as before the <strong>PID</strong> kit was installed.<br />
The steam temperature is not controlled by the <strong>PID</strong> controller. When frothing the<br />
milk, the heater of <strong>Silvia</strong> does not have enough power to maintaining a stable<br />
temperature. Even the heater is powered 100% on; the temperature of the boiler<br />
will still drop. Commercial espresso machines have separate steam boiler <strong>with</strong><br />
heater that is 2 to 3 times more powerful than the brewing heater for this reason.<br />
To <strong>PID</strong> control the frothing temperature of <strong>Silvia</strong> will make the steam much<br />
weaker.<br />
The <strong>PID</strong> controller, however, will help you to NsurfO the best time for frothing<br />
because you can read the temperature of the boiler. The steam thermostat of the<br />
<strong>Silvia</strong> is designed to turn off when the temperature reaches 284 F (140C) and on<br />
again when temperature dropped to below 265 F (130C). If you start the froth<br />
after the heater is turned off at 284F, the heater will not be on until it drops below<br />
265 F. Because the delays of heat transfer, the new steam won[t come until even<br />
lower temperature. When the heater is off, the steam is weak even the<br />
temperature reading might be high. The ideal condition to start the frothing is<br />
when the heater is on and temperature of the boiler is high. Normally, you<br />
should start steaming somewhere around 260-270F during the rise phase of the<br />
heating. This temperature range can vary due to the variation of frothing method<br />
among the users. Since the controller displays the actual temperature of the<br />
boiler, you can find the highest temperature to start frothing <strong>with</strong>out letting the<br />
thermostat to turn the heater off until the frothing is finished.