Maxtor OneTouch II Drive - Seagate
Maxtor OneTouch II Drive - Seagate
Maxtor OneTouch II Drive - Seagate

You also want an ePaper? Increase the reach of your titles
YUMPU automatically turns print PDFs into web optimized ePapers that Google loves.
2<br />
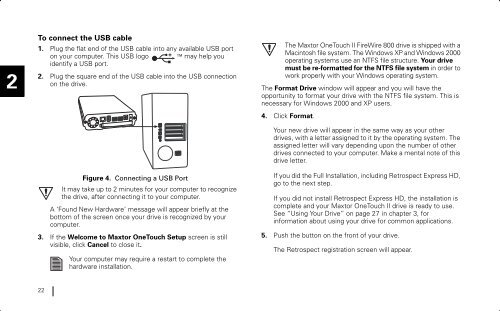
To connect the USB cable<br />
1. Plug the flat end of the USB cable into any available USB port<br />
on your computer. This USB logo may help you<br />
identify a USB port.<br />
2. Plug the square end of the USB cable into the USB connection<br />
on the drive.<br />
Figure 4. Connecting a USB Port<br />
It may take up to 2 minutes for your computer to recognize<br />
the drive, after connecting it to your computer.<br />
A ‘Found New Hardware’ message will appear briefly at the<br />
bottom of the screen once your drive is recognized by your<br />
computer.<br />
3. If the Welcome to <strong>Maxtor</strong> <strong>OneTouch</strong> Setup screen is still<br />
visible, click Cancel to close it.<br />
Your computer may require a restart to complete the<br />
hardware installation.<br />
The <strong>Maxtor</strong> <strong>OneTouch</strong> <strong>II</strong> FireWire 800 drive is shipped with a<br />
Macintosh file system. The Windows XP and Windows 2000<br />
operating systems use an NTFS file structure. Your drive<br />
must be re-formatted for the NTFS file system in order to<br />
work properly with your Windows operating system.<br />
The Format <strong>Drive</strong> window will appear and you will have the<br />
opportunity to format your drive with the NTFS file system. This is<br />
necessary for Windows 2000 and XP users.<br />
4. Click Format.<br />
Your new drive will appear in the same way as your other<br />
drives, with a letter assigned to it by the operating system. The<br />
assigned letter will vary depending upon the number of other<br />
drives connected to your computer. Make a mental note of this<br />
drive letter.<br />
If you did the Full Installation, including Retrospect Express HD,<br />
go to the next step.<br />
If you did not install Retrospect Express HD, the installation is<br />
complete and your <strong>Maxtor</strong> <strong>OneTouch</strong> <strong>II</strong> drive is ready to use.<br />
See “Using Your <strong>Drive</strong>” on page 27 in chapter 3, for<br />
information about using your drive for common applications.<br />
5. Push the button on the front of your drive.<br />
The Retrospect registration screen will appear.<br />
22