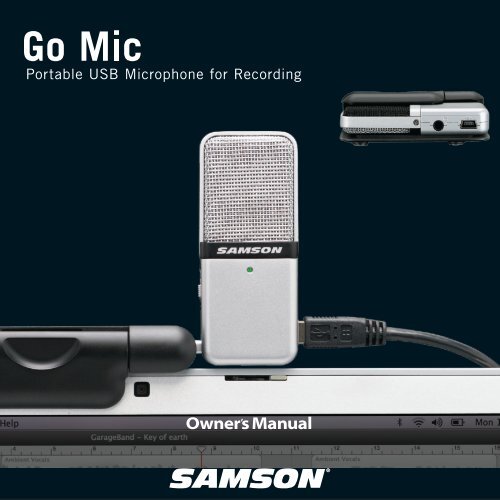
Download the Go Mic English User Manual in PDF format - Samson
Download the Go Mic English User Manual in PDF format - Samson
Download the Go Mic English User Manual in PDF format - Samson

Create successful ePaper yourself
Turn your PDF publications into a flip-book with our unique Google optimized e-Paper software.
Copyright 2009, <strong>Samson</strong> Technologies Corp.<br />
Pr<strong>in</strong>ted May, 2009 v1.1<br />
<strong>Samson</strong> Technologies Corp.<br />
45 Gilp<strong>in</strong> Avenue<br />
Hauppauge, New York 11788-8816<br />
Phone: 1-800-3-SAMSON (1-800-372-6766)<br />
Fax: 631-784-2201<br />
www.samsontech.com
Table of Contents<br />
Introduction . . . . . . . . . . . . . . . . . . . . . . . . . . . . . . . . . . . . . . . . . . . 2<br />
<strong>Go</strong> <strong>Mic</strong> Features. . . . . . . . . . . . . . . . . . . . . . . . . . . . . . . . . . . . . . . . . 4<br />
<strong>Go</strong> <strong>Mic</strong> Layout . . . . . . . . . . . . . . . . . . . . . . . . . . . . . . . . . . . . . . . . . . 5<br />
Install<strong>in</strong>g <strong>the</strong> <strong>Go</strong> <strong>Mic</strong> . . . . . . . . . . . . . . . . . . . . . . . . . . . . . . . . . . . . . 6<br />
Gett<strong>in</strong>g Started with W<strong>in</strong>dows XP . . . . . . . . . . . . . . . . . . . . . . . . . . . . . 6<br />
Gett<strong>in</strong>g Started with W<strong>in</strong>dows Vista . . . . . . . . . . . . . . . . . . . . . . . . . . . 9<br />
Gett<strong>in</strong>g Started with MAC OS X . . . . . . . . . . . . . . . . . . . . . . . . . . . . . .11<br />
Operat<strong>in</strong>g <strong>the</strong> <strong>Go</strong> <strong>Mic</strong> . . . . . . . . . . . . . . . . . . . . . . . . . . . . . . . . . 13 - 19<br />
<strong>Go</strong> <strong>Mic</strong> Quick Start . . . . . . . . . . . . . . . . . . . . . . . . . . . . . . . . . . . . . .13<br />
Power<strong>in</strong>g <strong>the</strong> <strong>Go</strong> <strong>Mic</strong> . . . . . . . . . . . . . . . . . . . . . . . . . . . . . . . . . . . . .15<br />
Sett<strong>in</strong>g Up <strong>the</strong> Signal Level . . . . . . . . . . . . . . . . . . . . . . . . . . . . . . . . .15<br />
Stand Mount<strong>in</strong>g <strong>the</strong> <strong>Go</strong> <strong>Mic</strong> . . . . . . . . . . . . . . . . . . . . . . . . . . . . . . . .15<br />
Polar Patterns. . . . . . . . . . . . . . . . . . . . . . . . . . . . . . . . . . . . . . . . . 16<br />
<strong>Mic</strong>rophone Placement . . . . . . . . . . . . . . . . . . . . . . . . . . . . . . . . . . .16<br />
P-Popp<strong>in</strong>g . . . . . . . . . . . . . . . . . . . . . . . . . . . . . . . . . . . . . . . . . . . 17<br />
Application Notes . . . . . . . . . . . . . . . . . . . . . . . . . . . . . . . . . . . . . . .18<br />
<strong>Go</strong> <strong>Mic</strong> Specifications . . . . . . . . . . . . . . . . . . . . . . . . . . . . . . . . . 20 - 21
Introduction<br />
Congratulations on your purchase of <strong>the</strong> <strong>Samson</strong> <strong>Go</strong> <strong>Mic</strong> portable USB studio condenser.<br />
The <strong>Go</strong> <strong>Mic</strong> is a dual-pattern studio microphone featur<strong>in</strong>g high quality onboard digital<br />
converters and USB <strong>in</strong>terface fit <strong>in</strong>to an extremely portable, fold-up design mak<strong>in</strong>g it ideal<br />
for professional digital record<strong>in</strong>g or webcast<strong>in</strong>g. The <strong>Go</strong> <strong>Mic</strong> is a studio quality condenser<br />
microphone offer<strong>in</strong>g both unidirectional, or cardioid, and omnidirectional pick-up patterns,<br />
plus <strong>the</strong>re’s a 10 dB PAD for record<strong>in</strong>g hot signals. The <strong>Go</strong> <strong>Mic</strong>’s built-<strong>in</strong> audio <strong>in</strong>terface<br />
features a robust headphone output allow<strong>in</strong>g you to monitor your record<strong>in</strong>gs. The clever<br />
clip design allows you to mount <strong>the</strong> microphone on your laptop or you can convert <strong>the</strong><br />
clip mount to a convenient desk stand. You can even mount <strong>the</strong> <strong>Go</strong> <strong>Mic</strong> on a standard<br />
microphone stand with <strong>the</strong> <strong>in</strong>cluded adapter. You get everyth<strong>in</strong>g you need to get started<br />
record<strong>in</strong>g on your computer <strong>in</strong>clud<strong>in</strong>g USB cable, cable clip, mic stand mount and handy<br />
carry case to keep your mic protected dur<strong>in</strong>g transport. The <strong>Go</strong> <strong>Mic</strong> is perfect for record<strong>in</strong>g<br />
any acoustic audio source on your favorite DAW (Digital Audio Workstation). Just plug <strong>in</strong> <strong>the</strong><br />
supplied USB cable, launch your DAW and start record<strong>in</strong>g. The <strong>Go</strong> <strong>Mic</strong> faithfully reproduces a<br />
variety of sound sources <strong>in</strong>clud<strong>in</strong>g vocals, acoustic str<strong>in</strong>g and w<strong>in</strong>d <strong>in</strong>struments, percussion,<br />
and overhead cymbals, to name a few. It is also great for VoIP, chatt<strong>in</strong>g and webcast<strong>in</strong>g.<br />
The extended frequency and fast transient response ensures an accurate reproduction with<br />
l<strong>in</strong>ear characteristics from bottom to top. Whe<strong>the</strong>r you’re record<strong>in</strong>g your latest song idea,<br />
a podcast, or your band’s next big hit, <strong>the</strong> <strong>Go</strong> <strong>Mic</strong> is <strong>the</strong> simplest and most comprehensive<br />
solution for high quality record<strong>in</strong>g on a Mac or PC. Just plug it <strong>in</strong> and start creat<strong>in</strong>g!
Introduction<br />
In <strong>the</strong>se pages, you’ll f<strong>in</strong>d a detailed description of <strong>the</strong> features of <strong>the</strong> <strong>Go</strong> <strong>Mic</strong> USB Studio<br />
Condenser <strong>Mic</strong>rophone, as well as step-by-step <strong>in</strong>structions for its setup and use, and full<br />
specifications. You’ll also f<strong>in</strong>d a warranty card enclosed—please don’t forget to fill it out and<br />
mail it <strong>in</strong> so that you can receive onl<strong>in</strong>e technical support and so we can send you updated<br />
<strong>in</strong><strong>format</strong>ion about <strong>the</strong>se and o<strong>the</strong>r <strong>Samson</strong> products <strong>in</strong> <strong>the</strong> future. Also, be sure to check out<br />
our website (www.samsontech.com) for complete <strong>in</strong><strong>format</strong>ion about our full product l<strong>in</strong>e.<br />
With proper care your <strong>Go</strong> <strong>Mic</strong> will operate trouble free for many years. We recommend you<br />
record your serial number <strong>in</strong> <strong>the</strong> space provided below for future reference.<br />
Serial number: __________________________<br />
Date of purchase: __________________<br />
Should your unit ever require servic<strong>in</strong>g, a Return Authorization number (RA) must be<br />
obta<strong>in</strong>ed before shipp<strong>in</strong>g your unit to <strong>Samson</strong>. Without this number, <strong>the</strong> unit will not be<br />
accepted. Please call <strong>Samson</strong> at 1-800-3SAMSON (1-800-372-6766) for a Return Authorization<br />
number prior to shipp<strong>in</strong>g your unit. Please reta<strong>in</strong> <strong>the</strong> orig<strong>in</strong>al pack<strong>in</strong>g materials and if<br />
possible, return <strong>the</strong> unit <strong>in</strong> <strong>the</strong> orig<strong>in</strong>al carton and pack<strong>in</strong>g materials. If you purchased your<br />
<strong>Samson</strong> product outside <strong>the</strong> United States, please contact your local distributor for warranty<br />
<strong>in</strong><strong>format</strong>ion and service.
<strong>Go</strong> <strong>Mic</strong> Features<br />
• Compact, dual pattern studio condenser with built-<strong>in</strong> audio <strong>in</strong>terface and USB digital I/O.<br />
• Compatible with most any Mac and PC based Digital Audio Workstation that support <strong>the</strong><br />
USB Audio class.<br />
• Unique, fold up design with <strong>in</strong>tegral clip makes <strong>the</strong> microphone extremely portable and<br />
ideal for most record<strong>in</strong>g solutions, especially for mobile laptop record<strong>in</strong>g.<br />
• The microphone’s capsules are extremely detailed and <strong>the</strong> switchable Cardioid and Omni<br />
pick-up patterns make it ideal for record<strong>in</strong>g voice, conferences, acoustic <strong>in</strong>struments and<br />
for just about any o<strong>the</strong>r sound source.<br />
• The onboard headphone amplifier allows you to listen to your record<strong>in</strong>g directly from<br />
<strong>the</strong> microphone, plus you can use <strong>the</strong> output to connect active studio monitors.<br />
• A software controlled, analog direct monitor mode is provided for zero latency<br />
monitor<strong>in</strong>g.<br />
• Computer controlled analog Input Ga<strong>in</strong> with Peak LED makes it easy to set <strong>the</strong> proper<br />
level and get a clean signal.<br />
• The on-board, high quality AD converters with 16 Bit, 48K sampl<strong>in</strong>g rate provide better<br />
than CD quality record<strong>in</strong>g.<br />
• On <strong>the</strong> road, <strong>in</strong> <strong>the</strong> studio or <strong>in</strong> a fixed <strong>in</strong>stallation, <strong>the</strong> solid construction with die cast<br />
base make <strong>the</strong> microphone a reliable audio tool, day <strong>in</strong> and day out.<br />
• A 10 foot USB cable, cable clip and mic stand adapter are <strong>in</strong>cluded to easily set up<br />
<strong>the</strong> microphone right out of <strong>the</strong> box, plus you can keep it safe while carry<strong>in</strong>g it <strong>in</strong> <strong>the</strong><br />
<strong>in</strong>cluded zipper pouch.<br />
• The <strong>Go</strong> <strong>Mic</strong> is perfect for record<strong>in</strong>g voice, music, live <strong>in</strong>struments, podcasts, or for<br />
chatt<strong>in</strong>g and VoIP.
1. W<strong>in</strong>dscreen – Dual stage grill protects <strong>the</strong><br />
capsules and helps reduce w<strong>in</strong>d noise and p-<br />
popp<strong>in</strong>g.<br />
2. Capsules – Dual, <strong>in</strong>ternally shock isolated<br />
10mm capsules provide both Cardioid and<br />
Omni polar patterns.<br />
3. LED – The dual color Power/Clip LED lights<br />
green to <strong>in</strong>dicate power, and flashes red when<br />
<strong>the</strong> <strong>in</strong>put signal is clipp<strong>in</strong>g.<br />
4. Diecast Base – The molded z<strong>in</strong>c base is<br />
weighted and shock isolated to provide a sturdy<br />
solution for desktop applications.<br />
5. <strong>Mic</strong> Stand Mount – A standard Euro-mount mic<br />
stand mount<strong>in</strong>g hole and <strong>in</strong>cluded adapters<br />
allow you to attach <strong>the</strong> <strong>Go</strong> <strong>Mic</strong> to a standard<br />
microphone stand.<br />
6. Clip – Integral mount<strong>in</strong>g clip for easy set-up<br />
and <strong>in</strong>stallation up on just about any laptop<br />
computer.<br />
8. USB – M<strong>in</strong>i-B size USB connector for <strong>in</strong>terfac<strong>in</strong>g<br />
with your PC or Mac.<br />
7. Phones - 1/8-<strong>in</strong>ch (.35mm) stereo jack for<br />
connect<strong>in</strong>g headphones or studio monitors.<br />
9. Pattern switch – Selector switch used to set <strong>the</strong><br />
microphone for Cardioid, Cardioid with a 10 dB<br />
Pad, or Omni pick-up pattern.<br />
<br />
6<br />
<strong>Go</strong> <strong>Mic</strong> Layout<br />
1<br />
2<br />
3<br />
4<br />
5<br />
7<br />
9<br />
8
Install<strong>in</strong>g <strong>the</strong> <strong>Go</strong> <strong>Mic</strong><br />
Install<strong>in</strong>g <strong>the</strong> <strong>Go</strong> <strong>Mic</strong> is a simple procedure<br />
that takes just a few m<strong>in</strong>utes. S<strong>in</strong>ce <strong>the</strong> <strong>Go</strong><br />
<strong>Mic</strong> is USB compliant, you can use ei<strong>the</strong>r<br />
a MAC or PC, connect <strong>the</strong> <strong>in</strong>cluded USB<br />
cable and plug and play. You will be able<br />
to control your <strong>Go</strong> <strong>Mic</strong> us<strong>in</strong>g <strong>the</strong> standard<br />
audio <strong>in</strong>terface controls <strong>in</strong> <strong>the</strong> MAC or<br />
W<strong>in</strong>dows operat<strong>in</strong>g system. You will f<strong>in</strong>d<br />
detailed <strong>in</strong>structions on sett<strong>in</strong>g up with<br />
MAC OS and W<strong>in</strong>dows <strong>in</strong> <strong>the</strong> follow<strong>in</strong>g<br />
sections of this manual.<br />
Gett<strong>in</strong>g Started with W<strong>in</strong>dows XP<br />
1. The first time you plug <strong>the</strong> <strong>Go</strong> <strong>Mic</strong> <strong>in</strong>to<br />
a USB port, W<strong>in</strong>dows will <strong>in</strong>stall <strong>the</strong><br />
universal drivers for that port. A balloon<br />
tip will pop up, tell<strong>in</strong>g you it has “Found<br />
new Hardware” (figure 1).<br />
2. When it is f<strong>in</strong>ished <strong>in</strong>stall<strong>in</strong>g <strong>the</strong> drivers,<br />
it will say “Your new hardware is <strong>in</strong>stalled<br />
and ready to use” (figure 2).<br />
Note: This balloon will not pop up aga<strong>in</strong> for<br />
<strong>the</strong> same USB port.<br />
Figure 1<br />
Figure 2<br />
<br />
Figure 3
Figure 4<br />
Figure 5<br />
Install<strong>in</strong>g <strong>the</strong> <strong>Go</strong> <strong>Mic</strong><br />
3. To set <strong>the</strong> <strong>Go</strong> <strong>Mic</strong> as your default device<br />
for sound playback and record<strong>in</strong>g, or<br />
to change its sett<strong>in</strong>gs, click <strong>the</strong> Start<br />
button, click Control Panel and <strong>the</strong>n<br />
click Sounds and Audio Devices.<br />
Under <strong>the</strong> Audio tab, you can select <strong>the</strong><br />
<strong>Samson</strong> <strong>Go</strong><strong>Mic</strong> from <strong>the</strong> drop-down<br />
menus. (figure 3).<br />
4. To set <strong>the</strong> ga<strong>in</strong> of <strong>the</strong> microphone,<br />
click <strong>the</strong> Volume button <strong>in</strong> <strong>the</strong> Sound<br />
record<strong>in</strong>g section to make <strong>the</strong><br />
<strong>Mic</strong>rophone slider appear (figure 4). It<br />
will say “<strong>Samson</strong> <strong>Go</strong> <strong>Mic</strong>” <strong>in</strong> <strong>the</strong> status<br />
bar at <strong>the</strong> bottom. Mov<strong>in</strong>g this slider will<br />
adjust <strong>the</strong> analog amplifier circuitry <strong>in</strong><br />
<strong>the</strong> microphone.<br />
5. To set <strong>the</strong> direct monitor<strong>in</strong>g level or <strong>the</strong><br />
playback volume <strong>in</strong> <strong>the</strong> headphones,<br />
click <strong>the</strong> Volume button <strong>in</strong> <strong>the</strong> Sound<br />
playback section <strong>in</strong>stead. Adjust<strong>in</strong>g <strong>the</strong><br />
Speaker slider on <strong>the</strong> left changes <strong>the</strong><br />
headphone level (figure 5). To turn off<br />
<strong>the</strong> zero-latency hardware monitor<strong>in</strong>g<br />
direct monitor<strong>in</strong>g (if you want to use<br />
software play-through with effects<br />
<strong>in</strong>stead), click
Install<strong>in</strong>g <strong>the</strong> <strong>Go</strong> <strong>Mic</strong><br />
<strong>the</strong> Mute checkbox <strong>in</strong> <strong>the</strong> <strong>Mic</strong>rophone<br />
section on <strong>the</strong> right. (If <strong>the</strong> <strong>Mic</strong>rophone<br />
section does not appear at first, click<br />
Options and <strong>the</strong>n Properties (figure<br />
6), and click <strong>the</strong> checkbox next to<br />
<strong>Mic</strong>rophone. (Figure 7)<br />
6. To prevent system sounds from com<strong>in</strong>g<br />
through <strong>the</strong> <strong>Go</strong> <strong>Mic</strong>, select a different<br />
sound card for <strong>the</strong> system default, and<br />
<strong>the</strong>n choose <strong>the</strong> <strong>Go</strong> <strong>Mic</strong> manually with<strong>in</strong><br />
your DAW software.<br />
Figure 6<br />
Figure 7
Gett<strong>in</strong>g Started with W<strong>in</strong>dows Vista<br />
1. The first time you plug <strong>the</strong> <strong>Go</strong> <strong>Mic</strong> <strong>in</strong>to a<br />
USB port, W<strong>in</strong>dows Vista will <strong>in</strong>stall <strong>the</strong><br />
universal drivers for that port. A balloon<br />
tip will pop up, tell<strong>in</strong>g you it has “Found<br />
new Hardware”.<br />
2. When it is f<strong>in</strong>ished <strong>in</strong>stall<strong>in</strong>g <strong>the</strong> drivers,<br />
it will say “Your new hardware is <strong>in</strong>stalled<br />
and ready to use”.<br />
Note: This balloon will not pop up aga<strong>in</strong> for <strong>the</strong><br />
same USB port.<br />
3. To set <strong>the</strong> <strong>Go</strong> <strong>Mic</strong> as your default device<br />
for sound playback and record<strong>in</strong>g, or to<br />
change its sett<strong>in</strong>gs, click <strong>the</strong> Start button,<br />
click Control Panel and <strong>the</strong>n click Sound.<br />
Under <strong>the</strong> Playback and Record<strong>in</strong>g tabs,<br />
you can select <strong>the</strong> <strong>Samson</strong> <strong>Go</strong><strong>Mic</strong> from <strong>the</strong><br />
menus and use <strong>the</strong> Set Default button to<br />
set it as <strong>the</strong> default device. (figure 8).<br />
4. To set <strong>the</strong> ga<strong>in</strong> of <strong>the</strong> microphone, make<br />
sure <strong>the</strong> <strong>Samson</strong> <strong>Go</strong><strong>Mic</strong> is selected <strong>in</strong> <strong>the</strong><br />
Record<strong>in</strong>g tab and click <strong>the</strong> Properties<br />
button. Under <strong>the</strong> Levels tab, move <strong>the</strong><br />
<strong>Mic</strong>rophone slider to adjust <strong>the</strong> analog<br />
amplifier circuitry <strong>in</strong> <strong>the</strong> microphone<br />
(figure 9).<br />
Install<strong>in</strong>g <strong>the</strong> <strong>Go</strong> <strong>Mic</strong><br />
Figure 8<br />
<br />
Figure 9
Install<strong>in</strong>g <strong>the</strong> <strong>Go</strong> <strong>Mic</strong><br />
5. To set <strong>the</strong> direct monitor<strong>in</strong>g level or <strong>the</strong><br />
playback volume <strong>in</strong> <strong>the</strong> headphones,<br />
click <strong>the</strong> Properties button <strong>in</strong> <strong>the</strong><br />
Playback tab <strong>in</strong>stead, and open <strong>the</strong><br />
Levels tab. Adjust<strong>in</strong>g <strong>the</strong> Speakers<br />
slider changes <strong>the</strong> headphone level. To<br />
turn off <strong>the</strong> zero-latency hardware direct<br />
monitor<strong>in</strong>g (if you want to use software<br />
play-through with effects <strong>in</strong>stead), click<br />
<strong>the</strong> Mute button (speaker symbol) <strong>in</strong><br />
<strong>the</strong> right of <strong>the</strong> <strong>Mic</strong>rophone section<br />
(figure11).<br />
Figure 10<br />
10<br />
Figure 11
Gett<strong>in</strong>g Started with MAC OS X<br />
The follow<strong>in</strong>g example is for sett<strong>in</strong>g up <strong>the</strong> <strong>Go</strong><br />
<strong>Mic</strong> <strong>in</strong> MAC OS X .<br />
1. To start us<strong>in</strong>g <strong>the</strong> <strong>Samson</strong> <strong>Go</strong> <strong>Mic</strong>, just plug<br />
it <strong>in</strong>. The LED will light to <strong>in</strong>dicate it is receiv<strong>in</strong>g<br />
USB power. The MAC will recognize<br />
<strong>the</strong> USB audio device and automatically<br />
<strong>in</strong>stall a universal driver.<br />
2. To select <strong>the</strong> <strong>Go</strong> <strong>Mic</strong> as <strong>the</strong> computer’s audio<br />
<strong>in</strong>put, open <strong>the</strong> System Preferences from<br />
<strong>the</strong> dock or <strong>the</strong> ma<strong>in</strong> Apple Menu (figure<br />
12).<br />
Plug and Play - Some MAC OS DAW’s, like Apple’s<br />
Garage band, will let you plug and play without<br />
go<strong>in</strong>g to <strong>the</strong> Sound preference set up. When you<br />
plug <strong>the</strong> <strong>Go</strong> <strong>Mic</strong> <strong>in</strong>to <strong>the</strong> USB port you’ll see a<br />
dialog box that will ask you if you want to select<br />
<strong>the</strong> <strong>Go</strong> <strong>Mic</strong>. Select yes and you’re ready to go.<br />
3. Next open <strong>the</strong> Sound preference (figure 13).<br />
4. Now, click <strong>in</strong> <strong>the</strong> Input tab and select <strong>Go</strong><br />
<strong>Mic</strong> (figure 14).<br />
5. To set <strong>the</strong> ga<strong>in</strong> of <strong>the</strong> microphone, adjust<br />
<strong>the</strong> Input volume slider at <strong>the</strong> bottom of <strong>the</strong><br />
Sound dialog box.<br />
6. Next, click <strong>in</strong> <strong>the</strong> Output tab and select <strong>Go</strong><br />
<strong>Mic</strong> .<br />
Install<strong>in</strong>g <strong>the</strong> <strong>Go</strong> <strong>Mic</strong><br />
<strong>Go</strong> <strong>Mic</strong><br />
Figure 12<br />
Figure 13<br />
Figure 14<br />
11
Install<strong>in</strong>g <strong>the</strong> <strong>Go</strong> <strong>Mic</strong><br />
7. To set <strong>the</strong> playback volume <strong>in</strong> <strong>the</strong><br />
headphones, adjust <strong>the</strong> Output<br />
volume slider at <strong>the</strong> bottom of <strong>the</strong><br />
Sound dialog box (figure 15).<br />
At this po<strong>in</strong>t you can beg<strong>in</strong> us<strong>in</strong>g your<br />
microphone with most any audio<br />
record<strong>in</strong>g software, but you need to select<br />
it as an <strong>in</strong>put and output device with<strong>in</strong><br />
<strong>the</strong> DAW. When select<strong>in</strong>g <strong>the</strong> <strong>in</strong>puts and<br />
outputs just look for and select <strong>the</strong> <strong>Go</strong> <strong>Mic</strong>.<br />
When record<strong>in</strong>g <strong>in</strong> your DAW with<br />
monitor<strong>in</strong>g turned on, you may<br />
experience a delay on <strong>the</strong> signal<br />
playback, commonly know as latency.<br />
The amount of latency depends on<br />
<strong>the</strong> speed of your computer, available<br />
memory and <strong>the</strong> number of tracks you<br />
are record<strong>in</strong>g. You can set <strong>the</strong> <strong>Go</strong> <strong>Mic</strong><br />
to Direct Monitor mode to listen to<br />
<strong>the</strong> signal directly off <strong>the</strong> <strong>in</strong>put of <strong>the</strong><br />
microphone to elim<strong>in</strong>ate <strong>the</strong> latency.<br />
Us<strong>in</strong>g <strong>the</strong> Direct Monitor<br />
1. To turn direct monitor<strong>in</strong>g on or off,<br />
open <strong>the</strong> Audio/MIDI Setup (figure<br />
16) utility located <strong>in</strong> <strong>the</strong> Utility folder<br />
<strong>in</strong>side <strong>the</strong> Applications folder.<br />
2. Now click <strong>the</strong> checkbox <strong>in</strong> <strong>the</strong> Thru<br />
column <strong>in</strong> Audio/MIDI Setup.<br />
12<br />
<strong>Go</strong> <strong>Mic</strong><br />
Figure 15<br />
Figure 16
<strong>Go</strong> <strong>Mic</strong> Quick Start<br />
You will f<strong>in</strong>d a detailed description of <strong>the</strong> <strong>Go</strong><br />
<strong>Mic</strong>’s controls and functions <strong>in</strong> <strong>the</strong> follow<strong>in</strong>g<br />
sections of this manual. However, if you<br />
can’t wait to get started, you can follow this<br />
quick start guide. Before you get go<strong>in</strong>g it’s<br />
recommended that you follow <strong>the</strong> <strong>in</strong>structions<br />
on <strong>in</strong>stall<strong>in</strong>g <strong>the</strong> <strong>Go</strong> <strong>Mic</strong> with ei<strong>the</strong>r<br />
W<strong>in</strong>dows or OS Mac <strong>in</strong> <strong>the</strong> previous sections<br />
of this manual. Once you confirm <strong>the</strong> <strong>Go</strong> <strong>Mic</strong><br />
is connected to your computer properly, it<br />
will be easy to start record<strong>in</strong>g. The more you<br />
learn about <strong>Go</strong> <strong>Mic</strong>, <strong>the</strong> more you’ll discover<br />
its versatility and powerful features.<br />
There are many ways to use <strong>the</strong> microphone,<br />
and our quick start example is for a typical<br />
set-up for record<strong>in</strong>g vocals.<br />
Just follow <strong>the</strong> simple steps below to start<br />
record<strong>in</strong>g.<br />
1. Unfold <strong>the</strong> <strong>Go</strong> <strong>Mic</strong>, press <strong>the</strong> clip <strong>in</strong> and set<br />
<strong>the</strong> microphone on <strong>the</strong> top of your laptop<br />
screen. If you prefer, you can position <strong>the</strong><br />
<strong>Go</strong> <strong>Mic</strong> on your desktop by us<strong>in</strong>g back of<br />
<strong>the</strong> clip as a desk stand.<br />
2. Set <strong>the</strong> <strong>Go</strong> <strong>Mic</strong>’s pattern switch to Cardioid<br />
and be sure to face <strong>the</strong> front side, with <strong>the</strong><br />
<strong>Samson</strong> logo, towards <strong>the</strong> vocalist.<br />
Operat<strong>in</strong>g <strong>the</strong> <strong>Go</strong> <strong>Mic</strong><br />
13
Operat<strong>in</strong>g <strong>the</strong> <strong>Go</strong> <strong>Mic</strong><br />
<strong>Go</strong> <strong>Mic</strong> Quick Start - cont<strong>in</strong>ued<br />
3. Next, connect your headphones to <strong>the</strong> PHONES output located on <strong>the</strong> right side of <strong>the</strong><br />
<strong>Go</strong> <strong>Mic</strong>.<br />
4. Plug <strong>the</strong> m<strong>in</strong>i-B size (small) end of <strong>the</strong> <strong>in</strong>cluded USB cable <strong>in</strong>to <strong>the</strong> USB socket on <strong>the</strong><br />
right side of <strong>the</strong> <strong>Go</strong> <strong>Mic</strong>.<br />
5. Now, plug <strong>the</strong> o<strong>the</strong>r end of <strong>the</strong> USB cable <strong>in</strong>to an available USB port on your<br />
computer.<br />
Note: Be sure to check <strong>the</strong> <strong>in</strong>stallation guide for W<strong>in</strong>dows and Mac OS to confirm your<br />
computer has recognized <strong>the</strong> <strong>Go</strong> <strong>Mic</strong>. Also, make sure your computer’s output level is set<br />
to maximum for full volume <strong>in</strong> <strong>the</strong> <strong>Go</strong> <strong>Mic</strong> headphone monitor.<br />
6. Next, launch your DAW, turn down <strong>the</strong> ma<strong>in</strong> output level and select <strong>the</strong> <strong>Go</strong> <strong>Mic</strong> for<br />
<strong>the</strong> <strong>in</strong>put and outputs.<br />
7. Set up a mono record track <strong>in</strong> your DAW for <strong>the</strong> vocal track.<br />
8. At this po<strong>in</strong>t you want to set <strong>the</strong> level of <strong>the</strong> <strong>Go</strong> <strong>Mic</strong> and <strong>the</strong>re are few ways to do<br />
this depend<strong>in</strong>g on your exact computer set up. You can set <strong>the</strong> microphone’s <strong>in</strong>put<br />
level <strong>in</strong> <strong>the</strong> Sound playback <strong>in</strong> W<strong>in</strong>dows or <strong>in</strong> <strong>the</strong> Sound dialog box <strong>in</strong> <strong>the</strong> System<br />
Preferences if you are us<strong>in</strong>g <strong>the</strong> MAC OS.<br />
9. Set level of <strong>the</strong> microphone by rais<strong>in</strong>g <strong>the</strong> Input level control <strong>in</strong> your DAW or system<br />
to about half way up. If you see <strong>the</strong> Power/Peak LED light red, your sgnal will be<br />
distorted. Turn <strong>the</strong> MIC level control down until it does not flash red.<br />
10. Next, put on your headphones, speak or s<strong>in</strong>g <strong>in</strong>to <strong>the</strong> mic and <strong>the</strong>n raise <strong>the</strong> DAW’s<br />
output level control until you reach a comfortable listen<strong>in</strong>g level.<br />
Now, follow <strong>the</strong> <strong>in</strong>structions of your DAW software to enable <strong>the</strong> track for record<strong>in</strong>g and<br />
you’re ready to record.<br />
14
Operat<strong>in</strong>g <strong>the</strong> <strong>Go</strong> <strong>Mic</strong><br />
A Note on Power<strong>in</strong>g <strong>the</strong> <strong>Go</strong> <strong>Mic</strong><br />
The <strong>Go</strong> <strong>Mic</strong> is a condenser microphone, and like all condenser microphones, it has<br />
<strong>in</strong>ternal electronics that require an active power supply. Traditional studio condensers<br />
are almost always powered by a Phantom Power supply which is usually derived from<br />
<strong>the</strong> mix<strong>in</strong>g console. The <strong>Go</strong> <strong>Mic</strong> receives its power from <strong>the</strong> USB bus. Simply connect<br />
<strong>the</strong> microphone to <strong>the</strong> computer’s USB port and <strong>the</strong> microphone is ready to operate.<br />
The <strong>Go</strong> <strong>Mic</strong> features a power on LED, which will illum<strong>in</strong>ate when USB power is present.<br />
Sett<strong>in</strong>g Up <strong>the</strong> Signal Level<br />
You can adjust <strong>the</strong> <strong>Go</strong> <strong>Mic</strong>’s <strong>in</strong>ternal analog <strong>in</strong>put ga<strong>in</strong> stage by us<strong>in</strong>g <strong>the</strong> your software<br />
DAW or operat<strong>in</strong>g system. The purpose of <strong>the</strong> level, or ga<strong>in</strong>, controls are to optimize<br />
<strong>the</strong> amount of good signal relative to any associated noise. A good mic or <strong>in</strong>strument<br />
pre-amplifier, like <strong>the</strong> one <strong>in</strong>side <strong>Go</strong> <strong>Mic</strong>, will also have a PEAK <strong>in</strong>dicator to show when<br />
<strong>the</strong> <strong>in</strong>put signal is clipp<strong>in</strong>g. To set a good level on <strong>the</strong> mic, set <strong>the</strong> <strong>Go</strong> <strong>Mic</strong> up <strong>in</strong> front<br />
of <strong>the</strong> desired sound source and slowly raise <strong>the</strong> DAW’s or operat<strong>in</strong>g system’s <strong>in</strong>put<br />
ga<strong>in</strong> control until you see <strong>the</strong> CLIP or Peak <strong>in</strong>dicator light up. Then, turn <strong>the</strong> <strong>in</strong>put trim<br />
control down until <strong>the</strong> <strong>in</strong>dicator does not light any more. Once you set <strong>the</strong> <strong>in</strong>put level<br />
control you shouldn’t need to change <strong>the</strong>m dur<strong>in</strong>g record<strong>in</strong>g. Use <strong>the</strong> level controls on<br />
<strong>the</strong> DAW to set <strong>the</strong> balance between <strong>the</strong> mic and stereo mix.<br />
Stand Mount<strong>in</strong>g <strong>the</strong> <strong>Go</strong> <strong>Mic</strong><br />
The <strong>Go</strong> <strong>Mic</strong> can be mounted to a standard microphone stand like <strong>the</strong> <strong>Samson</strong> BT4, BL3<br />
or MB1 us<strong>in</strong>g <strong>the</strong> <strong>in</strong>cluded nut adapter. If you are us<strong>in</strong>g a U.S. 5/8” mic stand, you will<br />
need to screw on <strong>the</strong> <strong>in</strong>cluded Euro stand adapter. Then <strong>in</strong>stall <strong>the</strong> nut spac<strong>in</strong>g adapter.<br />
Simply screw <strong>the</strong> <strong>Go</strong> <strong>Mic</strong> on to your mic stand or boom arm. Now, us<strong>in</strong>g <strong>the</strong> ball jo<strong>in</strong>t,<br />
adjust <strong>the</strong> microphone to <strong>the</strong> desired angle.<br />
15
Operat<strong>in</strong>g <strong>the</strong> <strong>Go</strong> <strong>Mic</strong><br />
Polar Patterns<br />
The most important characteristic of any microphone is its directionality or “pick-up<br />
pattern”. There are three basic categories of pick up patterns; omni, bidirectional (or<br />
figure 8) and unidirectional. Omni mics pick up sound from all directions, bidirectional<br />
mics pick up <strong>the</strong> sound directly <strong>in</strong> front and back of <strong>the</strong> microphone while reject<strong>in</strong>g<br />
<strong>the</strong> sound on <strong>the</strong> left and right sides, and unidirectional (cardioid) mics pick up <strong>the</strong><br />
sound <strong>in</strong> front of <strong>the</strong> microphone. While bidirectional microphones are very useful for<br />
a variety of applications, a majority of “mik<strong>in</strong>g” situations <strong>in</strong> record<strong>in</strong>g require cardioid<br />
or omni microphones. The cardioid pick up pattern allows for better separation of<br />
<strong>in</strong>struments <strong>in</strong> <strong>the</strong> studio and more control over feedback <strong>in</strong> live sound re<strong>in</strong>forcement.<br />
When positioned correctly, <strong>the</strong> cardioid pick-up pattern allows you to pick up more of<br />
<strong>the</strong> sound you want and less of <strong>the</strong> sound you don’t want. If you need to pick up sound<br />
from all around, for example when record<strong>in</strong>g a meet<strong>in</strong>g around a conference table,<br />
<strong>the</strong> Omni pattern is ideal. When <strong>the</strong> <strong>Go</strong> <strong>Mic</strong> is set to Omni pattern it will pick up sound<br />
<strong>in</strong> a 360-degree pattern. This can also be used to pick up <strong>the</strong> ambient room sound for<br />
natural reverb when record<strong>in</strong>g acoustic <strong>in</strong>struments.<br />
<strong>Mic</strong>rophone Placement<br />
In order to maximize <strong>the</strong> sound quality, you must pay careful attention to <strong>the</strong><br />
placement of your <strong>Go</strong> <strong>Mic</strong> and how it is positioned for <strong>the</strong> <strong>in</strong>strument or vocalist<br />
that you are mik<strong>in</strong>g. All microphones, especially cardioid microphones, exhibit a<br />
phenomenon known as “proximity effect.” Very simply put, proximity effect is a<br />
result<strong>in</strong>g change <strong>in</strong> <strong>the</strong> frequency response of a microphone based on <strong>the</strong> position<br />
of <strong>the</strong> mic capsule relative to <strong>the</strong> sound source. In general, as <strong>the</strong> microphone moves<br />
closer to <strong>the</strong> sound source, <strong>the</strong> bass response <strong>in</strong>creases.You can also make subtle<br />
changes to <strong>the</strong> frequency response by mak<strong>in</strong>g m<strong>in</strong>or adjustment to <strong>the</strong> position.<br />
Specifically, when you po<strong>in</strong>t a cardioid mic directly at <strong>the</strong> sound source (on axis) you<br />
16
Operat<strong>in</strong>g <strong>the</strong> <strong>Go</strong> <strong>Mic</strong><br />
will get <strong>the</strong> best frequency response, however when you start po<strong>in</strong>t<strong>in</strong>g <strong>the</strong><br />
microphone slightly away (off axis) you will notice <strong>the</strong> high frequency response<br />
dropp<strong>in</strong>g off and <strong>the</strong> microphone will start to sound like it has more bass and less<br />
highs.<br />
For most vocal applications you’ll want to position <strong>the</strong> microphone directly <strong>in</strong> front<br />
of <strong>the</strong> artist about 4 to 18 <strong>in</strong>ches. If you are close mik<strong>in</strong>g a vocal, set <strong>the</strong> microphone<br />
to a slight angle to reduce p-popp<strong>in</strong>g. The same may be true for mik<strong>in</strong>g <strong>in</strong>struments,<br />
however, you can make some pretty amaz<strong>in</strong>g equalization adjustments by slightly<br />
chang<strong>in</strong>g <strong>the</strong> angle of <strong>the</strong> capsule to <strong>the</strong> sound source. This can be a very useful<br />
technique <strong>in</strong> captur<strong>in</strong>g <strong>the</strong> optimum sound of drum set, acoustic guitar, piano or o<strong>the</strong>r<br />
<strong>in</strong>struments <strong>in</strong> a live room or sound stage. Experimentation and experience are <strong>the</strong><br />
best teachers <strong>in</strong> gett<strong>in</strong>g good sounds, so plug <strong>in</strong>!<br />
P-Popp<strong>in</strong>g<br />
P-popp<strong>in</strong>g is that annoy<strong>in</strong>g pop that you can get when <strong>the</strong> microphone diaphragm<br />
gets a blast of air from a vocalist pronounc<strong>in</strong>g words with <strong>the</strong> letter “P” <strong>in</strong>cluded. There<br />
are a few ways to deal with <strong>the</strong> problem <strong>in</strong>clud<strong>in</strong>g us<strong>in</strong>g an external pop filter. Some<br />
famous eng<strong>in</strong>eers have relied on an old nylon stock<strong>in</strong>g over a bent clo<strong>the</strong>s hanger,<br />
which actually works very well. As mentioned above, you can also try plac<strong>in</strong>g <strong>the</strong><br />
microphone slightly off axis (on a slight angle) from <strong>the</strong> vocalist. This can often solve<br />
<strong>the</strong> problem without us<strong>in</strong>g an external pop filter. However, <strong>the</strong> simplest, most reliable<br />
way to reduce P-popp<strong>in</strong>g (without <strong>the</strong> bad smell of old nylons) is to use a pop filter<br />
attached <strong>the</strong> microphone stand like <strong>the</strong> <strong>Samson</strong> PS-01. Us<strong>in</strong>g a pop filter also makes it<br />
easy to ma<strong>in</strong>ta<strong>in</strong> a good level by keep<strong>in</strong>g <strong>the</strong> vocalist at a constant distance from <strong>the</strong><br />
microphone.<br />
17
Application Notes<br />
The <strong>Go</strong> <strong>Mic</strong> is a great microphone choice for many <strong>in</strong>strument mik<strong>in</strong>g situations. Below is a<br />
brief guide on us<strong>in</strong>g <strong>the</strong> <strong>Go</strong> <strong>Mic</strong> <strong>in</strong> some typical applications:<br />
Vocals<br />
Position <strong>the</strong> microphone directly <strong>in</strong> front of <strong>the</strong> artist so that <strong>the</strong> microphone grill is<br />
approximately 4 to 18 <strong>in</strong>ches away. When close mik<strong>in</strong>g vocals, use of an external pop filter<br />
like <strong>the</strong> <strong>Samson</strong> PS01 is strongly recommended. You can use <strong>the</strong> Cardioid pattern to record a<br />
group of vocalists by position<strong>in</strong>g <strong>the</strong>m around <strong>the</strong> front of <strong>the</strong> microphone. Just remember<br />
that <strong>the</strong> extreme sides of <strong>the</strong> microphone pick up less with less high frequency response, so<br />
have <strong>the</strong>m stand toge<strong>the</strong>r tight, and/or move <strong>the</strong> microphone from one to two feet away<br />
from <strong>the</strong> group to pick up more room sound. You can also set <strong>the</strong> pattern to Omni mode<br />
and have a group of vocalist <strong>in</strong> a circle around <strong>the</strong> microphone.<br />
Acoustic Guitar<br />
There are a variety of ways that <strong>the</strong> <strong>Go</strong> <strong>Mic</strong> can be used to mic an acoustic guitar. The<br />
microphone placement will depend on <strong>the</strong> type of <strong>in</strong>strument and what k<strong>in</strong>d of sound<br />
you’re look<strong>in</strong>g to capture, for example <strong>the</strong> tonal quality you want to focus on, and how much<br />
f<strong>in</strong>ger slide or pick noise you may or may not want. When mik<strong>in</strong>g a standard steel str<strong>in</strong>g<br />
acoustic, a good place to start is with <strong>the</strong> microphone positioned and po<strong>in</strong>t<strong>in</strong>g towards <strong>the</strong><br />
end of <strong>the</strong> f<strong>in</strong>gerboard at a distance of about 6 <strong>in</strong>ches to 2 feet away from <strong>the</strong> <strong>in</strong>strument.<br />
You can experiment by mov<strong>in</strong>g <strong>the</strong> microphone slightly <strong>in</strong> <strong>the</strong> direction of <strong>the</strong> sound hole,<br />
which will produce more low frequencies, or move it <strong>in</strong> <strong>the</strong> direction of <strong>the</strong> f<strong>in</strong>gerboard to<br />
capture more high-end or to remove any unwanted boom<strong>in</strong>ess. For nylon str<strong>in</strong>g acoustic,<br />
try position<strong>in</strong>g <strong>the</strong> microphone above <strong>the</strong> bridge to emphasize more of <strong>the</strong> attack from <strong>the</strong><br />
sound of <strong>the</strong> f<strong>in</strong>ger pick<strong>in</strong>g, or for less, move <strong>the</strong> mic closer to <strong>the</strong> sound hole. If you have a<br />
pair of <strong>Go</strong> <strong>Mic</strong>s, try one positioned at <strong>the</strong> f<strong>in</strong>gerboard and <strong>the</strong> second over <strong>the</strong> sound hole.<br />
18
Application Notes<br />
Piano<br />
You can achieve outstand<strong>in</strong>g results us<strong>in</strong>g <strong>the</strong> <strong>Go</strong> <strong>Mic</strong> on acoustic piano. Several placement<br />
approaches can be used depend<strong>in</strong>g on <strong>the</strong> size of <strong>the</strong> piano, and <strong>the</strong> type of sound you are<br />
look<strong>in</strong>g to record. When mik<strong>in</strong>g a Grand Piano, (for an ambient sound like that used <strong>in</strong> a<br />
classical recital), a <strong>Go</strong> <strong>Mic</strong> can be positioned directly <strong>in</strong> front of <strong>the</strong> <strong>in</strong>strument. Open <strong>the</strong> lid<br />
to <strong>the</strong> full position and place <strong>the</strong> microphone five to twenty feet <strong>in</strong> front of <strong>the</strong> <strong>in</strong>strument.<br />
For a more contemporary ensemble sound, place two <strong>Go</strong> <strong>Mic</strong>s <strong>in</strong> <strong>the</strong> piano, position<strong>in</strong>g one<br />
over <strong>the</strong> low str<strong>in</strong>gs and <strong>the</strong> o<strong>the</strong>r over <strong>the</strong> high str<strong>in</strong>gs.<br />
Overhead Drum Kit<br />
Because of its extended high frequency response and fast transient response, <strong>the</strong> <strong>Go</strong> <strong>Mic</strong><br />
performs outstand<strong>in</strong>gly when used as an overhead cymbal microphone. You can position<br />
one <strong>Go</strong> <strong>Mic</strong> on a boom mic stand directly above <strong>the</strong> kit po<strong>in</strong>t<strong>in</strong>g from front to back. For<br />
stereo mik<strong>in</strong>g, use two <strong>Go</strong> <strong>Mic</strong>’s placed over <strong>the</strong> drum set at a distance of three to five feet.<br />
You can experiment with <strong>the</strong> exact placement depend<strong>in</strong>g on <strong>the</strong> size of <strong>the</strong> room and<br />
whe<strong>the</strong>r you’re look<strong>in</strong>g for an ambient or close-miked sound. In general, when mik<strong>in</strong>g<br />
a drum kit, it’s a good idea to start with <strong>the</strong> overhead mics. Even though you use <strong>the</strong><br />
overhead mics mostly for <strong>the</strong> cymbals, you can get <strong>the</strong> entire kit to sound great with just<br />
one overhead. Then it will be easier to just br<strong>in</strong>g up your <strong>in</strong>dividual mics for more attack and<br />
thickness <strong>in</strong> <strong>the</strong> overall sound.<br />
19
<strong>Go</strong> <strong>Mic</strong> Specifications<br />
<strong>Go</strong> <strong>Mic</strong> Frequency Response - Cardioid<br />
Polar Pattern - Cardioid<br />
<strong>Go</strong> <strong>Mic</strong> Frequency Response - Omni<br />
Polar Pattern - Omni<br />
20
<strong>Go</strong> <strong>Mic</strong> Specifications<br />
<strong>Go</strong> <strong>Mic</strong> Specifications<br />
Polar pattern<br />
Cardioid and Omni<br />
Frequency Response<br />
Cardioid<br />
80Hz - 18kHZ<br />
Omni<br />
20Hz - 20kHZ<br />
Element type<br />
Fixed Charge electret<br />
Element Diameter<br />
10mm<br />
Diaphragm thickness<br />
Cardioid<br />
4 microns<br />
Omni<br />
2 microns<br />
Sensitivity<br />
-47 +/- 2dB/Pa<br />
SPL<br />
121 db<br />
Weight<br />
0.23 lbs. (.105 kg)<br />
Dimensions 2.8” x 1.7” x 23”x 0.9”<br />
70.5 mm x 43.5mm x 23mm <br />
Specifications subject to change without notice.<br />
21
<strong>Samson</strong> Technologies Corp.<br />
45 Gilp<strong>in</strong> Avenue<br />
Hauppauge, New York 11788-8816<br />
Phone: 1-800-3-SAMSON (1-800-372-6766)<br />
Fax: 631-784-2201<br />
www.samsontech.com