Quick Installation Guide NAS 3.0 Adapter - Addonics
Quick Installation Guide NAS 3.0 Adapter - Addonics
Quick Installation Guide NAS 3.0 Adapter - Addonics

Create successful ePaper yourself
Turn your PDF publications into a flip-book with our unique Google optimized e-Paper software.
T E C H N O L O G I E S<br />
<strong>Quick</strong> <strong>Installation</strong> <strong>Guide</strong><br />
<strong>NAS</strong> <strong>3.0</strong> <strong>Adapter</strong><br />
(<strong>NAS</strong>30U2)<br />
www.addonics.com<br />
v5.1.11<br />
Technical Support<br />
If you need any assistance to get your unit functioning properly, please have your<br />
product information ready and contact <strong>Addonics</strong> Technical Support at:<br />
Hours: 8:30 am - 6:00 pm PST<br />
Phone: 408-453-6212<br />
Email: http://www.addonics.com/support/query/
For more detailed information on setting up the <strong>NAS</strong>30U2 adapter, refer to the<br />
User Manual located on the CD that came with the device.<br />
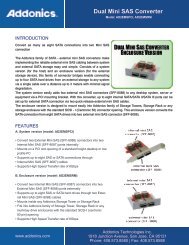
The <strong>NAS</strong> <strong>3.0</strong> adapter is a flexible, economical and powerful unit for your Network.<br />
Follow the instructions to help you connect, setup and configure it.<br />
Note: Any external USB storage device that you connect to the <strong>NAS</strong> <strong>3.0</strong> adapter<br />
is required to be pre-formatted with either NTFS, FAT32 or FAT64. When the external<br />
USB storage device is connected to the <strong>NAS</strong> <strong>3.0</strong> adapter , the adapter creates a<br />
configuration file and a default Public folder.<br />
If you are connecting an external USB drive with data on it, all the data will remain on<br />
the drive but the <strong>NAS</strong> cannot see those data unless transferred to the Public folder.<br />
Network Environment<br />
There are 3 different setup conditions you can choose:<br />
A. Setup <strong>NAS</strong>30U2 as a DHCP Client:<br />
If the <strong>NAS</strong>30U2 is connected to a LAN network with an active<br />
DHCP server, it will obtain an IP address from DHCP server<br />
automatically.<br />
B. Setup <strong>NAS</strong>30U2 as DHCP Server:<br />
If your LAN network does not have an active DHCP server, the<br />
<strong>NAS</strong>30U2 will immediately act as DHCP server and assign itself an<br />
IP address for installation.<br />
C. Setup <strong>NAS</strong>30U2 in Static IP environment:<br />
You first need to configure the IP address for <strong>NAS</strong>30U2 to operate<br />
in the static IP environment. For Configuring details, please refer to<br />
“LAN Config” setup page.<br />
Illustration of a <strong>NAS</strong>30U2 connected over the network<br />
www.addonics.com Technical Support (M-F 8:30am - 6:00pm PST) Phone: 408-453-6212 Email: www.addonics.com/support/query/
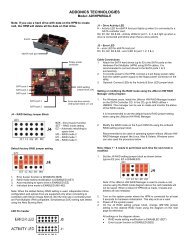
I. <strong>NAS</strong>30U2 Hardware <strong>Installation</strong><br />
5V Power Jack<br />
Access LED<br />
System LED<br />
Power LED<br />
USB Mass<br />
Storage Device<br />
(Full read/write<br />
function)<br />
Reset Button<br />
RJ45 Socket<br />
Additional USB<br />
Mass Storage (read-only) or USB Printer<br />
1. Connect external USB Storage device into USB port of the <strong>NAS</strong><br />
<strong>Adapter</strong>. Power on the USB Storage device.<br />
2. Connect LAN cable via LAN switch and Router.<br />
3. Connect 5V power adapter to power up the <strong>NAS</strong> adapter<br />
<strong>NAS</strong>30U2 connected directly to a computer’s NIC card<br />
If you connect the <strong>NAS</strong>30U2 to a computer directly, it will act as a DHCP server,<br />
assigning itself an IP address automatically and will also assign an IP address to the<br />
computer’s network card. This configuration will not enable you to see the drive on<br />
the network.<br />
<strong>NAS</strong>30U2 connected to a Router or Switch<br />
When the <strong>NAS</strong>30U2 is connected to a LAN network with an active DHCP server, it<br />
will obtain an IP address from DHCP server automatically. Or if your LAN network<br />
does not have an active DHCP server, <strong>NAS</strong>30U2 will immediately act as DHCP<br />
server and assign itself an IP address for installation<br />
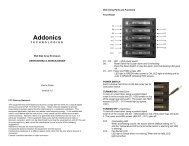
II.<br />
Search <strong>NAS</strong>30U2 using SDisk Utility<br />
1. Browse the CD enclosed in the product package. Copy and paste<br />
“SDisk Utility” in to your computer then double click the icon to start<br />
search.<br />
Note: “SDisk utility” was written with JAVA script, please make sure your computer<br />
has installed JAVA before, if not please install the JAVA JRE from the CD drive.<br />
www.addonics.com Technical Support (M-F 8:30am - 6:00pm PST) Phone: 408-453-6212 Email: www.addonics.com/support/query/
2. When <strong>NAS</strong>30U2 has been found, click “Connect” to enter web GUI<br />
utility.<br />
Open <strong>NAS</strong>30U2 web GUI by using web browser.<br />
1. Open web browser and type default host name “storage” in the<br />
search bar.<br />
2. Default login is “admin” for both User name and password. Click<br />
“OK” to enter configurations.<br />
Identification<br />
You can change and modify your host, group name and password from this page.<br />
Click “Apply” to save the setting.<br />
Host name: This is used to identify your device on the network. If you prefer<br />
a different name, type in the new name and click “Apply” to save setting.<br />
Group Name: This should be the same as your workgroup. In general, the<br />
default “WORKGROUP” will be OK. But if your workstation belongs to<br />
different workgroup, type in the correct group name to modify.<br />
For Window OS, right click on “My computer” and choose “Properties”, go to the<br />
computer name tab to see your current workgroup.<br />
If using a Mac OS system, to join a Windows workgroup, open the directory access<br />
utility (under Applications-> utilities). Select SMB and click configure to modify the<br />
settings (administrator access required to access this option.)<br />
Note: We strongly suggest you to change the password as soon as you<br />
logged in, to prevent unauthorized access.<br />
www.addonics.com Technical Support (M-F 8:30am - 6:00pm PST) Phone: 408-453-6212 Email: www.addonics.com/support/query/
LAN Configuration<br />
By default, “LAN Config” is set to “Automatic IP”. This will allow the <strong>NAS</strong>30U2 to<br />
obtain its IP address automatically. If you prefer setting it manually, select the static<br />
IP option, enter your own value and click “Apply” to confirm the new setting.<br />
To access File Server’s PUBLIC folder of <strong>NAS</strong>30U2 in Windows<br />
Click on the Windows icon located on the bottom left corner of the screen, on the<br />
“Search programs and files” \\ followed by the IP address of the <strong>NAS</strong><strong>3.0</strong> adapter.<br />
Eg:\\192.168.1.121 and press Enter key to continue.<br />
www.addonics.com Technical Support (M-F 8:30am - 6:00pm PST) Phone: 408-453-6212 Email: www.addonics.com/support/query/
Type “Guest” as username. Leave password empty. Click on OK.<br />
This will direct you to the Public folder on the <strong>NAS</strong> drive.<br />
Now you have set up the folder that you wish to share on your <strong>NAS</strong> . This folder can<br />
be access from other computer on your local network.<br />
www.addonics.com Technical Support (M-F 8:30am - 6:00pm PST) Phone: 408-453-6212 Email: www.addonics.com/support/query/
To list the <strong>NAS</strong> drive in Network Places<br />
Go to Network Places in Windows XP, under Network Tasks, click on the “Set<br />
up a home or small office network”. Follow the wizard and once completed,<br />
reboot your system.<br />
For Vista and Windows 7, enable file sharing when accessing the <strong>NAS</strong> over<br />
the network.<br />
To access Samba PUBLIC folder of <strong>NAS</strong>30U2 in Ubuntu 8.04<br />
First, using the console get the prerequisites for the samba file system:<br />
$ sudo aptitude install samba smbfs<br />
$ mkdir /mnt/<strong>NAS</strong><br />
$ sudo mount.cifs //<strong>NAS</strong>__IP_address/Public /mnt/<strong>NAS</strong> -o username=Guest<br />
www.addonics.com Technical Support (M-F 8:30am - 6:00pm PST) Phone: 408-453-6212 Email: www.addonics.com/support/query/
To access Samba PUBLIC folder of <strong>NAS</strong>30U2 in Mac OS X<br />
1. Start at the "Go" drop down menu at the top of your screen,<br />
then click "Connect to server".<br />
2. Type into the "Server Address" field 'smb://' followed by the<br />
IP address of the <strong>NAS</strong>30U2 you want to connect.<br />
3. Click the "Connect" button in the bottom right corner of the<br />
window.<br />
4. Enter in a username and password. Click the "OK" button in<br />
the bottom right hand corner of the window to finish.<br />
Note: The workgroup name needs to be the workgroup the<br />
PC belongs to. If you don't know the workgroup that the PC<br />
belongs to you can find out by right clicking on the "My<br />
Computer" desktop icon on the PC, selecting "Properties"<br />
and then selecting the "Computer Name" tab. The work<br />
group name is about half way down the window.<br />
5. Select the "share" you are after. This simply refers to a<br />
particular group of shared files. Click "OK".<br />
CONTACT US<br />
www.addonics.com<br />
Phone: 408-573-8580<br />
Fax: 408-573-8588<br />
Email: http://www.addonics.com/sales/query/