
Create successful ePaper yourself
Turn your PDF publications into a flip-book with our unique Google optimized e-Paper software.
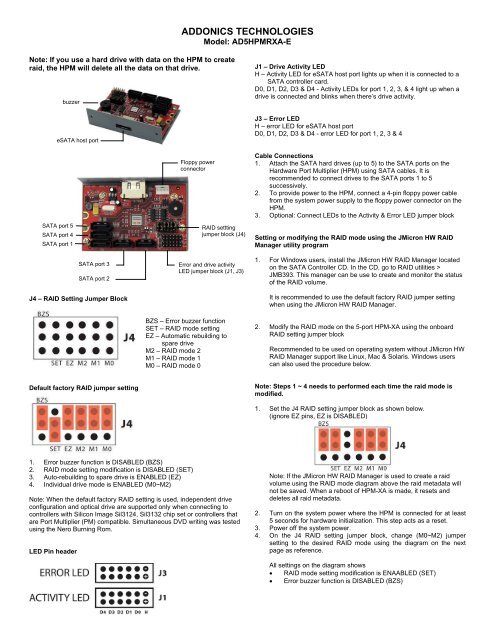
ADDONICS TECHNOLOGIES<br />
Model: AD5HPMRXA-E<br />
Note: If you use a hard drive with data on the HPM to create<br />
raid, the HPM will delete all the data on that drive.<br />
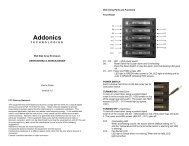
buzzer<br />
eSATA host port<br />
J1 – Drive Activity LED<br />
H – Activity LED for eSATA host port lights up when it is connected to a<br />
SATA controller card.<br />
D0, D1, D2, D3 & D4 - Activity LEDs for port 1, 2, 3, & 4 light up when a<br />
drive is connected and blinks when there’s drive activity.<br />
J3 – Error LED<br />
H – error LED for eSATA host port<br />
D0, D1, D2, D3 & D4 - error LED for port 1, 2, 3 & 4<br />
SATA port 5<br />
SATA port 4<br />
SATA port 1<br />
Floppy power<br />
connector<br />
RAID settting<br />
jumper block (J4)<br />
Cable Connections<br />
1. Attach the SATA hard drives (up to 5) to the SATA ports on the<br />
Hardware Port Multiplier (HPM) using SATA cables. It is<br />
recommended to connect drives to the SATA ports 1 to 5<br />
successively.<br />
2. To provide power to the HPM, connect a 4-pin floppy power cable<br />
from the system power supply to the floppy power connector on the<br />
HPM.<br />
3. Optional: Connect LEDs to the Activity & Error LED jumper block<br />
Setting or modifying the RAID mode using the JMicron HW RAID<br />
Manager utility program<br />
SATA port 3<br />
SATA port 2<br />
J4 – RAID Setting Jumper Block<br />
Error and drive activity<br />
LED jumper block (J1, J3)<br />
BZS – Error buzzer function<br />
SET – RAID mode setting<br />
EZ – Automatic rebuilding to<br />
spare drive<br />
M2 – RAID mode 2<br />
M1 – RAID mode 1<br />
M0 – RAID mode 0<br />
1. For Windows users, install the JMicron HW RAID Manager located<br />
on the SATA Controller CD. In the CD, go to RAID utilities ><br />
JMB393. This manager can be use to create and monitor the status<br />
of the RAID volume.<br />
It is recommended to use the default factory RAID jumper setting<br />
when using the JMicron HW RAID Manager.<br />
2. Modify the RAID mode on the 5-port HPM-XA using the onboard<br />
RAID setting jumper block<br />
Recommended to be used on operating system without JMicron HW<br />
RAID Manager support like Linux, Mac & Solaris. Windows users<br />
can also used the procedure below.<br />
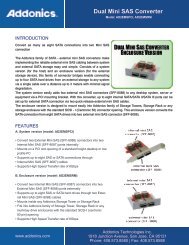
Default factory RAID jumper setting<br />
Note: Steps 1 ~ 4 needs to performed each time the raid mode is<br />
modified.<br />
1. Set the J4 RAID setting jumper block as shown below.<br />
(ignore EZ pins, EZ is DISABLED)<br />
1. Error buzzer function is DISABLED (BZS)<br />
2. RAID mode setting modification is DISABLED (SET)<br />
3. Auto-rebuilding to spare drive is ENABLED (EZ)<br />
4. Individual drive mode is ENABLED (M0~M2)<br />
Note: When the default factory RAID setting is used, independent drive<br />
configuration and optical drive are supported only when connecting to<br />
controllers with Silicon Image Sil3124, Sil3132 chip set or controllers that<br />
are Port Multiplier (PM) compatible. Simultaneous DVD writing was tested<br />
using the Nero Burning Rom.<br />
LED Pin header<br />
Note: If the JMicron HW RAID Manager is used to create a raid<br />
volume using the RAID mode diagram above the raid metadata will<br />
not be saved. When a reboot of HPM-XA is made, it resets and<br />
deletes all raid metadata.<br />
2. Turn on the system power where the HPM is connected for at least<br />
5 seconds for hardware initialization. This step acts as a reset.<br />
3. Power off the system power.<br />
4. On the J4 RAID setting jumper block, change (M0~M2) jumper<br />
setting to the desired RAID mode using the diagram on the next<br />
page as reference.<br />
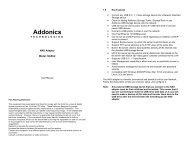
All settings on the diagram shows<br />
RAID mode setting modification is ENAABLED (SET)<br />
Error buzzer function is DISABLED (BZS)
ADDONICS TECHNOLOGIES<br />
Model: AD5HPMRXA-E<br />
RAID Setting Notes:<br />
When 2 drives are connected to the<br />
HPM-XA, and J4 is set to this setting,<br />
the 2 drives will be configured as a<br />
2-drive RAID1 array.<br />
When 4 drives are connected to the<br />
HPM-XA, the 4 drives will be<br />
configured as a 4-drive RAID10 array.<br />
Clone’s action is similar to RAID1.<br />
However, all of the hard drives will be<br />
mirrored. Clone mode is useful<br />
especially when users like to copy<br />
data from a source hard drive to the<br />
drives connected to the HPM-XA.<br />
Notes on Spare Drives<br />
Using the Easy RAID Setting (EZ)<br />
5. Power on the system power.<br />
6. Verify if the RAID array is detected by the system<br />
a. If the 5-port HPM-XA is connected to the motherboard onboard<br />
SATA, on the CMOS setup utility, the raid array will display as<br />
“<strong>Addonics</strong> H/W RAID5” if setup as a RAID5 array.<br />
b. If the 5-port HPM-XA is connected to an eSATA host controller<br />
card, on the RAID BIOS, the raid array will display as<br />
“<strong>Addonics</strong> H/W RAID0” if setup as a RAID0 array.<br />
c. If booted into Windows, in Disk Drives under Device Manager,<br />
the raid array will display as “<strong>Addonics</strong> H/W LARGE” if setup as<br />
a RAID0 array.<br />
7. Once raid array is verified, you can set back the RAID jumper setting<br />
back to default<br />
In reference to the diagram, the auto-rebuilding to spare drive is<br />
ENABLED (EZ)<br />
When EZ mode is ENABLED, the degraded RAID group will start<br />
rebuilding automatically by using the existing spare drive.<br />
* Spare drive can be either plugged before RAID building or a new drive<br />
can be plug as the spare drive when RAID rebuild is required.<br />
A. Which port acts as a spare drive?<br />
The last drive will automatically become the spare drive.<br />
For a 3-drive RAID5 with spare:<br />
Drives connected to SATA ports 1~3 belong to the active RAID5 array<br />
and drive connected to port 4 is the spare.<br />
For a 4-drive RAID10 with spare:<br />
Drives connected to SATA ports 1~4 belong to the active RAID10 array<br />
and drive connected to port 5 is the spare.<br />
or the diagram below where buzzer is ENABLED.<br />
For a 2-drive RAID1 with spare:<br />
Drives connected to SATA ports 1& 4 belong to the active RAID1 array<br />
and drive connected to port 5 is the spare.<br />
B. When will rebuild action start?<br />
When the raid fails and EZ is enabled, the HPM-XA will<br />
automatically rebuild the RAID group using the spare.<br />
When the raid fails and EZ is disabled, the HPM-XA will NOT rebuild<br />
the raid group unless you install a good drive to replace the failed<br />
drive.<br />
Note: On this setting, there is no jumper on SET.<br />
TECHNICAL SUPPORT<br />
Phone: 408-453-6212<br />
Hours:<br />
8:30 am - 6:00 pm PST<br />
Email:<br />
http://www.addonics.com/support/query/