User Guide NAS 4.0 Adapter - Addonics
User Guide NAS 4.0 Adapter - Addonics
User Guide NAS 4.0 Adapter - Addonics
You also want an ePaper? Increase the reach of your titles
YUMPU automatically turns print PDFs into web optimized ePapers that Google loves.
T E C H N O L O G I E S<br />
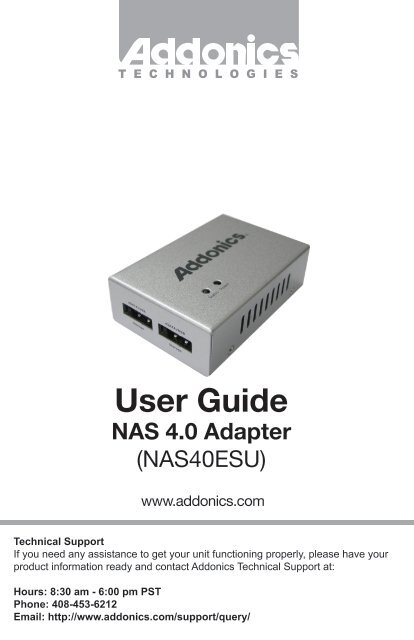
<strong>User</strong> <strong>Guide</strong><br />
<strong>NAS</strong> <strong>4.0</strong> <strong>Adapter</strong><br />
(<strong>NAS</strong>40ESU)<br />
www.addonics.com<br />
Technical Support<br />
If you need any assistance to get your unit functioning properly, please have your<br />
product information ready and contact <strong>Addonics</strong> Technical Support at:<br />
Hours: 8:30 am - 6:00 pm PST<br />
Phone: 408-453-6212<br />
Email: http://www.addonics.com/support/query/
Overview<br />
Status LED<br />
Power LED<br />
Storage Ports<br />
Network port<br />
Reset button<br />
Storage Ports: eSATA (1.5Gbps) or USB (2.0). Each port supports one eSATA device<br />
and one or more USB based devices, up to 16 physical drives.<br />
Network Port: Supports 10/100/1000.<br />
Power LED: glows when unit is on.<br />
Status LED: glows steady when unit is idle, other states are dark or dim to indicate a<br />
problem, slow or fast blinking between dark and bright or dim and bright to indicate<br />
the unit is busy.<br />
www.addonics.com Technical Support (M-F 8:30am - 6:00pm PST) Phone: 408-453-6212 Email: www.addonics.com/support/query/
Quick Install<br />
In order to start sharing storage as soon as possible, follow these steps:<br />
1. Attach the <strong>NAS</strong> <strong>4.0</strong> unit to a network with a DHCP server present<br />
(most home routers provide this by default).<br />
2. Follow the steps described in the Initial Setup section below.<br />
3. Attach one hard disk. The Status LED should begin to blink after a<br />
few moments, then settle back to a steady glow. Confirm at least one<br />
partition was detected using the View Drive Information feature in the<br />
Configuration Menu. If not, the drive may be formatted with ext3 or XFS<br />
using the Format Drive feature in the Configuration Menu.<br />
4. Define at least one share, granting either read-only or full access<br />
rights to “Everyone.”<br />
Installation<br />
Network Connection<br />
The <strong>NAS</strong> <strong>4.0</strong> unit is factory configured for dynamic IP addressing (DHCP client).<br />
Connect the unit to a network (router or switch) where DHCP is supported. Static IP<br />
may be assigned later after initial setup.<br />
Storage<br />
The <strong>NAS</strong> <strong>4.0</strong> unit has two EUHP (eSATA USB Hybrid Port) connectors, supporting<br />
eSATA 1.5Gbps or USB 2.0 devices. The eSATA connections do not support FIS<br />
switching for port multipliers, only one physical unit may be connected to each port<br />
using eSATA. Through the use of USB hubs up to a total of 16 physical units including<br />
eSATA and USB can be connected. One SATA port multiplier may be connected using<br />
USB; however, with more than one such port multiplier connected only one will<br />
function – others will not be recognized at all.<br />
Each physical unit may be formatted with up to 4 individual partitions using a Master<br />
Boot Record (MBR), or up to 15 individual partitions using a GUID Partition Table<br />
(GPT). Supported file systems are: FAT32, ext2, ext3, ext4, XFS, and NTFS. The <strong>NAS</strong><br />
<strong>4.0</strong> unit will by far provide the best performance when using an external drive<br />
connected using eSATA and formatted with the XFS file system.<br />
Note: Initializing a drive with MBR is limited to drives less than 2TB in capacity with up<br />
to 4 partitions total. For drives greater than 2TB in capacity or if more than 4 partitions<br />
are desired, the drive must be initialized using a GPT boot record.<br />
www.addonics.com Technical Support (M-F 8:30am - 6:00pm PST) Phone: 408-453-6212 Email: www.addonics.com/support/query/
The <strong>NAS</strong> <strong>4.0</strong> Unit Boot Process<br />
Upon powering up the unit, the status LED will blink at first between bright and dim,<br />
then remain dark for a few moments, then begin to blink between bright and dark for a<br />
while and finally settle down to glowing steadily. Once this pattern is complete the unit<br />
is ready to communicate.<br />
This process normally takes about a minute or less, but may take longer depending on<br />
the complexity of the configuration, storage and LAN connections. With the 240<br />
possible file systems, booting may take several minutes or longer.<br />
Resetting the <strong>NAS</strong> unit<br />
Should a problem arise with the <strong>NAS</strong> <strong>4.0</strong> unit or its configuration, the unit may be<br />
reset simply by disconnecting power and reconnecting after a few moments. If this<br />
doesn't clear the problem, the unit may be returned to its factory configuration by<br />
gently pressing and holding the reset button between the power and LAN connectors<br />
until the Status LED blinks slowly, then rapidly. After releasing the Reset button while<br />
blinking slowly there will be no changes. After releasing the button once the Status<br />
LED blinks rapidly, the Status LED will continue to blink for a while, and may possibly<br />
glow steadily for a while as well. Eventually it will begin the boot process, beginning<br />
with blinking between bright and dim. Once the boot process is complete and the LED<br />
is glowing steadily again, all settings will have been cleared and the unit is ready to<br />
communicate with all settings reset to the factory default – including the network and<br />
device name settings.<br />
If the process appears to become stuck or takes too long to complete, you can try<br />
disconnecting power, then reconnect and after the Status LED blinks bright and dark a<br />
few times, try the Reset button again.<br />
Initial Setup<br />
Windows: All of the <strong>NAS</strong> <strong>4.0</strong> unit's functions and features are configured using a Web<br />
Interface. Once the hardware is installed, access the Web Interface with a web<br />
browser on a computer attached to the same network by typing in “http://addnas” - this<br />
will work on most Windows systems. Be sure the computer accessing the <strong>NAS</strong> has<br />
the Workgroup name set to WORKGROUP.<br />
MAC: Mac users may need to determine the <strong>NAS</strong> <strong>4.0</strong> unit's IP address by opening a<br />
Terminal window and typing the following command:<br />
smbutil lookup addnas<br />
This utility should return the <strong>NAS</strong> <strong>4.0</strong> unit's IP address. Typing this address into the<br />
web browser should open the <strong>NAS</strong> <strong>4.0</strong> unit's Web Interface.<br />
Linux: Linux users may need to determine the <strong>NAS</strong> <strong>4.0</strong> unit's IP address if Windows<br />
name resolution support is not fully installed and configured, by examining the DHCP<br />
server's clients table and attempting to connect to each unidentified IP address using<br />
a browser until the <strong>NAS</strong> <strong>4.0</strong> unit's Web Interface appears.<br />
www.addonics.com Technical Support (M-F 8:30am - 6:00pm PST) Phone: 408-453-6212 Email: www.addonics.com/support/query/
Once you have connected to the Web Interface, the Initial Setup page will appear:<br />
Click Next, then set a custom password for the admin account. The admin account<br />
name may also be changed.<br />
Next, set up the Date and Time. Choose a city nearest you in the same Time Zone<br />
and be sure the Date and Time are correct.<br />
www.addonics.com Technical Support (M-F 8:30am - 6:00pm PST) Phone: 408-453-6212 Email: www.addonics.com/support/query/
Finally, review and confirm the settings:<br />
After clicking on the Update settings button, Initial Setup is complete.<br />
Sharing Files Using the <strong>NAS</strong> <strong>4.0</strong><br />
SMB (Windows Sharing)<br />
Connecting to the <strong>NAS</strong> for direct file access through Windows Explorer is very similar<br />
to sharing files between Windows systems. Typing “\\ADD<strong>NAS</strong>” (or the <strong>NAS</strong> <strong>4.0</strong> unit's<br />
hostname if changed from the default) or the double-backslash followed by the <strong>NAS</strong><br />
<strong>4.0</strong> unit's IP address is the easiest way to gain direct access quickly. After pressing<br />
Enter, the Explorer Window should show a list of the shares available. Opening any of<br />
the shares is like opening any other folder, except when accessing a share for the first<br />
time, Windows may request a username and password for access to the share<br />
(unless “Everyone” permissions have been changed from the default setting of<br />
NONE). Entering a valid username and password will open the folder with appropriate<br />
access rights to that user. If “NONE” permissions are set for that user on that share,<br />
Another username and password prompt will appear. After connecting to a share,<br />
Windows will use the same username and password for all connections until the<br />
Windows user logs off of Windows.<br />
On Mac systems, on the Finder's Go menu choose “Connect to Server...” then in the<br />
server address box type “smb://” followed by the <strong>NAS</strong> <strong>4.0</strong> unit's IP address.<br />
On Linux systems, use the “Connect to share...” dialog found on the Nautilus or “File<br />
Manager” menu bar, then select Windows Share for the type and complete the<br />
remaining fields for share name, username and password. Information required to<br />
complete the connection and the system's response vary from one version of Linux to<br />
another, and should be expected to work about the same way as connecting to a<br />
share on an actual Windows PC.<br />
www.addonics.com Technical Support (M-F 8:30am - 6:00pm PST) Phone: 408-453-6212 Email: www.addonics.com/support/query/
FTP Server<br />
The <strong>NAS</strong> <strong>4.0</strong> FTP server works by offering a private “home” folder to each user with<br />
exclusive access to the resources through FTP. FTP cannot be used to access shares<br />
defined under the Sharing tab in the web interface. Each user will also have access to<br />
their private FTP space using SMB.<br />
Getting Started with MLDonkey<br />
MLDonkey is a powerful, multi-protocol Peer-to-Peer (P2P) client included with the<br />
<strong>NAS</strong> <strong>4.0</strong> unit. The features and capabilities of this tool are beyond the scope of this<br />
user guide, the steps below will show how to get MLDonkey up and running. For more<br />
information on how to use MLDonkey, visit http://mldonkey.sourceforge.net.<br />
MLDonkey Basic Setup<br />
The MLDonkey client requires one partition formatted with either ext3 or XFS. The<br />
<strong>NAS</strong> <strong>4.0</strong> unit's format utility can format one physical unit with a single partition using<br />
all space if needed.<br />
Under the P2P/MLDonkey tab, choose the drive you wish to create the file structure<br />
on and click Save. Please note: this menu will permit setting up folders on<br />
incompatible file systems. If this is done, MLDonkey will not start or may not be able to<br />
download files.<br />
When the folder structure is set up, a page will appear stating this is done. Click the<br />
START button. NOTE: The MLDonkey setup page will create a share on the selected<br />
drive called MLDonkey. This share will be configured with “None” permissions to<br />
“Everyone” as well as all existing users.<br />
Next, a new page will appear stating MLDonkey is running. Click the link at the bottom<br />
of the page that reads “Launch MLDonkey Control Panel.”<br />
A new tab will appear in the browser with the MLDonkey web interface. If MLDonkey is<br />
not fully initialized yet, the browser may report a failure to connect. If this happens,<br />
wait about one minute and try again, either by refreshing the page or clicking a “try<br />
again” button – this step varies depending on the browser used.<br />
When first setting up, a prompt appears warning there is no password for the admin<br />
account. Click the space between the “DL” and “Input” buttons, then type the<br />
command “useradd admin” as shown, then add a password after a space.<br />
www.addonics.com Technical Support (M-F 8:30am - 6:00pm PST) Phone: 408-453-6212 Email: www.addonics.com/support/query/
Note: The MLDonkey admin account is not the same account as the <strong>NAS</strong> <strong>4.0</strong> unit's<br />
web interface admin account. It is recommended that the password matches for<br />
simplicity, but not necessary.<br />
MLDonkey will perform most of the remaining steps automatically and connect to<br />
some servers on the Donkey network.<br />
To download a file using the Donkey network, begin by clicking search, then enter<br />
some criteria and click the Search button. After a query message appears, click the<br />
"Search Results" button.<br />
To download a Torrent, on the command bar type dllink followed by a space and the<br />
full URL path to the .Torrent file and press Enter or click Input. (example: "dllink<br />
http://sampletorrent.com/path/dot-torrentfile.torrent"). MLDonkey will parse the<br />
download and add it to the download queue automatically.<br />
Files queued for download will appear in the MLDonkey share in the incoming/files<br />
folder when when complete.<br />
Note: this folder has read-only permissions and cannot be changed.<br />
The Configuration Tab<br />
www.addonics.com Technical Support (M-F 8:30am - 6:00pm PST) Phone: 408-453-6212 Email: www.addonics.com/support/query/
Update Admin <strong>User</strong>name and Password<br />
Changes the web interface management login.<br />
Configure <strong>User</strong> Home Directory Drive<br />
Determines which drive on the system carries the HOME directory for users. The<br />
user's home folder is used for FTP transfers and as a network share for private files. If<br />
a home directory is already defined it will be shown. Choose a volume and click Save.<br />
If any files exist in a previous Home directory they will be moved to the new location.<br />
Change Current Date and Time<br />
Settings for time zone, date and time. Set time zone to a listed city nearby in the<br />
same time zone.<br />
Update Device/Workgroup Names<br />
Settings for the <strong>NAS</strong> <strong>4.0</strong> unit's network name and Windows workgroup. Default setting<br />
is ADD<strong>NAS</strong> joined to WORKGROUP. Setting the workgroup name on all devices on<br />
the same network to match is strongly recommended. The Device name is used for<br />
accessing the Web Interface as well as browsing for the shared folders on the<br />
network.<br />
Update FTP Port Number<br />
Changes the TCP Port used by the FTP server. Default is port 21. Note that some<br />
FTP clients will not be able to connect on alternate ports.<br />
View Current Network Configuration<br />
Displays details about the <strong>NAS</strong> <strong>4.0</strong> unit's current network settings. Includes device<br />
and network names as well as TCP/IP settings.<br />
www.addonics.com Technical Support (M-F 8:30am - 6:00pm PST) Phone: 408-453-6212 Email: www.addonics.com/support/query/
Configure the Network Settings<br />
Starts the network configuration wizard.<br />
Choosing Automatic will configure the <strong>NAS</strong> <strong>4.0</strong> unit as a DHCP client and the<br />
configuration wizard will skip to the end. Choosing Manual configuration will proceed<br />
to Step 2.<br />
Step 2 configures the <strong>NAS</strong> <strong>4.0</strong> unit's static IP address and subnet mask. To choose a<br />
working static IP address, make sure you meet these criteria:<br />
1. The subnet mask must match the rest of the network exactly.<br />
2. The IP address must match the router's IP address exactly where the<br />
subnet mask is "255."<br />
3. The IP address cannot end in 0 or 255.<br />
4. The IP address must not match any other system on the network.<br />
5. The IP address should not be within the DHCP server's client pool.<br />
www.addonics.com Technical Support (M-F 8:30am - 6:00pm PST) Phone: 408-453-6212 Email: www.addonics.com/support/query/
The next step is to configure network connections. The gateway is usually the internal<br />
IP address for the router the <strong>NAS</strong> <strong>4.0</strong> unit is connected to. DNS entries are usually the<br />
same as used by the router's external network configuration (determined by your ISP).<br />
Setting an NTP server will synchronize the <strong>NAS</strong> <strong>4.0</strong> unit to a time server, usually on<br />
the Internet. This can be a name or IP address. Use the keywords “free NTP servers”<br />
on your preferred search engine if you wish to configure this feature and don't know of<br />
a server you can use.<br />
When the wizard is complete by either choosing Automatic in Step 1 or completing<br />
Steps 2 and 3, a confirmation page will appear. Clicking the Finish button will apply<br />
the settings.<br />
www.addonics.com Technical Support (M-F 8:30am - 6:00pm PST) Phone: 408-453-6212 Email: www.addonics.com/support/query/
View Drive Information<br />
Displays details of all connected drives. If network shares are configured for<br />
drives that have been disconnected, those drives will also appear in this list as<br />
unavailable.<br />
Device: The letter after “sd” is the drive's letter, in order of when the drive was first<br />
encountered by the <strong>NAS</strong> unit. The number at the end of the device label is the<br />
partition on the drive, in order of the drive's partition map.<br />
Vendor: The drive's manufacturer.<br />
Model: The drive's model number.<br />
Mount Point: Used by the <strong>NAS</strong> <strong>4.0</strong> unit internally.<br />
Type: The file system the partition is formatted with.<br />
Size: The total space of the partition.<br />
Used: Space in use on the partition.<br />
Available: Remaining space available on the partition.<br />
% Used: Percentage of the partition space in use.<br />
www.addonics.com Technical Support (M-F 8:30am - 6:00pm PST) Phone: 408-453-6212 Email: www.addonics.com/support/query/
View <strong>User</strong> Samba and FTP Login Information<br />
Displays a list of open sessions for file sharing of Windows sharing and FTP. The login<br />
username, the computer's hostname and IP address are listed for each session.<br />
Format Drive<br />
Formats a specific drive using a choice of ext3 or XFS file systems.<br />
Caution: this function destroys data.<br />
Choose a drive to format. If the drive is greater than 2TB in capacity choose the GPT<br />
boot record, otherwise choose MBR. Finally, choose Linux EXT3 or Linux XFS for the<br />
file system. After clicking Format Drive, the format utility will request confirmation.<br />
Note: For highest possible performance, use the XFS file system.<br />
After clicking “Yes, I'm sure,” the format utility will create and prepare one partition on<br />
the selected drive, using all space on the disk. A page will load next confirming the<br />
format is in progress. This page updates once every minute. Once formatting is<br />
complete, the page will change to state it is done. Click any of the tabs above the<br />
message to perform other tasks. If desired, this can be done before formatting is<br />
complete; however, the drive being formatted cannot be used until formatting is done<br />
and there<br />
will be no further notifications.<br />
Safely Remove Drive<br />
Closes all pending I/O to a specified drive then “unmounts” it for removal.<br />
Caution: best practice is to notify any and all users this will be done before proceeding<br />
to prevent data loss. Abruptly removing a physical drive without notifying users or<br />
using the Safely Remove Drive function may cause file system corruption and loss of<br />
data.<br />
Backup Internal System Configuration Information<br />
Saves or restores all of the <strong>NAS</strong> <strong>4.0</strong> unit's settings using a specified drive. Select the<br />
volume desired for backups. If backups exist on that volume they will be listed under<br />
Backups, with comments if present.<br />
To create a backup, add a backup comment if desired then click Create Backup. To<br />
restore an existing backup, select the desired backup and click Restore Selected. The<br />
currently selected backup may also be deleted using the Delete Selected button. All<br />
three functions will request confirmation before proceeding.<br />
Reboot<br />
Restarts the <strong>NAS</strong> <strong>4.0</strong> unit.<br />
Caution: best practice is to notify any and all users this will be done before proceeding<br />
www.addonics.com Technical Support (M-F 8:30am - 6:00pm PST) Phone: 408-453-6212 Email: www.addonics.com/support/query/
Upgrade the System Firmware<br />
In the case of a firmware update release, this utility applies the update.<br />
Update will not proceed unless only one volume (one partition on one drive) is<br />
present. Instructions on updating firmware are provided with the firmware<br />
update.<br />
Caution: All of the <strong>NAS</strong> <strong>4.0</strong> unit's settings will be lost in the process of applying<br />
firmware. Make sure to notify any and all users this will be done to prevent data loss<br />
and use the Backup Internal System Configuration Information utility before<br />
proceeding.<br />
The Sharing Tab<br />
<strong>User</strong> Management<br />
Shows current list of known users on the <strong>NAS</strong> <strong>4.0</strong> unit.<br />
To delete a user, click the “Delete” link next to that username, then confirm.<br />
To change a user's password, select the username just above “New Password,” then<br />
enter the new password into the “New Password” and “Confirm Password” fields and<br />
click “Change Password.”<br />
To create a new user account, click “New <strong>User</strong>,” then enter the new username and<br />
the initial password in the “New Password” and “Confirm Password” fields. If shared<br />
folders are defined on the system, select the default permissions granted to the new<br />
user for each share.<br />
Add A Shared Folder<br />
Creates a new folder and shares it on the network. This function has several steps.<br />
The first page introduces the wizard. Click “Begin Wizard” to proceed.<br />
www.addonics.com Technical Support (M-F 8:30am - 6:00pm PST) Phone: 408-453-6212 Email: www.addonics.com/support/query/
Step 1 is to define the name of the share. The share name will become the folder<br />
name on the drive.<br />
Note: The shared folder name will be written to disk using all capital letters. If an<br />
existing folder of the same name appears and is not all capital letters, the <strong>NAS</strong> <strong>4.0</strong><br />
considers that not a match and writes the same folder name in all capital letters<br />
anyway. This can cause unpredictable results if the drive is subsequently connected to<br />
a computer. If a folder exists of the same name with all capital letters, it will be shared<br />
without harming any data.<br />
Step 2 is to select the drive the share is to be created on. The drive is identified by the<br />
drive letter and partition number, the vendor and model, and the mount point.<br />
www.addonics.com Technical Support (M-F 8:30am - 6:00pm PST) Phone: 408-453-6212 Email: www.addonics.com/support/query/
Step 3 is to set the initial permissions for the new share. A permission setting for<br />
“Everyone” as well as each individual user is listed, with the default permission set to<br />
None. Once you have reviewed the permissions for all users and made any desired<br />
changes, clicking on “Create Share Folder” will complete the Wizard.<br />
Rename A Shared Folder<br />
Changes the name of the directory as well as the share name for an existing shared<br />
folder. Select the share to change and type in a new name, then click “Rename<br />
Shared Folder.”<br />
Note: The new shared folder name will be written to disk using all capital letters. If an<br />
existing folder of the same name appears and is not all capital letters, the <strong>NAS</strong> <strong>4.0</strong><br />
considers that not a match and writes the same folder name in all capital letters<br />
anyway. This can cause unpredictable results if the drive is subsequently connected to<br />
a computer. If a folder exists of the same name with all capital letters, it will be shared<br />
without harming any data.<br />
www.addonics.com Technical Support (M-F 8:30am - 6:00pm PST) Phone: 408-453-6212 Email: www.addonics.com/support/query/
Remove a Shared Folder<br />
Deletes a share from the <strong>NAS</strong> <strong>4.0</strong> unit. As a precaution this screen requires the word<br />
“yes” is typed in as confirmation.<br />
Note: Removing a shared folder also deletes the associated directory and all of its<br />
contents from the drive. It is however possible to delete the share without destroying<br />
any data: simply disconnect the drive physically from the <strong>NAS</strong> <strong>4.0</strong> unit before<br />
proceeding.<br />
Update Security Settings<br />
Changes permissions for a share for each user and the general permission for<br />
“Everyone.” Select the share to change, then click next and another page will appear<br />
with current permissions. Make desired changes and click Update to apply.
CONTACT US<br />
www.addonics.com<br />
Phone: 408-573-8580<br />
Fax: 408-573-8588<br />
Email: http://www.addonics.com/sales/query/


