Addonics ATAPI to SCSI Converter Board Overview Features Outlines
Addonics ATAPI to SCSI Converter Board Overview Features Outlines
Addonics ATAPI to SCSI Converter Board Overview Features Outlines

You also want an ePaper? Increase the reach of your titles
YUMPU automatically turns print PDFs into web optimized ePapers that Google loves.
<strong>Overview</strong><br />
<strong>Addonics</strong> <strong>ATAPI</strong> <strong>to</strong> <strong>SCSI</strong> <strong>Converter</strong> <strong>Board</strong><br />
(Model: ADAEC7722)<br />
Thank you for purchasing the <strong>Addonics</strong> <strong>ATAPI</strong> <strong>to</strong> <strong>SCSI</strong> converter, model ADAEC7722. With this converter, you can use any standard<br />
<strong>ATAPI</strong> devices like a standard <strong>SCSI</strong> device. Thus many devices that are available only in <strong>ATAPI</strong> interface such as CDRW, DVD-R/RW,<br />
ZIP drive, MO drives and so can now be installed in<strong>to</strong> computers that have <strong>SCSI</strong> controller. Once installed, all application software works<br />
transparently. You can burn CD on CDRW, play DVD movie with a DVD ROM. The converter supports <strong>SCSI</strong> performance up <strong>to</strong> LVD160<br />
standard, thus ensuring that you will get the maximum performance from any <strong>ATAPI</strong> device.<br />
<strong>Features</strong><br />
• Built-in RISC CPU, <strong>SCSI</strong>, IDE controllers and interfaces on the chip.<br />
• Maximum data transfer - 80Mb/sec.<br />
• Full support of <strong>SCSI</strong> target features.<br />
• Programmable IDE access modes, including PIO mode 0,1,2,3,4.<br />
• Upgradeable firmware.<br />
Package Contents<br />
• <strong>ATAPI</strong> <strong>to</strong> <strong>SCSI</strong> <strong>Converter</strong><br />
• This Manual<br />
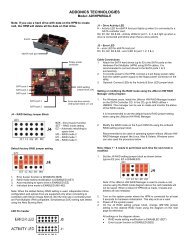
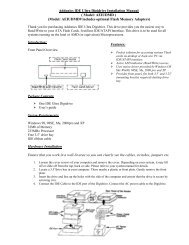
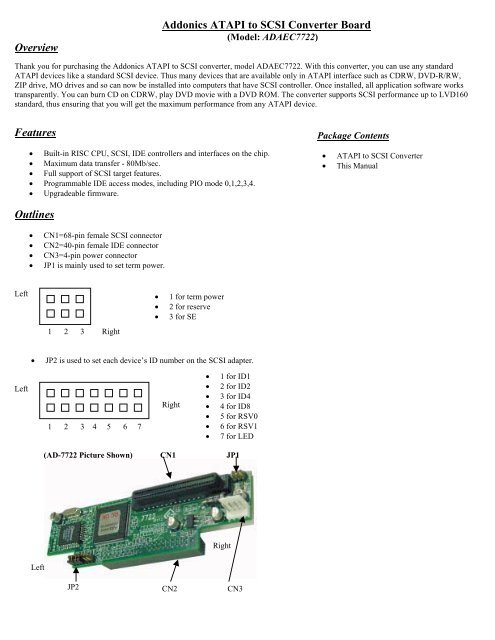
<strong>Outlines</strong><br />
• CN1=68-pin female <strong>SCSI</strong> connec<strong>to</strong>r<br />
• CN2=40-pin female IDE connec<strong>to</strong>r<br />
• CN3=4-pin power connec<strong>to</strong>r<br />
• JP1 is mainly used <strong>to</strong> set term power.<br />
Left • 1 for term power<br />
• 2 for reserve<br />
• 3 for SE<br />
1 2 3 Right<br />
• JP2 is used <strong>to</strong> set each device’s ID number on the <strong>SCSI</strong> adapter.<br />
Left<br />
1 2 3 4 5 6 7<br />
Right<br />
• 1 for ID1<br />
• 2 for ID2<br />
• 3 for ID4<br />
• 4 for ID8<br />
• 5 for RSV0<br />
• 6 for RSV1<br />
• 7 for LED<br />
(AD-7722 Picture Shown) CN1 JP1<br />
Left<br />
Right<br />
JP2 CN2 CN3
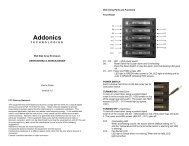
Hardware Installation<br />
Internal Power Connection<br />
There are two kinds of internal power connec<strong>to</strong>rs providing power <strong>to</strong> the <strong>ATAPI</strong> device and AD-7722 circuit board. The large connec<strong>to</strong>r is<br />
for most <strong>ATAPI</strong> devices while the small one is for AD-7722. For correct connection see picture below:<br />
Cable Connection<br />
Before connecting AD-7722 <strong>to</strong> an <strong>ATAPI</strong> device, you should know the <strong>SCSI</strong> connec<strong>to</strong>r from the IDE one. On the circuit board the 68-pin<br />
connec<strong>to</strong>r is for <strong>SCSI</strong> adapter while the 40-pin one is for <strong>ATAPI</strong> devices. Please connect it <strong>to</strong> AD-7722. The steps are listed below:<br />
• Find out pin 1 of CN2 on AD-7722<br />
• Find out pin 1 of the connec<strong>to</strong>rs by pin <strong>to</strong> pin and connect them.<br />
• Find out the colored pin 1 of the connec<strong>to</strong>r on the other end of the <strong>SCSI</strong> cable and connect <strong>to</strong> CN1 of AD-7722. See below:<br />
Troubleshooting<br />
After installing AD-7722, if you find out that it does not work correctly. Try the following methods below:<br />
Check the <strong>SCSI</strong> host adapter<br />
Check if the adapter is firmly inserted in<strong>to</strong> PCI slot on the motherboard.<br />
Check all Connec<strong>to</strong>rs and Cables<br />
Check if the power connec<strong>to</strong>r, <strong>SCSI</strong> connec<strong>to</strong>r, <strong>ATAPI</strong> connec<strong>to</strong>r on the bridge, the power connec<strong>to</strong>r on the <strong>ATAPI</strong> device, and the cables<br />
are all properly connected. The cable is easily damaged due <strong>to</strong> folds. You may use a new cable. Be sure that the pins inside the connec<strong>to</strong>r are<br />
not bent and the two-colored pin 1 on both ends of the cable are corresponding <strong>to</strong> the pin 1 on CN1 of the bridge and the pin 1 on <strong>SCSI</strong><br />
adapter respectively.<br />
Contact Information<br />
<strong>Addonics</strong> Technologies<br />
2466 Kruse Drive<br />
San Jose CA, 95131<br />
Phone: 408-433-3899<br />
Fax: 408-433-3898<br />
Internet: http://www.addonics.com<br />
Technical Support<br />
Phone: 408-433-3855<br />
Email: Techinfo@addonics.com