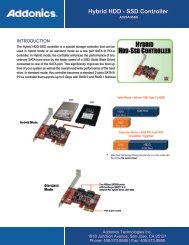
User Guide - Addonics
User Guide - Addonics
User Guide - Addonics

Create successful ePaper yourself
Turn your PDF publications into a flip-book with our unique Google optimized e-Paper software.
T E C H N O L O G I E S<br />
ENT<br />
ESC<br />
<strong>User</strong> <strong>Guide</strong><br />
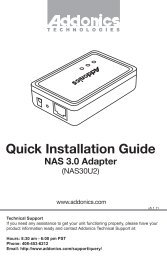
1:5 CF or CFAST Duplicator<br />
(CFASTD5 / CFD5)<br />
www.addonics.com<br />
v3.1.11<br />
Technical Support<br />
If you need any assistance to get your unit functioning properly, please have your<br />
product information ready and contact <strong>Addonics</strong> Technical Support at:<br />
Hours: 8:30 am - 6:00 pm PST<br />
Phone: 408-453-6212<br />
Email: http://www.addonics.com/support/query/
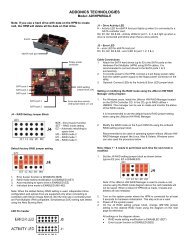
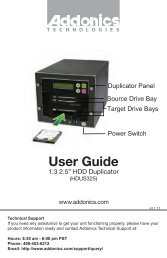
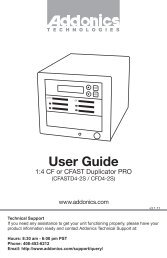
Diagram<br />
Duplicator Panel<br />
LCD<br />
Scroll Up<br />
ENT<br />
ESC<br />
Executes Function<br />
Cancels Function<br />
Scroll Down<br />
Front View<br />
Source Slot<br />
(CF or CFAST)<br />
ENT<br />
ESC<br />
Target Slot 1<br />
Target Slot 3<br />
Target Slot 2 Target Slot 4<br />
Target Slot 5<br />
Power Switch<br />
Flash Reader LEDs<br />
Power LED<br />
www.addonics.com Technical Support (M-F 8:30am - 6:00pm PST) Phone: 408-453-6212 Email: www.addonics.com/support/query/
Note: Make sure that the capacity of the target CF or FAST cards are equal or<br />
larger than the source CF or CFAST Card. For example, the label on the cards<br />
might say 8GB for both but they might vary in capacity. When these cards are used<br />
in the CF or CFAST Duplicator, you might get an error that says “Target Not Ready”.<br />
To fix this, you can decrease the source card by going to: 6. Setup > 6.2 Copy Size<br />
and decrease it by increments of 1% by using the down arrow button.<br />
Quick <strong>Guide</strong><br />
Installing CF or CFAST card into the duplicator<br />
Step 1<br />
Depending on the model of the duplicator, insert the source CF or CFAST card into<br />
the source slot.<br />
Step 2<br />
Depending on the model of the duplicator, insert the target CF or CFAST card(s)<br />
into the target slot(s).<br />
Step 3<br />
Connect the power cord provided from the wall outlet to the back of the tower.<br />
Push the power switch button to turn on the duplicator.<br />
Duplicating card(s)<br />
Make sure the source and target cards are in their proper slots. When the<br />
duplicator powers on, it will go through the steps below.<br />
Step 1<br />
Duplicator LED will light up and the device will beep.<br />
Step 2<br />
LCD will display initial steps:<br />
1. Duplicator Ver: - Displays duplicator version<br />
2. Initializing SDRAM<br />
3. Detect Source/Target - Will detect the type of source/targets<br />
4. Copy - Defaults to the first function which is to copy<br />
Step 3<br />
Once the duplicator gets to the copy menu, press ENT to begin copying. The<br />
duplicator will auto-detect the card and display its information on the LCD. Make<br />
sure that the power LEDs of the flash reader are blinking, the blinking indicates<br />
drive activity.<br />
You can find the complete user manual of the CF or CFAST Duplicator panel on the<br />
driver disk under user guides. You can also download it from our website at<br />
www.addonics.com/support/user_guides/<br />
www.addonics.com Technical Support (M-F 8:30am - 6:00pm PST) Phone: 408-453-6212 Email: www.addonics.com/support/query/
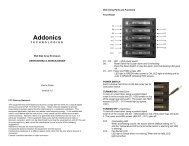
Panel Functions<br />
Duplicator Panel<br />
LCD<br />
Scroll Up<br />
ENT<br />
ESC<br />
Executes Function<br />
Cancels Function<br />
The Duplicator has 8 functions to choose from:<br />
Scroll Down<br />
1. Copy HDD<br />
2. Async Copy HDD<br />
3. Compare HDD<br />
4. Async Compare<br />
5. PreScan Source<br />
6. ReScan BUS<br />
7. Source Size<br />
8. Setup<br />
8-1. Language<br />
8-2. Copy Size<br />
8-3. Startup Menu<br />
8-4. Auto Compare<br />
8-5. Button Sound<br />
8-6. Device Info<br />
8-7. System Info<br />
8-8. Fast Copy<br />
8-9. Auto Start Drive<br />
8-10. Auto Start Timer<br />
8-11. Tolerance Size<br />
8-12. Boot Time Delay<br />
1. Copy HDD<br />
Make sure that the capacity of the target is equal or larger than the source.<br />
Copies data directly from the source to the target.<br />
Choose option 1 from the menu and press ENT to begin copying. The system will<br />
auto detect the source/target and display info about the copying process. Once<br />
the copying process is complete, the LCD will display Copy OK.<br />
2. Async Copy HDD<br />
Copy HDD copies data directly from the source hard disk to the target hard disks.<br />
While duplication process is on-going, allows you to plug-in additional target drives<br />
and duplication will automatically start for the added target drive.<br />
Choose option 2 and press ENT to begin copying. The duplicator will auto detect<br />
the drive and the LCD will display copying information. If the duplicator detects<br />
that the drive does not have enough capacity, the LCD will display it.<br />
www.addonics.com Technical Support (M-F 8:30am - 6:00pm PST) Phone: 408-453-6212 Email: www.addonics.com/support/query/
3. Compare HDD<br />
Compare HDD is used to see if the data on a source hard disk is identical to the<br />
target hard disk after the Copy HDD operation.<br />
Choose option 3 and press ENT to begin comparing.<br />
4. Async Compare<br />
Compare HDD is used to see if the data on a source hard disk is identical to the<br />
target hard disk after the Copy HDD operation. While compare process is<br />
on-going, allows you to plug-in additional target drives and comparison will<br />
automatically start for the added target drive.<br />
Choose option 4 and press ENT to begin comparing.<br />
5. PreScan Source<br />
PreScan HDD is used to check if the source hard disk can be accessed properly.<br />
It also tests the read speed.<br />
Choose option 5 and press ENT. The LCD will display prescan information.<br />
6. ReScan BUS<br />
ReScan Bus allows swapping the source or target in and out without having to<br />
reboot the system.<br />
Choose option 6 and press ENT to begin rescanning. The system will rescan the<br />
source without the need to reboot.<br />
7. Source Size<br />
Source Size is used to show the capacity of the source.<br />
Choose option 7 and press ENT. The LCD will display the capacity of the source.<br />
8. Setup<br />
Setup allows various system settings to be changed. There are 12 sub-options:<br />
Language, Copy Size, Startup Menu, Auto Compare, Button Sound, Device Info,<br />
System Info, Fast Copy, Auto Start Drive, Auto Start Timer, Tolerance Size and<br />
Boot Time Delay.<br />
Choose option 8 and the LCD will display the first option of the subfunctions.<br />
www.addonics.com Technical Support (M-F 8:30am - 6:00pm PST) Phone: 408-453-6212 Email: www.addonics.com/support/query/
Setup Functions<br />
8-1. Language<br />
Use this option to select the language of the system, by default it’s set at English.<br />
8-2. Copy Size<br />
This option is used to specify the size of the source for simplifying further copying<br />
operations.<br />
Press ENT on this option and the LCD will display Copy Size ALL. Use the up<br />
and down arrow keys to change the copy size. The system will offer<br />
corresponding percentages so the user can specify the amount to copy from the<br />
source.<br />
8-3. Startup Menu<br />
This option allows the user to change the first option they see when they boot up<br />
the system. By default, the first option is Copy.<br />
To change this, press ENT and use the up and down arrows to choose other<br />
options.<br />
8-4. Auto Compare<br />
This option toggles the systems ability to automatically compare the source and<br />
target after a copy is complete.<br />
By default it is set to OFF, use the up and down arrows to toggle between ON<br />
and OFF.<br />
8-5. Button Sound<br />
This option toggles the button sound of the system.<br />
By default it is set to ON, use the up and down arrows to toggle between ON and<br />
OFF.<br />
8-6. Device Info<br />
This option will diplay the details of everything connected to the controller.<br />
8-7. System Info<br />
This option will display the system information.<br />
8-8. Fast Copy<br />
This option displays Fast Copy. Fast Copy only copies data on the source drive<br />
to the target drives. Currently only supports FAT, FAT32, NTFS, HFS, Ext2 and<br />
Ext3 partitions.<br />
www.addonics.com Technical Support (M-F 8:30am - 6:00pm PST) Phone: 408-453-6212 Email: www.addonics.com/support/query/
8-9. Auto Start Drive<br />
This option is used to copy automatically once you inserted a HDD on target port.<br />
Default is set at OFF, use the arrows to toggle.<br />
8-10. Auto Start Timer<br />
This option is used to set the period of time when the duplicator starts copying<br />
automatically once you insert HDD on target port. Default is set at OFF, use the<br />
arrows to choose time.<br />
8-11. Tolerance Size<br />
This option is used to set the tolerance in terms of percentage difference between<br />
the source and target capacity. This is to ensure that when the target drive is<br />
smaller than the source drive, the duplication process will not start.<br />
8-12. BootTime Delay<br />
This option is used to set boot delay time.<br />
Troubleshooting<br />
LCD<br />
If the LCD display is blank after the device is turned on, check if the power<br />
cable is properly connected and that the power supply is on.<br />
Error Message<br />
If an operation is manually terminated by pressing ESC while the system is running<br />
a copy operation or hardware diagnostics, an error message will show up on the<br />
LCD. This may lead to an illegal operation and cause the device to stop reminding.<br />
If this happens, restart the device.<br />
Source/Target<br />
If the duplicator is unable to read the source or target please check that the data<br />
and power cables are properly connected. When making a copy please make sure<br />
that you set the source correctly.<br />
Keys<br />
If pressing the keys on the front panel produces no response from the system,<br />
the keys may have malfunctioned.<br />
Startup/Shutdown<br />
Do not suddenly turn off the power while the system is performing an operation.<br />
After shutting down normally, wait a moment (usually around 2 seconds) before<br />
restarting the system so it can run self-diagnostics.<br />
www.addonics.com Technical Support (M-F 8:30am - 6:00pm PST) Phone: 408-453-6212 Email: www.addonics.com/support/query/
LCD Messages<br />
Connecting with a HDD:<br />
All data will be lost, format?<br />
All data will be lost. Confirm formatting.<br />
Delete Image in Partition xx?<br />
Confirm the deleting of data image in partition xx.<br />
Format?<br />
Ask if you want to format.<br />
Format OK!<br />
The formatting has been completed.<br />
HDD not Format!<br />
The hard disk hasn’t been formatted yet.<br />
HDD too small<br />
The capacity of hard disk is too small.<br />
HDD too small to handle image!<br />
The hard disk hasn’t enough capacity to store the<br />
data image (at least 5Gbytes).<br />
Image Exists Overwrite?<br />
There is a data image in the current partition.<br />
Confirm the overwriting of data.<br />
Image load Fail<br />
The image isn’t successfully loaded from DVD to<br />
the hard disk.<br />
Image load OK<br />
The image is successfully loaded from DVD to<br />
the hard disk<br />
No Image in Partition xx<br />
There is no data image in partition xx.<br />
No Valid HDD!<br />
The system cannot find a hard disk.<br />
Partition Damage<br />
The partition is damaged.<br />
Select HD First!<br />
Select a formatted hard disk at first.<br />
Verify Disk or Partition?<br />
Do you want to verify the hard disk or just a<br />
partition?<br />
Verify Hard Disk Fail!<br />
The hard disk is not verified successfully.<br />
Firmware Update:<br />
Check Sum Error!<br />
The updated firmware has errors.<br />
Flash ROM fail!<br />
Data cannot be written into Flash ROM.<br />
Invalid firmware<br />
The disc doesn’t contain a valid firmware.<br />
Last update F/W Fail!<br />
The firmware is not updated successfully.<br />
Last update F/W OK!<br />
The firmware is updated successfully.<br />
Searching F/W<br />
The system is searching for a valid firmware.<br />
Source can’t be Hard Disk!<br />
During comparison the source cannot be hard<br />
disk.<br />
CONTACT US<br />
www.addonics.com<br />
Phone: 408-573-8580<br />
Fax: 408-573-8588<br />
Email: http://www.addonics.com/sales/query/