User Guide - Addonics
User Guide - Addonics
User Guide - Addonics

You also want an ePaper? Increase the reach of your titles
YUMPU automatically turns print PDFs into web optimized ePapers that Google loves.
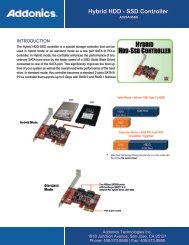
T E C H N O L O G I E S<br />
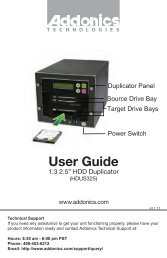
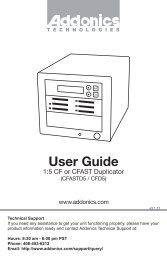
Source Drive Bay<br />
Target Drive Bay 1 - 5<br />
ENT<br />
ESC<br />
Duplicator Panel<br />
Target Drive Bay 6 - 11<br />
Power Switch<br />
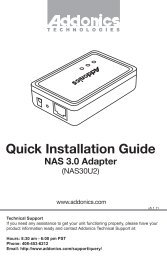
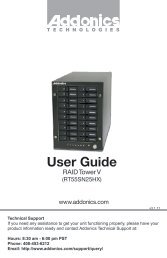
<strong>User</strong> <strong>Guide</strong><br />
1:11 HDD Duplicator Deluxe<br />
(HDUS11325DX)<br />
www.addonics.com<br />
v3.1.11<br />
Technical Support<br />
If you need any assistance to get your unit functioning properly, please have your<br />
product information ready and contact <strong>Addonics</strong> Technical Support at:<br />
Hours: 8:30 am - 6:00 pm PST<br />
Phone: 408-453-6212<br />
Email: http://www.addonics.com/support/query/
Table Of Contents<br />
Basic Instructions<br />
Functions<br />
Copy HDD<br />
Compare HDD<br />
PreScan Source<br />
ReScan Bus<br />
Source Size<br />
Overwrite<br />
Setup<br />
Advanced Setup<br />
Basic Troubleshooting<br />
Error Messages List<br />
Firmware Update Procedure<br />
............. Page 3<br />
............. Page 5<br />
............. Page 6<br />
............. Page 6<br />
............. Page 7<br />
............. Page 8<br />
............. Page 8<br />
............. Page 9<br />
............. Page 9<br />
............. Page 13<br />
............. Page 16<br />
............. Page 17<br />
............. Page 18
Basic Instructions<br />
I. Installing Drive into the HDD Duplicator<br />
For installing a hard drive on the various enclosures that come with the HDD duplicator, refer to the<br />
bundled enclosure installation guides.<br />
Step 1<br />
Open the source drive door and slide in the 3.5” SATA hard disk Source drive into the drive bay. Close the<br />
front panel and using the key provided, turn the key lock to the Lock position. This will secure the drive and<br />
turn on the power to the hard drive.<br />
Step 2<br />
Open the target drive door(s) and slide in the 3.5” SATA hard disk Target drive(s) into the drive bay. Close<br />
the front panel and using the key provided, turn the key lock to the Lock position. This will secure the drive<br />
and turn on the power to the hard drive.<br />
Note: Refer to the Snap-In 25 user guide for 2.5” SATA hard drive installation.<br />
II.<br />
Connecting the Power Cable and Powering On<br />
a. Connect the power cord provided from the wall outlet to the back of the tower.<br />
b. A main power switch is located at the back of the tower. Turn the switch on. Another auxiliary<br />
switch is located on the front of the tower.<br />
c. Push the auxiliary switch button to turn on the HDD duplicator.<br />
III.<br />
The Duplicator Panel<br />
There are four buttons and an LCD on the panel of HDD Duplicator.<br />
1 – LCD shows a function or a message.<br />
2 – it is used to scroll up function menus.<br />
3 – it is used to scroll down function menus.<br />
4 – it is used to execute a function.<br />
5 – it is used to cancel a function.<br />
Duplicator Panel<br />
1<br />
2<br />
ENT<br />
ESC<br />
4<br />
5<br />
3<br />
www.addonics.com Technical Support (M-F 8:30am - 6:00pm PST) Phone: 408-453-6212 Email: www.addonics.com/support/query/
IV. Duplicating a drive<br />
When the duplicator powers on, it initializes and goes through the steps below<br />
Shows the firmware version<br />
HD Duplicator<br />
1-1 Ver:<br />
Detect Drives' status.<br />
Detect Drives<br />
Initialize SDRAM's status..<br />
Initialize SDRAM<br />
Shows the first function:<br />
1.Copy HD<br />
Copy HDD copies data directly from the source hard disk to the target hard disk.<br />
Press ENT button to begin copy. The system will auto-detect the hard disks and show the following info on<br />
the LCD.<br />
Copy-36MBs 0%<br />
235.7GB 1:48<br />
The LCD will show the following info during the copying process: remaining time, completed percentage.<br />
The copy speed, capacity and time will vary depending on the source hard disk. Once the copying process<br />
is complete the LCD will display the following results.<br />
Copy HD<br />
OK:<br />
www.addonics.com Technical Support (M-F 8:30am - 6:00pm PST) Phone: 408-453-6212 Email: www.addonics.com/support/query/
Functions<br />
The copy controller has 11 functions in total, with the 11th (Adv Setup) being a hidden system<br />
function that only appears when the ESC key is pressed for 2 seconds until there is a beep. These<br />
are shown below.<br />
1. Copy HDD<br />
2. Async Copy HDD<br />
3. Compare HDD<br />
4. Async Compare<br />
5. PreScan Source<br />
Duplicator Controller<br />
6. ReScan BUS<br />
7. Source Size<br />
8. Secure Erase<br />
9. Overwrite<br />
10. Setup<br />
11. Adv Setup<br />
10-01. Language<br />
10-02. Copy Size<br />
10-03. Startup Menu<br />
11-01. Read Error Skip<br />
10-04. Auto Compare<br />
11-02. Update Firmware<br />
10-05. Button Sound<br />
11-03. Compare Firmware<br />
10-06. Device Info<br />
11-04. Quick Erase HDD<br />
10. Setup<br />
10-07. System Info<br />
11. Adv Setup<br />
11-05. Full Erase HDD<br />
10-08. Fast Copy<br />
11-06. H/W Diagnostic<br />
10-09. Auto Start Drive<br />
11-07. Load Default<br />
10-10. Auto Start Timer<br />
11-08. Copy HPA<br />
10-11. Tolerance Size<br />
11-09. Burn In<br />
10-12. BootTime Delay<br />
10-13. Quick Compare<br />
www.addonics.com Technical Support (M-F 8:30am - 6:00pm PST) Phone: 408-453-6212 Email: www.addonics.com/support/query/
Copy HDD<br />
Copy HDD copies data directly from the source hard disk to the target hard disk. Please make<br />
sure that the capacity of the target hard disk is equal or larger than the source hard disk.<br />
Choose option 1 from the menu:<br />
Press ENT to begin copy. The system will auto-detect the hard disks and show the following<br />
copying info on the LCD.<br />
Copy-36MB/s 0%<br />
232.9GB 00:00:00<br />
The LCD will show the following info during the copying process: elapsed time, completed<br />
percentage. The copy speed, capacity and time will vary depending on the source hard disk. Once<br />
the copying process is complete the LCD will display the following results.<br />
Async Copy HDD<br />
1. Copy HDD<br />
HDD:11 232.9GB<br />
Copy HDD<br />
OK: 11 Fail: 0<br />
This option is used to specify the size of the source for simplifying further copying operations.<br />
Choose option 2 from the menu:<br />
2. Async Copy HDD<br />
HDD:10 232.9GB<br />
Press ENT . Before the start of the reproduction, if the console detects that a hard drive<br />
capacity is less than source, then the LCD will show the corresponding channel number.<br />
8<br />
Space Not Enough<br />
And then automatically copies. The LCD will display the following info.<br />
Acpy-36MB/s 0%<br />
232.9GB 00:00:00<br />
If the replication process to continue to add additional hard disk device, LCD will only show the last<br />
completed percentage.<br />
Once the copying process is complete the LCD will display the following results.<br />
Async Copy HDD<br />
OK: 11 Fail: 0<br />
Compare<br />
Compare HDD is used to see if the data on a source hard disk is identical to the target hard disk<br />
after the Copy HD operation.<br />
Choose option 3 from the menu:<br />
www.addonics.com Technical Support (M-F 8:30am - 6:00pm PST) Phone: 408-453-6212 Email: www.addonics.com/support/query/
3. Compare HDD<br />
HDD: 11 232.9GB<br />
Press ENT to begin the comparison. The LCD will display the following info.<br />
Comp-23MB/s 0%<br />
232.9GB 00:00:00<br />
Once the comparison is complete the LCD will display the following info as well as the amount of<br />
data on the source hard disk.<br />
Compare OK:11<br />
Fail: 0 Diff: 0<br />
Async Compare<br />
Compare HDD is used to see if the data on a source hard disk is identical to the<br />
target hard disk after the Copy HDD operation. While compare process is<br />
on-going, allows you to plug-in additional target drives and comparison will<br />
automatically start for the added target drive.<br />
Choose option 4 from the menu:<br />
Press ENT<br />
PreScan Source<br />
PreScan HDD is used to check if the source hard disk can be accessed properly.<br />
It also tests the read speed.<br />
Choose option 5 from the menu:<br />
4. Async Compare<br />
HDD: 11 232.9GB<br />
to begin the async comparison. The LCD will display the following info.<br />
ACmp-23MB/s 0%<br />
232.9GB 00:00:00<br />
If the comparison process continues to add additional hard disk device, LCD will only show the<br />
last completed percentage.<br />
Once the copying process is complete the LCD will display the following results.<br />
Compare OK:11<br />
Fail: 0 Diff: 0<br />
Press ENT<br />
5. PreScan Source<br />
HDD : 11 232.9GB<br />
to begin scan. The LCD will display the following info<br />
Scan-90MB/s 1%<br />
230.6GB 00:00:27<br />
Once the scan is complete, the LCD will display the corresp onding results<br />
PreScan OK!<br />
www.addonics.com Technical Support (M-F 8:30am - 6:00pm PST) Phone: 408-453-6212 Email: www.addonics.com/support/query/
ReScan Bus<br />
ReScan Bus allows swapping the source or target in and out without having to<br />
reboot the system.<br />
Choose option 6 from the menu:<br />
6. ReScan BUS<br />
Press ENT to re-scan hardware. The LCD will display the following info.<br />
Re-Scan BUS NOW?<br />
Yes<br />
When the scan is complete the LCD will display the fol lowing info.<br />
Source Size<br />
Bus re- scan OK!<br />
Source Size is used to show the capacity of the source.<br />
Choose option 7 from the menu:<br />
7. Source Size<br />
Press ENT and the LCD will show the following info.<br />
HDD:Hitachi<br />
Size:232.9GB<br />
Then press ENT and the LCD will show the data's size info.<br />
HDD:Hitachi<br />
Data:200.9GB<br />
Secure Erase<br />
Secure Erase is used to wipe the data of the hard disk, it will erase all of HDD of duplicator<br />
(included Source HDD).<br />
Choose option 8 from the menu:<br />
8. Secure Erase<br />
Press ENT to access option. By default it is set to No. Use the Up and Down arrow keys to choose<br />
Yes.<br />
Wipe all data.<br />
Continue? No<br />
Press ENT and the LCD will show the following info.<br />
www.addonics.com Technical Support (M-F 8:30am - 6:00pm PST) Phone: 408-453-6212 Email: www.addonics.com/support/query/
In Process<br />
Elapsed 01:00<br />
Overwrite<br />
Overwrite is used to overwrite the data of the hard disk, it will erase all HDDs connected to the duplicator<br />
(including Source HDD). There are 3 sub-options: One pass, 3 pass and 7 pass.<br />
Choose option 9 from the menu:<br />
9. Overwrite<br />
Press ENT to access option. By default it is One pass Use the Up and Down arrow keys to choose<br />
other options.<br />
9-01. Overwrite<br />
One pass<br />
Press ENT to access option. By default it is set to No. Use the Up and Down arrow keys to choose<br />
Yes.<br />
Wipe all data.<br />
Continue? No<br />
Press ENT and the LCD will show the following info.<br />
In Process<br />
Elapsed 01:00<br />
Setup<br />
Setup allows various system settings to be changed. There are 12 sub-options:<br />
Language, Copy Size, Startup Menu, Auto Compare, Button Sound, Device Info,<br />
System Info, Fast Copy, Auto Start Drive, Auto Start Timer, Tolerance Size and<br />
Boot Time Delay.<br />
Choose option 8 from the menu:<br />
10. Setup<br />
Language<br />
This option is used to select the system's language sup port. By default this is set to English. Press<br />
ENT to change the Language settings.<br />
Language<br />
English<br />
www.addonics.com Technical Support (M-F 8:30am - 6:00pm PST) Phone: 408-453-6212 Email: www.addonics.com/support/query/
Copy Size<br />
This option is used to specify the size of the source hard disk for simplifying further copying<br />
operations.<br />
10-02. Setup<br />
Copy Size<br />
Press ENT and the LCD will display a detailed list of options as shown below<br />
Copy Size<br />
100%~1% (*MB)<br />
Use the Up and Down arrow keys to choose different copy si zes. The system will offer their<br />
corresponding percentages so the user can specify the amount to copy from the source hard disk.<br />
Press ENT to confirm and save the changes.<br />
Startup Menu<br />
This option allows you to set an option other than "Se tup" to be displayed as the first available<br />
option on the menu every time you start the system.<br />
10-03. Setup<br />
Startup Menu<br />
Press ENT then use the Up and Down arrow keys to choose other options. By default the first<br />
menu option is Copy HDD.<br />
Startup Menu<br />
1. Copy HDD<br />
Auto Compare<br />
This option automatically compares the source hard disk with the target hard disk after a copy<br />
operation is completed.<br />
10-04. Setup<br />
Auto Compare<br />
Press ENT to access option. By default it is set to Off. Use the Up and Down arrow keys to choose<br />
On.<br />
Auto Compare<br />
Off<br />
Button Sound<br />
This option is used to control the sound of a button when you press it.<br />
10-05. Setup<br />
Button Sound<br />
Press ENT and the LCD will display the following info. Use the Up and Down arrow keys to choose<br />
whether button sound is on or off.<br />
Button Sound<br />
On<br />
www.addonics.com Technical Support (M-F 8:30am - 6:00pm PST) Phone: 408-453-6212 Email: www.addonics.com/support/query/
Device Info<br />
This option is used to display the details of all hard disks connected to the copy controller.<br />
10-06. Setup<br />
Device Info<br />
Press ENT and the LCD will display each hard disk' information in order as shown below.<br />
0 Source CH: 0<br />
Hitachi 232.9GB<br />
System Info<br />
This option displays system information.<br />
10-07. Setup<br />
System Info<br />
Fast Copy<br />
This option displays Fast Copy. Fast Copy only copies data on the source drive<br />
to the target drives. Currently only supports FAT, FAT32, NTFS, HFS, Ext2 and<br />
Ext3 partitions.<br />
10-08. Setup<br />
Fast Copy<br />
Press ENT and the LCD will display the following info. Use the Up and Down arrow keys to choose<br />
whether fast copy is on or off. (This function currently only effective in FAT, FAT32, NTFS, HFS,<br />
Ext2 and Ext3 partitions.)<br />
Fast Copy<br />
On<br />
Auto Start Drive<br />
This option is used to display to copy automatically once y ou insert HDD on target port.<br />
10-09. Setup<br />
Auto Start Drive<br />
Press ENT to enter the following figure. The default is Off. Use the Up and Down arrow keys to<br />
choose 1-11.<br />
Auto Start Drive<br />
Off<br />
Auto Start Timer<br />
This option is used to set the period of time when the duplicator starts copying<br />
automatically once you insert HDD on target port. Default is set at OFF, use the<br />
arrows to choose time.<br />
10-10. Setup<br />
Auto Start Timer<br />
www.addonics.com Technical Support (M-F 8:30am - 6:00pm PST) Phone: 408-453-6212 Email: www.addonics.com/support/query/
Press ENT to enter the following figure. The default is Off. Use the Up and Down arrow keys to<br />
choose 5 Sec-50 Sec.<br />
Auto Start Timer<br />
Off<br />
Tolerance Size<br />
This option is used to set the tolerance in terms of percentage difference between<br />
the source and target capacity. This is to ensure that when the target drive is<br />
smaller than the source drive, the duplication process will not start.<br />
10-11. Setup<br />
Tolerance Size<br />
Press ENT to enter the following figure. The default is Off. Use the Up and Down arrow keys to<br />
choose 1MB~100MB of source.<br />
BootTime Delay<br />
This option is used to to set boot delay time.<br />
Tolerance Size<br />
1MB<br />
10-12. Setup<br />
BootTime Delay<br />
Press ENT to enter the following figure. The default is 5 sec. Use the Up and Down arrow keys to<br />
choose 0~99 sec.<br />
BootTime Delay<br />
5 sec<br />
Quick Compare<br />
This option is used to set the size of each comparison unit.<br />
10-13. Setup<br />
Quick Compare<br />
Press ENT to enter the following figure. The default is Off. Use the Up and Down arrow keys to<br />
choose 1 Byte/1K/10K/100K/1MB/10MB/100 Mbytes. (In order to improve the accuracy of pure<br />
data can maintain the default settings.)<br />
Quick Compare<br />
Off<br />
www.addonics.com Technical Support (M-F 8:30am - 6:00pm PST) Phone: 408-453-6212 Email: www.addonics.com/support/query/
Adv Setup<br />
Adv Setup offers expert users access to more advanced system settings.<br />
To access this option, hold down the ESC key for two seconds until it appears.<br />
Read Error Skip<br />
11. Adv Setup<br />
This function sets the system to ignore any errors during the copying process. Normally if there is<br />
an error during copying a warning is displayed on the LCD. By using this function, users can also<br />
copy a HDD with errors.<br />
Update Firmware<br />
11-01. Adv Setup<br />
Read Error Skip<br />
Press ENT to enter the following screen. By default this option is set to OFF. Use the up and down<br />
buttons to enable or disable this option.<br />
Read Error Skip<br />
Off<br />
This function is used to update the system's firmware. Download the latest version of the firmware<br />
from the Internet at www.addonics.com. For the complete instructions, visit the firmware update<br />
webpage or view the instructions found later in this manual.<br />
Compare Firmware<br />
11-02. Adv Setup<br />
Update Firmware<br />
This function is used to compare the current system firmware version with the new version the user<br />
is upgrading to. This ensures that the downloaded fi rmware is the latest version. The message<br />
"Last update F/W" indicates that it is the latest version.<br />
11-03.Adv Setup<br />
Compare Firmware<br />
Searching F/W ...<br />
Please Wait ...<br />
Last update F/W<br />
OK!<br />
Quick Erase HDD<br />
This function is used to quickly erase all data on the HDD<br />
before using this function.<br />
11-04.Adv Setup<br />
Quick Erase HDD<br />
Quick Erase HDD<br />
ALL/Target CH:*<br />
. Please backup any important data<br />
Press ENT to enter the following screen. Use the Up and Down buttons to select the HDD to<br />
erase.<br />
www.addonics.com Technical Support (M-F 8:30am - 6:00pm PST) Phone: 408-453-6212 Email: www.addonics.com/support/query/
Press ENT again and the LCD will prompt you to confirm the er ase operation.<br />
All data will be<br />
lost,Erase? No<br />
Full Erase HDD<br />
This function is used to full erase all data on the HDD. Please backup any important data before<br />
using this function.<br />
11-05.Adv Setup<br />
Full Erase HDD<br />
Press ENT to enter the following screen. Use the Up and Down buttons to select the HDD to<br />
erase.<br />
Quick Erase HDD<br />
ALL/Target CH:*<br />
Press ENT again and the LCD will prompt you to confirm the er ase operation.<br />
H/W Diagnostic<br />
All data will be<br />
lost,Erase? No<br />
Press ENT to enter the following screen. This function is use d to check that the system is<br />
operating normally.<br />
11-06.Adv Setup<br />
H/W Diagnostic<br />
Press ENT again to enter the following screen. The LCD will cycle through the test categories as<br />
they are performed. The LCD display is tested first, the control panel is tested next (requires<br />
manual operation), then followed by the system's internal diagnostics, hardware connection test<br />
then the RAM and SD Flash test. All test results are shown on the LCD. This is a simple way to<br />
verify that the system is operating normally.<br />
Press ENT and the system will begin the tests as shown below.<br />
LCD Test Start Button Test ? SDRAM Test:<br />
8192Kbytes OK<br />
Test IDE 0/1<br />
OK<br />
FlashTest: OK<br />
Test finished<br />
Once the system diagnostics have been completed the "Test finished" message will appear on the<br />
LCD.<br />
www.addonics.com Technical Support (M-F 8:30am - 6:00pm PST) Phone: 408-453-6212 Email: www.addonics.com/support/query/
Load Default<br />
Press ESC to return to the main menu then use the ENT button to select. This function resets all<br />
settings to their factory default. This function helps the system recover from errors caused by an<br />
illegal operation.<br />
11-07.Adv Setup<br />
Load Default<br />
Press ENT to enter the following screen. Use the Up and Down buttons to confirm reset to factory<br />
defaults.<br />
Load Default<br />
Config? Yes<br />
If Load Default OK, this will be displayed on the LCD as shown below.<br />
Load Default<br />
Ok<br />
Copy HPA<br />
If this function is set to "ON", the system will completely copy the data in a source HDD's host<br />
protected area.<br />
11-08. Adv Setup<br />
Copy HPA<br />
The default is "OFF". Use the<br />
ENT , Up and Down buttons to change this to "On".<br />
Burn In<br />
This function is used to burn test the system reliability.<br />
Press ENT to enter the following screen.<br />
11-09. Adv Setup<br />
Burn In<br />
Burn In Mode<br />
Copy & Compare<br />
Use the Up and Down buttons to choose Compare, Async Copy & Cmp and Async Compare, then<br />
press ENT to confirm.<br />
www.addonics.com Technical Support (M-F 8:30am - 6:00pm PST) Phone: 408-453-6212 Email: www.addonics.com/support/query/
Basic Troubleshooting<br />
LCD<br />
If the LCD blank after the device is turned on, check that the power cable is properly connected<br />
and that the power supply is on.<br />
Error Message<br />
When the system is running a copy operation or hardware diagnostics, if the operation is manually<br />
terminated by pressing ESC an error message will be shown by the LCD. This may lead to an<br />
illegal operation and cause the device to stop reminding. If this happens, the device must be<br />
restarted.<br />
Hard Disk<br />
If unable to read the hard disk please check that the data and power cables are properly<br />
connected.<br />
Keys<br />
If pressing the keys on the front panel produces no response from the system, the keys may have<br />
malfunctioned. Please check the control panel to see if the wiring has come loose.<br />
Firmware Upgrade<br />
The device can be updated to new versions of firmware through CD/DVD-ROM. If unable to<br />
update the firmware, check that the firmware was downloaded correctly. A failed firmware upgrade<br />
may cause the duplicator to become inoperable. If the system is working normally, do not attempt<br />
this operation. If the system is already experiencing problems, please contact your distributor for<br />
repairs.<br />
Startup/Shutdown<br />
Do not suddenly turn off the power while the system is performing an operation. After shutting<br />
down normally, wait a moment (usually around 2 seconds) before starting the system again so it<br />
can run its self-diagnostics.<br />
About Copy HPA<br />
The HPA (Host Protected Area) is a hidden data region defined in ATA/ATAPI-4. This area is not<br />
usually accessible to software. The SATA HDD Duplicate Controller supports the copying of data<br />
from this hidden area.<br />
Drive is locked (cannot be initialized after the SECURE ERASE or OVERWRITE)<br />
1. Place drive in the source slot<br />
2. Execute "PreScan" function for 1 minute<br />
3. Press "ESC" key until you see "<strong>User</strong> Abort" on the LCD screen<br />
4. Now remove the drive from the duplicator and connect it to your system, the HDD should be<br />
recognized and be able to initialize again<br />
www.addonics.com Technical Support (M-F 8:30am - 6:00pm PST) Phone: 408-453-6212 Email: www.addonics.com/support/query/
Error Messages List<br />
NO# Error Messages Description Applied to<br />
1 Source Drive Not Exist!<br />
No source HDD exist<br />
during operating<br />
2 <strong>User</strong> Abort! Cancel operating<br />
3 No Drive Exist<br />
4 X Space Not Enough<br />
Target Drive Space Not<br />
Enough<br />
5 X Space Not Enough<br />
Target Drive Fail!<br />
6 PreScan Fail<br />
7 Source Drive Read Fail!<br />
8 Target Drive Write Fail!<br />
9 Target Drive Read Fail!<br />
10 Target Drive Fail<br />
11 Target Drive Not Exist!<br />
12 One pass<br />
One pass failed<br />
13 3 pass<br />
pass 1 failed<br />
14 7 pass 5220.22-M<br />
pass 1 failed<br />
No HDD exist during<br />
operating<br />
When source capacity is<br />
small than target<br />
When source capacity is<br />
small than target<br />
Lose SATA connection<br />
during copy or bad sector<br />
on HDD<br />
Lose target SATA<br />
connection on source port<br />
during copy or bad sector<br />
on source HDD<br />
Lose target SATA<br />
connection on target port<br />
during copy<br />
Lose target SATA<br />
connection on target port<br />
during comparing<br />
Lose target SATA<br />
connection on target port<br />
during async comparing<br />
No HDD exist during<br />
operating<br />
Lose SATA connection on<br />
SATA port during Overwrite<br />
Lose SATA connection on<br />
SATA port during Overwrite<br />
Lose SATA connection on<br />
SATA port during Overwrite<br />
Copy, Async Copy, Compare,<br />
Async Compare, PreScan<br />
Source, Source Size, Copy<br />
Size, Tolerance Size<br />
Any function and any time<br />
Device Info<br />
Copy, Compare<br />
Async Copy, Async Compare<br />
PreScan Source<br />
Copy, Async Copy, Compare<br />
Copy<br />
Compare<br />
Async Copy, Async Compare<br />
Overwrite<br />
Overwrite<br />
Overwrite<br />
Overwrite<br />
If you hear the warning signal while the copying function is executing (a beep every 5 seconds),<br />
the LCD screen will display the problem status; you may press any button to return to the copy<br />
progress screen.<br />
www.addonics.com Technical Support (M-F 8:30am - 6:00pm PST) Phone: 408-453-6212 Email: www.addonics.com/support/query/
Firmware Update Procedure<br />
(Requires one hard drive containing the firmware file):<br />
1. Create a 50MB HDD partition with FAT/FAT32 or NTFS files system on any SATA hard drive<br />
2. Download the firmware and unzip the file to .BIN file format<br />
3. Copy the .BIN file onto the 50 MB partition of the HDD<br />
4. Insert this drive to the Source slot of the duplicator. For subsystem, connect the drive to the<br />
Source SATA port<br />
5. Select "Firmware Update" function under the "Setup" or "Advanced Setup" menu and press<br />
ENT to do the update. To access the "Advanced Setup", hold onto the ESC button for 5 seconds.<br />
The new option will appear<br />
6. Once completed, it will reboot and show you the new firmware version<br />
Notes:<br />
SECURE ERASE - HDD duplicator sends a WIPE<br />
command to the hard drive. This command fills 00 string to entire HDD<br />
OVERWRITE - There are three options: One pass, 3 passes and 7 passes 5220.22-M. The duplicator<br />
writes a string of pattern over the entire disk one time, three times or seven times. (5220.22-M is<br />
the DoD standard for drive sanitization)<br />
Please note that some drives may become locked and cannot be initialized after the SECURE ERASE<br />
or OVERWRITE. Should this happen, use the following procedures to unlock the drive:<br />
1. Place drive in the source slot<br />
2. Execute "PreScan" function for 1 minute<br />
3. Press "ESC" key until you see "<strong>User</strong> Abort" on the LCD screen<br />
4. Now remove the drive from the duplicator and connect it to your system, the HDD should be<br />
recognized and be able to initialize again<br />
CONTACT US<br />
www.addonics.com<br />
Phone: 408-573-8580<br />
Fax: 408-573-8588<br />
Email: http://www.addonics.com/sales/query/