Addonics 4 Slot/Pocket Ultra Digidrive Overview Features Outlines
Addonics 4 Slot/Pocket Ultra Digidrive Overview Features Outlines
Addonics 4 Slot/Pocket Ultra Digidrive Overview Features Outlines

You also want an ePaper? Increase the reach of your titles
YUMPU automatically turns print PDFs into web optimized ePapers that Google loves.
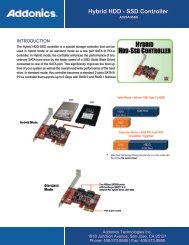
<strong>Overview</strong><br />
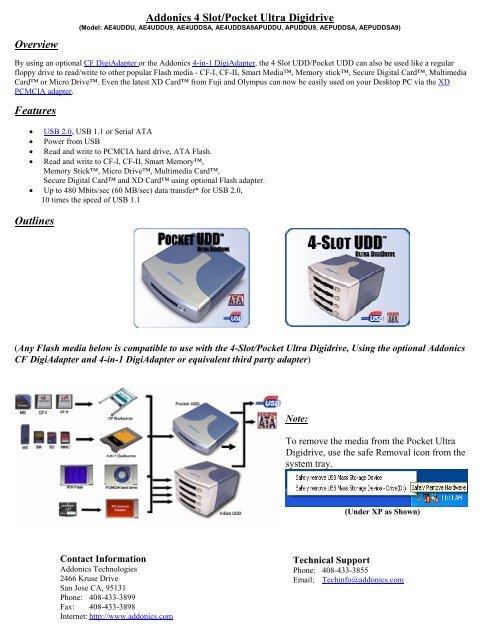
<strong>Addonics</strong> 4 <strong>Slot</strong>/<strong>Pocket</strong> <strong>Ultra</strong> <strong>Digidrive</strong><br />
(Model: AE4UDDU, AE4UDDU9, AE4UDDSA, AE4UDDSA9APUDDU, APUDDU9, AEPUDDSA, AEPUDDSA9)<br />
By using an optional CF DigiAdapter or the <strong>Addonics</strong> 4-in-1 DigiAdapter, the 4 <strong>Slot</strong> UDD/<strong>Pocket</strong> UDD can also be used like a regular<br />
floppy drive to read/write to other popular Flash media - CF-I, CF-II, Smart Media, Memory stick, Secure Digital Card, Multimedia<br />
Card or Micro Drive. Even the latest XD Card from Fuji and Olympus can now be easily used on your Desktop PC via the XD<br />
PCMCIA adapter.<br />
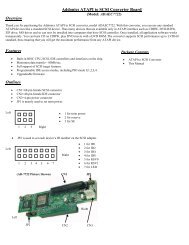
<strong>Features</strong><br />
• USB 2.0, USB 1.1 or Serial ATA<br />
• Power from USB<br />
• Read and write to PCMCIA hard drive, ATA Flash.<br />
• Read and write to CF-I, CF-II, Smart Memory,<br />
Memory Stick, Micro Drive, Multimedia Card,<br />
Secure Digital Card and XD Card using optional Flash adapter.<br />
• Up to 480 Mbits/sec (60 MB/sec) data transfer* for USB 2.0,<br />
10 times the speed of USB 1.1<br />
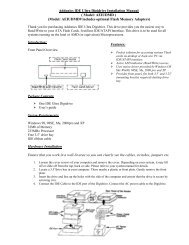
<strong>Outlines</strong><br />
(Any Flash media below is compatible to use with the 4-<strong>Slot</strong>/<strong>Pocket</strong> <strong>Ultra</strong> <strong>Digidrive</strong>, Using the optional <strong>Addonics</strong><br />
CF DigiAdapter and 4-in-1 DigiAdapter or equivalent third party adapter)<br />
Note:<br />
To remove the media from the <strong>Pocket</strong> <strong>Ultra</strong><br />
<strong>Digidrive</strong>, use the safe Removal icon from the<br />
system tray.<br />
(Under XP as Shown)<br />
Contact Information<br />
<strong>Addonics</strong> Technologies<br />
2466 Kruse Drive<br />
San Jose CA, 95131<br />
Phone: 408-433-3899<br />
Fax: 408-433-3898<br />
Internet: http://www.addonics.com<br />
Technical Support<br />
Phone: 408-433-3855<br />
Email: Techinfo@addonics.com
USB driver Installation<br />
For Win98 and Win98SE<br />
Note:<br />
Plug and Play under Windows Me, 2000 and XP<br />
Uses Mass Storage Driver under Windows Me,<br />
Windows 2000 and XP (Plug and Play)<br />
1. Make sure your computer is up and running<br />
2. Verify that all cables are connected.<br />
3. Insert the Flash card that you will be using to the <strong>Digidrive</strong>.<br />
4. Connect the USB cable to the USB Port.<br />
5. A "New Hardware Found" message shall pops up.<br />
a. Follow the ON SCREEN wizard and point to the<br />
location of A:\USBWIN98 for the driver.<br />
b. Let Windows finish the installation and that’s it.<br />
c. Double click My Computer icon and see if you have<br />
an extra drive letter for the <strong>Pocket</strong> <strong>Ultra</strong> <strong>Digidrive</strong>.<br />
You may now access the <strong>Pocket</strong> <strong>Ultra</strong> <strong>Digidrive</strong>.<br />
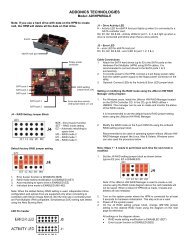
Operation of the 4-<strong>Slot</strong> UDD/<strong>Pocket</strong> UDD<br />
Serial ATA Installation<br />
Note: Serial ATA does not require driver to<br />
be loaded for the drive. You need to load the<br />
driver for the Serial ATA controller for the<br />
Serial ATA drive to work. Just plug in the<br />
drive, insert a media card and that’s it.<br />
The 4-<strong>Slot</strong> UDD/<strong>Pocket</strong> UDD is designed not to draw any power when there is no media inserted. So the LED light will remain off even the<br />
device is connected to the computer.<br />
Use the following procedures to add or remove the media from the 4 <strong>Slot</strong> UDD/<strong>Pocket</strong> UDD.<br />
1. Insert the media fully into the device, the LED light will turn green, indicating the media is properly inserted inside and the device<br />
is now turned on. Your operating system will report new hardware detected and begin to install the device. This may take a few<br />
seconds before a new drive icon appears in the My Computer folder. During this initialization, the LED light on the 4 <strong>Slot</strong><br />
UDD/<strong>Pocket</strong> UDD toggles between orange and green color; and will stay green once the computer recognizes the media.<br />
2. Once the drive icon appears, the media is now ready and can be used like regular floppy media.<br />
3. During the read / write operation, the LED light of the 4 <strong>Slot</strong> UDD/<strong>Pocket</strong> UDD will turn Red.<br />
4. To remove the media, click on the Safe Remove icon to stop the connection as shown below. Once the “you may now safely<br />
remove window” shows up, you can then remove the media from the 4 <strong>Slot</strong> UDD/<strong>Pocket</strong> UDD by pushing on the eject button.<br />
LED light<br />
Eject Button<br />
Note: if you eject the media from the 4 <strong>Slot</strong> UDD/<strong>Pocket</strong> UDD without checking the Safe Remove icon, a warning message will appear<br />
from Windows 98SE, Me and 2000. This message is a reminder that it is safer to use the Safe Remove icon when you remove the media<br />
to prevent possible data loss in case you are in the middle of copying a file to and from the media. You can go ahead and close this<br />
message.<br />
5. After the media is ejected from the 4 <strong>Slot</strong> UDD/<strong>Pocket</strong> UDD, the LED light will go off, indicating the media is fully ejected from<br />
the device.<br />
6. Do not pull the media out of the device without using the eject button. This may crash the computer, as it does not realize the<br />
media has been manually removed from the device.<br />
UUU<strong>Addonics</strong> Technologies – ATAPI to SCSI UUsers Guide v1.0