Addonics IDE DigiDrive Installation (Model: AEIDEDMD4)
Addonics IDE DigiDrive Installation (Model: AEIDEDMD4)
Addonics IDE DigiDrive Installation (Model: AEIDEDMD4)

Create successful ePaper yourself
Turn your PDF publications into a flip-book with our unique Google optimized e-Paper software.
<strong>Addonics</strong> <strong>IDE</strong> <strong>DigiDrive</strong> <strong>Installation</strong><br />
(<strong>Model</strong>: AE<strong>IDE</strong>DMD4)<br />
Thank you for purchasing the <strong>Addonics</strong> <strong>IDE</strong> <strong>DigiDrive</strong>. This drive is designed for installing into any PC or Equipment with a standard<br />
3.5’ drive bay and <strong>IDE</strong> interfaces. The drive works like a floppy device and requires No special driver. Once connected, it can be use<br />
in computer running DOS and all Windows OS.<br />
Hardware <strong>Installation</strong><br />
1. Power off the computer<br />
2. Handle the device on the side and avoid touching the circuit board. Slide the <strong>IDE</strong> <strong>DigiDrive</strong> into one of the 3.5” drive bay of the<br />
computer and secure the device to the drive bay with mounting screws.<br />
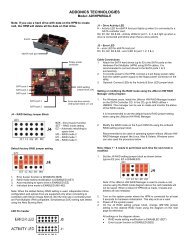
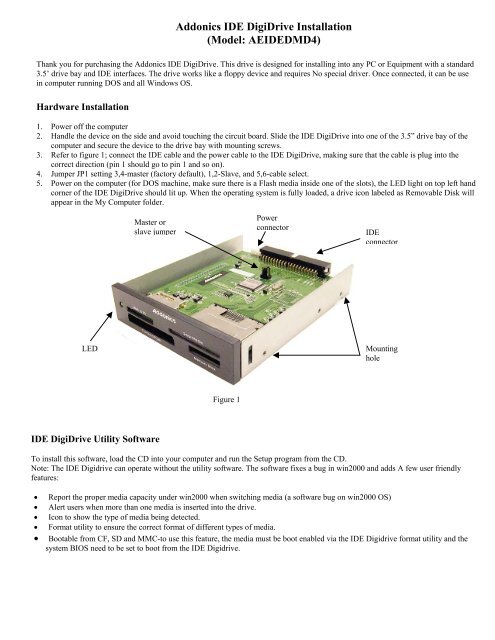
3. Refer to figure 1; connect the <strong>IDE</strong> cable and the power cable to the <strong>IDE</strong> <strong>DigiDrive</strong>, making sure that the cable is plug into the<br />
correct direction (pin 1 should go to pin 1 and so on).<br />
4. Jumper JP1 setting 3,4-master (factory default), 1,2-Slave, and 5,6-cable select.<br />
5. Power on the computer (for DOS machine, make sure there is a Flash media inside one of the slots), the LED light on top left hand<br />
corner of the <strong>IDE</strong> <strong>DigiDrive</strong> should lit up. When the operating system is fully loaded, a drive icon labeled as Removable Disk will<br />
appear in the My Computer folder.<br />
Master or<br />
slave jumper<br />
Power<br />
connector<br />
<strong>IDE</strong><br />
connector<br />
LED<br />
Mounting<br />
hole<br />
Figure 1<br />
<strong>IDE</strong> <strong>DigiDrive</strong> Utility Software<br />
To install this software, load the CD into your computer and run the Setup program from the CD.<br />
Note: The <strong>IDE</strong> Digidrive can operate without the utility software. The software fixes a bug in win2000 and adds A few user friendly<br />
features:<br />
• Report the proper media capacity under win2000 when switching media (a software bug on win2000 OS)<br />
• Alert users when more than one media is inserted into the drive.<br />
• Icon to show the type of media being detected.<br />
• Format utility to ensure the correct format of different types of media.<br />
• Bootable from CF, SD and MMC-to use this feature, the media must be boot enabled via the <strong>IDE</strong> Digidrive format utility and the<br />
system BIOS need to be set to boot from the <strong>IDE</strong> Digidrive.
How to Use<br />
To use, insert your memory card into the appropriate slot into the <strong>IDE</strong> <strong>DigiDrive</strong>. From here the card works similar to a floppy disk.<br />
During operation, the LED light flashes when data is read or copied onto the media.<br />
Switching to different media with one drive icon<br />
1. Please note that if you have more than one media in the device, the drive icon will recognize only the media that is inserted first<br />
into the device. To recognize the new media inserted in another slot, the first media must be removed and follow by double<br />
clicking on the drive icon again to reset the device.<br />
2. If you have more than two media inside the device while booting up your computer, the first media that will be detected will be in<br />
the following slot order: Compact Flash, Smart Media, Memory Stick and MMC & SD.<br />
For DOS and Windows NT<br />
When using the device on DOS machine, one of the slots must contain a media during the boot time. Otherwise, no drive letter will appear<br />
under DOS. Switching media to different slot must require system reboot in order to recognize the new media.<br />
Smart Media (SM)<br />
‣ Insert Card with metal contact strip facing down and the cut out notch on the left side going toward the drive.<br />
Push gently all the way in and then release.<br />
To remove the card, merely pull out the media. When more than ¼ inch of the card is showing, you may remove the card safely.<br />
Sony Memory Stick (MS)<br />
‣ Insert Card with metal contact strip facing down and the cut out notch on the left side going toward the drive.<br />
Push gently all the in and then release.<br />
To remove the card, merely pull out the media<br />
Multimedia Card (MMC) or SecureDigital Card (SD)<br />
‣ Insert Card with metal contact strip facing down and the cut out notch on the left side going toward the drive.<br />
Push gently all the in and then release.<br />
To remove the card, merely pull out the media<br />
Compact Flash (CF) or IBM Microdrive<br />
‣ Insert Card with the edge with the holes facing toward the drive, making sure to line the card up with rails.<br />
To remove the card, merely pull out the media<br />
Technical Support<br />
If you need assistance to get your unit functioning properly, please call <strong>Addonics</strong> Technical Support. Our technical staff will be happy to<br />
assist you, but they will need your help to do so. Calling the technical support staff without all the proper information can be both time<br />
consuming and frustrating. Here are some tips to help you out:<br />
Contact Information<br />
<strong>Addonics</strong> Technologies<br />
2466 Kruse Drive<br />
San Jose CA, 95131<br />
Phone: 408-433-3855<br />
Fax: 408-433-3898<br />
Email: Techinfo@addonics.com<br />
<strong>Addonics</strong> Technologies – <strong>IDE</strong> Digidrive Users Guide v1.0 1