InSite 6 Uploading Guide - RR Donnelley
InSite 6 Uploading Guide - RR Donnelley
InSite 6 Uploading Guide - RR Donnelley

You also want an ePaper? Increase the reach of your titles
YUMPU automatically turns print PDFs into web optimized ePapers that Google loves.
INSITE CUSTOMER UPLOADING GUIDE<br />
This document is designed to help <strong>InSite</strong> users with uploading files. Below are a few<br />
guidelines for file submission, followed by instructions on uploading.<br />
• Only PDF’s can be uploaded into <strong>InSite</strong> for auto-processing. If other files need to be<br />
uploaded into <strong>InSite</strong>, they should be compressed into a .zip or .sit file prior to upload.<br />
• PDF’s can be generated as single-page or multi-page documents. Both methods can<br />
be successfully utilized in the <strong>InSite</strong> workflow. If you are not sure which method is<br />
best for you, consult with your Technical Service Representative. When making<br />
revisions in Insite, keep in mind how Insite handles them. There is no charge when<br />
you make revisions by uploading and overwriting previous files. There is a charge for<br />
other methods.<br />
o Insite overwrites an original file if the revised file has the same file name, the same<br />
number of pages as the original file, and if the original file has not been approved.<br />
o Revised files with different file names than originals add pages to the Insite job until<br />
<strong>RR</strong> <strong>Donnelley</strong> deletes the original pages.<br />
For additional information on our file-naming standard, see page 6 of our File Standards and<br />
Review document online at this link:<br />
http://prepress.rrd.com/www<strong>RR</strong>D1/Docs/Markets/Books/File_Standards_and_Review.pdf<br />
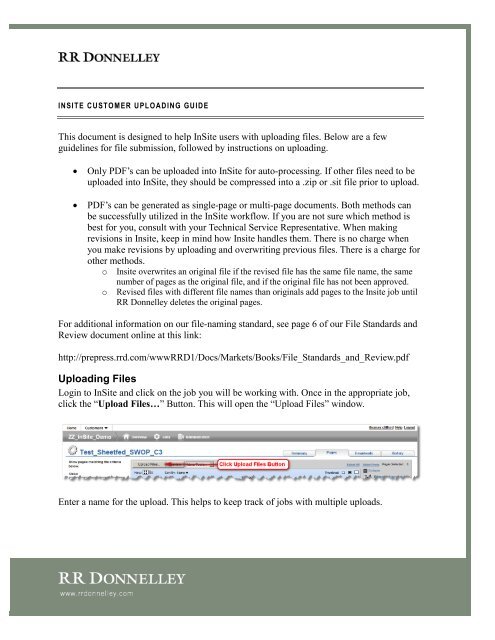
<strong>Uploading</strong> Files<br />
Login to <strong>InSite</strong> and click on the job you will be working with. Once in the appropriate job,<br />
click the “Upload Files…” Button. This will open the “Upload Files” window.<br />
Enter a name for the upload. This helps to keep track of jobs with multiple uploads.
1) Select the files to be uploaded and either drag them to the upload window or click on<br />
the green page icon with the “+” sign on it to browse your computer for the pages to<br />
be uploaded.<br />
2) Click Upload. A pop-up window will display the progress of the upload. Do not close<br />
the Upload window. Doing so will stop the upload! Clicking Cancel will permanently<br />
stop the upload.<br />
Keep this window open until<br />
the upload has completed.<br />
After the upload completes, a details window will open up and give you a detailed log<br />
on the processing of the files. Pay close attention to this window as any warnings or<br />
errors will be shown here. This window will tell you if your files have been auto<br />
processed and if not will give valuable information as to why the files did not auto<br />
process.<br />
last revised July 23, 2010 -JCS 2
Resuming An Upload<br />
There may be cases when an upload didn’t complete successfully: the upload window was<br />
accidentally closed, computer was shutdown, lost network connection, etc. <strong>InSite</strong> has the<br />
ability to resume an upload. When you login to <strong>InSite</strong>, it will detect if you have an upload<br />
that has failed to complete.<br />
To resume the upload, click on the job name link to open the job. This will take you to the<br />
Summary view of the job. In the File Transfer section you will see the incomplete upload<br />
listed.<br />
Click Resume to continue the upload or click Cancel to permanently stop the upload. If you<br />
click Cancel a confirmation dialog box will pop up. Click OK to confirm the cancellation of<br />
the upload.<br />
last revised July 23, 2010 -JCS 3