Issue 34b - The Enthusiasts Website for Roll-Royce & Bentley Motor ...
Issue 34b - The Enthusiasts Website for Roll-Royce & Bentley Motor ...
Issue 34b - The Enthusiasts Website for Roll-Royce & Bentley Motor ...

You also want an ePaper? Increase the reach of your titles
YUMPU automatically turns print PDFs into web optimized ePapers that Google loves.
Number 34B April, 2004<br />
<br />
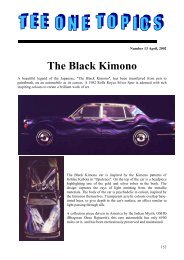
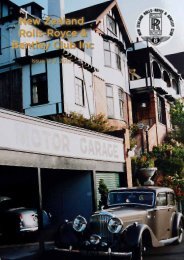
WHAT IS ODD ABOUT THIS PICTURE ?<br />
Of course being the bright readers that you all are you would have noticed that very Holden<br />
looking radiator cap. Egads sir – is there no end to it! Relax colonel it is quite kosher. I<br />
suppose this example, a Silver Cloud as I remember it is an illustration of the hand built nature<br />
of the car. For reasons I cannot think of, the builders having installed air conditioning in the car<br />
at the Factory realised that the cooling system would need to run a Hell of a lot hotter than the<br />
standard chariot. Normally this would involve wacking in a higher rated steam valve in the top<br />
of the radiator capped by that nice little round plate and a caution label neatly fitted under the<br />
retaining screws! But the steam valves in the store room were only rated at 10lb or 15lb at the<br />
most and probably a higher figure was required to cope with the higher temperature.<br />
So it was much easier given the few cars produced at that time with air conditioning to fit a<br />
conventional filler neck and an off the shelf cap of whatever rating you required. <strong>The</strong>re, I have<br />
answered my own question – I think.<br />
<strong>The</strong>se fittings were standard on the Continental models which presumably ran hotter anyway.<br />
<br />
489
After the wedding, he laid down the following rules: "I'll be home when I want, if I want and at<br />
what time I want-and I don't expect any hassle from you. I expect a great dinner to be on the<br />
table unless I tell you that I won't be home <strong>for</strong> dinner. I'll go hunting, fishing, boozing and cardplaying<br />
when I want with my old buddies and don't you give me a hard time about it. Those are<br />
my rules. Any comments?" His new bride said, "No, that's fine with me. Just understand that<br />
there will be sex here at seven o'clock every night... whether you're here or not."<br />
<br />
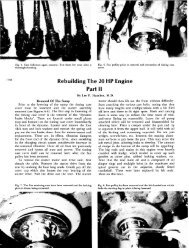
WHERE ARE THE PUMPS?<br />
I am often asked by owners and spectators alike ‘Where are the Pumps”. And here they are<br />
sitting in the valley of the engine normally surrounded by the intake manifold and all its<br />
attendant bits. <strong>The</strong> units sit immediately over the camshaft which has extra cams on it to work<br />
the plungers that work the pumps. <strong>The</strong>y are fed by gravity into a surrounding body which is<br />
sealed by nothing else but a couple of ‘O’ rings. <strong>The</strong> inlet can be seen gaping on the pump at<br />
the front of the<br />
picture. By<br />
releasing a circlip on<br />
the top of the pump<br />
and undoing the pipe<br />
screwed to its top –<br />
the outlet, the outer<br />
body can be prised<br />
off and the ‘O’ rings<br />
replaced should they<br />
choose to leak.<br />
Originally the<br />
outlets were joined<br />
to the accumulators<br />
490
down the side of the engine with flexible pipes the object being to separate the unavoidable<br />
clicking of the pump from the main body of the engine. <strong>The</strong> idea was great but un<strong>for</strong>tunately<br />
the technology of the day did not match the aspirations of the designers. <strong>The</strong>re were some<br />
spectacular failures of these flexible pipes with seemingly gallons of brake fluid being unloaded<br />
on the indoor/outdoor carpet so popular in the States when these very impressive cars wafted up<br />
the carriage sweep and drew into the porte cochère.<br />
A further problem ensued with the plungers on the cam shaft. <strong>The</strong> lower picture shows the<br />
underside of the valley cover with the plunger protruding from the plunger body. <strong>The</strong> body was<br />
quite enclosed and enjoyed as do most <strong>Roll</strong>s-<strong>Royce</strong> enclosed mechanical spaces, the<br />
accumulation of gunk. So much so that the plunger often didn’t and pressure did not ensue,<br />
lights came on and….. well out came an open version of the plunger housing and all was well<br />
with the world once more.<br />
<br />
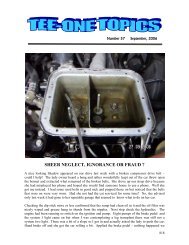
LIGHTING VARIATIONS FOR THE POSTWAR STANDARD<br />
STEEL BODY<br />
Many years ago, in a<br />
moment of exuberance I<br />
rushed out and bought an R<br />
Type <strong>Bentley</strong> with a<br />
damaged manual gearbox.<br />
Events at the time<br />
overwhelmed me and to my<br />
shame I did nothing to the<br />
car selling it some time later<br />
to an absolute perfectionist<br />
restorer. He could not wait<br />
to remove the tail light<br />
assemblies which must have<br />
been fitted by a very<br />
talented metal worker. <strong>The</strong><br />
actual lights were pinched<br />
from a Morris Major <strong>for</strong> those that can remember those funny little cars! At the front end a more<br />
conventional approach had been adopted. <strong>The</strong> overall problem was to provide some turn<br />
signalling other than those ridiculous trafficators. This was the Factory solution although they<br />
used a carefully cast<br />
mounting block behind<br />
the light and an almost<br />
flat lens glass. <strong>The</strong><br />
ones used here are<br />
highly Mini Moke<br />
methinks.<br />
And lastly the<br />
headlights. Nothing<br />
wrong here in fact they<br />
are very right. To start<br />
with the lights supplied<br />
491
with these cars were about<br />
as much use as a bucket of<br />
glow worms. <strong>The</strong>y looked<br />
very elegant and are now<br />
impossible to replace.<br />
<strong>The</strong>re are I was horrified to<br />
note at the Centenary<br />
Rally, some of these cars<br />
getting around with<br />
original light fittings. <strong>The</strong><br />
above conversion using a<br />
standard 7 inch sealed<br />
beam light and an old<br />
Holden inner frame not<br />
only protects the original<br />
item but gives a far<br />
superior light. If you want to improve on that look to flat front sealed beams or semi sealed<br />
units with super dooper globes but watch the current draw and if necessary hide a relay<br />
somewhere <strong>for</strong> switching lest you burn up your beautiful light switch.<br />
<br />
REFINISHING WOODWORK<br />
(<strong>The</strong>se writings appeared on the Club website in response to someone enquiring about failing<br />
veneers particularly on SZ cars.) Lest it be lost I include it here <strong>for</strong> reference. <strong>The</strong> author<br />
‘Steve’ is unknown to me.)<br />
Most of the veneered wooden trim fitted to vehicles since the 60's has been of very poor quality,<br />
<strong>Roll</strong>s-<strong>Royce</strong> & <strong>Bentley</strong> however have continued to use the finest backing materials and<br />
adhesives and this in my experience makes it the easiest to restore of any manufacturer. <strong>The</strong><br />
only exception is the Camargue fascia where the veneers are bonded to aluminium, which<br />
causes particular difficulties during stripping. In answer to your question the lacquer used on<br />
your car was polyester and if memory serves correctly 1985 saw the introduction of an improved<br />
coating with a flex additive. This was better able to resist cracking and subsequent shelling.<br />
Prior to polyester, melamine materials were used but these would date back to the 1960’s.<br />
I would strongly suggest you do not sand the existing coatings. Apart from being time<br />
consuming the risk of breaking through the veneers is too high. <strong>The</strong> best method is to use a<br />
chemical paint remover however as the original coating is a flexible polyester and polyesters do<br />
not break down easily, go <strong>for</strong> a brand that has a reputation <strong>for</strong> being aggressive. If you plan on<br />
doing the entire wood set buy at least a 2.5 litre can.<br />
Be<strong>for</strong>e you do anything make notes or take photographs showing the location and colour of the<br />
painted in areas on the ends of the waist rails etc. You should also try and obtain at this stage a<br />
small amount of brown cellulose paint matched to the instrument apertures.<br />
Paint removers contain some pretty nasty chemicals so work in a well ventilated area and at the<br />
very least wear rubber gloves and use eye protection. Don't work in direct sunlight though as the<br />
stripper will dry out too quickly. To limit the amount of clearing up later lay down several<br />
thicknesses of a good quality paper, sufficient to do at least several pieces at a time. Tape up any<br />
492
joins and fold up the edges and corners to limit the flow of the paint remover. Upon completion<br />
the paper can be rolled up and placed in plastic bags.<br />
Pour the paint remover over the pieces and leave it to react. Unless the wood has been refinished<br />
using a non-polyester material nothing will happen very quickly so don't expect instant results.<br />
It helps to keep the pieces wetted either by tipping on more paint remover or by scooping the<br />
excess off the paper and putting it back on the wood but don't scrape or otherwise disturb the<br />
coating. Eventually the polyester will fragment and take on, <strong>for</strong> want of a better description, a<br />
sugary appearance. At this stage scrape the coating away with a soft scraper, the spreaders used<br />
<strong>for</strong> polyester body fillers are ideal. Ideally the coating will lift away easily and the paint remover<br />
will not even have penetrated through to the veneer. Too soon and either the coating will remain<br />
intact or only small areas will lift away and then with some ef<strong>for</strong>t. If this is the case just pour on<br />
more paint remover and wait.<br />
When the coating has been removed wash the pieces down with cellulose paint thinner to<br />
remove all traces of the paint remover. Any small fragments of lacquer can be picked off easily.<br />
Do this several times and do not be afraid to really wet the surface then leave everything to dry<br />
out.<br />
As an alternative you can use a hot air gun and a scraper but be warned that fragments of<br />
polyester will fly off and eye protection is essential. <strong>The</strong>re is also a very significant risk of<br />
scorching the surface with the resultant discolouration. In many thousands of pieces I have never<br />
encountered a problem using paint removers so I suggest sticking with this method. Try this<br />
with any Jaguar or Aston Martin wood trim from the same period however and the veneers will<br />
lift off, assuming this has not already happened.<br />
At this stage the surface will be rough, slightly shiny and fairly dark in colour. After picking off<br />
any small fragments with a small craft knife begin sanding the surface. I wouldn’t bother using<br />
glass paper as a conventional woodworker might but suggest instead using 3M pre-cut, or<br />
similar, abrasive paper, which you can buy from any supplier of vehicle, paints. European and<br />
American grading systems differ slightly and as I have no idea what system is used in Australia<br />
it would be a good idea to cross-reference the European grades I will quote. While you are at the<br />
paint supplier buy some spirit wipe, sometimes called pre cleaner. Painters use this to wipe<br />
down prior to spraying to remove any residual contaminants from fingerprints etc. A litre will be<br />
sufficient.<br />
When sanding it is essential to use a hard backing <strong>for</strong> the paper. If the backing has any give it<br />
will apply greater pressure on the edges and will have a tendency to wear through the veneer but<br />
even if this extreme is not reached any unevenness created will still have to levelled out by the<br />
clear coat later. I suggest starting with P120 used very lightly just to skim over the surface and<br />
break the slight glaze it will have at this stage be<strong>for</strong>e switching to P180. Make sure the paper is<br />
kept tightly against the backing. <strong>The</strong> paper will clog initially so wire brush it frequently or<br />
change to a new piece. Electrically operated orbital sanders can be used but care must be taken<br />
to avoid damage to edges as they are usually supplied with a soft sponge backing. When<br />
working around the instrument openings use a piece of 1” dowel or similar to back up the paper.<br />
Be very careful when working on the edges of the cross banding on the waist rails and<br />
companion sets, this will already have been well sanded during production. <strong>The</strong>re are techniques<br />
to repair it but the best solution is not to cause any damage in the first place. After blowing off<br />
any dust you will find the surface is smooth to the touch and free of any scratch marks. Final<br />
finishing with P240 will improve the finish still further. Ideally using a compressor and<br />
blowgun, remove all traces of dust.<br />
493
To assess the colour of the finished veneer apply the spirit wipe to its surface using a pad. Water<br />
will achieve the same thing but will raise the grain necessitating further sanding. Spirit wipe<br />
dries out fairly quickly but you will have quite a few seconds to judge whether the colour is<br />
acceptable. <strong>Roll</strong>s-<strong>Royce</strong> generally used stains or paints to darken the appearance but the natural<br />
colour is often quite acceptable <strong>for</strong> the veneered areas. <strong>The</strong> top of the waist rails however will be<br />
solid mahogany on your car and this will appear very light after lacquering so you will probably<br />
feel the need to darken these, often quite considerably, as did the factory. Staining and painting<br />
is done in stages with individual areas being masked off one at a time to avoid affecting adjacent<br />
areas. <strong>The</strong> instrument openings and end sections are painted in using a brush, ideally an<br />
airbrush, using cellulose paint over the bare wood. Spirit wiping will also highlight any defects<br />
such as areas filled during the original production. <strong>The</strong>se too need painting in and once again an<br />
airbrush is the best way to do this. As a book match is used if any area is painted in on one leaf<br />
of veneer every other leaf should be similarly touched in. This would mean eight touch in’s<br />
across the early Spirit and Shadow dash or <strong>for</strong> a set or waist rails or a pair of picnic tables. After<br />
the touch in has dried re apply the spirit wipe and assess how good it looks. If you are not happy<br />
wash it off with thinner or lightly sand it be<strong>for</strong>e repeating the process. If you find areas that need<br />
filling, as is frequently the case, use a two part wood filler, which a specialist timber merchant<br />
should be able to supply in various colours. Mix it according to the directions, fill the defects<br />
and then sand them smooth. Finally paint them in.<br />
Burr walnut naturally contains black so I would suggest using black to paint in any and all<br />
defects. Black will look 100% convincing if applied correctly and very little practice is actually<br />
required <strong>for</strong> small areas. Other veneers however do not have this advantage and some, like birds<br />
eye maple, are almost impossible to make convincing repairs over.<br />
<strong>The</strong> ideal finish is flexible polyester <strong>for</strong> a variety of reasons but this is not really an option<br />
unless you can find a company to apply it <strong>for</strong> you. This gives the required thickness in one<br />
operation instead of requiring time spent building layers. Polyesters are used <strong>for</strong> finishing<br />
musical instruments like pianos and guitars and frequently used <strong>for</strong> decorative features in luxury<br />
yachts. You may get lucky finding such a specialist. <strong>The</strong>re are a few excellent non-sand varieties<br />
that can give a very good finish almost to the standard of the original. <strong>The</strong> very finest finish<br />
however is only obtained using the varieties designed to be sanded and polished.<br />
Polyurethane lacquer will give good results but it will take many coats and several sanding<br />
operations to build the required thickness to fill the grain and provide a flat surface <strong>for</strong><br />
polishing, it can be brushed or sprayed. Avoid fact drying cellulose or acrylic lacquers as these<br />
will crack very quickly as they lack the necessary flexibility. <strong>The</strong>y will also soften all the areas<br />
painted in which may streak if you brush over them. Two pack clear coats, particularly high<br />
solids varieties, used <strong>for</strong> painting cars are probably the next best alternative to polyester but<br />
there are very real health implications involved when spraying them. Any car paint shop can<br />
apply the lacquer <strong>for</strong> you and they may be willing to do this <strong>for</strong> a reasonable cost as they can<br />
easily combine small pieces with other work requiring clear coat spraying. Although they will<br />
probably not have any experience of wood finishing just tell them to apply three sets of coating<br />
with a light rub down with scotchbrite in between. You will then need to wet sand, using P600<br />
or P800 wet or dry paper and a hard rubber block to level the surface. Take your time and wipe<br />
and dry the surface frequently to assess the progress. Polyester builds very well and rubbing<br />
through is never a problem but it is a very real danger with any other coating so take special care<br />
on edges. Now take the wood back to the paint shop and get them to apply another couple of<br />
sets of clear. You will then need to wet sand with P800 wet or dry paper to remove any “gun<br />
texture” and any residual sinkage into the grain. Follow up with P1200 and then polish using a<br />
494
suitable compound. Polyurethane requires longer drying times, more coats and more sanding<br />
operations. Whatever material you use seal the back with a couple of coats. Although the factory<br />
never did this it does give a number of advantages.<br />
<strong>The</strong> final task is to refit the hardware and this can take some time, a lot of care and a good craft<br />
knife. Masking certain areas prior to lacquering helps but to lift the masking tape you will still<br />
have to cut through the lacquer.<br />
Although time consuming you will find this task extremely rewarding and the results will last<br />
<strong>for</strong> many years. I wish you every success.<br />
495