Basic OSPF Lab Walkthrough - Router Alley
Basic OSPF Lab Walkthrough - Router Alley
Basic OSPF Lab Walkthrough - Router Alley

Create successful ePaper yourself
Turn your PDF publications into a flip-book with our unique Google optimized e-Paper software.
<strong>Basic</strong> <strong>OSPF</strong> <strong>Lab</strong> <strong>Walkthrough</strong> v1.10 – Aaron Balchunas<br />
1<br />
- <strong>Basic</strong> <strong>OSPF</strong> <strong>Lab</strong> <strong>Walkthrough</strong> -<br />
Configuring <strong>Basic</strong> <strong>OSPF</strong> Routing – <strong>Lab</strong> <strong>Walkthrough</strong><br />
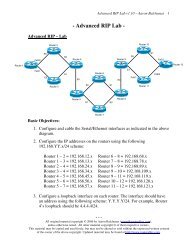
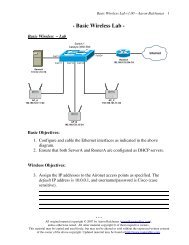
<strong>Basic</strong> Objectives:<br />
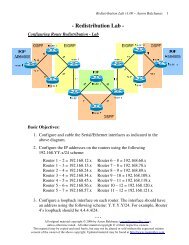
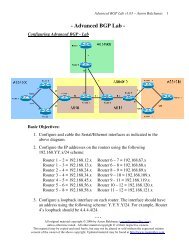
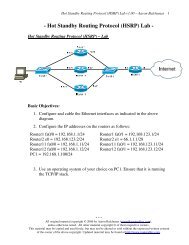
1. Configure and cable the Serial and Ethernet interfaces as indicated in the<br />
above diagram.<br />
2. Configure IP addresses between the routers using the following<br />
192.168.YY.x/24 scheme:<br />
<strong>Router</strong> 1 – 3 = 192.168.13.x<br />
<strong>Router</strong> 2 – 3 = 192.168.23.x<br />
<strong>Router</strong> 3 – 4 = 192.168.34.x<br />
<strong>Router</strong> 4 – 5 = 192.168.45.x<br />
<strong>Router</strong> 4 – 7 = 192.168.47.x<br />
<strong>Router</strong> 5 – 6 = 192.168.56.x<br />
<strong>Router</strong> 7 – 8 = 192.168.78.x<br />
<strong>Router</strong> 7 – 9 = 192.168.79.x<br />
<strong>Router</strong> 9 – 10 = 192.168.109.x<br />
<strong>Router</strong> 9 - 11 = 192.168.119.x<br />
3. Configure a loopback interface on each router. The interface should have<br />
an address using the following scheme: Y.Y.Y.Y/24. For example, <strong>Router</strong><br />
4’s loopback should be 4.4.4.4/24.<br />
* * *<br />
All original material copyright © 2006 by Aaron Balchunas (aaron@routeralley.com),<br />
unless otherwise noted. All other material copyright © of their respective owners.<br />
This material may be copied and used freely, but may not be altered or sold without the expressed written<br />
consent of the owner of the above copyright. Updated material may be found at http://www.routeralley.com.
<strong>Basic</strong> <strong>OSPF</strong> <strong>Lab</strong> <strong>Walkthrough</strong> v1.10 – Aaron Balchunas<br />
2<br />
Configuring <strong>Basic</strong> <strong>OSPF</strong> Routing – <strong>Lab</strong> <strong>Walkthrough</strong> (continued)<br />
<strong>OSPF</strong> Objectives:<br />
4. Configure <strong>OSPF</strong> routing on all routers. Use whatever process ID you<br />
wish.<br />
We’ll look at <strong>Router</strong> 2 as our example to complete this:<br />
<strong>Router</strong>2(config)# router ospf 2<br />
<strong>Router</strong>2(config-router)#<br />
The <strong>OSPF</strong> process ID is only locally significant – a unique ID can be used on each router in your<br />
Autonomous system. The process ID allows you to distinguish between multiple <strong>OSPF</strong> processes on<br />
the same router. Do not confuse the <strong>OSPF</strong> process ID with the EIGRP’s AS number!<br />
5. Manually set the <strong>OSPF</strong> router-ID on your router to your loopback IP<br />
address.<br />
We’ll look at <strong>Router</strong> 6 as our example to complete this:<br />
<strong>Router</strong>6(config)# router ospf 6<br />
<strong>Router</strong>6(config-router)# router-id 6.6.6.6<br />
The <strong>OSPF</strong> router ID can be manually specified, as it was here; otherwise, either the highest Loopback<br />
interface IP address, or highest physical interface IP address (respectively) will be used for the RID.<br />
* * *<br />
All original material copyright © 2006 by Aaron Balchunas (aaron@routeralley.com),<br />
unless otherwise noted. All other material copyright © of their respective owners.<br />
This material may be copied and used freely, but may not be altered or sold without the expressed written<br />
consent of the owner of the above copyright. Updated material may be found at http://www.routeralley.com.
<strong>Basic</strong> <strong>OSPF</strong> <strong>Lab</strong> <strong>Walkthrough</strong> v1.10 – Aaron Balchunas<br />
3<br />
Configuring <strong>Basic</strong> <strong>OSPF</strong> Routing – <strong>Lab</strong> (continued)<br />
<strong>OSPF</strong> Objectives:<br />
6. Place each interface on your router into the Area specified by the diagram.<br />
Place loopback interfaces in whatever area makes the most sense.<br />
We’ll look at <strong>Router</strong> 9 as our example to complete this:<br />
<strong>Router</strong>9(config)# router ospf 9<br />
<strong>Router</strong>9(config-router)# router-id 9.9.9.9<br />
<strong>Router</strong>9(config-router)# network 192.168.79.0 0.0.0.255 area 0<br />
<strong>Router</strong>9(config-router)# network 192.168.109.0 0.0.0.255 area 1011<br />
<strong>Router</strong>9(config-router)# network 192.168.119.0 0.0.0.255 area 1011<br />
<strong>Router</strong>9(config-router)# network 9.9.9.9 0.0.0.0 area 0<br />
With <strong>OSPF</strong>, the “network” command does not tell the router what networks to advertise; instead, the<br />
network command is used to place certain interfaces into specific areas, so those routers can form<br />
neighbor relationships.<br />
Notice the use of the wildcard mask. The first network command instructs the router to place any<br />
interface with an IP address matching “192.168.79” into area 0. Thus, a “0” in the wildcard mask<br />
indicates that octet must match exactly, where as a “255” indicates that octet can match anything.<br />
To match a specific IP address, we use a wildcard mask of 0.0.0.0, as we did when we placed the<br />
loopback interface in area 0.<br />
* * *<br />
All original material copyright © 2006 by Aaron Balchunas (aaron@routeralley.com),<br />
unless otherwise noted. All other material copyright © of their respective owners.<br />
This material may be copied and used freely, but may not be altered or sold without the expressed written<br />
consent of the owner of the above copyright. Updated material may be found at http://www.routeralley.com.
<strong>Basic</strong> <strong>OSPF</strong> <strong>Lab</strong> <strong>Walkthrough</strong> v1.10 – Aaron Balchunas<br />
4<br />
Configuring <strong>Basic</strong> <strong>OSPF</strong> Routing – <strong>Lab</strong> (continued)<br />
<strong>OSPF</strong> Objectives:<br />
7. Check the routing tables on your routers. What different types of routes do<br />
you see?<br />
We’ll look at <strong>Router</strong> 10 as our example to complete this:<br />
<strong>Router</strong>10# show ip route<br />
Gateway of last resort is not set<br />
O 192.168.119.0 [110/6] via 192.168.109.1, 0:01:22, Ethernet0<br />
O 11.11.11.0 [110/9] via 192.168.109.1, 0:01:52, Ethernet0<br />
O IA 192.168.79.0 [110/14] via 192.168.109.1, 0:00:59, Ethernet0<br />
O IA 7.7.7.0 [110/15] via 192.168.109.1, 0:00:55, Ethernet0<br />
O IA 9.9.9.0 [110/6] via 192.168.109.1, 0:01:23, Ethernet0<br />
<br />
The above is a condensed and incomplete look at <strong>Router</strong> 10’s routing table, but enough to give us a<br />
sense of what’s happening. Notice that routes within the local area are marked simply as “O” (<strong>OSPF</strong><br />
intra-area), while routes from a remote area are marked “O IA”(<strong>OSPF</strong> inter-area).<br />
* * *<br />
All original material copyright © 2006 by Aaron Balchunas (aaron@routeralley.com),<br />
unless otherwise noted. All other material copyright © of their respective owners.<br />
This material may be copied and used freely, but may not be altered or sold without the expressed written<br />
consent of the owner of the above copyright. Updated material may be found at http://www.routeralley.com.
<strong>Basic</strong> <strong>OSPF</strong> <strong>Lab</strong> <strong>Walkthrough</strong> v1.10 – Aaron Balchunas<br />
5<br />
Configuring <strong>Basic</strong> <strong>OSPF</strong> Routing – <strong>Lab</strong> (continued)<br />
<strong>OSPF</strong> Objectives:<br />
8. Confirm that you can ping all networks in the <strong>OSPF</strong> domain.<br />
No explanation necessary. Use the “ping” command:<br />
<strong>Router</strong>10# ping 1.1.1.1<br />
Type escape sequence to abort.<br />
Sending 5, 100-byte ICMP Echoes to 1.1.1.1, timeout is 2 seconds:<br />
!!!!!<br />
Success rate is 100 percent (5/5), round-trip min/avg/max = 1/3/4 ms<br />
9. View your neighbor table.<br />
We’ll look at <strong>Router</strong> 3 as our example to complete this:<br />
<strong>Router</strong>3# show ip ospf neighbor<br />
Neighbor ID Pri State Dead Time Address Interface<br />
1.1.1.1 1 FULL/DR 00:00:36 192.168.13.1 Ethernet0<br />
2.2.2.2 1 FULL/ 00:00:14 192.168.23.1 Serial0<br />
4.4.4.4 1 FULL/ 00:00:11 192.168.34.2 Serial1<br />
* * *<br />
All original material copyright © 2006 by Aaron Balchunas (aaron@routeralley.com),<br />
unless otherwise noted. All other material copyright © of their respective owners.<br />
This material may be copied and used freely, but may not be altered or sold without the expressed written<br />
consent of the owner of the above copyright. Updated material may be found at http://www.routeralley.com.
<strong>Basic</strong> <strong>OSPF</strong> <strong>Lab</strong> <strong>Walkthrough</strong> v1.10 – Aaron Balchunas<br />
6<br />
Configuring <strong>Basic</strong> <strong>OSPF</strong> Routing – <strong>Lab</strong> (continued)<br />
<strong>OSPF</strong> Objectives:<br />
10. Debug <strong>OSPF</strong> so that you can see hello packets sent between neighbors.<br />
No explanation necessary. On <strong>Router</strong> 8:<br />
<strong>Router</strong>8# debug ip ospf hello<br />
Aug 14 09:22:40: <strong>OSPF</strong>: Send hello to 224.0.0.5 area 8 on Ethernet0<br />
Aug 14 09:22:50: <strong>OSPF</strong>: Send hello to 224.0.0.5 area 8 on Ethernet0<br />
Notice that the <strong>OSPF</strong> hellos are sent every 10 seconds. There are various other debug commands to<br />
view <strong>OSPF</strong> messages:<br />
<strong>Router</strong>8# debug ip ospf adj<br />
<strong>Router</strong>8# debug ip ospf events<br />
* * *<br />
All original material copyright © 2006 by Aaron Balchunas (aaron@routeralley.com),<br />
unless otherwise noted. All other material copyright © of their respective owners.<br />
This material may be copied and used freely, but may not be altered or sold without the expressed written<br />
consent of the owner of the above copyright. Updated material may be found at http://www.routeralley.com.
<strong>Basic</strong> <strong>OSPF</strong> <strong>Lab</strong> <strong>Walkthrough</strong> v1.10 – Aaron Balchunas<br />
7<br />
Configuring <strong>Basic</strong> <strong>OSPF</strong> Routing – <strong>Lab</strong> (continued)<br />
<strong>OSPF</strong> Objectives:<br />
11. Your instructor will inject some external routes into <strong>Router</strong> 7. What<br />
additional type of route now shows up in the routing table?<br />
We’ll look at <strong>Router</strong> 10’s table again:<br />
<strong>Router</strong>10# show ip route<br />
O E2 199.1.1.0 [110/5] via 192.168.109.1, 0:01:21, Ethernet0<br />
O E2 199.1.2.0 [110/5] via 192.168.109.1, 0:01:22, Ethernet0<br />
O E2 199.1.3.0 [110/5] via 192.168.109.1, 0:01:24, Ethernet0<br />
O E1 199.1.3.0 [110/16] via 192.168.109.1, 0:01:24, Ethernet0<br />
<br />
Notice the new types of routes populating the routing table. “O E2” indicates an <strong>OSPF</strong> External Type<br />
2 route, and is the default external type. External Type 2 routes include only the external cost to the<br />
destination network.<br />
<strong>OSPF</strong> External Type 1 routes (O E1) include both the external cost, and the internal cost to reach the<br />
ASBR that injected the routes. Type 1 routes are always preferred over Type 2 routes to the same<br />
destination.<br />
* * *<br />
All original material copyright © 2006 by Aaron Balchunas (aaron@routeralley.com),<br />
unless otherwise noted. All other material copyright © of their respective owners.<br />
This material may be copied and used freely, but may not be altered or sold without the expressed written<br />
consent of the owner of the above copyright. Updated material may be found at http://www.routeralley.com.